Seat functions
Center armrest
Front center armrest

Fig. 88 Front center armrest (variant 1).

Fig. 89 Front center armrest (variant 2).
-
To lift : Pull the center armrest up to the detents in the direction of the arrow fig. 88 or fig. 89.
-
To lower: Pull the center armrest up fully. Then press the center armrest down.
-
Fore-and-aft adjustment : slide the center armrest in the direction of the arrow all the way forwards fig. 88 or rearwards.
Depending on vehicle equipment, there may be a storage compartment located under the center armrest.
 WARNING
If the front center armrest is opened all the way or not completely closed, it can limit the driver’s ability to move his or her arms, which can cause accidents and serious injuries.
-
Always keep the storage compartments closed while driving.
-
Never allow an adult or child to ride on the center armrest. This incorrect seating position can cause serious injuries.
Rear center armrest

Fig. 90 Rear center armrest
There may be a folding armrest in the backrest of the rear center seat.
-
To fold forward : pull the center armrest in the direction of the arrow using the loop fig. 90.
-
To fold back : fold the center armrest upward in the opposite direction of the arrow fig. 90 and press it all the way toward the seat backrest.
Passengers must not sit in the center rear seat when the center armrest is folded down.
WARNING
To reduce the risk of injuries while driving, the rear center armrest must always be folded up.
-
If the center armrest is folded down, the center rear bench seat must never be used by either adults or children. Doing so would create an incorrect seating position that could result in serious injuries.
Third row seat entry assistance
To make it easier to enter and exit the third row seats in vehicles with seven seats, the outer seats in the second row can be folded forward.
Folding second row seats forward

Fig. 91 Second row seats: entry assistance controls.
-
Remove any objects from the footwell in the second row of seats ⇒
 .
. -
Move the head restraints all the way down.
-
Pull the lever fig. 91 forwards in the direction of the arrow, fold the rear seat backrest forwards and push the seat forwards.
-
Enter and exit carefully ⇒
 .
.
Folding the second row seats back
-
Move the rear seat all the way back.
-
Pull the lever fig. 91 and fold the rear seat backrest back into the upright position.
The entire rear seat will fold back ⇒
.
The rear seat must be latched securely. The red mark on the seat rail must not be visible ⇒ .
WARNING
Careless or unintended use of the entry assistance can cause accidents and serious injuries.
-
Never use entry assistance while driving.
-
Do not allow the safety belt to be damaged when folding the rear seat back, e.g. due to pinching.
-
Keep hands, fingers, feet, and other parts of the body out of the range of operation of the seat hinges and seat locking mechanism when folding the backrest forward and back.
-
Floor mats or other objects can become caught in the hinges on the rear seat backrest or seat. This can prevent the rear seat backrest or rear seat from latching when folded into the upright position.
-
Each rear seat backrest must always be locked in the upright position to ensure that the safety belts in the rear seats can provide the maximum protection. If a seat is used without the backrest being locked in place, the passenger will move forward with the backrest in the event of sudden braking and driving maneuvers or a collision.
-
A red marking on the seat rail indicates that the rear seat backrest is not securely engaged. The red marking must not be visible when the backrest is engaged.
-
Never allow adults or children to sit in a rear seat if the rear seat or rear seat backrest is folded forward or is not securely locked into place.
-
Never support yourself on or hold onto a seat in the second row that is folded forward when entering and exiting.
WARNING
If child restraints are installed in all of the second row seats, it may not be possible for someone in the third row to fold the second row seats forward in the event of an accident. Passengers sitting in the third row seats will not be able to exit the vehicle by themselves or help themselves in an emergency.
-
Never install child restraints on all seats in the second row if any passengers will be riding in the third row.
 NOTICE
Before folding the rear seat backrests forward or back, adjust the front seats so that the head restraints or cushions on the rear seat backrests do not bump against the front seats.
NOTICE
Objects in the footwell in the second row can be damaged when the rear seat is folded forward. Remove any objects before folding the seat forward.
Memory function
Memory buttons
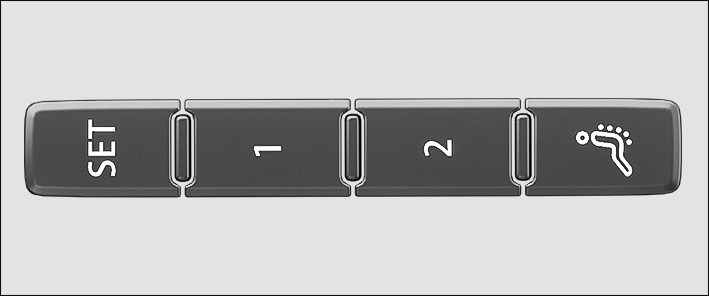
Fig. 92 On the outer side of the driver’s seat: memory buttons.
Driver seat and outside mirror settings can be saved and called up using the memory buttons.
Storing the driver's seat and outside mirror settings for driving forward
-
Set the electronic parking brake.
-
Shift the transmission to neutral.
-
Switch the ignition on.
-
Adjust the driver's seat and outside mirror.
-
Press the
 fig. 92 button for longer than ten seconds.
 -
Press the desired memory button within approximately ten seconds.
A chime will confirm that the settings were saved.
Storing the front passenger's outside mirror settings for driving in reverse
-
Set the electronic parking brake.
-
Shift the transmission to neutral.
-
Switch the ignition on.
-
Press the desired memory button fig. 92.
-
Select the reverse gear.
-
Adjust the front passenger's outside mirror so that the edge of the curb can be seen clearly, for example.
The selected mirror position will be stored automatically and assigned to the vehicle key that was used to unlock the vehicle.
Recalling driver's seat and outside mirror settings
-
When the vehicle is stationary, the ignition is switched off, and a door is open, press the respective memory button briefly.
After approximately ten minutes, the stored positions can no longer be adjusted automatically. The adjustment process will be canceled if one of the memory buttons is pressed again.
Or: When the ignition is switched on or the door is closed, press and hold the respective memory button until the stored position is reached.
The front passenger's outside mirror automatically leaves the position stored for driving in reverse once you begin driving forward at speeds of at least approx. 15 km/h (approx. 10 mph) or when you turn the knob for the outside mirrors from the R position to another position.
 If you open the driver door more than approximately ten minutes after the vehicle is unlocked, the driver seat and the outside mirrors will not be adjusted automatically.
Front seat convenience entry function
When you open the driver door, the driver seat automatically moves to a position that enables you to enter and exit the vehicle with ease.
The driver seat automatically returns to its original position once you have closed the driver door and switched on the ignition.
The front seat convenience entry function can be enabled and disabled in the Infotainment system.
WARNING
Improper use of seat functions can cause injuries.
-
Before beginning a journey always adjust to the correct seat position and maintain this throughout the journey. This also applies to all passengers.
-
Set the memory function only with the vehicle stationary.
-
Always keep your hands, fingers, feet and other parts of your body clear of the area in which the seats operate and move during adjustment.
1) Only if personalization has been activated.
Massage feature
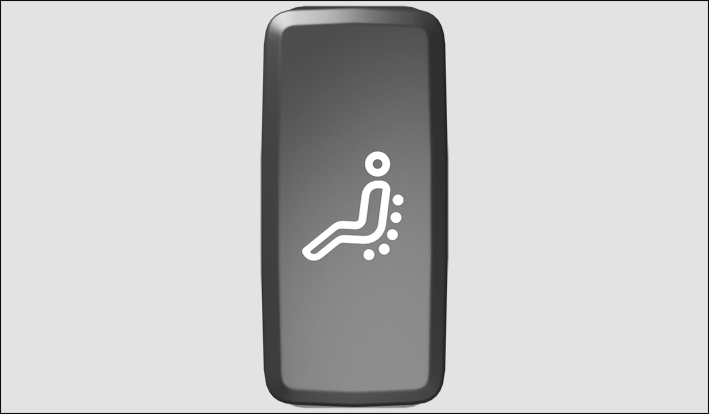
Fig. 93 In the lower part of the driver seat: Massage function button.
For the massage function, the lumbar support moves and massages the lumbar area of your back.
The lumbar support cushioning can be individually adjusted during operation by pressing repeatedly on the corresponding switch ⇒ Adjusting power front seats.
Switching the massage function on or off
-
To switch on, push the
 button in the seat control panel. Press the button again to switch off.
After around ten minutes, the massage function switches off automatically.
WARNING
Improper use of seat functions can cause injuries.
-
Before beginning a journey always adjust to the correct seat position and maintain this throughout the journey. This also applies to all passengers.
-
Only switch the massage function on and off when the vehicle is stationary.
-
Always keep your hands, fingers, feet and other parts of your body clear of the area in which the seats operate and move during adjustment.
Download Manual