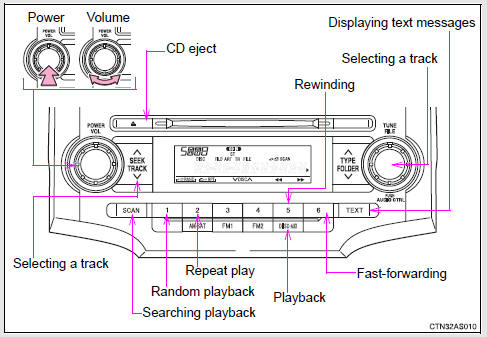
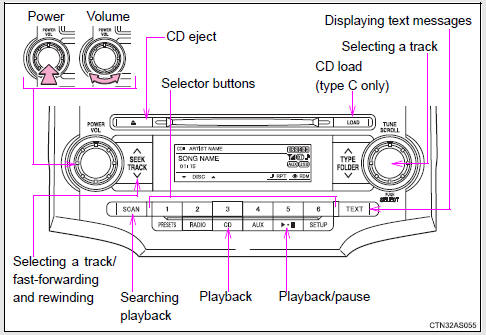
Using the audio system
Audio system types
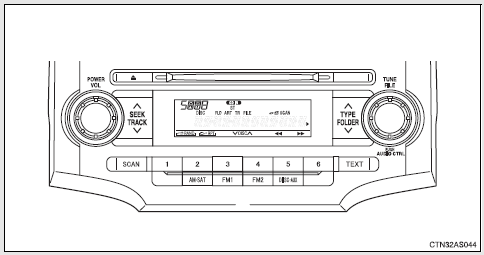
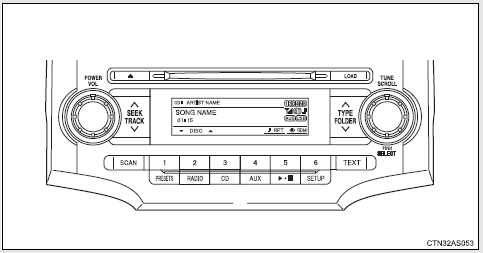
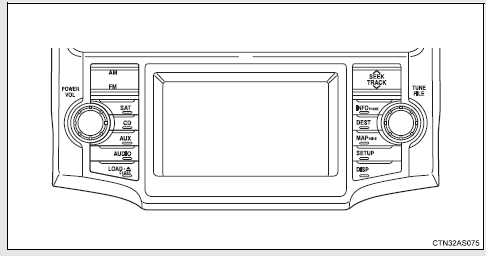
Without navigation system and Display Audio system
Type A: CD player with changer controller and AM/FM radio
Type B: CD player with changer controller and AM/FM radio

Type C: CD player with changer and AM/FM radio
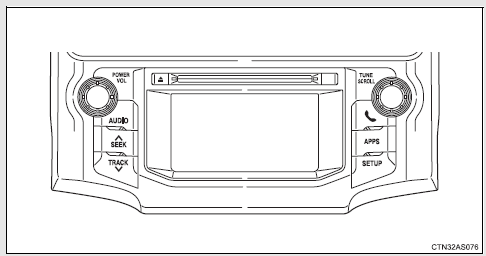
With Display Audio system
Owners of models equipped with a Display Audio system should refer to the “Display Audio System Owner's Manual”.
With navigation system
Owners of models equipped with a navigation system should refer to the “Navigation System Owner's Manual”.
Language settings (type B and C)
The language used for all voice guidance, voice recognition and messages may be changed.
 Press
Press
 .
.
 Press
Press
 (MORE).
 Press
Press
 (LANG).
 Press
Press
 or
or
 as corresponds to the desired
language.
For vehicles sold in the U.S.A.
“ENG” (English) or “ESP” (Spanish)
For vehicles sold in Canada
“ENG” (English) or “FRAN” (French)
Using cellular phones
Interference may be heard through the audio system's speakers if a cellular phone is being used inside or close to the vehicle while the audio system is operating.
About Bluetooth®
The Bluetooth wordmark and logo are owned by Bluetooth SIG. and permission has been granted to use the trademark of the licensee Panasonic Corporation.
Other trademarks and trade names are owned by various different owners.
Certification
For the Display Audio system
FCC ID: AJDK032
IC ID: 775E-K032
For the Display Audio system and the audio system
NOTE:
This device complies with Part 15 of FCC Rules and Industry Canada licence-exempt RSS standard(s). Operation is subject to the following two conditions: (1) this device may not cause interference, and (2) this device must accept any interference, including interference that may cause undesired operation of this device.
Le présent appareil est conforme aux la partie 15 des règles de la FCC et CNR d’Industrie Canada applicables aux appareils radio exempts de licence. L’exploitation est autorisée aux deux conditions suivantes: (1) l’appareil ne doit pas produire de brouillage, et (2) l’utilisateur de l’appareil doit accepter tout brouillage radioélectrique subi, même si le brouillage est susceptible d’en compromettre le fonctionnement.
The antenna for Bluetooth cannot be removed (or replaced) by user.
L'antenne de Bluetooth ne peut pas être supprimé (ou remplacé) par l'utilisateur.
This device complies with RSS-310 of Industry Canada. Operation is subject to the condition that this device does not cause harmful interference.
Cet appareil est conforme au CNR-310 d'Industrie Canada. Son exploitation est autorisée sous réserve que l'appareil ne cause pas de brouillage préjudiciable.
FCC WARNING:
Changes or modifications not expressly approved by the party responsible for compliance could void the user's authority to operate the equipment.
CAUTION:
This equipment complies with FCC/IC radiation exposure limits set forth for an uncontrolled environment and meets the FCC radio frequency (RF) Exposure Guidelines in Supplement C to OET65 and RSS-102 of the IC radio frequency (RF) Exposure rules. This equipment has very low levels of RF energy that it deemed to comply without maximum permissive exposure evaluation (MPE). But it is desirable that it should be installed and operated keeping the radiator at least 20 cm or more away from person’s body (excluding extremities: hands, wrists, feet and ankles).
Cet équipement est conforme aux limites d’exposition aux rayonnements énoncées pour un environnement non contrôlé et respecte les règles les radioélectriques (RF) de la FCC lignes directrices d’exposition dans le Supplément C à OET65 et d’exposition aux fréquences radioélectriques (RF) CNR-102 de l’IC. Cet équipement émet une énergie RF très faible qui est considérée conforme sans évaluation de l’exposition maximale autorisée.
Cependant, cet équipement doit être installé et utilisé en gardant une distance de 20 cm ou plus entre le dispositif rayonnant et le corps (à l’exception des extrémités: mains, poignets, pieds et chevilles).
NOTICE:
This equipment has been tested and found to comply with the limits for a Class B digital device, pursuant to Part 15 of the FCC Rules. These limits are designed to provide reasonable protection against harmful interference in a residential installation. This equipment generates, uses and can radiate radio frequency energy and, if not installed and used in accordance with the instructions, may cause harmful interference to radio communications. However, there is no guarantee that interference will not occur in a particular installation. If this equipment does cause harmful interference to radio or television reception, which can be determined by turning the equipment off and on, the user is encouraged to try to correct the interference by one or more of the following measures:
• Reorient or relocate the receiving antenna.
• Increase the separation between the equipment and receiver.
• Connect the equipment into an outlet on a circuit different from that to which the receiver is connected.
• Consult the dealer or an experienced radio/TV technician for help.
Co-location:
This transmitter must not be co-located or operated in conjunction with any other antenna or transmitter.
CAUTION
For vehicles sold in the U.S.A. and Canada
• Part 15 of the FCC Rules and RSS-Gen of the IC Rules FCC Warning:
Changes or modifications not expressly approved by the party responsible for compliance could void the user's authority to operate the equipment.
• Laser products
• Do not take this unit apart or attempt to make any changes yourself.
This is an intricate unit that uses a laser pickup to retrieve information from the surface of compact discs. The laser is carefully shielded so that its rays remain inside the cabinet. Therefore, never try to disassemble the player or alter any of its parts since you may be exposed to laser rays and dangerous voltages.
• This product utilizes a laser.
Use of controls or adjustments or performance of procedures other than those specified herein may result in hazardous radiation exposure.
• The use of optical instruments with this product will increase eye hazard.
NOTICE
To prevent battery discharge
Do not leave the audio system on longer than necessary with the engine off.
To avoid damaging the audio system
Take care not to spill drinks or other fluids over the audio system.
Using the radio
Type A
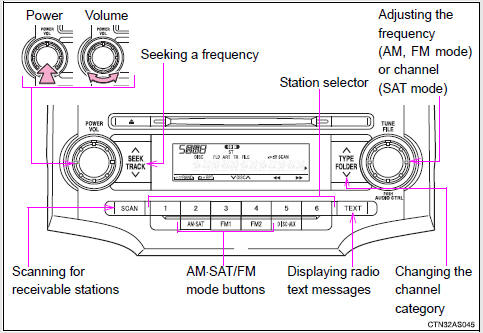
Type B and C
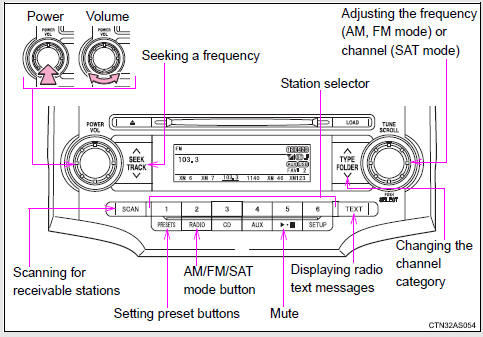
Setting station presets (excluding XM® Satellite Radio)
Search for desired stations by
turning  or
or
 or pressing “∧” or “∨” on
 .
.
Press and hold a button (from
 to
to
 ) until you hear a beep.
Type B and C: Each time  is
is
pressed, station pages are changed. There are a total of 6 pages.
Scanning radio stations (excluding XM® Satellite Radio)
Scanning the preset radio stations
Press and hold
 until you hear a beep.
Preset stations will be played for 5 seconds each.
When the desired station is
reached, press  again.
Scanning all radio stations within range
Press
.
All the stations with reception will be played for 5 seconds each.
When the desired station is
reached, press again.
Displaying radio text messages (for type B and C, FM mode only)
When a new radio text message is received, “MSG” is shown on the display. To display the message, press  .
.
If the text continues past the end of the display, “
” is displayed. Press and hold 
until you hear a beep.
Text messages are not displayed while driving.
XM® Satellite Radio (if equipped)
Receiving XM® Satellite Radio
Press
 or
or
 .
.
The display changes as follows each time or
is pressed.
Type A: AM → SAT1 → SAT2 → SAT3 Type B and C: AM → FM → SAT
Turn
 or
or
 to select the desired channel in all
the categories or press “∧” or “∨” on  to select the desired channel in
the current category.
Setting XM® Satellite Radio channel presets
Select the desired channel. Press and hold a button (from 
to  ) until you hear a beep.
Type
B and C: Each time  is pressed,
station pages are changed.
There are a total of 6 pages.
Changing the channel category
Press “∧” or “∨” on  .
.
Scanning XM® Satellite Radio channels
• Scanning channels in the current category Press
 .
.
When the desired channel is
reached, press  again.
• Scanning the preset channels
Press and hold  until you hear a
beep.
When the desired channel is
reached, press  again.
Displaying text information
Press  .
.
Each time  is pressed, the
display changes in the following order:
Type A: Channel name → Title (song/program title) → Name (artist name/ feature) → Channel number.
Type B and C: Title (song/program title) → Name (artist name/feature)/ Title (song/program title).
hen the battery is disconnected
All preset stations are erased. (type A only)
Reception sensitivity
• Type B and C -- Cargo loaded on the roof luggage carrier, especially metal objects, may adversely affect the reception of XM® Satellite Radio.
• Maintaining perfect radio reception at all times is difficult due to the continually changing position of the antenna, differences in signal strength and surrounding objects, such as trains, transmitters, etc.
• The radio antenna is mounted on the right-side front fender. The antenna can be removed from the base by turning it.
XM® Satellite Radio
An XM® Satellite Radio is a tuner designed exclusively to receive broadcasts provided under a separate subscription. Availability is limited to the 48 contiguous states and 10 Canadian provinces.
• XM® subscriptions
For detailed information about XM® Satellite Radio or to subscribe:
U.S.A. --
Visit on the web at www.xmradio.com or call 1-800-967-2346.
Canada --
Visit on the web at www.xmradio.ca or call 1-877-209-0079.
• Radio ID
You will need the radio ID when activating XM® service or reporting a problem. Select “CH000” using 
or  , and the receiver's 8- character ID
number will appear.
• Satellite tuner
The tuner supports only Audio Services (Music and Talk) and the accompanying Text Information of XM® Satellite Radio.
If XM® Satellite Radio does not operate normally
If a problem occurs with the XM® tuner, a message will appear on the display.
Refer to the table below to identify the problem, and take the suggested corrective action.
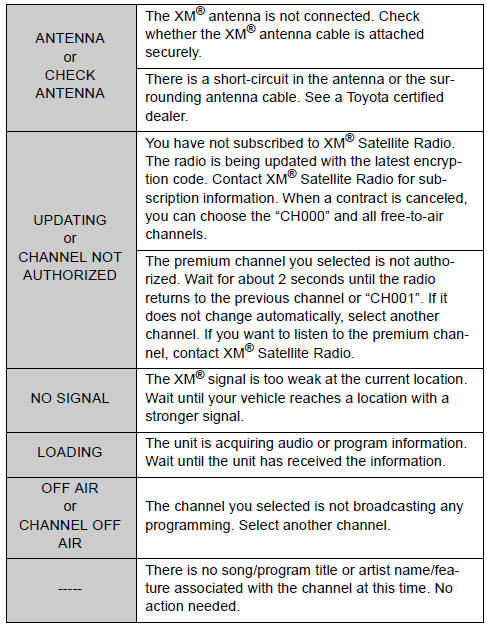

Contact the XM® Listener Care Center at 1-800-967-2346 (U.S.A.) or 1-877- 209-0079 (Canada)
Certifications for the radio tuner
This equipment has been tested and found to comply with the limits for a Class B digital device, pursuant to Part 15 of the FCC Rules. These limits are designed to provide reasonable protection against harmful interference in a residential installation. This equipment generates, uses and can radiate radio frequency energy and, if not installed and used in accordance with the instructions, may cause harmful interference to radio communications. However, there is no guarantee that interference will not occur in a particular installation. If this equipment does cause harmful interference to radio or television reception, which can be determined by turning the equipment off and on, the user is encouraged to try to correct the interference by one or more of the following measures:
• Reorient or relocate the receiving antenna.
• Increase the separation between the equipment and receiver.
• Connect the equipment into an outlet on a circuit different from that to which the receiver is connected.
• Consult the dealer or an experienced radio/TV technician for help.
NOTICE
To prevent damage, remove the antenna in the following cases.
• The antenna will touch the ceiling of a garage.
• A cover will be put on the vehicle.
Using the CD player
Type A
Type B and C
Loading CDs
Loading a CD (type A and B)
Insert a CD.
Loading a CD (type C)
Press
 .
.
When the indicator on the slot turns
from amber to green, insert a CD.
Loading multiple CDs (type C only)
Press and hold
 until you hear a beep.
When the indicator on the slot turns
from amber to green, insert a CD.
The indicator on the slot turns to amber when the CD is inserted.
When
the indicator on the slot turns from amber to green again, insert the next CD.
Repeat the procedure for the remaining CDs.
To cancel, press  . If you do not insert a disc within
15 seconds, loading will be canceled automatically.
Ejecting CDs
Ejecting a CD (type A and B)
Press  and remove the CD.
Ejecting a CD (type C)
To
select the CD to be ejected, press 
(  ) or
) or
 (
(
).
The selected CD number is shown
on the display.
Press  and remove the CD.
Ejecting all the CDs (type C only)
Press and hold  until you hear a beep, and then
remove the CDs.
Selecting a track
Press “∧” to move up or “∨” to move down using  until the desired track number is
displayed.
Fast-forwarding and rewinding tracks
Type A: Press  (
(
) or  (
(
 ).
).
Type B and C: Press and hold “∧” or “∨” on  .
.
Scanning tracks
Press
 .
.
The first ten seconds of each track will be played.
To cancel, press  again.
Press
 again when the desired track is
reached.
Selecting a CD (type C only)
Selecting a CD to play
Press  (
(
 ) or
) or
 (
(
 ).
).
Scanning loaded CDs
Press and hold
 until you hear a beep.
The first ten seconds of the first track on each CD will be played.
To cancel, press again.
Press
again when the desired CD is
reached.
Playing and pausing tracks (type B and C)
Press  .
.
Random playback
Current CD
Press  (RAND) or
 (RDM).
Songs are played in random order.
To cancel, press the button once more (type A and B), or twice more (type C).
All CDs (type C only)
Press  (RDM) twice.
Tracks on all loaded CDs are played in random order.
To cancel, press the button again.
Repeat play
Repeating a track
Press  (RPT) or
 (RPT).
To cancel, press the
button once more (type A and B), or twice more (type C).
Repeating all of the tracks on a CD (type C only)
Press  (RPT) twice.
To
cancel, press the button again.
Switching the display
Press  .
.
Each time  is pressed, the
display changes in the following order: Type A: Track no./Elapsed time → CD title → Track name.
Type B and C: Track title → Track name/Artist name → Track name/ Elapsed time.
Display (type A only)
Up to 12 characters can be displayed at a time.
If there are 13 characters or more, pressing and holding  for 1 second or more will display
the remaining characters.
A maximum of 24 characters can be displayed.
If  is pressed for 1 second or
more again or has not been pressed for 6 seconds or more, the display will return to the first 12 characters.
Depending on the contents recorded, the characters may not be displayed properly or may not be displayed at all.
Error messages
“CD CHECK”: This indicates a problem either with the CD or inside the player. The CD may be dirty, damaged or inserted up-side down.
“WAIT” or “PLEASE WAIT”: Operation has stopped due to a high temperature inside the player. Wait for a while and then press  or
or
 . Contact your Toyota dealer if the
CD still cannot be played back.
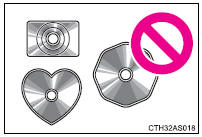
Discs that can be used
Discs with the marks shown below can be used.
Playback may not be possible depending on the recording format or disc features, or due to scratches, dirt or deterioration.

CDs with copy-protection features may not be used.
CD player protection feature
To protect the internal components, playback is automatically stopped when a problem is detected while the CD player is being used.
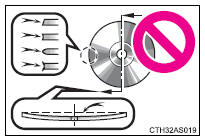
If CDs are left inside the CD player or in the ejected position for extended periods
CDs may be damaged and may not play properly.
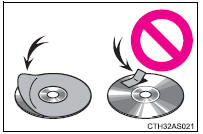
Lens cleaners
Do not use lens cleaners. Doing so may damage the CD player.
NOTICE
CDs and adapters that cannot be used
Do not use the following types of CDs, 3 in. (8 cm) CD adapters or Dual Discs.
Doing so may damage the CD player and/or the CD insert/eject function.
• CD player with changer and AM/FM radio: CDs that have a diameter that is not 4.7 in. (12 cm)
• Low-quality and deformed CDs
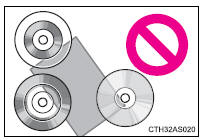
• CDs with a transparent or translucent recording area
• CDs that have had tape, stickers or CDR labels attached to them, or that have had the label peeled off
NOTICE
CD player precautions
Failure to follow the precautions below may result in serious damage to the CDs or the player itself.
• Do not insert anything other than CDs into the CD slot.
• Do not apply oil to the CD player.
• Store CDs away from direct sunlight.
• Never try to disassemble any part of the CD player.
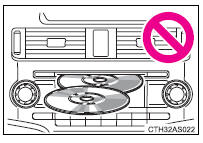
• Do not insert more than one CD at a time.
Download Manual