Ride Control Systems
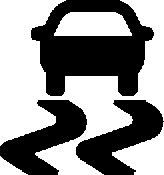
The vehicle has a Traction Control System (TCS) and StabiliTrak/ Electronic Stability Control (ESC), an electronic stability control system. These systems help limit wheel spin and assist the driver in maintaining control, especially on slippery road conditions.
TCS activates if it senses any of the drive wheels are spinning or beginning to lose traction. When this happens, TCS applies the brakes to the spinning wheels and reduces engine power to limit wheel spin.
StabiliTrak/ESC activates when the vehicle senses a difference between the intended path and the direction the vehicle is actually traveling.
StabiliTrak/ESC selectively applies braking pressure to any one of the vehicle wheel brakes to assist the
driver in keeping the vehicle on the intended path. Trailer Sway Control (TSC) is also on automatically when the vehicle is started. See Trailer Sway Control (TSC) 0 298.
If cruise control is being used and traction control or StabiliTrak/ESC begins to limit wheel spin, cruise control will disengage. Cruise control may be turned back on when road conditions allow.
Both systems come on automatically when the vehicle is started and begins to move. The systems may be heard or felt while they are operating or while performing diagnostic checks. This is normal and does not mean there is a problem with the vehicle.
It is recommended to leave both systems on for normal driving conditions, but it may be necessary to turn TCS off if the vehicle gets stuck in sand, mud, ice, or snow.
See If the Vehicle Is Stuck 0 210 and “Turning the Systems Off and On” later in this section.
When the transfer case (if equipped) is in Four-Wheel Drive Low, the stability system is automatically disabled,  comes on, and the appropriate message will appear on the Driver Information Center (DIC).
Both traction control and StabiliTrak/ ESC are automatically disabled in this condition.
The indicator light for both systems is in the instrument cluster. This light will:
If either system fails to turn on or to activate, a message displays in the Driver Information Center (DIC), and
d comes on and stays on to indicate that the system is inactive and is not assisting the driver in maintaining control. The vehicle is safe to drive, but driving should be adjusted accordingly.
If d comes on and stays on:
Drive the vehicle. If d comes on and stays on, the vehicle may need more time to diagnose the problem. If the condition persists, see your dealer.
The button for TCS and StabiliTrak/ ESC is on the center stack.
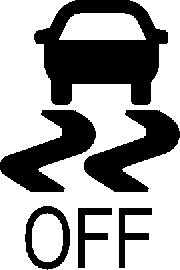
To turn off only TCS, press and release  . The traction off light i displays in the instrument cluster.
The appropriate message will display in the DIC. To turn TCS on again, press and release  . The traction off light i displayed in the
instrument cluster will turn off.
If TCS is limiting wheel spin when  is pressed, the system will not turn off until the wheels stop spinning.
To turn off both TCS and StabiliTrak/ ESC, press and hold  until the traction off light i and the
StabiliTrak/ESC OFF light  come on and stay on in the instrument
cluster, then release. The appropriate message will display in the DIC.
To turn TCS and StabiliTrak/ESC on again, press and release  . The traction off light i and the
StabiliTrak/ESC OFF light  in the instrument cluster turn off.
StabiliTrak/ESC will automatically turn on if the vehicle exceeds
56 km/h (35 mph). Traction control will remain off.
The vehicle has a Trailer Sway Control (TSC) feature and a Hill Start Assist (HSA) feature. See Trailer Sway Control (TSC) 0 298 or Hill Start Assist (HSA) 0 246.
Adding accessories can affect the vehicle performance. See Accessories and Modifications
0 317.
If equipped, Hill Descent Control (HDC) sets and maintains vehicle speed while driving down steep grades in a forward or reverse gear. The HDC switch is on the center stack, below the climate controls.
Press 5 to enable or disable HDC. Vehicle speed must be below
50 km/h (31 mph).

When enabled, the HDC light displays on the instrument cluster.
A blinking HDC light indicates the system is actively applying the brakes to maintain vehicle speed. HDC can maintain vehicle speeds between 1 and 22 km/h (1 and
14 mph) on grades greater than or equal to 10%.
If HDC is to be used for more than three minutes or on grades steeper than 25%, the transfer case should be put into Four-Wheel Drive Low (4
n) to reduce the possibility of brake
overheating.
Noise from the Electronic Brake Control Module (EBCM) is normal when HDC is active.
When HDC is activated, the initial HDC speed is set to the current driving speed. It can be increased or decreased by pressing +RES or SET- on the steering wheel, or by applying the accelerator or brake pedal. This adjusted speed becomes the new set speed.
HDC will remain enabled between 30 and 60 km/h (19 and 37 mph); however, vehicle speed cannot be set or maintained in this range. HDC will automatically disable if the vehicle speed is above 80 km/h
(50 mph) or above 60 km/h
(37 mph) for at least 30 seconds.
5 must be pressed again to
re-enable HDC. HDC may disable after an extended period of use.
If this happens, HDC will require time to cool down. The length of time HDC remains active depends on road conditions, grade, set speed, vehicle loading, and outside temperature.
When enabled, if the vehicle speed is above 30 km/h (19 mph) and below 60 km/h (37 mph), a DIC message will display.
This feature adds a sportier feel, provides a more comfortable ride, or assists in different weather conditions or terrain to optimize driving performance. Depending on the option package, available features, and mode selected, the suspension, steering, and powertrain will change settings to achieve the desired mode characteristics. Selecting the various Driver Modes enhances the ride performance for the road conditions and the selected mode.
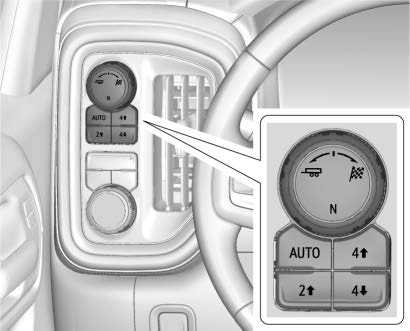
To activate modes, rotate the Drive Mode knob left or right to the desired mode.

Vehicles without mode graphics on the knob will have a menu selection screen in the instrument cluster to select the desired mode. When the Drive Mode knob is rotated, the mode list will display the next available mode.

If equipped, select Terrain Mode by pressing the Terrain Mode button, below the 4 m transfer case button.
Tour Mode
Use for normal city and highway driving to provide a smooth, soft ride. When selected, there is no indicator in the instrument cluster.
Sport Mode
Use where road conditions or personal preference demand a more controlled response.
When in Sport Mode, the vehicle will shift automatically but may hold a lower gear longer than it would in the normal driving mode based on braking, throttle input, and vehicle lateral acceleration. See Automatic Transmission 0 231. The steering will change to provide more precise control. The continuous damping will change to provide better cornering performance.
When selected, the Sport Mode light displays in the instrument cluster.
Snow Mode
Use when more traction is needed during slippery conditions. The vehicle will upshift normally when the vehicle is moving. The acceleration will adjust to help provide a smoother launch.
Snow Mode is only available on two-wheel-drive vehicles. When selected, the Snow Mode light displays in the instrument cluster.
Off-Road Mode
Use to improve driving at moderate speeds, on grass, gravel, dirt, unpaved roads, or snow-covered roads that have not been groomed or plowed.
The accelerator pedal will be more sensitive to provide finer control of the torque at the wheels. Electronic Stability Control (ESC), the Antilock Brake System (ABS), and the Traction Control System (TCS) will change for optimal off-road performance. Use this mode for public off-road recreational driving. See Off-Road Driving 0 202.
When selected, the Off-Road Mode indicator light displays in the instrument cluster.
Tow/Haul Mode
This feature assists when pulling a heavy trailer or a large or heavy load. See Tow/Haul Mode 0 237.
Tow/Haul Mode is designed to be most effective when the vehicle and trailer combined weight is at least 75% of the vehicle’s Gross
Combined Weight Rating (GCWR). See “Weight of the Trailer” under Trailer Towing 0 285.
Tow/Haul Mode is most useful when pulling a heavy trailer or a large or heavy load under the following conditions:
Operating the vehicle in Tow/Haul Mode when lightly loaded or with no trailer at all will not cause damage. However, there is no benefit to selecting Tow/Haul Mode when the vehicle is unloaded. Such a selection when unloaded may result in unpleasant engine and transmission driving characteristics and reduced fuel economy.
When selected, the Tow/Haul Mode light will display in the instrument cluster.
If the vehicle is turned off with Tow/ Haul Mode active, Tow/Haul Mode will remain active after the vehicle has been turned on if the vehicle was turned off for less than four hours. Otherwise, the vehicle will start up in Tour Mode.
Terrain Mode
Use for finer control during low speed, off-road driving. When using this mode it will mimic the characteristics of four-wheel-drive low without the torque capabilities.
Use when:
two-track or heavily rutted road.
off-road recreational driving. See
Off-Road Driving 0 202 and
Hill and Mountain Roads 0 208.
When in Terrain Mode, the vehicle will shift automatically but may hold a lower gear longer to maximize engine torque. The steering will change to provide more precise control. A unique pedal map, transmission shift pattern, and rpm control are utilized to give better control at lower speeds and over rough terrain. When the vehicle comes to a stop, Vehicle Hold is engaged. TCS will be optimized for maximum torque transfer across axles, and Active Braking During Lift Throttle will be engaged.
Active Braking During Lift Throttle:
Active Braking During Lift Throttle will reduce the back and forth between the accelerator and brake pedals.
Vehicle Hold Features:
. When the vehicle comes to a stop on an incline grade in forward gear or on a decline
grade in reverse gear, Vehicle Hold is engaged until the accelerator pedal is pressed.
without pressing accelerator pedal. The vehicle will also creep forward on flat ground.
Terrain Mode is only available on vehicles equipped with the single speed transfer case.
Terrain Mode can only be active when:
The vehicle will automatically exit the mode if the brakes get too hot. Terrain mode can be turned back on after the brakes have cooled.
When Terrain Mode is selected:
If equipped, the limited-slip differential can give more traction on snow, mud, ice, sand, or gravel.
It works like a standard axle most of the time, but when traction is low, this feature allows the drive wheel with the most traction to move the vehicle. For vehicles with the limited-slip differential, driven under
severe conditions, the rear axle fluid should be changed. See Maintenance Schedule 0 419.
Vehicles with a locking rear axle can give more traction on snow, mud, ice, sand, or gravel. It works like a standard axle most of the time, but when traction is low, this feature will allow the rear wheel with the most traction to move the vehicle.
If equipped with cruise control, a speed of about 40 km/h (25 mph) or more can be maintained without keeping your foot on the accelerator. Cruise control does not work at speeds below about
40 km/h (25 mph).
If the cruise control is being used and the Traction Control System (TCS) or StabiliTrak/Electronic Stability Control (ESC) begins to limit wheel spin, the cruise control
will automatically disengage. See Traction Control/Electronic Stability Control 0 246. If a collision alert occurs when cruise control is activated, cruise control is disengaged. See Forward Collision Alert (FCA) System 0 264. When road conditions allow you to safely use it again, cruise control can be turned back on.
Turning off the TCS or StabiliTrak/ ESC system will disengage the cruise control.
If the brakes are applied, cruise control disengages.
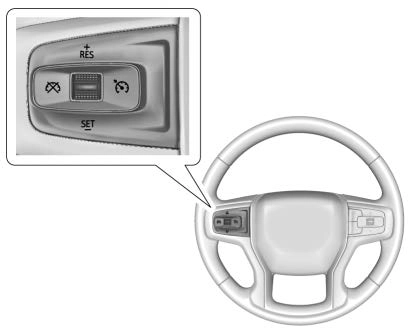
5 : Press to turn cruise control on or off. A white indicator comes on or off in the instrument cluster.
+RES : If there is a set speed in memory, press the control up briefly to resume to that speed or press and hold to accelerate. If cruise control is already engaged, use to increase vehicle speed.
SET− : Press the control down briefly to set the speed and activate cruise control. If cruise control is already engaged, use to decrease vehicle speed.
* : Press to disengage cruise control without erasing the set speed from memory.
Setting Cruise Control
If 5 is on when not in use, SET− or
+RES could get pressed and go into cruise when not desired. Keep 5 off when cruise is not being used.
The cruise control indicator on the instrument cluster turns green after cruise control has been set to the desired speed. See Instrument Cluster 0 140.
Resuming a Set Speed
If the cruise control is set at a desired speed and then the brakes are applied or * is pressed, the cruise control is disengaged without erasing the set speed from memory.
Once the vehicle reaches about 40 km/h (25 mph) or more, press RES+ up briefly. The vehicle returns to the previously set speed.
Increasing Speed While Using Cruise Control
Do one of the following:
. Press and hold +RES up until the desired speed is reached, then release it.
(1 mph) faster.
The speedometer reading can be displayed in either English or metric units. See Instrument Cluster 0 140. The increment value used depends on the units displayed.
Reducing Speed While Using Cruise Control
Do one of the following:
(1 mph) slower.
The speedometer reading can be displayed in either English or metric units. See Instrument Cluster 0 140. The increment value used depends on the units displayed.
Passing Another Vehicle While Using Cruise Control
Use the accelerator pedal to increase the vehicle speed. When you take your foot off the pedal, the vehicle will slow down to the previously set cruise speed. While pressing the accelerator pedal or shortly following the release to override cruise control, briefly pressing SET– will result in cruise control set to the current vehicle speed.
Using Cruise Control on Hills
How well the cruise control works on hills depends on the vehicle speed, the load, and the steepness of the hills. When going up steep hills, pressing the accelerator pedal may be necessary to maintain vehicle speed.
While going downhill, cruise braking helps maintain driver selected speed.
Cruise Grade Braking is enabled when the vehicle is started and cruise control is active. It is not enabled in Range Selection Mode.
It assists in maintaining driver selected speed when driving on downhill grades by using the engine and transmission to slow the vehicle.
For other forms of descent control, see Hill Descent Control (HDC)
0 248, Automatic Transmission
0 231, and Tow/Haul Mode 0 237.
Ending Cruise Control
There are four ways to end cruise control:
Erasing Speed Memory
The cruise control set speed is erased from memory if 5 is pressed or the ignition is turned off.
Download Manual