Electrical System
The vehicle has fuses to protect against an electrical system overload. Fuses also protect power devices in the vehicle.
Replace a bad fuse with a new one of the identical size and rating.
If there is a problem on the road and a fuse needs to be replaced, there are some spare fuses and a fuse puller in the left instrument panel fuse block. The same amperage fuse can also be borrowed. Choose some feature of the vehicle that is not needed to use and replace it as soon as possible.
An electrical overload may cause the lamps to go on and off, or in some cases to remain off. Have the headlamp wiring checked right away if the lamps go on and off or
remain off.
If the wiper motor overheats due to heavy snow or ice, the windshield wipers will stop until the motor cools and will then restart.
Although the circuit is protected from electrical overload, overload due to heavy snow or ice may cause wiper linkage damage.
Always clear ice and heavy snow from the windshield before using the windshield wipers.
If the overload is caused by an electrical problem and not snow or ice, be sure to get it fixed.
The wiring circuits in the vehicle are protected from short circuits by a combination of fuses and circuit breakers. This greatly reduces the chance of damage caused by electrical problems.
To check a fuse, look at the
silver-colored band inside the fuse. If the band is broken or melted, replace the fuse. Be sure to replace a bad fuse with a new one of the identical size and rating.
Fuses of the same amperage can be temporarily borrowed from another fuse location, if a fuse goes out. Replace the fuse as soon as possible.
If the vehicle has a diesel engine, see the Duramax diesel supplement.
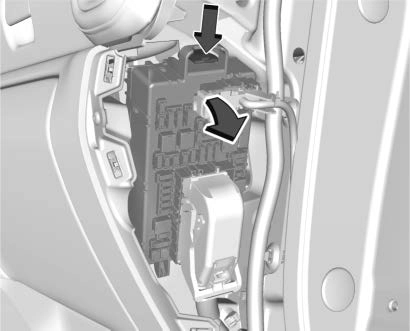
The engine compartment fuse block is in the engine compartment, on the passenger side of the vehicle.
Lift the cover to access the fuse block.
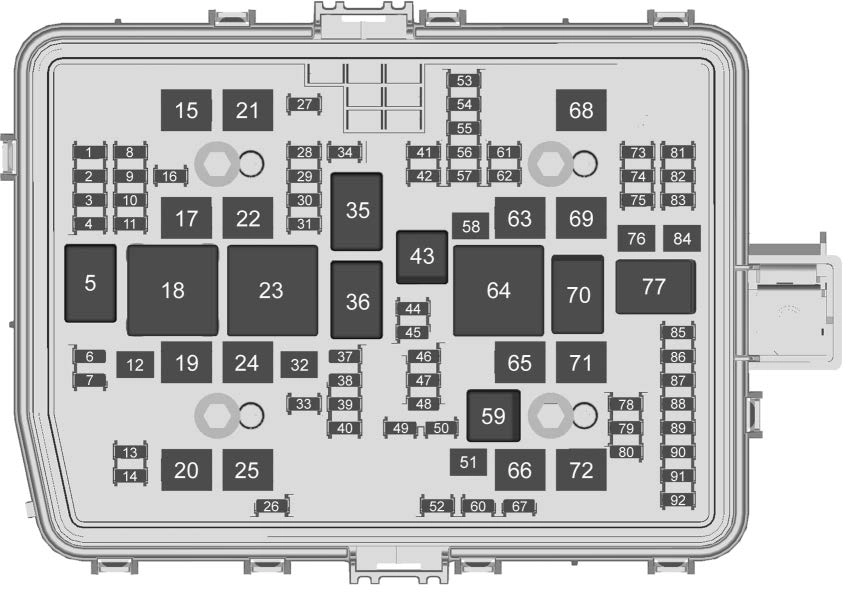 A fuse puller is available in the left instrument panel end cap.
The vehicle may not be equipped with all of the fuses, relays, and features shown.
Fuses Usage
1 High-beam left
Fuses Usage
|
Fuses 4 |
Usage Headlamp right |
Fuses 26 |
Usage – |
Fuses 47 |
Usage Transmission |
|
6 |
TIM |
27 |
Horn |
control module ignition |
|
|
7 |
– |
28 |
– |
48 |
– |
|
8 |
Fog lamp |
29 |
– |
49 |
Transmission |
|
9 |
VKM |
30 |
– |
control module |
|
|
10 |
– |
31 |
– |
50 |
A/C clutch |
|
11 |
Police upfitter |
32 |
Rear window |
51 |
Transfer case |
|
12 |
– |
defogger |
control module |
||
|
13 |
Washer front |
33 |
Heated mirror |
52 |
Front wiper |
|
14 |
Washer rear |
34 |
Parking lamp left |
53 |
Center |
|
15 |
MSB driver |
37 |
Euro trailer |
high-mounted stop lamp |
|
|
16 17 |
– IECL 1 |
38 39 |
TIM – |
54 |
Trailer reverse lamp |
|
19 |
DC/AC inverter |
40 |
Misc ignition |
55 |
Trailer |
|
20 21 22 24 |
IECR 2 MSB pass IECL 2 Electric brake booster 1 |
41 42 44 45 |
Trailer parking lamp Park lamp right – Second fuel pump |
56 57 58 60 |
back-up lamp SADS TTPM Starter motor Active fuel |
|
25 |
REC |
46 |
Engine control module ignition |
management 1 |
Fuses Usage
68 –
69 Starter pinion
Fuses Usage
Relays Usage
5 Headlamp
18 DC/AC inverter
23 Rear window defogger
43 Second fuel pump
59 A/C clutch
64 Starter motor
70 Starter pinion
77 Powertrain
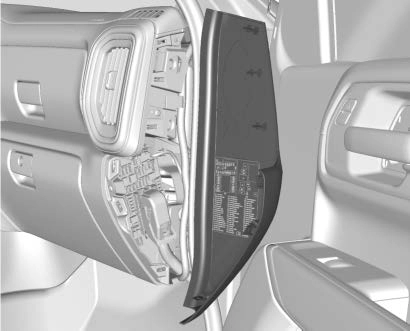
The right instrument panel fuse block access door is on the passenger side edge of the instrument panel.
Pull off the cover to access the front of the fuse block.
To access the back of the fuse block:
Back
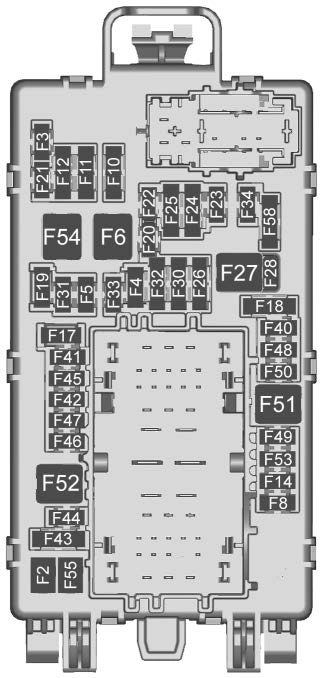
The vehicle may not be equipped with all of the fuses, relays, and features shown.
Fuses Usage
F1 Right doors
F2 Left doors
F3 Universal remote system
F4 –
F5 –
F6 Front blower
F8 Lumbar switch
F10 Body control module 6/Body control module 7
F11 Seat/CLM
F12 Body control module 3/Body control module 5
F14 Mirrors/Windows module
F17 Steering wheel controls
F18 VPM/OBS DET
Fuses Usage
F19 DLIS
F20 Cooled seats
F21 NOT R/C
F22 Heated steering wheel F23 MISC R/C
F24 Instrument panel
cluster ignition/ Overhead
F25 Heating, ventilation,
and air conditioning ignition/Heating, ventilation, and air conditioning auxiliary
F26 USB ports/Special
equipment option retained accessory power
F27 Accessory power
outlet/retained accessory power
F28 Accessory power
outlet/Battery
Fuses Usage
F30 Sensing and diagnostic module/ Parking brake
F31 Body control module 4 F32 Special equipment
option/Data link connection
F33 Body control module 8 F34 Cargo lamp
F40 CGM
F41 Infotainment 1
F42 TCP
Fuses Usage
F49 Body control module 1 F50 –
F51 Battery 1
F52 Battery 2
F53 –
F54 Sunroof
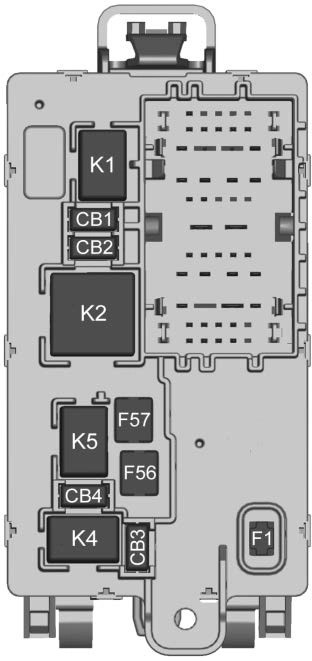
F55 Driver power seat F56 DC DC TRANS 1 F57 DC DC TRANS 2
F58 Infotainment 2
Relays Usage
K1 Run/Crank
K2 Retained accessory power/Accessory 1
K4 Retained accessory power/Accessory 2
K5 –
F43 –
F44 AVM
Circuit Breakers
Usage
F45 Body control module 2 F46 Heating, ventilation,
and air conditioning/ Battery 1
F47 Instrument panel
cluster/Battery
F48 Transmission control
module
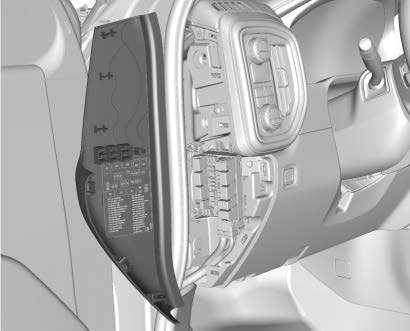 The left instrument panel fuse block access door is on the driver side edge of the instrument panel.
The vehicle may not be equipped with all of the fuses, relays, and features shown.
Pull off the cover to access the fuse block.
The vehicle may not be equipped with all of the fuses, relays, and features shown.
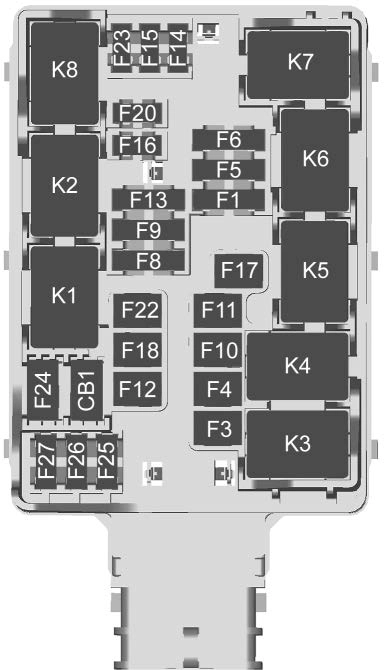
Fuses Usage
F1 Rear heated seats left/right
F3 Euro trailer
F4 –
F5 Front Bolster
F6 Heated and cooled seats left/right
F8 Rear seat entertainment/Theft deterrent
F9 Passive entry/Passive start/Driver seat module
F10 –
F11 Sunshade
F12 Passenger power seat F13 Export power take off/
Special equipment
option 1
F14 –
F15 –
F16 AMP
Fuses Usage
F17 MFEG
F18 –
F20 Endgate
F22 Rear sliding window F23 –
F24 –
F25 –
F26 –
F27 –
Relays Usage
K5 MFEG minor 2
K6 MFEG major 2
K7 Anti-theft
K8 –
Circuit Breakers
CB1 –
Usage
Relays Usage
K1 Rear sliding window open
K2 Rear sliding window close
K3 MFEG major 1
K4 MFEG minor 1
Download Manual