Navigation
Using the Navigation System
If equipped, launch the Nav application by touching the Nav icon on the Home Page or on the shortcut tray near the bottom of the infotainment display.
When the Nav application is launched for the first time, a product walkthrough is available. Use of the feature requires the Terms and Conditions and the Privacy statement to be confirmed. If available and signed into a profile, it is also suggested to enable and confirm Predictive Navigation.
Predictive Navigation (If Equipped)
If Predictive Navigation is available and confirmed, this feature learns preferences by remembering where the vehicle has been.
It uses the locations and navigation history to personalize routes and results.
Predictive Navigation may learn elements such as:
Predictive Navigation can also be enabled or disabled at a later time by touching A (Options). While in Options, touch Settings, then Map and Navigation Settings, and then Predictive Navigation. See Settings 0 181.
Navigation Map View
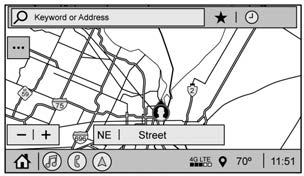
After opening the Nav application for the first time, the application will always open in full map view displaying the vehicle’s current location. When the vehicle is stopped, the search bar will appear along
the top of the navigation map view. Manually close the search bar by touching
z. When the vehicle is moving, the } (Search) icon will replace the search bar to maximize the full map view.
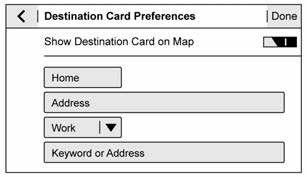
Destination Card Preferences
From the Nav application, set up Home and Work addresses to enable one-touch navigation. To set up Home and Work addresses, touch A and select Settings, then Map and Navigation Settings, and then Destination Card Preferences. Show My Places on Map should be on by default.
Select and enter Home and/or Work address and save.
If the vehicle’s system is not signed into a customized profile, the current location icon uses a generic symbol. Once signed into a
customized profile, the current location symbol will show a customized icon. See Navigation Symbols 0 161.
Map and Navigation Settings
Touch A while in the map view to display options. The following may display:
Touch Settings to view Map and Navigation Settings. The following may display:
To exit a list, touch z in the top right corner to return to the main map view.
Make sure to set up preferences before setting a destination and starting active guidance.
Map Preferences
Touch to choose between basic map feature configurations:
Map Colors
3D Landmark (Default is On) : Touch On or Off. When turned on, the system will display all 3D Landmarks on the map depending on the zoom level.
3D Building (Default is Off) : Touch On or Off. When turned on, the system will display all of the possible 3D building shapes on the map depending on the zoom level.
Show Terrain in 3D (Default is Off) :
If equipped, touch On or Off. When turned on, the system will display terrain information on the map in 3D view.
Auto-Zoom (Default is On) : Touch On or Off. When turned on, the system will automatically adjust the zoom level when the vehicle is approaching a turn. After the turn is completed, the system automatically brings the zoom back to the originally set level. If the vehicle is approaching a turn with the next turn occurring shortly after, the Auto-Zoom will remain on until both turns are completed.
Route Preferences
Touch to access the Route Preferences. The choices are:
Navigation Voice Control
Touch to access the voice control setting display.
using the knob on the center stack or the volume switch on the steering wheel.
Traffic Events (If Equipped)
This feature provides a list of events that are on the route or nearby. Touch A and then select Traffic Events. An OnStar connected Navigation service plan is required.
Traffic Preferences (If Equipped)
While in Map View, touch A, then Settings and then Map and Navigation Settings to access Traffic Preferences. When Show
Traffic on Map is turned on, the feature provides an overview of the traffic flow using different coded colors. The following options are available for rerouting:
or cancel the alert.
Alert Preferences
Set alerts on or off during both inactive and active guidance views. The following alerts may be available:
Manage History
Touch Manage History to access the History options:
About
Touch to display software information, such as:
The Nav application requires a map database to run. It is stored on an SD card that is connected to the infotainment system. If the map database is not available, a missing SD card error message will be displayed.
SD Card Error Messages
The SD card only works for one unique vehicle. The SD card must pass authentication verification to be used for that specific vehicle. Potential error scenarios and messages include:
(Error Code).”
(Error Code).”
Touch Continue to resume after the initialization error message. For the other messages, touch OK to return to the Home Page.
Following are the most common symbols that may appear in the Nav application.

This indicates the vehicle’s current location and direction on the map.

This is the vehicle’s current location icon during inactive guidance mode. Once a user profile is created, the current location icon can be customized.
This icon indicates the vehicle’s current location and direction on the map.

The destination pin marks the location of the final destination. Touch the pin to view the destination address or to add it or remove it from the Favorites list. Hide the information by touching the pin one more time. It will automatically time out if no action is taken.
If equipped, smart Points of Interest (POIs) are places of interest for parking and gas stations.
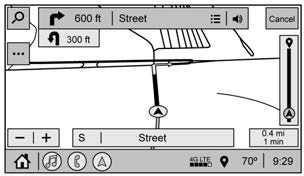
The progress bar provides an overview of the route progress and may show traffic and incidents along the way. As the route proceeds, the vehicle icon moves up the bar.
Touch the icon to zoom out on the map and view the entire route. Touch it again to return to the previous view.
View the drive time by touching the estimated time of arrival (ETA).
Current Location
When the vehicle is parked and not in a Navigation session, the user icon is centered on the map view, highlighting the current location.
Receiving Destination Directions from Different Sources
Destinations can be received or transferred from different sources to the Nav application for route guidance. If equipped, some of these sources may include:
Add up to five waypoints, which are additional destinations, along the route. To add an additional stop or waypoint:
Route options are not available for waypoints.
Arriving at a Waypoint
When approaching a waypoint, the system will display a Destination Arrival view. To continue on to the next destination touch the Drive to message on the infotainment display.
If the vehicle passes the waypoint or gets out of the current route, the system will automatically reroute back to this waypoint. At the same time, it will show a Drive to icon along with the next waypoint address so the current waypoint can be skipped and guidance can resume to the next waypoint or destination.
Editing a Waypoint
When waypoints are added during active guidance, the system allows a stop to be deleted or the order to be changed. To edit a waypoint:
A pop-up will appear to confirm waypoint removal. Once the request is confirmed, the system will remove the address from the destinations list. Touch z on the top right corner so the system can recalculate the route.
If there is only one address in the destinations list, the system will disable the move and delete functions. The system will not allow the final destination to be deleted.
Road network attributes are contained in the map database for map information.
Attributes include information such as street
names, street addresses, and turn restrictions. A detailed area includes all major highways, service roads, and residential roads. The detailed areas include Places of Interest (POIs) such as restaurants, airports, banks, hospitals, police stations, gas stations, tourist attractions, and historical monuments.
If the vehicle does not have an applicable service plan, the map database may not include data for newly constructed areas or map database corrections that are completed after production. The navigation system provides full route guidance in the detailed map areas.
The zoom control display is shown on the map view. A few ways to zoom in or
out are:
Use the following gestures on the infotainment display to adjust the map scale and display options.
See Using the System 0 147.
When in active guidance, the audio prompts while using navigation can be muted. Touch the speaker icon on the right side of the upper bar. A slash will appear on the speaker to indicate voice guidance is muted.
When a destination is chosen and a navigation session is active, the navigation system enters into an Active Guidance View (AGV).
Map Orientation
Touch A on the map to access map orientation settings. Map orientation is 3D Heading Up by default.
Available settings are:
Touch the icon to change the map type. The icon and label will also update accordingly.
Depending on the zoom level of the 2D Heading Up and 3D Heading Up maps, the system may automatically switch to the 2D North Up map.
When in AGV, the entire route can be viewed in 2D North Up by touching the traffic bar. The map will zoom out and readjust to display the full route. When in
2D North Up Route View, the Recenter icon will appear in the middle of the display. Touch either the Recenter icon or the traffic bar again to return to the previous view, either 2D or 3D.
Lane Guidance
The map will display the lane information for the upcoming maneuver if it is available.
Junction View
When a vehicle is on the highway and approaching the exit, an image displays the lane that the vehicle must stay in to complete the next maneuver.
Quick-Turn View
When the vehicle is approaching a turn with the next turn following in quick succession, a quick-turn list appears below the primary turn indicator. An audio prompt will announce the quick turn.
Auto-Zoom
When approaching a maneuver, the map will automatically zoom in to show both the vehicle icon and the upcoming maneuver to give a better view of the maneuver. Once the maneuver is complete, the system will zoom back to the previous zoom level.
Touch A on the map to access Settings, then touch Map Preferences to access Auto-Zoom. This feature can be enabled or disabled.
Directions
Touch the menu option next to the next turn street name to display Directions.
Directions displays the turns and directions from the current location to the final destination.
Editing Directions
Directions can be edited by choosing y, which expands the list to fill the display and enters the Edit Mode. While in Edit Mode, an unwanted route segment can be
removed from the route by touching Y next to the segment. A pop-up appears to confirm segment removal.
When the route segment has been removed, all segments are replaced by an activity indicator while the new route is recalculated. When the recalculation is complete, the activity indicator is replaced with the new route segments.
Highway Exits List
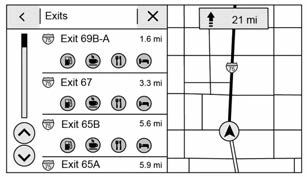
Touch C to open the Exit list. This icon displays next to the current street name near the bottom of the display. The icon only appears when on a highway with defined exits.
While traveling on roads with designated exits, an Exit list may be available. The Exit list displays the exit number, distance to the
exit from the current vehicle position, and convenience stops that may be available, such as gas, coffee, food, and lodging.
Next Maneuver Menu
When in Active Guidance, the Next Maneuver Turn Arrow, Street Name, and Maneuver Distance are shown in the Next Maneuver at the top of the display overlaying the map. ETA, Distance to Destination, and Traffic Indicator are displayed in a panel pinned on the right of the display.
Navigation Next Turn Maneuver Alert
If the Navigation application is not open when a near maneuver prompt is given, it is shown as an alert. Touch the alert to go to the main navigation view or touch z to dismiss the alert.
Repeat Voice Guidance
This symbol indicates the next guidance maneuver. Touch it to repeat the last spoken guidance instruction.
Incident Alert (If Equipped)
During active guidance, if the system determines that there is an incident ahead but there is not a better route, the system will play a tone and show a Quick Notice. This will only show once per incident.
Incident Reports (If Equipped)
Incident report icons, along with traffic flow data, display on the map during both active and inactive guidance.
End Route
Touch Cancel at the top right corner to end active guidance and return to inactive guidance. If active guidance is canceled before the destination has been reached, a pop-up option to Resume Trip will appear.
Resume Trip
The trip can be resumed if it was canceled by touching the Resume Trip pop-up option.
If the system has determined that the destination has been reached, either because the arrival view displayed or the destination has been passed, the Resume Trip option will not appear.
The navigation favorites can have contacts, addresses, or POIs that have been saved through the favorite icon on the
details view.
Accessing Favorites
In the Nav application, view the Favorites list by touching H in the search bar along the top of the Nav map view. If the search bar is closed, touch } and select H.
Saving Favorites
Favorites can be added from a number of the system’s applications. Touch the favorites icon to save content as a favorite.
Renaming Navigation Favorites
Touch H to access a list of recent destinations.
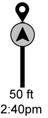
Recenter Position Icon
Touch the Recenter Position arrow in the middle of the map view to reset the map to the current location.
Last Parked Location
The Last Parked Location is the last location the vehicle engine was turned off. That location is displayed in the first row of the Recents list. Touching the last Parked Location shows the Address Details view to either save the address or drive to it. The Last Parked Location can be deleted by entering the Edit display. Once the Last Parked Location is deleted, it no longer appears in the Recents list, unless the vehicle is started at that location again.
To see the POI categories, touch Options, then touch Show on Map. Up to eight categories of icons can be selected.
Smart POI Icons on Map (If Equipped)
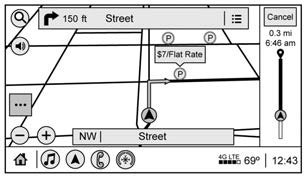
The smart POI icons such as fuel stations and parking may appear based on time, location, driver search behavior, driving conditions, and vehicle conditions.
Touch a smart POI icon to open the corresponding details:
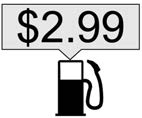
Smart Fuel Station Icons
Fuel station prices are shown if available for nearby stations when the vehicle is low
on fuel.
Smart Parking Icons
When reaching a densely populated destination and the system determines that parking may be limited, the system will attempt to display nearby parking destinations with pricing information,
if available.
Report an Issue Using POI Details (If Equipped)
In the POI details page, a POI issue can be reported if the data is not accurate or the address is incorrect. Touch Report an Issue near the bottom of the display to access the issue selection page. Touch one of the predefined issues on the selection page, then touch Send. The system will send the information for analysis.
Search
Touch Search on the infotainment display to open the search display. It has a search field entry box, quick category icon shortcuts, recents icon, favorites icon, and keyboard.
Auto Complete
Enter a partial location in the field entry box on the search display. Auto complete will attempt to complete the destination based on what is being entered. Touch the suggested item to search.
Search While in Motion with No Front Seat Passenger Present
The search display will not allow changes or text input with the keyboard when the vehicle is in motion. As a result, a display showing three rows of the most commonly used categories appears. Touching the search box will activate speech recognition.
Search While in Motion with Front Seat Passenger Present
If the system detects that the front seat passenger is present with both driver and passenger seat belts buckled, touching the search icon will display an alert message that allows the passenger to search for a destination as if the vehicle were stopped.
Connected Navigation is a subscription service that enables certain capabilities within the navigation system, such as Traffic, Smart Search/Routing, and Predictive
Navigation capabilities. The system will show an alert when the subscription is expiring and will ask to renew the plan.
With a connected plan, an OnStar Advisor can download a destination to the vehicle or into the built-in navigation system.
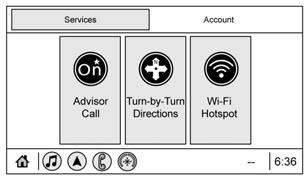
Touch OnStar Services on the Home Page to access the OnStar menu. Touch Turn-by-Turn Directions icon while on the Services tab of the OnStar menu.
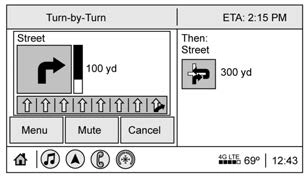
Turn-by-Turn Navigation
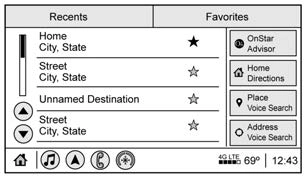
If equipped, after touching the Turn-by-Turn Directions icon, select destinations from Recents or Favorites. Recents or Favorites will be empty if this is the first use. To find new locations, touch OnStar Advisor, Home Directions, Place Voice Search, or Address Voice Search.
Lane Guidance
When available, the system will show the best lane(s) to be in for the next maneuver.
Cancel a Route
If a route is in progress using either the vehicle navigation system or the
Turn-by-Turn route, and a new route is requested, the current route in progress will be canceled.
If equipped, the position of the vehicle is determined by using satellite signals, various vehicle signals, and map data.
At times, other interference such as the satellite condition, road configuration, condition of the vehicle, and/or other circumstances can affect the navigation system's ability to determine the accurate position of the vehicle.
The GPS shows the current position of the vehicle using signals sent by GPS satellites. When the vehicle is not receiving signals from the satellites, a symbol appears in the status bar.
This system might not be available or interference can occur if any of the following are true:
For more information if the GPS is not functioning properly, see Problems with Route Guidance 0 169 and
If the System Needs Service 0 170.
At times, the position of the vehicle on the map could be inaccurate due to one or more of the following reasons:
Inappropriate route guidance can occur under one or more of the following conditions:
To recalibrate the vehicle's position on the map, park with the vehicle running for two to five minutes, until the vehicle position updates. Make sure the vehicle is parked in
a location that is safe and has a clear view of the sky and away from large obstructions.
If the navigation system needs service, see your dealer.
The map data in the vehicle is the most up-to-date information available when the vehicle was produced. The map data is
updated periodically, provided that the map information has changed and the vehicle has a relevant service plan.
See www.gmnavdisc.com for details on ordering, purchasing, and installing a new or replacement SD card. Features are subject to change. For more information on this feature, see my.chevrolet.com/learn.
If the vehicle is equipped with Connected Navigation, which is a subscription service that enables certain features of the navigation system, such as Traffic, Smart Search/Routing, and Predictive Navigation, then the system will download the latest map data from the cloud.
Coverage areas vary with respect to the level of map detail available for any given area. Some areas feature greater levels of detail than others. If this happens, it does not mean there is a problem with the system. As the map data is updated, more detail can become available for areas that previously had limited detail. See Map Data Updates 0 170.
Download Manual