Vehicle Features
Radio(s)
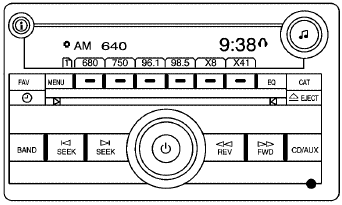
Radio with CD (MP3)
 : Press to turn the system on and off. Turn to increase or decrease the volume.
BAND: Press to choose between FM, AM, or XM™, if equipped.
 : Select radio stations.
 : Seek or scan stations.
 (XM™ Satellite Radio Service, MP3, and RDS Features): Press this button to display additional text information related to the current FM-RDS or XM station, or MP3 song. When information is not available, No Info displays.
For more information about these and other radio features, see Audio System(s).
Storing a Favorite Station
For vehicles with an XM radio, a maximum of 36 stations can be stored as favorites using the six softkeys located below the radio station frequency tabs and by using the radio FAV button. Press FAV to go through up to six pages of favorites, each having six favorite stations available per page. Each page of favorites can contain any combination of AM, FM, or XM stations.
See Radio(s).
Setting the Clock
To set the time and date for the radio with CD (MP3):
1. Turn the ignition key to ACC/ACCESSORY or ON/RUN.
2. Press  to turn the radio on.
3. Press  and the HR, MIN, MM, DD, YYYY (hour, minute, month, day, and year) displays.
4. Press the softkey located below any one of the tabs that you want to change.
5. Increase or decrease the time or date by turning  clockwise or counterclockwise.
For detailed instructions on setting the clock for your specific audio system, see Setting the Clock.
Satellite Radio
XM is a satellite radio service that is based in the 48 contiguous United States and 10 Canadian provinces. XM satellite radio has a wide variety of programming and commercial-free music, coast-to-coast, and in digital-quality sound.
A fee is required to receive the XM service.
For more information, refer to:
• www.xmradio.com or call 1-800-929-2100 (U.S.)
• www.xmradio.ca or call 1-877-438-9677 (Canada)
See “XM Satellite Radio Service” under Radio(s) .
Portable Audio Devices
This vehicle may have an auxiliary input, located on the audio faceplate. External devices such as iPod®, laptop computers, MP3 players, CD changers, etc. can be connected to the auxiliary port using a 3.5 mm (1/8 in) input jack.
See “Using the Auxiliary Input Jack” under Radio(s).
Steering Wheel Controls
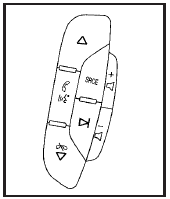
If equipped, these controls are located on the right side of the steering wheel.
 : Press to go to the next radio station stored as a favorite, or the next track, if a CD/DVD is playing.
 : Press to silence the vehicle speakers only.
Press again to turn the sound on. Press and hold longer than two seconds to interact with OnStar® or Bluetooth® systems.
 : Increases or decreases volume.
 : Press to go to the previous radio station stored as a favorite, the next track if a CD/DVD is playing, to reject an incoming call, or end a current call.
SRCE: Press to switch between the radio, CD, and for vehicles with, DVD, front auxiliary, and rear auxiliary.
 : Press seek the next radio station, or to select tracks on a CD or DVD.
For more information, see Audio Steering Wheel Controls.
Bluetooth®
For vehicles with an in-vehicle Bluetooth system, it allows users with a Bluetooth enabled cell phone to make and receive hands-free calls using the vehicle’s audio system and controls.
The Bluetooth enabled cell phone must be paired with the in-vehicle Bluetooth system before it can be used in the vehicle. Not all phones will support all functions.
For more information visit www.gm.com/bluetooth.
For more information, see Bluetooth®.
Navigation System
The vehicle’s navigation system provides detailed maps of most major freeways and roads throughout the United States and Canada. After a destination has been set, the system provides turn-by-turn instructions for reaching the destination. In addition, the system can help locate a variety of points of interest (POI), such as banks, airports, restaurants, and more.
See the vehicle’s Navigation System manual for more information.
Driver Information Center (DIC)
The DIC display is located at the bottom of the instrument panel cluster. It shows the status of many vehicle systems and enables access to the personalization menu.
The DIC buttons are located on the instrument panel to the left of the instrument panel cluster.
 : Press to scroll through the trip and fuel displays.
 : Press to scroll through the vehicle information displays.
 : Press to customize the feature settings on your vehicle. See DIC Vehicle Customization for more information.
 : Press to reset certain DIC features and to acknowledge DIC warning messages and clear them from the display.
For more information, see Driver Information Center (DIC).
Vehicle Customization
Some vehicle features can be programmed by using the DIC buttons on the instrument panel to the left of the steering wheel. These features include:
• Language
• Door Lock and Unlock Settings
• Lighting
• Chime Volume
• Memory Settings
• Remote Start
See DIC Vehicle Customization.
Cruise Control
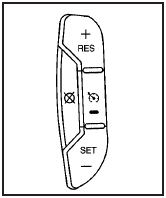
The cruise control buttons are located on the left side of the steering wheel.
 : On/Off.
+ RES: Press to accelerate or resume speed.
SET–: Press to set or decrease the speed.
 (Cancel): Press to cancel cruise control.
For more information, see Cruise Control.
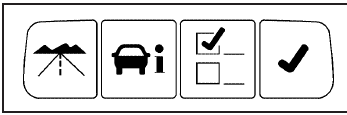
Lane Departure Warning (LDW)
For vehicles with LDW, it is intended to help avoid lane change collisions. It provides a warning if the vehicle is crossing a lane without using a turn signal. LDW uses a camera to detect the lane markings. It only operates at speeds of 56 km (35 mph) or greater.
The warning symbol  , located in the instrument panel cluster, appears green if a lane marking is detected.
It changes to amber, flashes, and sounds three chimes if the vehicle crosses a detected land marking and the turn signal is not on.
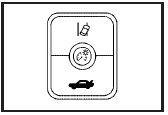
To turn LDW on and off, press the LDW button, located by the exterior headlamp control.
See Lane Departure Warning (LDW) for more information.
Side Blind Zone Alert (SBZA)
For vehicles with this feature, it may alert you to vehicles located in your side blind zone. When the system detects a vehicle in the side blind zone, an SBZA display will light up in the corresponding outside side mirror indicating that it may not be safe to change lanes.
The system is enabled at every vehicle startup. It can be disabled through the Driver Information Center (DIC).
If the message SIDE BLIND ZONE SYS. UNAVAILABLE appears on the DIC, the system has been disabled because the sensor is blocked and cannot detect vehicles in the blind zone. The sensors, located behind the rear quarter panels, may be blocked by mud, dirt, snow, ice, slush, or even heavy rainstorms. The vehicle does not need service.
See Side Blind Zone Alert (SBZA) for more information.
Ultrasonic Parking Assist
For vehicles with this feature, it uses sensors on the rear bumper to detect objects while parking the vehicle. It operates at speeds less than 8 km/h (5 mph) while in R (Reverse). URPA uses audio beeps and three color-coded lights, located on the rear shelf, below the rear window, to provide distance and system information.
Keep the sensors on the vehicle’s rear bumper clean to ensure proper operation.
The system can be disabled through the Driver Information Center (DIC).
See Ultrasonic Rear Parking Assist (URPA) for more information.
Power Outlets
The accessory power outlets can be used to plug in electrical equipment, such as a cellular telephone.
The vehicle may have up to three power outlets depending on the type of front seat installed. If the vehicle has front bucket seats with a center console, there are two outlets inside the rear storage compartment. An extra power outlet can be found under the climate control system next to the ashtray.
See Accessory Power Outlet(s).
Universal Remote System
The Universal Home Remote System allows for garage door openers, security systems, and home automation devices to be programmed to work with these buttons in the vehicle.
See Universal Home Remote System.
Download Manual