Instrument Panel Overview
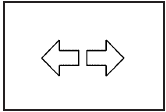
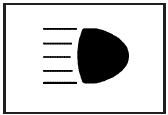
Hazard Warning Flashers
The hazard warning flashers let you warn others that you have a problem.
The hazard warning flasher button is located in the center of the instrument panel above the radio.
 : Press to make the front and rear turn signal lamps flash on and off. Press the button again to turn the flashers off.
When the hazard warning flashers are on, the turn signals will not work.
Horn
Press near or on the horn symbols on the steering wheel pad to sound the horn.
Tilt Wheel
The tilt lever is located on the left side of the steering column.
To adjust the lever:
1. Hold the wheel and pull the lever toward you.
2. Move the steering wheel up or down into a comfortable position.
3. Release the lever to lock the wheel in place.
Do not adjust the steering wheel while driving.
Power Tilt Wheel and Telescopic Steering Column
For vehicles with a power tilt control, it is located on the left hand side of the steering column.
To adjust the power tilt wheel:
• Push the control up or down to tilt the steering wheel up or down.
• Push the control forward or rearward to move the steering wheel toward the front or rear of the vehicle.
Heated Steering Wheel
For vehicles with a heated steering wheel, the button for this feature is located on the steering wheel.
 : Press to turn the heated steering wheel on or off.
A light on the button displays when the feature is turned on.
The steering wheel takes about three minutes to start heating.
Turn Signal/Multifunction Lever
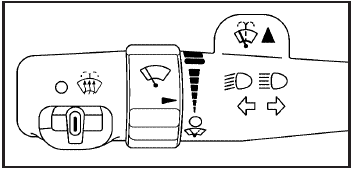
The lever on the left side of the steering column includes the following:
 : Turn and Lane-Change Signals
 : Headlamp High/Low-Beam Changer
 : Windshield Wipers
 : Windshield Washer
Flash-To-Pass Feature.
Information for these features is on the pages following.
Turn and Lane-Change Signals
An arrow on the instrument panel cluster flashes in the direction of the turn or lane change.
For vehicles with the side blind zone alert system, an arrow in the outside mirror flashes when the turn signal is used. See Side Blind Zone Alert (SBZA) for more information.
Move the lever all the way up or down to signal a turn.
Raise or lower the lever until the arrow starts to flash to signal a lane change. Hold it there until the lane change is complete. If the lever is briefly pressed and released, the turn signal will flash three times.
The lever returns to its starting position when it is released.
If after signaling a turn or lane change the arrow flashes rapidly or does not come on, a signal bulb may be burned out.
Have the bulbs replaced. If the bulb is not burned out, check the fuse. See Fuses and Circuit Breakers
Turn Signal On Chime
If the turn signal is left on, a warning chime sounds and the Driver Information Center (DIC) will display TURN SIGNAL ON after driving about a mile as a reminder to turn it off. See DIC Warnings and Messages.
Headlamp High/Low-Beam Changer
To change the headlamps from low beam to high beam, push the turn signal lever away from you. To change from high beam to low beam, pull the turn signal lever toward you.
While the high beams are on, this light located on the instrument panel cluster will also be on.
Flash-to-Pass
This feature lets you use the high-beam headlamps to signal the driver in front of you that you want to pass. It works even if your headlamps are off.
Pull the turn signal lever toward you briefly to flash-to-pass.
If the headlamps are off or on low beam, the high-beam headlamps will turn on. They will stay on as long as you hold the lever toward you and the high-beam indicator on the instrument panel cluster will come on.
Windshield Wipers
The windshield wiper lever is located on the left side of the steering column.
Turn the band with the wiper symbol on it to control the windshield wipers.
 (Mist): For a single wiping cycle, hold it on mist until the wipers start, then release. The wipers stop after one wipe. Several wipes, hold the band longer.
 (Delay): Use to set the delay time between wipe cycles. The wiper speed can be set for a long or short delay between wipes. The closer the band is set to the top of the lever, the shorter the delay.
 (Low Speed): Slow wipes.
 (High Speed): Fast wipes.
 (Off): Turns the wipers off.
Clear ice and snow from the wiper blades before using them. If frozen to the windshield, carefully loosen or thaw them. Damaged blades should be replaced.
Heavy snow or ice can overload the wiper motor. A circuit breaker will stop the motor until it cools.
The vehicle has wiper-activated headlamps. After the windshield wipers have completed eight wipe cycles within four minutes, the headlamps automatically turn on. See Wiper Activated Headlamps for more information.
Rainsense™ II Wipers
If the vehicle has this feature, the moisture sensor is mounted on the interior of the windshield beside the rearview mirror and is used to automatically operate the wipers. This system operates by monitoring the amount of moisture build-up on the windshield. Wipes occur as needed to clear the windshield depending on the driving conditions and the sensitivity setting. In light rain or snow, fewer wipes will occur. In heavy rain or snow, wipes will occur more frequently.
The system operates in the delay mode. If the system is left on for long periods of time, occasional wipes may occur without any moisture on the windshield. This is normal and indicates that the Rainsense™ system is active.
The Rainsense™ system is activated by turning the wiper control band to one of the five sensitivity levels within the delay area. The position closest to off is the lowest sensitivity setting, level one. This allows more rain or snow to collect on the windshield between wipes. Turning the wiper band away from you to higher sensitivity levels increases the sensitivity of the system and frequency of wipes. The highest sensitivity setting, level five is closest to low. A single wipe will occur each time you turn the wiper stalk to a higher sensitivity level to indicate that the sensitivity level has been increased.
Notice: Going through an automatic car wash with the wipers on can damage them. Turn the wipers off when going through an automatic car wash.
The MIST and wash cycle operates as normal and are not affected by the Rainsense™ function. The system can be overridden at any time by manually changing the wiper control to low or high speed.
Notice: Do not place stickers or other items on the exterior glass surface directly in front of the rain sensor.
Windshield Washer
WARNING:
In freezing weather, do not use your washer until the windshield is warmed. Otherwise the washer fluid can form ice on the windshield, blocking your vision.
 (Washer Fluid): Press and release this paddle, located at the top of the turn signal/multifunction lever, to spray washer fluid on the windshield. The wipers will clear the windshield and either stop or return to the preset speed. For more washer cycles, press and hold the paddle.
Cruise Control
With cruise control, you can maintain a speed of about 40 km/h (25 mph) or more without keeping your foot on the accelerator. Cruise control does not work at speeds below about 40 km/h (25 mph).
WARNING:
Cruise control can be dangerous where you cannot drive safely at a steady speed. So, do not use the cruise control on winding roads or in heavy traffic.
Cruise control can be dangerous on slippery roads. On such roads, fast changes in tire traction can cause excessive wheel slip, and you could lose control. Do not use cruise control on slippery roads.
If your vehicle has the Traction Control System (TCS) and the cruise control is on, TCS will begin to limit wheel spin and the cruise control automatically turns off.
See Traction Control System (TCS). When road conditions allow you to safely use it again, the cruise control can be turned back on.
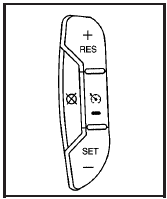
The cruise control buttons are located on left side of the steering wheel.
 (On/Off): Press to turn cruise control on and off.
The indicator is lit when cruise control is on.
+ RES (Resume/Accelerate): Press to make the vehicle accelerate or resume to a previously set speed.
SET–: Press to set the speed or make the vehicle decelerate.
 (Cancel): Press to cancel cruise control.
Setting Cruise Control
Cruise control will not work if the parking brake is set, or if the master cylinder brake fluid level is low.
The cruise control light on the instrument panel cluster comes on after the cruise control has been set to the desired speed. See Instrument Panel Cluster.
WARNING:
If you leave your cruise control on when you are not using cruise, you might hit a button and go into cruise when you do not want to. You could be startled and even lose control. Keep the cruise control switch off until you want to use cruise control.
1. Press the button.
2. Get up to the desired speed.
3. Press and release the SET– button located on the steering wheel.
4. Take your foot off the accelerator.
Resuming a Set Speed
If cruise control is set at a desired speed and the brakes are applied, this shuts off the cruise control.
However, it does not need to be reset.
Once your vehicle reaches a speed of about 40 km/h (25 mph) or more, press the +RES button on the steering wheel. The vehicle goes back to the previously selected speed and stays there.
Increasing Speed While Using Cruise Control
To increase the cruise speed while using cruise control:
• Press and hold the +RES button on the steering wheel until the desired speed is reached, then release it.
• To increase vehicle speed in small increments, press the +RES button. Each time this is done, the vehicle goes about 1.6 km/h (1 mph) faster.
Reducing Speed While Using Cruise Control
To reduce your speed while using cruise control:
• Press and hold the SET– button on the steering wheel until the desired lower speed is reached, then release it.
• To slow down in very small amounts, press the SET– button on the steering wheel briefly. Each time this is done, the vehicle goes about 1.6 km/h (1 mph) slower.
Passing Another Vehicle While Using Cruise Control
Use the accelerator pedal to increase vehicle speed.
When you take your foot off the pedal, the vehicle will slow down to the cruise speed you set earlier.
Using Cruise Control on Hills
How well the cruise control will work on hills depends upon the vehicle speed, load and the steepness of the hills. When going up steep hills, you might have to step on the accelerator pedal to maintain your speed.
When going downhill, you might have to brake or shift to a lower gear to keep your speed down. If the brakes are applied the cruise control will turn off.
Ending Cruise Control
There are three ways to end cruise control:
• Step lightly on the brake pedal.
• Press the button on the steering wheel.
• Press the button on the steering wheel.
Erasing Speed Memory
The cruise control set speed memory is erased by turning off the cruise control or the ignition.
Exterior Lamps
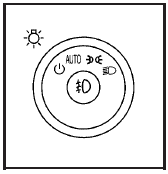
The exterior lamps control is located on the instrument panel to the left of the steering wheel.
It controls the following systems:
• Headlamps
• Taillamps
• Parking Lamps
• License Plate Lamps
• Instrument Panel Lights
• Fog Lamps (If Equipped)
The exterior lamps control has four positions:
 (Off): Turn the control to this position to turn off the exterior lamps.
AUTO (Automatic): Turn the control to this position to automatically turn on the headlamps at normal brightness, together with the following:
• Parking Lamps
• Instrument Panel Lights
 (Parking Lamps): Turn the control to this position to turn on the parking lamps together with the following:
• Taillamps
• License Plate Lamps
• Instrument Panel Lights
 (Headlamps): Turn the control to this position to turn on the headlamps together with the following lamps listed below. A warning chime sounds if the driver’s door is opened while the ignition switch is off and the headlamps are on.
• Parking Lamps
• License Plate Lamps
• Instrument Panel Lights
 (Fog Lamps): Push the exterior lamps control in to turn on the fog lamps.
See Fog Lamps.
Wiper Activated Headlamps
This feature activates the headlamps and parking lamps after the windshield wipers are turned on and have completed eight wipe cycles within four minutes.
When the ignition is turned to LOCK/OFF, the wiper-activated headlamps immediately turn off. The wiper-activated headlamps also turn off if the windshield wipers are turned off.
Headlamps on Reminder
If you leave the exterior lamp buttons for the headlamps or parking lamps on, remove the key from the ignition and open the driver’s door, you will hear a continuous warning chime. The chime will turn off when the lamps are turned off.
Daytime Running Lamps (DRL)
Daytime Running Lamps (DRL) can make it easier for others to see the front of your vehicle during the day. Fully functional daytime running lamps are required on all vehicles first sold in Canada.
A light sensor on top of the instrument panel monitors the exterior light level for the operation of DRL, so be sure it is not covered.
The DRL system makes the low-beam headlamps turn on at reduced brightness in daylight when the following conditions are met:
• The ignition is on.
• The exterior lamp button for the headlamps is off.
• The automatic transmission is not in P (Park).
When the DRL are on, only the low-beam headlamps will be on. The parking lamps, taillamps, sidemarker and other lamps will not be on.
When it is dark enough outside, the low-beam headlamps will come on. The other lamps that turn on with the headlamps will also turn on. When it is bright enough outside, the regular lamps will go off, and the low-beam headlamps change to the reduced brightness of DRL.
To turn off all exterior lighting at night when the vehicle is parked, turn the exterior lamp control to the off position. The exterior lamps will turn back on automatically when the transmission is moved out of P (Park). See Exterior Lamps for more information.
The regular headlamp system should be turned on when needed.
Fog Lamps
The fog lamps button is on the exterior lamps control to the left of the steering column.
(Fog Lamps): Press the exterior lamps button to turn the fog lamps on or off. A light comes on in the instrument panel cluster when the fog lamps are in use. See Instrument Panel Cluster.
The ignition must be in the ON/RUN position for the fog lamps to work.
The fog lamps will go off when the headlamps are changed to high-beam.
Some localities have laws that require the headlamps to be on along with the fog lamps.
Cornering Lamps
When any door is opened, several lamps turn on making it easier for you to enter and exit the vehicle.
Turn the instrument panel brightness control completely clockwise to manually turn on these lamps.
Exterior Lighting Battery Saver
If the exterior lamp button has been left on, the exterior lamps will turn off about 10 minutes after the ignition is turned to LOCK/OFF and a door has been opened. This protects against draining the battery if the headlamps or parking lamps are accidentally left on. If you need to leave the lamps on for more than 10 minutes, use the exterior lamp control to turn the lamps back on after the ignition is turned to LOCK/OFF and any door is opened.
Instrument Panel Brightness
 (Instrument Panel Brightness): This feature controls the brightness of the instrument panel lights.
The knob for this control is located next to the exterior lamps control.
Push the knob in and release when it pops out. Turn the knob clockwise to increase the brightness of the instrument panel lights and counter clockwise to decrease the brightness. Turning the knob completely clockwise to the detent will turn on the courtesy lamps.
Courtesy Lamps
When any door is opened, several lamps turn on making it easier for you to enter and exit the vehicle.
Turn the instrument panel brightness control completely clockwise to manually turn on these lamps.
Entry Lighting
If it is dark enough outside when you press the unlock button on the remote keyless entry transmitter, the interior courtesy lamps will turn on and stay on for about 40 seconds. The lamps can be turned off immediately by pressing the lock button on the remote keyless entry transmitter, turning the ignition key to ON/RUN or activating the power door locks.
Delayed Entry Lighting
The interior lamps will turn on if you open the door when it is dark enough outside. When you close the door with the ignition off, the interior lamps will stay on for up to 25 seconds or until the ignition is turned to an on position.
When the lamps turn off as a result of the 25 second timer or the ignition switch being turned on, the lighting will deactivate by way of the theater dimming effect. Locking the doors will override the delayed entry lighting feature and the lamps will turn off right away.
Theater Dimming
This feature allows for a three to five second fade out of the courtesy lamps instead of immediate turn off.
Delayed Exit Lighting
If it is dark enough outside when you remove the key from the ignition, the interior lamps will turn on and stay on for about 25 seconds. This will give you time to find the door pull handle or lock switches. Once the key is inserted into the ignition, the exit lighting will be cancelled and the lighting will fade out.
Perimeter Lighting
If it is dark enough outside when the unlock button on the remote keyless entry transmitter is pressed, the DRL, parking lamps and back-up lamps will come on.
This feature can be programmed on for various amounts of time in seconds for each transmitter.
See DIC Vehicle Customization for information on programming.
Front Reading Lamps
The front reading lamps are located on the headliner.
Press the button near each lamp to turn them on or off.
Electric Power Management
The vehicle has Electric Power Management (EPM) that estimates the battery’s temperature and state of charge.
It then adjusts the voltage for best performance and extended life of the battery.
When the battery’s state of charge is low, the voltage is raised slightly to quickly bring the charge back up. When the state of charge is high, the voltage is lowered slightly to prevent overcharging. If the vehicle has a voltmeter gage or a voltage display on the Driver Information Center (DIC), you may see the voltage move up or down.
This is normal. If there is a problem, an alert will be displayed.
The battery can be discharged at idle if the electrical loads are very high. This is true for all vehicles. This is because the generator (alternator) may not be spinning fast enough at idle to produce all the power that is needed for very high electrical loads.
A high electrical load occurs when several of the following are on, such as: headlamps, high beams, fog lamps, rear window defogger, climate control fan at high speed, heated seats, engine cooling fans, trailer loads, and loads plugged into accessory power outlets.
EPM works to prevent excessive discharge of the battery. It does this by balancing the generator’s output and the vehicle’s electrical needs. It can increase engine idle speed to generate more power, whenever needed. It can temporarily reduce the power demands of some accessories.
Normally, these actions occur in steps or levels, without being noticeable. In rare cases at the highest levels of corrective action, this action may be noticeable to the driver. If so, a Driver Information Center (DIC) message might be displayed, such as BATTERY SAVER ACTIVE, BATTERY VOLTAGE LOW, or LOW BATTERY. If this message is displayed, it is recommended that the driver reduce the electrical loads as much as possible. See DIC Warnings and Messages.
Inadvertent Power Battery Saver
This feature is designed to protect your vehicle’s battery against drainage from the interior lamps, or garage door opener. When the ignition is turned off, the power to these features will automatically turn off after 10 minutes. Power will be restored for an additional 10 minutes if any door is opened, the trunk is opened or the courtesy lamp switch is turned on.
Battery Run-Down Protection
This feature helps prevent the battery from being drained, if the interior courtesy lamps, reading/map lamps, visor vanity lamps or trunk lamp are accidentally left on. If any of these lamps are left on, they automatically turn off after 10 minutes, if the ignition is off. The lamps will not come back on again until one of the following occurs:
• The ignition is turned on.
• The exterior lamps control is turned off, then on again.
The headlamps will timeout after 10 minutes, if they are manually turned on with the ignition on or off.
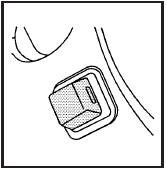
Accessory Power Outlet(s)
The accessory power outlets can be used to plug in electrical equipment, such as a cellular telephone.
The vehicle may have up to three power outlets depending on the type of front seat installed. If the vehicle has front bucket seats with a center console, there are two outlets inside the rear storage compartment. An extra power outlet can be found under the climate control system next to the ashtray.
The vehicle may have a small cap that must be pulled down to access the accessory power outlet. Cover the outlet with the protective cap when it is not being used.
Notice: Leaving electrical equipment on for extended periods will drain the battery. Always turn off electrical equipment when not in use and do not plug in equipment that exceeds the maximum amperage rating.
Certain electrical accessories may not be compatible to the accessory power outlets and could result in blown vehicle or adapter fuses. If you experience a problem see your dealer/retailer for additional information on the accessory power outlets.
Notice: Adding any electrical equipment to the vehicle can damage it or keep other components from working as they should. The repairs would not be covered by the vehicle warranty. Do not use equipment exceeding maximum amperage rating of 20 amperes. Check with your dealer/retailer before adding electrical equipment.
When adding electrical equipment, be sure to follow the proper installation instructions included with the equipment.
Notice: Improper use of the power outlet can cause damage not covered by the vehicle warranty. Do not hang any type of accessory or accessory bracket from the plug because the power outlets are designed for accessory power plugs only.
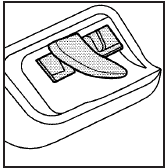
Ashtray(s)
Notice: If papers, pins, or other flammable items are put in the ashtray, hot cigarettes or other smoking materials could ignite them and possibly damage the vehicle. Never put flammable items in the ashtray.
For vehicles without the floor console, pull the tray located below the climate controls to reveal the ashtray.
The ashtray can be removed by pulling on the ledge located at the top of the ashtray.
The vehicles with a full floor console do not have an ashtray. There is a storage bin below the climate control system. For more information, see Front Storage Area.
Download Manual