Appearance Care
Locks are lubricated at the factory. Use a de-icing agent only when absolutely necessary, and have the locks greased after using. See Recommended Fluids and Lubricants 0 329.
For the Camaro High Performance vehicle, see the Camaro High performance supplement.
To preserve the vehicle's finish, wash it often and out of direct sunlight.
If using an automatic car wash, comply with the car wash instructions. The windshield wiper and rear window wiper, if equipped, must be off. Remove any
accessories that may be damaged or interfere with the car wash equipment.
Rinse the vehicle well, before washing and after, to remove all cleaning agents completely. If they are allowed to dry on the surface, they could stain.
Dry the finish with a soft, clean chamois or an all-cotton towel to avoid surface scratches and water spotting.
Application of aftermarket clearcoat sealant/wax materials is not recommended. If painted surfaces are damaged, see your dealer to have the damage assessed and repaired. Foreign materials such as calcium chloride and other salts, ice melting agents, road oil and tar, tree sap, bird droppings, chemicals from industrial chimneys, etc., can damage the vehicle's finish if they remain on painted surfaces. Wash the vehicle as soon as possible.
If necessary, use non-abrasive
cleaners that are marked safe for painted surfaces to remove foreign matter.
Occasional hand waxing or mild polishing should be done to remove residue from the paint finish. See your dealer for approved cleaning products.
Do not apply waxes or polishes to uncoated plastic, vinyl, rubber, decals, simulated wood, or flat paint as damage can occur.
To keep the paint finish looking new, keep the vehicle garaged or covered whenever possible.
Protecting Exterior Bright Metal Moldings
The bright metal moldings on the vehicle are aluminum, chrome or stainless steel. To prevent damage always follow these cleaning instructions:
Frequently hand wash convertible tops with mild car wash soap. Never use a stiff brush, steam, bleach,
or aggressive cleaners.
If necessary, a soft brush can be used to remove dirt. When finished cleaning, thoroughly rinse the fabric. Avoid automatic car washes with overhead brushes or very high pressure sprays as they can cause damage and leaking.
Only lower the top when it is completely dry and avoid leaving the top lowered for extended periods of time to prevent excessive interior weathering.
Avoid leaving large amounts of snow on the top for extended periods of time as damage may also occur.
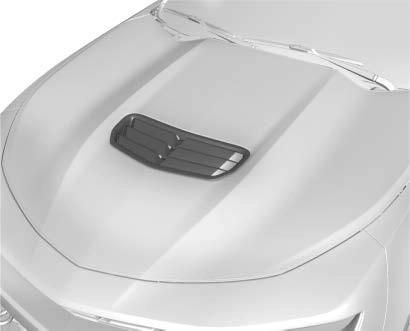
Hood Air Extractor
For the Camaro High Performance vehicle, see the Camaro High performance supplement.
It is not recommended that the air extractor on the SS Performance Package be waxed, as it will change the gloss level of the surface. In addition, care must be used when waxing around the air extractor. If a small amount of wax is applied to the extractor it can create an irregular appearance in the surface of the panel.
The air extractor may have vent screens in the openings. Keep leaves or other debris out of the vent screens.
There is a water deflector on the underside of the air extractor. Do not remove it.
Use only lukewarm or cold water, a soft cloth, and a car washing soap to clean exterior lamps, lenses, emblems, decals, and stripes.
Follow instructions under "Washing the Vehicle" previously in this section.
Lamp covers are made of plastic, and some have a UV protective coating. Do not clean or wipe them when dry.
Do not use any of the following on lamp covers:
Clear debris from the air intakes, between the hood and windshield, when washing the vehicle.
Clean the outside of the windshield with glass cleaner.
Clean rubber blades using lint-free cloth or paper towel soaked with windshield washer fluid or a mild detergent. Wash the windshield thoroughly when cleaning the blades. Bugs, road grime, sap, and a buildup of vehicle wash/wax treatments may cause wiper streaking.
Replace the wiper blades if they are worn or damaged. Damage can be caused by extreme dusty conditions, sand, salt, heat, sun, snow, and ice.
Apply weatherstrip lubricant on weatherstrips to make them last longer, seal better, and not stick or squeak. Lubricate weatherstrips at least once a year. Hot, dry climates may require more frequent application. Black marks from rubber material on painted surfaces can be removed by rubbing with a clean cloth. See Recommended Fluids and Lubricants 0 329.
Use a stiff brush with tire cleaner to clean the tires.
Use a soft, clean cloth with mild soap and water to clean the wheels. After rinsing thoroughly with clean water, dry with a soft, clean towel.
A wax may then be applied.
Visually inspect brake lines and hoses for proper hook-up, binding, leaks, cracks, chafing, etc. Inspect disc brake pads for wear and rotors for surface condition. Inspect drum brake linings/shoes for wear or cracks. Inspect all other brake parts.
Visually inspect steering, suspension, and chassis components for damaged, loose, or missing parts or signs of wear at least once a year.
Inspect power steering for proper attachment, connections, binding, leaks, cracks, chafing, etc.
Visually check constant velocity joint boots and axle seals for leaks.
Lubricate all key lock cylinders, hood hinges, liftgate hinges, and steel fuel door hinge unless the components are plastic. Applying silicone grease on weatherstrips with a clean cloth will make them last longer, seal better, and not stick or squeak.
At least twice a year, spring and fall, use plain water to flush any corrosive materials from the
underbody. Take care to thoroughly clean any areas where mud and other debris can collect.
Do not directly power wash the transfer case and/or front/rear axle output seals. High pressure water can overcome the seals and contaminate the fluid. Contaminated fluid will decrease the life of the transfer case and/or axles and should be replaced.
If the vehicle is damaged and requires sheet metal repair or replacement, make sure the body repair shop applies anti-corrosion material to parts repaired or replaced to restore corrosion protection.
Original manufacturer replacement parts will provide the corrosion protection while maintaining the vehicle warranty.
Quickly repair minor chips and scratches with touch-up materials available from your dealer to avoid
corrosion. Larger areas of finish damage can be corrected in your dealer's body and paint shop.
Airborne pollutants can fall upon and attack painted vehicle surfaces causing blotchy, ring-shaped discolorations, and small, irregular dark spots etched into the paint surface. See “Finish Care” previously in this section.
To prevent dirt particle abrasions, regularly clean the vehicle's interior. Immediately remove any soils.
Newspapers or dark garments can transfer color to the vehicle’s interior.
Use a soft bristle brush to remove dust from knobs and crevices on the instrument cluster. Using a mild soap solution, immediately remove hand lotions, sunscreen, and insect repellent from all interior surfaces or permanent damage may result.
Use cleaners specifically designed for the surfaces being cleaned to prevent permanent damage. Apply all cleaners directly to the cleaning cloth. Do not spray cleaners on any switches or controls. Remove cleaners quickly.
Before using cleaners, read and follow all safety instructions on the label. While cleaning the interior, open the doors and windows to get proper ventilation.
To prevent damage, do not clean the interior using the following cleaners or techniques:
3.8 L (1 gal) of water.
A concentrated soap solution will create streaks and attract dirt.
Do not use solutions that contain strong or caustic soap.
To clean, use a terry cloth fabric dampened with water. Wipe droplets left behind with a clean dry cloth.
If necessary, use a commercial glass cleaner after cleaning with plain water.
Cleaning the windshield with water during the first three to six months of ownership will reduce tendency to fog.
Vacuum around a speaker cover gently, so that the speaker will not be damaged. Clean spots with water and mild soap.
Coated moldings should be cleaned.
Start by vacuuming the surface using a soft brush attachment. If a rotating vacuum brush attachment is being used, only use it on the floor carpet. Before cleaning, gently remove as much of the soil as possible:
To clean:
If the soil is not completely removed, it may be necessary to use a commercial upholstery cleaner or spot lifter. Test a small hidden area for colorfastness before using a commercial upholstery cleaner or spot lifter. If ring formation occurs, clean the entire fabric or carpet.
After cleaning, use a paper towel to blot excess moisture.
Use a microfiber cloth on high gloss surfaces or vehicle displays. First, use a soft bristle brush to remove dirt that can scratch the surface.
Then gently clean by rubbing with a microfiber cloth. Never use window cleaners or solvents. Periodically hand wash the microfiber cloth separately, using mild soap. Do not
use bleach or fabric softener. Rinse thoroughly and air dry before
next use.
Use a soft microfiber cloth dampened with water to remove dust and loose dirt. For a more thorough cleaning, use a soft microfiber cloth dampened with a mild soap solution.
Do not use cleaners that increase gloss, especially on the instrument panel. Reflected glare can decrease visibility through the windshield under certain conditions.
If equipped, wash with warm water and mild detergent. Do not use chlorine bleach. Rinse with cold water, and then dry completely.
Keep belts clean and dry.
Use the following guidelines for proper floor mat usage.
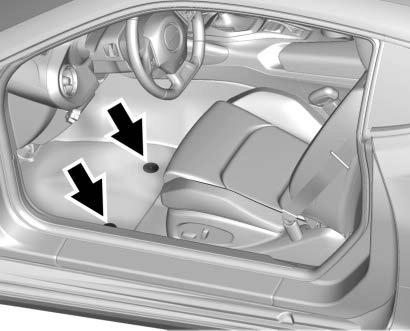
The driver side floor mat is held in place by two hook-type retainers.
Removing and Replacing the Driver Side Floor Mat
Download Manual