Ride Control Systems
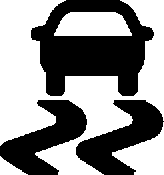
The vehicle has a Traction Control System (TCS) and StabiliTrak/ Electronic Stability Control (ESC). These systems help limit wheel slip and assist the driver in maintaining control, especially on slippery road conditions.
TCS activates if it senses that any of the drive wheels are spinning or beginning to lose traction. When this happens, TCS applies the brakes to the spinning wheels and reduces engine power to limit wheel spin.
StabiliTrak/ESC activates when the vehicle senses a difference between the intended path and the direction the vehicle is actually traveling.
StabiliTrak/ESC selectively applies braking pressure to any one of the
vehicle wheel brakes to assist the driver in keeping the vehicle on the intended path.
If cruise control is being used and traction control or StabiliTrak/ESC begins to limit wheel spin, cruise control will disengage. Cruise control may be turned back on when road conditions allow.
Both systems come on automatically when the vehicle is started and begins to move. The systems may be heard or felt while they are operating or while performing diagnostic checks. This is normal and does not mean there is a problem with the vehicle.
It is recommended to leave both systems on for normal driving conditions, but it may be necessary to turn TCS off if the vehicle gets stuck in sand, mud, ice, or snow.
See If the Vehicle Is Stuck 0 186 and “Turning the Systems Off and On” later in this section.
The indicator light for both systems is in the instrument cluster. This light will:
If either system fails to turn on or to activate, a message displays in the Driver Information Center (DIC), and
d comes on and stays on to
indicate that the system is inactive and is not assisting the driver in maintaining control. The vehicle is safe to drive, but driving should be adjusted accordingly.
If d comes on and stays on:
Drive the vehicle. If d comes on and stays on, the vehicle may need more time to diagnose the problem. If the condition persists, see your dealer.
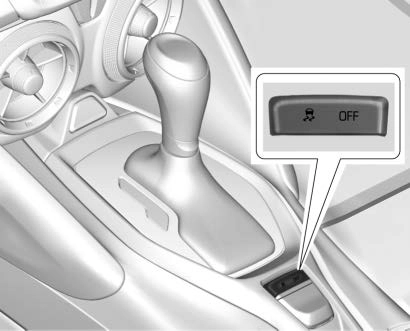
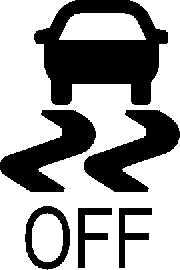
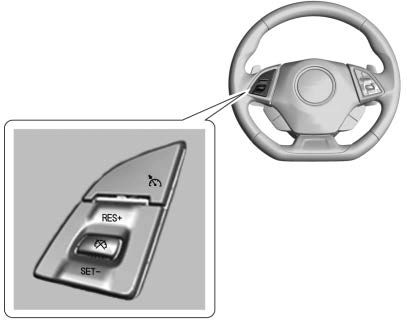
 To turn off only TCS, press and release . The traction off light i displays in the instrument cluster.
To turn TCS on again, press  . The traction off light i displayed in the instrument cluster will turn off.
If TCS is limiting wheel spin when  is pressed, the system will not turn off until the wheels stop spinning.
To turn off both TCS and StabiliTrak/ ESC, press and hold  until the
traction off light i and StabiliTrak/
ESC OFF light  come on and stay on in the instrument cluster.
To turn TCS and StabiliTrak/ESC on again, press  . The traction off
light i and StabiliTrak/ESC OFF
light  in the instrument cluster turn off.
Adding accessories can affect the vehicle performance. See Accessories and Modifications
0 236.
EDC improves vehicle stability by sensing if there is a difference in speed between the free rolling front wheels and the rear drive wheels that often occurs when the driver takes their foot off the accelerator pedal on slippery surfaces (snow, ice, etc.). When this is detected, EDC sends more torque to the rear wheels to make sure all four wheels are spinning at similar speeds, making the vehicle more stable.
Driver Mode Control attempts to add a sportier feel, provide a more comfortable ride, or assist in
different weather conditions or terrain. This system simultaneously changes the software calibration of various sub-systems. Depending on the option package, available features, and mode selected, the suspension, steering, and powertrain will change calibrations to achieve the desired mode characteristics. If the vehicle is equipped with Magnetic Ride Control, selecting the various Driver Modes adjusts the ride of the vehicle to enhance the ride performance for the road conditions and the selected mode.
While in the Sport and/or Track Modes, the vehicle monitors driving behavior and automatically enables Performance Shift Features in the automatic transmission when spirited driving is detected. These features maintain lower transmission gears to increase available engine braking and improve acceleration response. The vehicle will exit these features and return to normal operation after a short period when no spirited driving is detected.
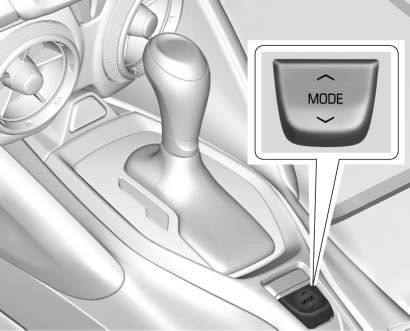
Driver Mode Control Switch
The Driver Mode Control has three or four modes: Tour, Sport, Snow/ Ice, and Track. Press y or z on the MODE switch on the center
console to make a mode selection. Pressing the switch will display a graphic of all available ride modes and change to the next mode. The Tour and Sport Modes will feel similar on a smooth road. Select a new setting whenever driving conditions change.
Use for normal city and highway driving to provide a smooth,
soft ride.
When selected, the Tour Mode indicator will display in the Driver Information Center (DIC).
Use where road conditions or personal preference demand a more controlled response.
When selected, the Sport Mode indicator will display in the DIC.
When in Sport Mode, the automatic transmission will shift automatically but hold a lower gear longer than it would in the Tour Mode based on braking, throttle input, and vehicle lateral acceleration. See Automatic Transmission 0 199. The steering will change to provide more precise control. If the vehicle has Magnetic Ride Control, the suspension will change to provide better cornering performance. If the vehicle is equipped with Active Exhaust, the exhaust valves will open earlier and
more often. Competitive Driving Mode can be accessed through this
mode by pressing  on the console twice.
This Competitive Driving Mode is only on SS, 1LE, and ZL1 vehicles. For example, a vehicle with a
V6 engine and automatic transmission will have Sport Mode, but will not be able to access Competitive Driving Mode.
Use when more traction is needed during slippery conditions. The automatic transmission will upshift normally when the vehicle is moving. The acceleration will adjust to help provide a smoother launch. The automatic transmission will also shift differently to assist in maintaining traction.
When selected, the Snow/Ice Mode indicator will display in the DIC.
This feature is not intended for use when the vehicle is stuck in sand, mud, ice, snow, or gravel. If the vehicle becomes stuck, see If the Vehicle Is Stuck 0 186.
Use when maximum vehicle handling is desired.
When selected, the Track Mode indicator will display in the DIC.
When in Track Mode, the automatic transmission and steering will function similar to Sport Mode. The accelerator pedal is adjusted to give maximum control during the highest level of spirited driving. The Magnetic Ride Control will be set to
the optimum level for vehicle responsiveness. If the vehicle is equipped with Active Exhaust, the exhaust valves will open.
Competitive Driving Mode can be accessed through this mode by
pressing  on the console twice.
There are attributes that vary by mode shown below. Not all vehicles have all features, depending on the vehicle options.
|
Modes: |
SNOW/ICE |
TOUR Default |
SPORT |
TRACK |
|
Throttle Progression |
Weather |
Normal |
Normal |
Track |
|
Transmission Shift Mode (Automatic Only) |
Normal |
Normal |
Sport |
Track |
|
Engine Sound Management (if equipped) |
Stealth not on all models |
Tour |
Sport |
Track |
|
Engine Sound Enhancement (turbo 4) |
Tour |
Tour |
Sport |
Track (Turbo 1LE) |
|
Steering |
Tour |
Tour |
Sport |
Track |
|
StabiliTrak/Electronic Stability Control (ESC) - Competitive Driving Mode (if equipped) |
N/A |
N/A |
Available |
Available |
|
Magnetic Ride Control (if equipped) |
Tour |
Tour |
Sport |
Track |
|
Launch Control (when in Competitive Driving Mode) |
N/A |
N/A |
Available |
Available |
Throttle Progression
Adjusts throttle sensitivity by selecting how quickly or slowly the throttle reacts to input.
Automatic Transmission Shift Mode (if equipped)
Adjusts to either a smoother or firmer shift.
Engine Sound Management (if equipped)
Changes when variable exhaust valves open or close.
Engine Sound Enhancement (turbo 4)
Allows the ability to turn Engine Sound Enhancement off.
Steering
Adjusts from a lighter steering feel in Tour Mode to reduced assist for more steering feel.
StabiliTrak/ESC - Competitive Driving Mode (if equipped)
Available in Sport and Track Modes.
Magnetic Ride Control (if equipped)
Adjusts the shock damping firmness based on driving conditions to improve comfort and performance.
Launch Control (when in Competitive Driving Mode)
Available only in Sport and Track Modes for maximum “off-the-line” acceleration when in Competitive Driving Mode.
For more information, see Track Events and Competitive Driving 0 173.
Models Only)
Competitive Driving Mode and Launch Control are systems designed to allow increased performance while accelerating and/ or cornering. This is accomplished by regulating and optimizing the engine, brakes, and suspension performance. These modes are for use at a closed course race track and are not intended for use on public roads. They will not compensate for a driver’s inexperience or lack of familiarity with the race track. Drivers who prefer to allow the system to have more control of the engine, brakes, and suspension are advised to turn the normal TCS and StabiliTrak/ Electronic Stability Control (ESC) systems on.
Competitive Driving Mode allows full engine power while the StabiliTrak/ ESC system helps maintain directional control of the vehicle by selective brake application. In this mode, TCS is off and Launch Control is available. Adjust your driving style to account for the available engine power. See “Launch Control” later in this section.

These lights are on when the vehicle is in the Competitive Driving Mode.

This optional handling mode can be selected by pressing the TCS/ StabiliTrak/ESC button on the console two times. The appropriate message displays in the Driver Information Center (DIC).
When the TCS/StabiliTrak/ESC button is pressed again, the TCS and StabiliTrak/ESC systems are on. The appropriate message displays briefly in the DIC.
If the vehicle has the LT1 10 speed transmission, see Track Events and Competitive Driving 0 173 for custom launch control information.
A Launch Control feature is available, within Competitive Driving Mode, to allow the driver to achieve high levels of vehicle acceleration in a straight line. Launch Control is a form of traction control that manages tire spin while launching the vehicle. This feature is intended for use during closed course race events where consistent zero to sixty and quarter mile times are desirable.
Launch Control is only available when the following criteria are met:
Manual Transmissions
1 (First) gear.
The Launch Control feature will initially limit engine speed as the driver rapidly applies the accelerator pedal to wide open throttle. Allow the engine rpm to stabilize.
A smooth, quick release of the clutch, while maintaining the fully pressed accelerator pedal, will manage wheel slip. Complete shifts are described in Manual Transmission 0 203.
Automatic Transmissions
After the vehicle is launched, the system continues in Competitive Driving Mode.
Competitive Driving Mode and Launch Control are systems designed for a closed course race track and not intended for use on public roads. The systems are not intended to compensate for lack of driver experience or familiarity with the race track.
Vehicles with a limited-slip rear axle can give more traction on snow, mud, ice, sand, or gravel. When traction is low, this feature allows the drive wheel with the most traction to move the vehicle. The limited-slip rear axle also gives the driver enhanced control when cornering hard or completing a maneuver, such as a lane change. For vehicles with limited-slip differential, driven under severe conditions, the rear axle fluid should be changed.
See Competitive Driving Mode (SS, ZL1 and 1LE Models Only) 0 215 and Maintenance Schedule 0 320.
When using cruise control, the vehicle can maintain a speed of about 40 km/h (25 mph) or more without keeping your foot on the accelerator. Cruise control does not work at speeds below 40 km/h (25 mph).
If equipped with a manual transmission, the cruise control will remain active when the gears are
shifted. The cruise is disengaged if the clutch is pressed for several seconds.
If the StabiliTrak/Electronic Stability Control (ESC) system begins to limit wheel spin while using cruise control, the cruise control automatically disengages. See Traction Control/Electronic Stability Control 0 209. When road conditions allow you to safely use it again, cruise control can be turned back on.
Cruise control will disengage if either TCS or StabiliTrak/ESC is turned off.
Cruise control is not available when using Competitive Driving Mode,
if equipped. See Competitive Driving Mode (SS, ZL1 and 1LE Models Only) 0 215.
If the brakes are applied, cruise control disengages.
Cruise Control with Cancel Button
Cruise Control without Cancel Button
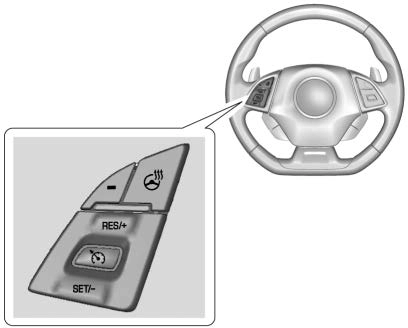
1 : Press to turn the system on and off. A white indicator appears in the instrument cluster when cruise is turned on.
* : If equipped, press to disengage cruise control without erasing the set speed from memory.
RES+ : If there is a set speed in memory, press briefly to resume to that speed or hold upward to accelerate. If cruise control is already active, use to increase vehicle speed.
SET− : Press briefly to set the speed and activate cruise control. If cruise control is already active, use to decrease speed.
Setting Cruise Control
If 1 is on when not in use, SET− or RES+ could get bumped and go into cruise when not desired. Keep 1 off when cruise control is not
being used.
The cruise control indicator on the instrument cluster turns green after cruise control has been set to the desired speed. See Instrument Cluster 0 115.
Resuming a Set Speed
If the cruise control is set at a desired speed and then the brakes are applied or * is pressed,
if equipped, the cruise control is disengaged without erasing the set speed from memory.
Once the vehicle speed reaches about 40 km/h (25 mph) or more, briefly press RES+. The vehicle returns to the previous set speed.
Increasing Speed While Using Cruise Control
If the cruise control system is already activated:
The speedometer reading can be displayed in either English or metric units. See “Options” under Instrument Cluster 0 115. The increment value used depends on the units displayed.
Reducing Speed While Using Cruise Control
If the cruise control system is already activated:
The speedometer reading can be displayed in either English or metric units. See “Options” under Instrument Cluster 0 115. The increment value used depends on the units displayed.
Passing Another Vehicle While Using Cruise Control
Use the accelerator pedal to increase the vehicle speed. When you take your foot off the pedal, the vehicle slows down to the previously set cruise control speed. While pressing the accelerator pedal or shortly following the release to
override cruise control, briefly pressing SET– will result in cruise control set to the current vehicle speed.
Using Cruise Control on Hills
How well the cruise control works on hills depends upon the vehicle speed, load, and the steepness of the hills. When going up steep hills, you might have to step on the accelerator pedal to maintain the vehicle speed. When going downhill, you might have to brake or shift to a lower gear to keep your speed down. If the brake pedal is applied, cruise control will disengage.
Ending Cruise Control
There are five ways to end cruise control:
Erasing Speed Memory
The cruise control set speed is erased from memory if 1 is pressed or if the vehicle is turned off.
This vehicle may have features that work together to help avoid crashes or reduce crash damage while driving, backing, and parking. Read this entire section before using these systems.
Audible Alert
Some driver assistance features alert the driver of obstacles by beeping. To change the volume of the warning chime, see “Comfort and Convenience” under Vehicle Personalization 0 141.
Cleaning
Depending on vehicle options, keep these areas of the vehicle clean to ensure the best driver assistance feature performance. Driver Information Center (DIC) messages may display when the systems are unavailable or blocked.
Assistance Systems for Parking or Backing
If equipped, the Rear Vision Camera (RVC), Rear Park Assist (RPA), and Rear Cross Traffic Alert (RCTA) may help the driver park or avoid objects. Always check around the vehicle when parking or backing.
Rear Vision Camera (RVC)
When the vehicle is shifted into R (Reverse), the RVC displays an image of the area behind the vehicle in the infotainment display. The previous screen displays when the vehicle is shifted out of R (Reverse)
after a short delay. To return to the previous screen sooner, press any button on the infotainment system, shift into P (Park), or reach a vehicle speed of approximately
12 km/h (8 mph).
Displayed images may be farther or closer than they appear. The area displayed is limited and objects that are close to either corner of the bumper or under the bumper do not display.
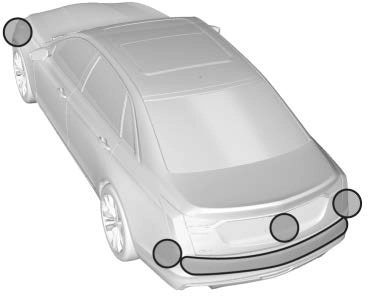
A warning triangle may display to show that Rear Park Assist (RPA) has detected an object. This triangle changes from amber to red and increases in size the closer the object.
Park Assist
With RPA, as the vehicle backs up at speeds of less than 8 km/h (5 mph), the sensors on the rear bumper may detect objects up to
Blocked sensors will not detect objects and can also cause false detections. Keep the sensors clean of mud, dirt, snow, ice, and slush; and clean sensors after a car wash in freezing temperatures.
The instrument cluster may have a Park Assist display with bars that show “distance to object” and object location information for RPA. As the object gets closer, more bars light up and the bars change color from yellow to amber to red.
When an object is first detected in the rear, one beep will be heard from the rear. When an object is very close (<0.6 m (2 ft) in the vehicle rear), five beeps will sound from the rear.
Rear Cross Traffic Alert (RCTA)
If equipped, RCTA displays a red warning triangle with a left or right pointing arrow to warn of traffic coming from the left or right. This system detects objects coming from
up to 20 m (65 ft) from the left or right side of the vehicle. When an object is detected, three beeps sound from the left or right, depending on the direction of the detected vehicle.
See Radio Frequency Statement
0 347.
RPA and RCTA can be turned on or off. See “Collision/Detection Systems” under Vehicle Personalization 0 141.
To turn the rear Park Assist symbols or guidance lines on or off, see “Rear Camera” under Vehicle Personalization 0 141.
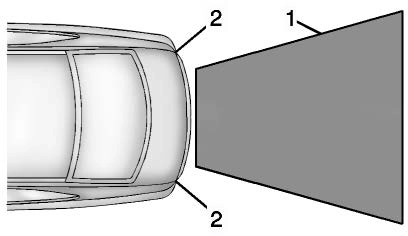
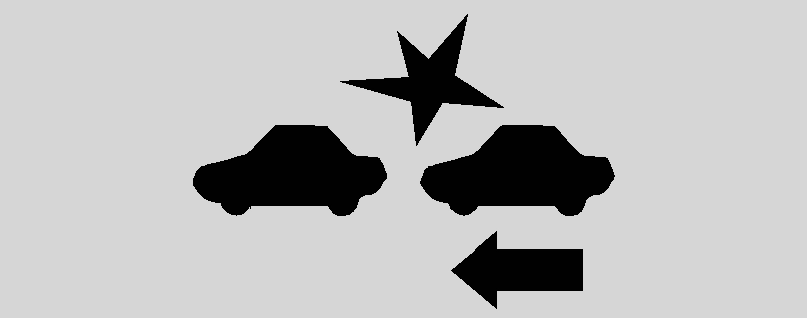
If equipped, the FCA system may help to avoid or reduce the harm caused by front-end crashes. When approaching a vehicle ahead too quickly, FCA provides a red flashing alert on the windshield and rapidly beeps or pulses the driver seat.
FCA also lights an amber visual alert if following another vehicle much too closely.
FCA detects vehicles within a distance of approximately 60 m (197 ft) and operates at speeds above 8 km/h (5 mph).
FCA can be disabled with the FCA steering wheel control.
FCA warnings will not occur unless the FCA system detects a vehicle ahead. When a vehicle is detected, the vehicle ahead indicator will display green. Vehicles may not be detected on curves, highway exit ramps, or hills, due to poor visibility; or if a vehicle ahead is partially blocked by pedestrians or other objects. FCA will not detect another vehicle ahead until it is completely in the driving lane.
 Tailgating Alert

Collision Alert
With Head-Up Display
Without Head-Up Display
When your vehicle approaches another detected vehicle too rapidly, the red FCA display will flash on the windshield. Also, eight rapid
high-pitched beeps will sound from the front, or both sides of the Safety Alert Seat will pulse five times.
When this Collision Alert occurs, the brake system may prepare for driver braking to occur more rapidly which can cause a brief, mild deceleration. Continue to apply the brake pedal as needed. Cruise control may be disengaged when the Collision Alert occurs.
The vehicle ahead indicator will display amber when you are following a vehicle ahead much too closely.
The Collision Alert control is on the steering wheel. Press [ to set the FCA timing to Far, Medium, Near, or on some vehicles, Off. The first button press shows the current
setting on the DIC. Additional button presses will change this setting. The chosen setting will remain until it is changed and will affect the timing of both the Collision Alert and the Tailgating Alert features. The timing of both alerts will vary based on vehicle speed. The faster the vehicle speed, the farther away the alert will occur. Consider traffic and weather conditions when selecting
the alert timing. The range of selectable alert timings may not be appropriate for all drivers and driving conditions.
FCA may provide unnecessary alerts for turning vehicles, vehicles in other lanes, objects that are not vehicles, or shadows. These alerts are normal operation and the vehicle does not need service.
If the FCA system does not seem to operate properly, this may correct the issue:
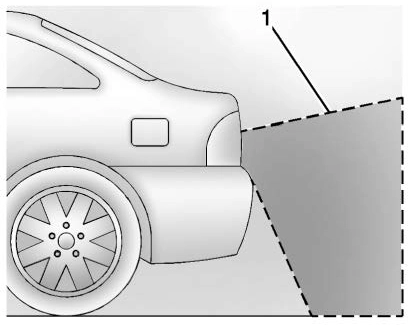
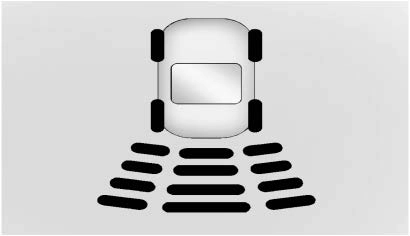
If equipped, the SBZA system is a lane-changing aid that assists drivers with avoiding crashes that occur with moving vehicles in the side blind zone (or spot) areas.
When the vehicle is in a forward gear, the left or right side mirror display will light up if a moving vehicle is detected in that blind zone. If the turn signal is activated and a vehicle is also detected on the same side, the display will flash as an extra warning not to change lanes. Since this system is part of the Lane Change Alert (LCA) system, read the entire LCA section before using this feature.
If equipped, the LCA system is a lane-changing aid that assists drivers with avoiding lane change crashes that occur with moving vehicles in the side blind zone (or spot) areas or with vehicles rapidly approaching these areas from
behind. The LCA warning display will light up in the corresponding outside side mirror and will flash if the turn signal is on.
LCA Detection Zones
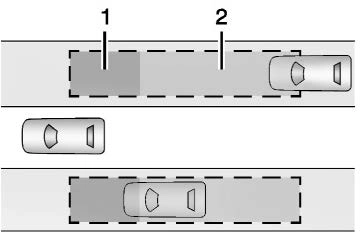
The LCA sensor covers a zone of approximately one lane over from both sides of the vehicle, or 3.5 m (11 ft). The height of the zone is approximately between 0.5 m (1.5 ft) and 2 m (6 ft) off the ground. The
The LCA symbol lights up in the side mirrors when the system detects a moving vehicle in the next lane over that is in the side blind zone or rapidly approaching that zone from behind. A lit LCA symbol indicates it may be unsafe to change lanes. Before making a lane change, check the LCA display, check mirrors, glance over your shoulder, and use the turn signals.


Left Side Mirror Right Side Mirror
or rapidly approaching that zone. If the turn signal is activated in the same direction as a detected
vehicle, this display will flash as an extra warning not to change lanes.
LCA can be disabled through vehicle personalization. See “Collision/Detection Systems” under Vehicle Personalization 0 141.
If LCA is disabled by the driver, the LCA mirror displays will not light up.
The LCA system requires some driving for the system to calibrate to maximum performance. This calibration may occur more quickly if the vehicle is driving on a straight
Side Blind Zone Alert (SBZA) warning area starts at approximately
Display
Display
highway road with traffic and
roadside objects (e.g., guardrails,
the middle of the vehicle and goes back 5 m (16 ft). Drivers are also warned of vehicles rapidly approaching from up to 25 m (82 ft) behind the vehicle.
When the vehicle is started, both
outside mirror LCA displays will briefly come on to indicate the system is operating. When the vehicle is in a forward gear, the left or right side mirror display will light up if a moving vehicle is detected in the next lane over in that blind zone
barriers). During a trip, the LCA
system is not operational until the vehicle first reaches a speed of 24 km/h (15 mph).
LCA displays may not come on when passing a vehicle quickly or for a stopped vehicle. LCA may alert to objects attached to the vehicle,
such as a bicycle or object extending out to either side of the vehicle. Attached objects may also interfere with the detection of vehicles. This is normal system operation; the vehicle does not need service.
LCA may not always alert the driver to vehicles in the next lane over, especially in wet conditions or when driving on sharp curves. The system does not need to be serviced. The system may light up due to guardrails, signs, trees, shrubs, and other non-moving objects. This is normal system operation; the vehicle does not need service.
LCA may not operate when the LCA sensors in the left or right corners of the rear bumper are covered with mud, dirt, snow, ice, or slush, or in heavy rainstorms. For cleaning
instructions, see "Washing the Vehicle" under Exterior Care 0 308. If the DIC still displays the system unavailable message after cleaning both sides of the vehicle toward the rear corners of the vehicle, see your dealer.
If the LCA displays do not light up when moving vehicles are in the side blind zone or rapidly approaching this zone and the system is clean, the system may need service. Take the vehicle to your dealer.
See Radio Frequency Statement
0 347.
Download Manual