Fixing - If equipped *1 or Changing a Tire
If a tire goes flat while driving, grasp the steering wheel firmly and brake gradually to reduce speed. Then stop in a safe place. Replace the flat tire with the compact spare tire. Go to a dealer as soon as possible to have the full-size tire repaired or replaced.
- Park the vehicle on firm, level, non-slippery surface and set the parking brake.
- Shift to Park (P).
- Turn on the hazard warning lights and set the power mode to VEHICLE OFF.
- Getting Ready to Change the Tire(*1) / Temporarily Repair the Flat Tire (*1)
- Setting Up the Jack
- Replacing the Flat Tire
- Storing the Flat Tire
■Getting Ready to Change the Tire - If equipped *1 / Temporarily Repair the Flat Tire - If equipped *1
If the tire has a large cut or is otherwise severely damaged, you will need to have the vehicle towed. If the tire only has a small puncture, from a nail for instance (do not remove the nail), you can use the temporary tire repair kit so that you can drive to the nearest service station for a more permanent repair.
- Park the vehicle on a firm, level and non-slippery surface, and apply the parking brake.
- Change the shift position to Park (P).
- Turn the hazard warning lights and set the power mode to VEHICLE OFF (LOCK).
- Push the rear edge of the handle on the floor lid and open the lid.
- Take the kit out of the case.
- Place the kit face up, on flat ground near the flat tire, and away from traffic. Do not place the kit on its side.
Injecting Sealant and Air
- Remove the valve cap from the tire valve stem.
- Remove the sealant/air hose from the packaging.
- Attach the sealant/air hose onto the tire valve stem. Screw it until it is tight.
- Plug in the compressor to the accessory power socket.
- Start the engine. Keep the engine running while injecting sealant and air.
- Turn the selector switch to REPAIR (for U.S. models) or SEALANT/AIR or PRODUIT ANTIFUITE/AIR (for Canadian models).
- Press the inflator switch to turn on the compressor
- Models with 215/45R17 87V tires: After the air pressure reaches front: 35 psi (240 kPa)/rear: 33 psi (230 kPa), turn off the kit.
- Models with225/40R18 92V tires: After the air pressure reaches front: 33 psi (230 kPa) rear: 32 psi (220 kPa) or more , turn off the kit. Continue driving for another 10 minutes or until you reach the nearest service station, whichever is sooner. Do not exceed 50 mph (80km/h). If you have not reached a service station after 10 minutes, stop in a safe place and check the tire pressure.
Models with P215/45R17 87V tires: Greater than 25 psi (175 kPa), but less than front: 35 psi (240 kPa)/rear: 33psi (230 kPa), turn off the kit.
Models with 225/40R18 92V tires: Greater than 25 psi (175 kPa), but less than front: 35 psi (240 kPa)/rear: 32psi (220 kPa), turn off the kit.
- Unplug the power plug from the accessory power socket.
- Unscrew the sealant/air hose from the tire valve stem. Reinstall the valve cap.
- Press the pressure relief button until the gauge returns to (0 kPa).
- Apply the repair notification label to the flat surface of the wheel.
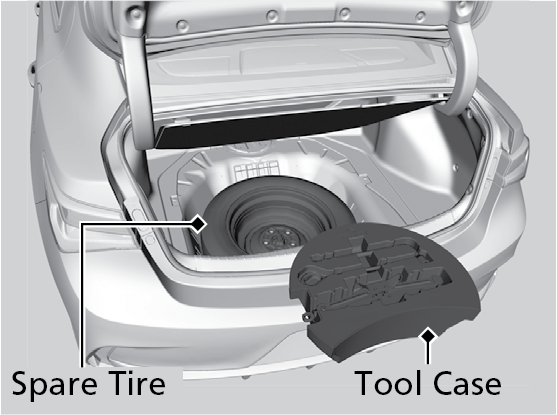
Getting Ready to Replace the Flat Tire
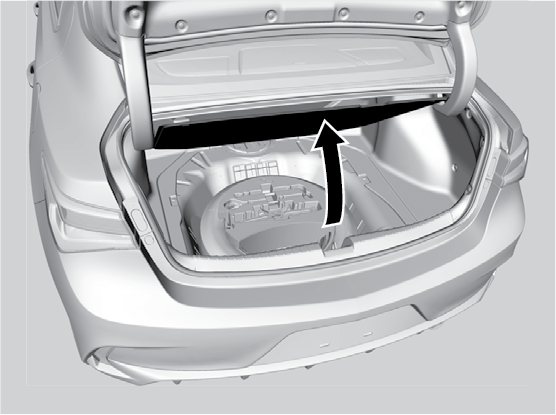
- Open the trunk floor lid.
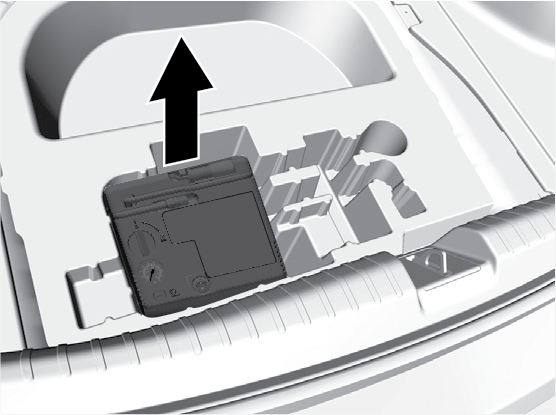
- Take the tool case out. Take the jack and wheel nut wrench out of the tool case.
- Unscrew the wing bolt, then remove the spacer cone. Then, remove the spare tire.
-
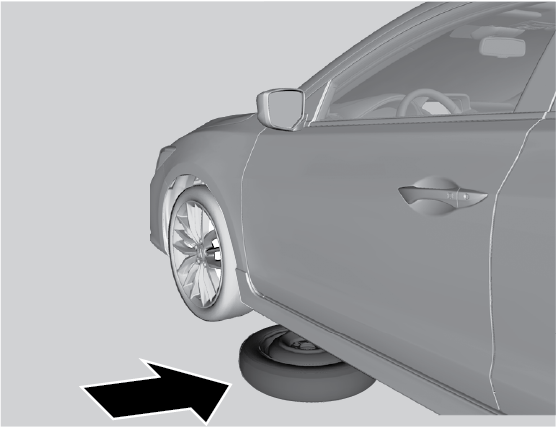
Place the spare tire (wheel side up) under the vehicle body, near the tire that needs to be replaced.
-
Loosen each wheel nut about one turn using the wheel nut wrench.

■Setting Up the Jack
- Place the jack under the jacking point closest to the tire to be changed.

- Turn the end bracket clockwise (as shown in the image) until the top of the jack contacts the jacking point. Make sure that the jacking point tab is resting in the jack notch.

- Raise the vehicle, using the jack handle bar and the jack handle, until the tire is off the ground.

The vehicle can easily roll off the jack, seriously injuring anyone underneath.
Follow the directions for changing a tire exactly, and no person should place any portion of their body under a vehicle that is supported by a jack.
The following instructions must be followed to use the jack safely:
- Do not use the jack with people or luggage in the vehicle.
- Use the jack provided in your vehicle. Other jacks may not support the weight (load) or fit the jacking point.
- Do not use while the engine is running.
- Use only where the ground is firm and level.
- Use only at the jacking points.
- Do not get in the vehicle while using the jack.
- Do not put anything on top of or underneath the jack.
■Replacing the Flat Tire
- Remove the wheel nuts and flat tire.

- Mount the compact spare tire. Replace the wheel nuts and lightly tighten them.

- Lower the vehicle and remove the jack. Tighten the wheel nuts in the order indicated in the image. Go around, tightening the nuts, two to three times in this order. Do not overtighten the wheel nuts.
■Storing the Flat Tire
- Remove the center cap.

- Place the flat tire face down in the spare tire well.
- Remove the spacer cone from the wing bolt, flip it over, and insert it back on the bolt. Secure the flat tire with the wing bolt.

Loose items can fly around the interior in a crash and can seriously injure the occupants.
Store the wheel, jack, and tools securely before driving.
Download Manual