Other interior features
|
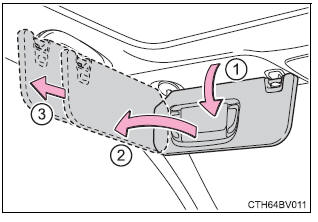
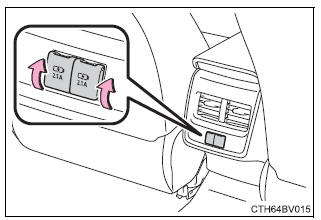
Other interior features Sun visors
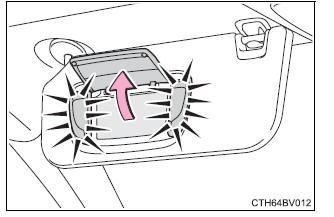
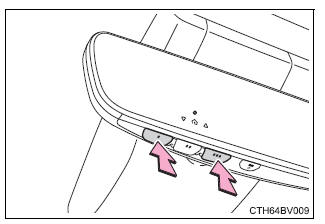
Vanity mirrors Open the cover to use. The light turns on when the cover is opened.
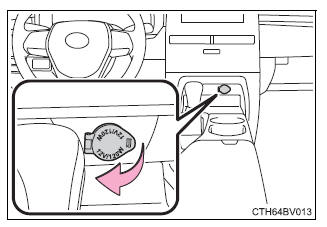
If the vanity lights remain on for 20 minutes while the engine is off, the lights will turn off automatically. Power outlet Please use as a power supply for electronic goods that use less than 12 VDC/10 A (power consumption of 120 W). Open the lid.
The power outlet can be used when the engine switch is in ACCESSORY or IGNITION ON mode.
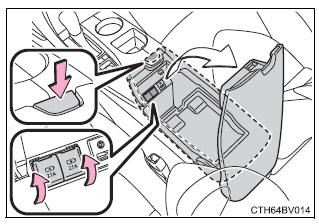
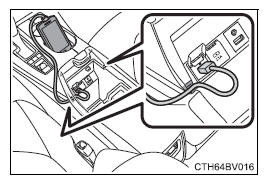
USB charging ports The USB charging ports are used to supply 2.1 A of electricity at 5 V to external devices (power consumption of 10.5 W). The USB charging ports are for charging only. They are not designed for data transfer or other purposes. Depending on the external device, it may not charge properly. Refer to the manual included with the device before using a USB charging port. ■ Using the USB charging ports Front
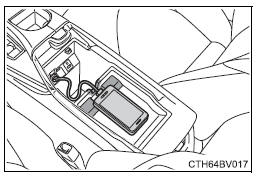
Open the console box lid and open the lid. Rear
Open the lid. ■The USB charging ports can be used when The engine switch is in ACCESSORY or IGNITION ON mode. ■Situations in which the USB charging ports may not operate correctly
■About connected external devices Depending on the connected external device, charging may occasionally be suspended and then start again. This is not a malfunction. ■Cable pass through
To prevent damage to the charging port of an electronic device when it is placed on the tray while it is being charged, place the connector side of the device on the raised portions near the cutout.
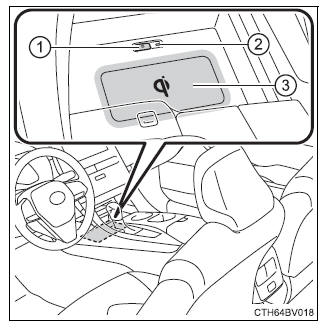
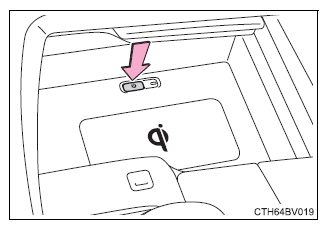
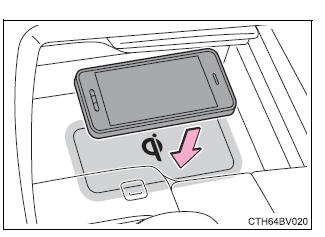
Wireless charger (if equipped) A portable device, such as a smartphone or mobile battery, can be charged by just placing it on the charging area, provided the device is compatible with the Qi wireless charging standard created by the Wireless Power Consortium. The wireless charger cannot be used with a portable device that is larger than the charging area. Additionally, depending on the portable device, the wireless charger may not operate properly. Refer to the operation manual of the portable device. ■ The "Qi" symbol The "Qi" symbol is a trademark of the Wireless Power Consortium.
■ Name for all parts
■ Using the wireless charger 1. Push the open tray forward until it locks. 2. Press the power supply switch of the wireless charger. Pressing the switch again turns the wireless charger off. When turned on, the operation indicator light (green) comes on. When the engine switch is turned off, the on/off state of the wireless charger will be memorized.
3. Place a portable device on the charging area with its charging surface facing down. While charging, the operation indicator light (orange) will be illuminated. If charging does not begin, move the portable device as close to the center of the charging area as possible. When charging is complete, the operation indicator light (green) will illuminate.
■ Operation indicator light status
*: Depending on the portable device, the operation indicator light may stay illuminated (orange) after charging has completed.
■The wireless charger can be operated when The engine switch is in ACCESSORY or IGNITION ON mode. ■Portable devices that can be charged
■If a cover or accessory is attached to the portable device Do not charge a portable device if a cover or accessory which is not Qi compatible is attached. Depending on the type of cover and/or accessory attached, it may not be possible to charge the portable device. If the portable device is placed on the charging area and does not charge, remove the cover and/or accessories. ■If interference is heard in AM radio broadcasts while charging Turn off the wireless charger and check if the noise is reduced. If noise is reduced, press and hold the power supply switch of the wireless charger for 2 seconds. The frequency of the wireless charger is changed and noise may be reduced. When the frequency is changed, the operation indicator light will blink (orange) 2 times. ■Charging precautions
■Sound generated during operation When the power supply switch is turned on or while a portable device is being identified, operation sounds may be heard. This is not a malfunction.
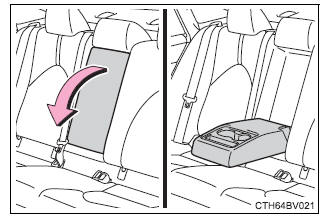
Armrest Fold down the armrest for use.
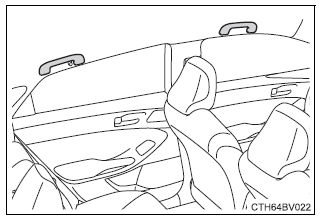
Assist grips An assist grip installed on the ceiling can be used to support your body while sitting on the seat.
Coat hooks Coat hooks are provided on the rear assist grips.
|

Garage door opener
The garage door opener can be programmed to operate garage doors, gates, entry doors, door locks, home lighting systems, security systems, and other devices.
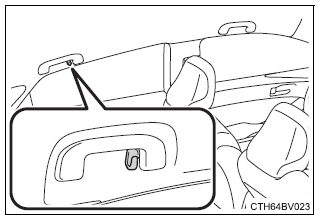
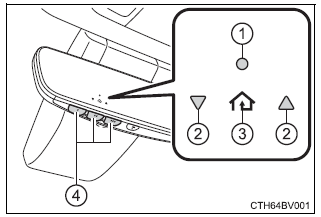
HomeLink
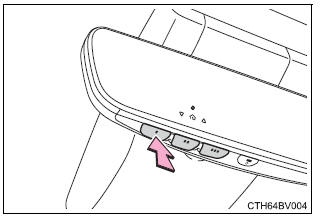
The HomeLink wireless control system in your vehicle has 3 buttons which can be programmed to operate 3 different devices. Refer to the programming methods on the following pages to determine the method which is appropriate for the device.
- HomeLink indicator light
- Garage door operation indicators
- HomeLink icon
Illuminates while HomeLink is operating. - Buttons
■ Before programming the HomeLink
- During programming, it is possible that garage doors, gates, or other devices may operate. For this reason, make sure that people and objects are clear of the garage door or other devices to prevent injury or other potential harm.
- It is recommended that a new battery be placed in the remote control transmitter for more accurate programming.
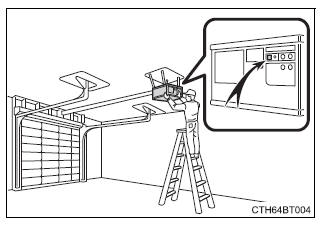
- Garage door opener motors manufactured after 1995 may be equipped with rolling code protection. If this is the case, you may need a stepladder or other sturdy, safe device to reach the "Learn" or "Smart" button on the garage door opener motor.
■ Programming the HomeLink Steps 1 through must 3 be performed within 60 seconds, otherwise the indicator light will stop flashing and programming will not be able to be completed.
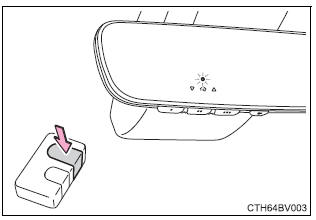
1. Press and release the HomeLink button you want to program and check that the HomeLink indicator light flashes orange.
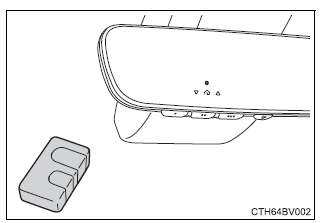
2. Point the remote control transmitter for the device at the rear view mirror, 1 to 3 in.
(25 to 75 mm) from the HomeLink buttons.
Keep the HomeLink indicator light in view while programming.
3. Program a device.
Programming a device other than an entry gate (for U.S.A. owners)
Press and hold the remote control transmitter button until the HomeLink indicator light changes from slowly flashing orange to rapidly flashing green (rolling code) or continuously lit green (fixed code), then release the button.
Programming an entry gate (for U.S.A. owners)/Programming a device in the Canadian market
Press and release the remote control transmitter button at 2 second intervals, repeatedly, until the HomeLink indicator light changes from slowly flashing orange to rapidly flashing green (rolling code) or continuously lit green (fixed code).
4. Test the HomeLink operation by pressing the newly programmed button and observing the indicator light:
- Indicator light illuminates: Programming of a fixed code device has completed. The garage door or other device should operate when a HomeLink button is pressed and released.
- Indicator light flashes rapidly: The garage door opener motor or other device is equipped with a rolling code. To complete programming, firmly press and hold the HomeLink button for 2 seconds then release it.
- If the garage door or other device does not operate, proceed to "Programming a rolling code system".
5. Repeat the steps above to program another device for any of the remaining HomeLink buttons.
■ Programming a rolling code system 2 or more people may be necessary to complete rolling code programming.
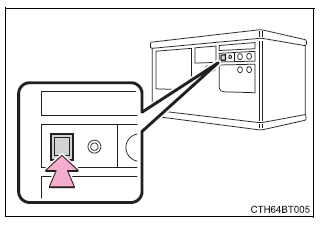
1. Locate the "Learn" or "Smart" button on the garage door opener motor in the garage.
This button can usually be found where the hanging antenna wire is attached to the unit. The name and color of the button may vary by manufacturer.
Refer to the Owner's manual supplied with the garage door opener motor for details.
2. Press and release the "Learn" or "Smart" button.
Perform 2 within 30 seconds after performing 2.
3. Press and hold the desired HomeLink button (inside the vehicle) for 2 seconds and release it. Repeat this sequence (press/hold/ release) up to 3 times to complete programming.
If the garage door opener motor operates when the HomeLink button is pressed, the garage door opener motor recognizes the HomeLink signal.
■ Enabling 2-way communication with a garage door (only available for compatible devices) When enabled, 2-way communication allows you to check the status of the opening and closing of a garage door through indicators in your vehicle.
2-way communication is only available if the garage door opener motor used is a compatible device. (To check device compatibility, refer to www.HomeLink.com.)
1. Within 5 seconds after programming the garage door opener has been completed, if the garage door opener motor is trained to HomeLink, both garage door operation indicators will flash rapidly green and the light on the garage door opener motor will blink twice, indicating that 2-way communication is enabled.
If the indicators do not flash, perform 2 and 3 within the first 10 presses of the HomeLink button after programming has been completed.
2. Press a programmed HomeLink button to operate a garage door.
3. Within 1 minute of pressing the HomeLink button, after the garage door operation has stopped, press the "Learn" or "Smart" button on the garage door opener motor. Within 5 seconds of the establishment of 2-way communication with the garage door opener, both garage door operation indicators in the vehicle will flash rapidly green and the light on the garage door opener motor will blink twice, indicating that 2-way communication is enabled.
■ Reprogramming a single HomeLink button When the following procedure is performed, buttons which already have devices registered to them can be overwritten:
1. With one hand, press and hold the desired HomeLink button.
2. When the HomeLink indicator starts flashing orange, continue to hold the HomeLink button and perform "Programming the HomeLink" 1 (it takes 20 seconds for the HomeLink indicator to start flashing).
Operating the HomeLink
Press the appropriate HomeLink button. The HomeLink indicator light should turn on.
Garage door operation indicators
The status of the opening and closing of a garage door is shown by the indicators.
- Opening
- Closing
This function is only available if the garage door opener motor used is a compatible device. (To check device compatibility, refer to www.HomeLink.com.)
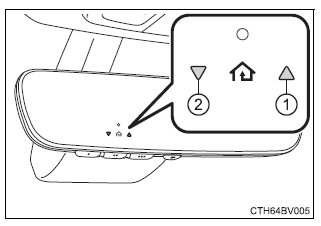
| Color | Status |
| Orange (flashing) | Currently opening/closing |
| Green | Opening/closing has completed |
| Red (flashing) | Feedback signals cannot be received |
The indicators can operate within approximately 820 ft. (250 m) of the garage door. However, if there are obstructions between the garage door and the vehicle, such as houses and trees, feedback signals from the garage door may not be received. To recall the previous door operation status, press and release either HomeLink buttons  and
and  or
or  and
and  simultaneously.
The last recorded status will be displayed for 3 seconds.
Erasing the entire HomeLink memory (all three codes)
Press and hold the 2 outside buttons for 10 seconds until the HomeLink indicator light changes from continuously lit orange to rapidly flashing green.
If you sell your vehicle, be sure to erase the programs stored in the HomeLink memory.
■Codes stored in the HomeLink memory
- The registered codes are not erased even if the battery cable is disconnected.
- If learning failed when registering a different code to a HomeLink button that already has a code registered to it, the already registered code will not be erased.
■Before programming
- Install a new battery in the transmitter.
- The battery side of the transmitter must be pointed away from the Home- Link.
■When support is necessary
Visit on the web at www.homelink.com/toyota or call 1-800-355-3515.
| WARNING
■When programming a garage door or other remote control device The garage door or other device may operate, so ensure people and objects are out of danger to prevent potential harm. ■Conforming to federal safety standards Do not use the HomeLink compatible transceiver with any garage door opener or device that lacks safety stop and reverse features as required by federal safety standards. This includes any garage door that cannot detect an interfering object. A door or device without these features increases the risk of death or serious injury. ■When operating or programming HomeLink Never allow a child to operate or play with the HomeLink buttons. |
Safety Connect
Safety Connect is a subscription-based telematics service that uses Global Positioning System (GPS) data and embedded cellular technology to provide safety and security features to subscribers.
Safety Connect is supported by Toyota's designated response center, which operates 24 hours per day, 7 days per week.
Safety Connect service is available by subscription on select, telematics hardware-equipped vehicles.
By using the Safety Connect service, you are agreeing to be bound by the Telematics Subscription Service Agreement and its Terms and Conditions, as in effect and amended from time to time, a current copy of which is available at Toyota.com in the United States, Toyotapr.com in Puerto Rico and Toyota.ca in Canada. All use of the Safety Connect service is subject to such then-applicable Terms and Conditions.
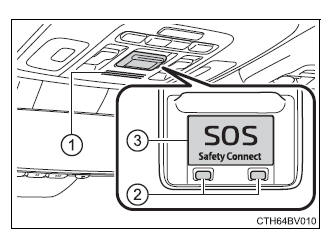
■ System components
- Microphone
- LED light indicators
- "SOS" button
■ Services
Subscribers have the following Safety Connect services available:
- Automatic Collision Notification* Helps drivers receive necessary response from emergency service providers.
*: U.S. Patent No. 7,508,298 B2
- Stolen Vehicle Location
Helps drivers in the event of vehicle theft. - Emergency Assistance Button ("SOS")
Connects drivers to response-center support. - Enhanced Roadside Assistance
Provides drivers various on-road assistance.
■ Subscription
After you have signed the Telematics Subscription Service Agreement and are enrolled, you can begin receiving services.
A variety of subscription terms are available for purchase. Contact your Toyota dealer, call the following appropriate Safety Connect response center or push the "SOS" button in your vehicle for further subscription details.
- The United States 1-855-405-6500
- Canada 1-888-869-6828
- Puerto Rico 1-877-855-8377
■Safety Connect Services Information
- Phone calls using the vehicle's Bluetooth technology will not be possible during Safety Connect.
- Safety Connect is available beginning Fall 2009 on select Toyota models (in the contiguous United States only). Contact with the Safety Connect response center is dependent upon the telematics device being in operative condition, cellular connection availability, and GPS satellite signal reception, which can limit the ability to reach the response center or receive emergency service support. Enrollment and Telematics Subscription Service Agreement are required. A variety of subscription terms are available; charges vary by subscription term selected and location.
- Automatic Collision Notification, Emergency Assistance and Stolen Vehicle Location are available in the United States, including Hawaii and Alaska, Puerto Rico and Canada, and Enhanced Roadside Assistance are available in the United States, Puerto Rico and Canada.
- Automatic Collision Notification, Emergency Assistance, Stolen Vehicle and Enhanced Road Assistance are not available in the U.S. Virgin Islands.
For vehicles first sold in the U.S. Virgin Islands, no Safety Connect services are available in or outside the U.S. Virgin Islands.
- Safety Connect services are not subject to section 255 of the Telecommunications Act and the device is not TTY compatible.
■Languages The Safety Connect response center will offer support in multiple languages.
The Safety Connect system will offer voice prompts in English, Spanish, and French. Please indicate your language of choice when enrolling.
■When contacting the response center You may be unable to contact the response center if the network is busy.
Safety Connect LED light Indicators
When the engine switch is turned to IGNITION ON mode, the red indicator light comes on for 2 seconds then turns off. Afterward, the green indicator light comes on, indicating that the service is active.
The following indicator light patterns indicate specific system usage conditions:
- Green indicator light on = Active service
- Green indicator light flashing = Safety Connect call in process
- Red indicator light (except at vehicle start-up) = System malfunction (contact your Toyota dealer)
- No indicator light (off) = Safety Connect service not active
Safety Connect services
■ Automatic Collision Notification In case of either airbag deployment or severe rear-end collision, the system is designed to automatically call the response center. The responding agent receives the vehicle's location and attempts to speak with the vehicle occupants to assess the level of emergency.
If the occupants are unable to communicate, the agent automatically treats the call as an emergency, contacts the nearest emergency services provider to describe the situation, and requests that assistance be sent to the location.
■ Stolen Vehicle Location If your vehicle is stolen, Safety Connect can work with local authorities to assist them in locating and recovering the vehicle. After filing a police report, call the Safety Connect response center at 1-855- 405-6500 in the Unites States, 1-877-855-8377 in Puerto Rico or 1- 888-869-6828 in Canada, and follow the prompts for Safety Connect to initiate this service.
In addition to assisting law enforcement with recovery of a stolen vehicle, Safety-Connect-equipped vehicle location data may, under certain circumstances, be shared with third parties to locate your vehicle. Further information is available at Toyota.com in the United States, Toyotapr.com in Puerto Rico and Toyota.ca in Canada.
■ Emergency Assistance Button ("SOS") In the event of an emergency on the road, push the "SOS" button to reach the Safety Connect response center. The answering agent will determine your vehicle's location, assess the emergency, and dispatch the necessary assistance required.
If you accidentally press the "SOS" button, tell the response-center agent that you are not experiencing an emergency.
■ Enhanced Roadside Assistance Enhanced Roadside Assistance adds GPS data to the already included warranty-based Toyota roadside service.
Subscribers can press the "SOS" button to reach a Safety Connect response-center agent, who can help with a wide range of needs, such as: towing, flat tire, fuel delivery, etc. For a description of the Enhanced Roadside Assistance services and their limitations, please see the Safety Connect Terms and Conditions, which are available at Toyota.com in the United States, Toyotapr.com in Puerto Rico and Toyota.ca in Canada.
Safety information for Safety Connect
Important! Read this information before using Safety Connect.
■ Exposure to radio frequency signals The Safety Connect system installed in your vehicle is a low-power radio transmitter and receiver. It receives and also sends out radio frequency (RF) signals.
In August 1996, the Federal Communications Commission (FCC) adopted RF exposure guidelines with safety levels for mobile wireless phones. Those guidelines are consistent with the safety standards previously set by the following U.S. and international standards bodies.
- ANSI (American National Standards Institute) C95.1 [1992]
- NCRP (National Council on Radiation Protection and Measurement) Report 86 [1986]
- ICNIRP (International Commission on Non-Ionizing Radiation Protection) [1996]
Those standards were based on comprehensive and periodic evaluations of the relevant scientific literature. Over 120 scientists, engineers, and physicians from universities, and government health agencies and industries reviewed the available body of research to develop the ANSI Standard (C95.1).
The design of Safety Connect complies with the FCC guidelines in addition to those standards.
Download Manual