Head Restraints
Front Seats
The vehicle's front seats have adjustable head restraints in the outboard seating positions.
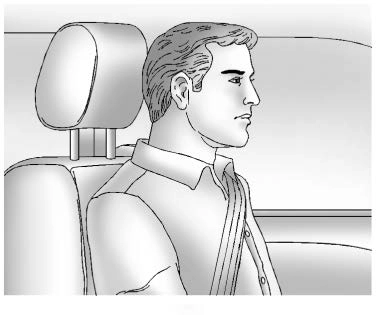
Adjust the head restraint so that the top of the restraint is at the same height as the top of the occupant's head. This position reduces the chance of a neck injury in a crash.

To raise or lower the head restraint, press the button on the side of the head restraint and pull up or push the head restraint down and release the button.
Pull and push on the head restraint after the button is released to make sure that it is locked in place.
The front seat outboard head restraints are not removable.
The vehicle’s rear seat has head restraints in the outboard seating positions that cannot be adjusted.
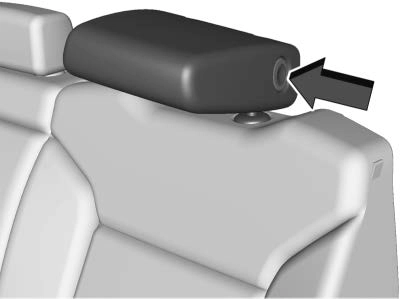
The head restraint can be folded forward to allow for better visibility when the rear seat is unoccupied. To fold the head restraint, press the button on the side of the head restraint.
When an occupant is in the seat, always return the head restraint to the upright position until it locks into place. Push and pull on the head restraint to make sure that it is locked.
If you are installing a child restraint in the rear seat, see Lower Anchors and Tethers for Children (LATCH System) 0 89.
Center Headrest
The vehicle’s rear seat may be equipped with a headrest in the center seating position that cannot be adjusted.
If you are installing a child restraint in the rear seat, see Lower Anchors and Tethers for Children (LATCH System) 0 89.
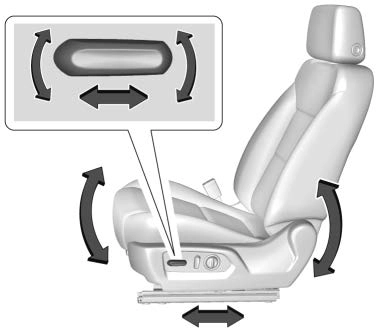
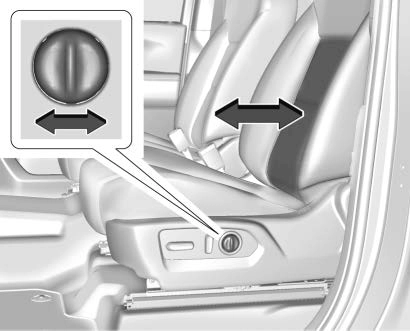
Front Seats
To adjust a manual seat:
To adjust the seatback, see
Reclining Seatbacks 0 54.
To adjust the lumbar support,
if equipped, see Lumbar Adjustment
0 54.
If equipped, the center front seatback doubles as an armrest and cupholder/storage area for the driver and passenger when the center front seat is not used.

Pull the strap on the side of the center seatback to fold the center seatback. Do not use the center seatback as a seating position when the seatback is folded down.
To raise the seatback, push the seatback rearward until it locks in the upright position. Push and pull on the seatback to make sure it is locked.
To adjust a power seat, if equipped:
To adjust the seatback, see
Reclining Seatbacks 0 54.
To adjust the lumbar support, see
Lumbar Adjustment 0 54.
Some vehicles are equipped with a feature that activates a vibrating pulse alert in the driver seat to help the driver avoid crashes. See Driver Assistance Systems 0 252.
To adjust the lumbar support, if equipped:
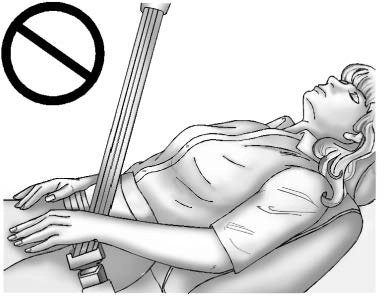
Do not have a seatback reclined if
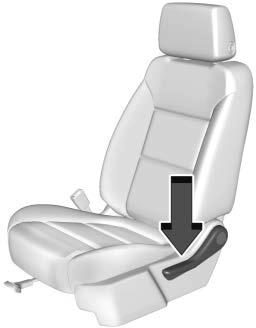
To adjust a manual seatback:
The seatback will automatically fold forward.
 To return the seatback to the upright position:
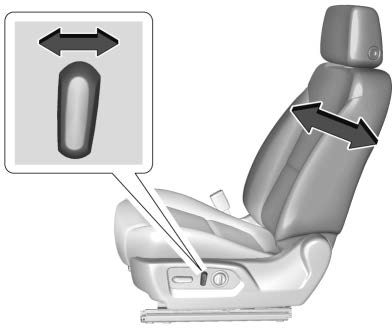
To recline a power seatback, if equipped:
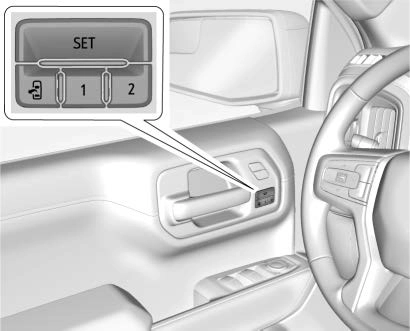
If equipped, memory seats allow two drivers to save and recall their unique seat positions for driving the vehicle, and a shared exit position for getting out of the vehicle. Other feature positions may also be saved, such as power mirrors,
if equipped. Memory positions are linked to RKE transmitter 1 or 2 for automatic memory recalls.
Before saving, adjust all available memory feature positions. Turn the vehicle on and then press and release SET; a beep will sound.
Then immediately press and hold 1, 2, or B (Exit) until two beeps sound. To manually recall these positions, press and hold 1, 2, or B until the saved position is reached. Follow the instructions under “Saving Memory Positions.”
The vehicle identifies the current driver’s RKE transmitter number (1–8). See Remote Keyless Entry (RKE) System Operation (Key Access) 0 13 or
Remote Keyless Entry (RKE) System Operation (Keyless Access) 0 16. Only RKE transmitters 1 and 2 can be used for automatic memory recalls. A Driver Information Center (DIC) welcome message indicating the transmitter number may display for the first few ignition cycles following a transmitter change. For Seat Entry Memory to work properly, save the positions to the memory button (1 or 2) matching the RKE transmitter number displayed in the DIC welcome message. Carry the linked RKE transmitter when entering the vehicle.
Vehicle Personalization Settings
Identifying Driver Number
To identify the driver number:
Saving Memory Positions
Read these instructions completely before saving memory positions.
To save preferred driving positions 1 and 2:
A DIC welcome message may indicate driver number 1 or 2.
If too much time passes between releasing SET and pressing 1, the memory position will not be saved and two beeps will not sound.
Repeat Steps 3 and 4.
1 or 2 corresponds to the driver number. See “Identifying Driver Number” previously in this section.
To save the position for B and Seat Exit Memory features, repeat
Steps 1–4 using B. This saves the position for getting out of the vehicle.
Save preferred memory feature positions to both 1 and 2 if you are the only driver.
Manually Recalling Memory Positions
Press and hold 1, 2, or B to recall the previously saved memory positions if you are driver 1 or 2 identified in the DIC welcome message.
To stop Manual Memory recall movement, release 1, 2, or B or press any of the following controls:
Seat Entry Memory
The vehicle identifies the number of the current driver’s RKE transmitter (1–8). See Remote Keyless Entry (RKE) System Operation (Key Access) 0 13 or
Remote Keyless Entry (RKE) System Operation (Keyless Access) 0 16. If the RKE transmitter is 1 or 2, and Seat Entry Memory is enabled in vehicle personalization, the positions saved to the same memory button number 1 or 2 are
automatically recalled when the vehicle is turned on, or turned from off to ACC/ACCESSORY. RKE
transmitters 3–8 will not provide automatic memory recalls.
To turn Seat Entry Memory on or off, see “Vehicle Personalization Settings” previously in this section and Vehicle Personalization 0 153.
The shift lever must be in P (Park) to start Seat Entry Memory. Seat Entry Memory recall will complete if the vehicle is shifted out of P (Park) prior to reaching the saved memory position.
To stop Seat Entry Memory recall movement, turn the vehicle off or press any of the following controls:
If the saved memory seat position does not automatically recall or recalls to the wrong positions, the driver’s RKE transmitter number
(1 or 2) may not match the memory
button number that positions were saved to. Try storing the position to the other memory button or try the other RKE transmitter.
Seat Exit Memory
Seat Exit Memory is not linked to an RKE transmitter. The position saved to B is used for all drivers. To turn Seat Exit Memory on or off, see "Vehicle Personalization Settings" previously in this section and Vehicle Personalization 0 153.
If turned on, the position saved to B is automatically recalled when one of the following occurs:
To stop Seat Exit Memory movement, press any of the following memory controls:
Obstructions
If something has blocked the driver seat while recalling a memory position, the recall may stop.
Remove the obstruction and try the recall again. If the memory position still does not recall, see your dealer.
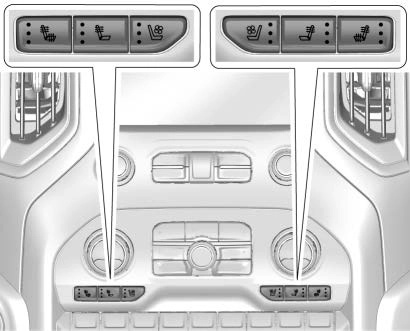
Heated and Ventilated Seat Buttons Shown, Heated Seat Buttons Similar
If equipped, the buttons are on the center stack. To operate, the engine must be running.
Press I or + to heat the driver or passenger seatback only.
Press J or z to heat the driver or passenger seat cushion and seatback.
Press C or { to ventilate the driver or passenger seat.
The indicator light on the button comes on when this feature is on.
Press the button once for the highest setting. With each press of the button, the seat will change to the next lower setting, and then to the off setting. The indicator lights next to the buttons indicate three for the highest setting and one for the lowest. If the heated seats are on high for an extended time, their level may automatically be lowered.
Auto Heated Seats
When the vehicle is on, this feature will automatically activate the heated seats at the level required by the vehicle’s interior temperature.
The active high, medium, low, or off heated seat level will be indicated by the manual heated seat buttons
on the center stack. Use the manual heated seat buttons on the center stack to turn auto heated seats off. If the passenger seat is unoccupied, the auto heated seats feature will not activate that seat. The auto heated seats feature can be programmed to always be enabled when the vehicle is on. See Vehicle Personalization 0 153.
Remote Start Heated and Ventilated Seats
If equipped, the heated seats will turn on automatically during a remote start if it is cold outside and the ventilated seats will turn on automatically if it is hot outside.
If equipped, the heated steering wheel will turn on automatically during a remote start if it is cold outside. The heated and ventilated seat indicators and heated steering wheel indicator may not come on during this operation.
The heated and ventilated seats and heated steering wheel may cancel when the vehicle is started. These features can be manually selected after the ignition is
turned on.
The temperature performance of an unoccupied seat may be reduced. This is normal.
The heated or ventilated seats will not turn on during a remote start unless they are enabled in vehicle personalization. See Remote Vehicle Start 0 24 and
Vehicle Personalization 0 153.
Download Manual