Driver Assistance Systems
For cleaning instructions, see “Washing the Vehicle” under Exterior Care 0 424.
This vehicle may have features that work together to help avoid crashes or reduce crash damage while driving, backing, and parking. Read this entire section before using these systems.
Audible or Safety Alert Seat
Some driver assistance features alert the driver of obstacles by beeping. To change the volume of the warning chime, see “Comfort and Convenience” under Vehicle Personalization 0 153.
If equipped with the Safety Alert Seat, the driver seat cushion may provide a vibrating pulse alert instead of beeping. To change this, see “Collision/Detection Systems” under Vehicle Personalization
0 153.
Cleaning
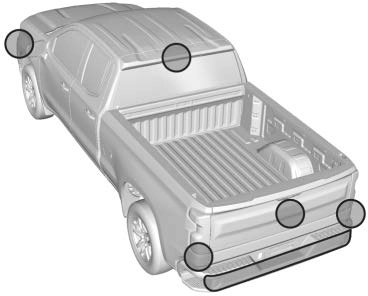
Depending on vehicle options, keep these areas of the vehicle clean to ensure the best driver assistance feature performance. Driver
Information Center (DIC) messages may display when the systems are unavailable or blocked.
If equipped, the Rear Vision Camera (RVC), Surround Vision, Rear Park Assist (RPA), Front Park Assist (FPA), and Rear Cross Traffic Alert (RCTA) may help the driver park or
avoid objects. Always check around the vehicle when parking or backing.
The RVC, RPA, and Surround Vision will not work properly if the tailgate is down. If the tailgate is down, do not use these systems.
When the vehicle is shifted into R (Reverse), the RVC displays an image of the area behind the vehicle in the infotainment display. The previous screen displays when the vehicle is shifted out of R (Reverse) after a short delay. To return to the previous screen sooner, press any button on the infotainment system, shift into P (Park), or, while in D (Drive), reach a vehicle speed of approximately 12 km/h (8 mph). The rear vision camera is in the tailgate handle.
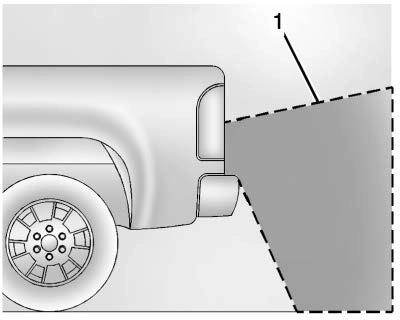
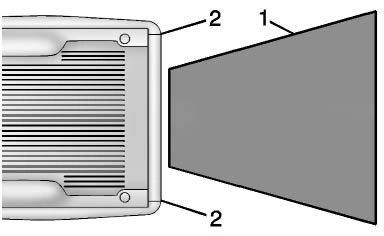
Displayed images may be farther or closer than they appear. The area displayed is limited and objects that are close to either corner of the bumper or under the bumper do not display.
A warning triangle may display to show that Rear Park Assist (RPA) has detected an object. This triangle changes from amber to red and increases in size the closer the object.
If equipped with Hitch View, see
“Surround Vision” following.
If equipped the Surround Vision system can display various views surrounding the vehicle in the infotainment display. See below for camera view descriptions and more information.
Camera Views
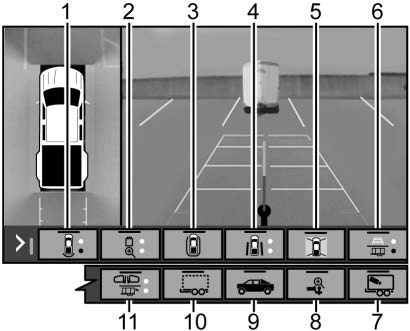
Touch the camera view buttons along the bottom of the infotainment display to access each view (if equipped):
Displays an image of the area in front or behind the vehicle. To select, touch Front/Rear Standard View on the infotainment display when a camera view is active. Touch the button to toggle between front and rear camera views.
When the hitch guidance is selected, Rear Standard View will remain visible across gear changes, otherwise the view will toggle between Front and Rear Standard View based on gear position.
If equipped, the front view camera also displays when the Park Assist system detects an object within
30 cm (12 in).
Displays a front or rear overhead view of the vehicle. To select, touch Front/Rear Top-Down View on the infotainment display when a camera view is
active. Touch the button to toggle between front and rear camera views.
Displays a perspective view of the vehicle from the front looking rearward. To select, touch Rear Bowl View on the infotainment display when a camera view is active. Park Assist and Rear Cross Traffic Alert (RCTA) overlays are not available when bowl view is active.
Displays a view that shows objects next to the front or rear sides of the vehicle. To select, touch Front/Rear Side View on the infotainment display when a camera view is active.
Touch the button to toggle between front and rear camera views. Park Assist and RCTA overlays are not available when Front/Rear Side View is active.
The Turn Signal Activated View works with Rear Side View to provide a rearward view of the left or right side of the vehicle and trailer. Views are provided based on turn signal activation with the right-side view being shown when the right turn signal is active and the left side view being shown when the left turn signal is active. The feature is available when a trailer is connected. The feature can be enabled or disabled.
See Vehicle Personalization
0 153. Touch X to exit.
Displays an image of the area surrounding the vehicle. Surround View is available as part of the Front/Rear Standard Views, the Front/Rear Top-Down Views and the Front/Rear Side Views. In these views Surround View can be enabled by touching
Surround View on the infotainment display when the camera view is active.
Guidance Lines displays available guidelines, including Standard and Hitch Guidance.
A grayed-out icon indicates that guidelines are not available. To enable, touch Guidance Lines on the infotainment display when a camera view is active.
Touching the button multiple times will toggle through Standard Guidelines, Hitch Guidance and no guidelines.
Standard guidelines are available in Front/Rear Standard Views, Front/Rear Top-Down Views and Surround View.
Hitch Guidance displays a single centered guideline on the infotainment display to assist with aligning the
vehicle’s hitch ball with a trailer coupler. Touch the Hitch Guidance icon, then align the trailer guidance line over the trailer coupler. Continuously steer the vehicle to keep the guideline centered on the coupler when backing. Park Assist overlays will not display when the trailer guidance line is active.
Hitch Guidance is available in Rear Standard View.
Provides a view of the interior of the trailer. The feature is available when a trailer is connected. The feature requires user installation of an accessory trailer camera on the interior of the trailer per the accessory trailer camera installation instructions (see your dealer for accessory trailer camera(s) and information). To select, touch Interior Trailer View on the infotainment display when a camera view is active. To access this view when in a forward gear above 12 km/h (8 mph), touch CAMERA on the infotainment display and touch the Interior Trailer View icon. The view will close after 8 seconds and can be closed early by touching X.
Assists with connecting to a trailer by providing a zoomed-in view of the hitch to help align the vehicle’s hitch ball with the trailer coupler, or to monitor the trailer connection. To select, touch Hitch View on the infotainment display when a camera view is active. To access this view when in a forward gear above 12 km/h (8 mph), touch CAMERA on the infotainment display
and touch the Cargo Bed View icon. The view will close after 8 seconds and can be closed early by touching X. Shifting into P (Park) while in this view will automatically engage the Electric Parking Brake (EPB).
Provides a view of the truck bed and the area behind the vehicle to assist in cargo or hitch monitoring or
hitching to a fifth wheel or gooseneck trailer. To select, touch Bed View on the infotainment display when a camera view is active. To access this view when in a forward gear above 12 km/h (8 mph), touch CAMERA on the infotainment display
and touch the Bed View icon. The view will close after 8 seconds and can be closed early by touching X.
Provides a view that allows the driver to virtually “see through” the trailer. The feature is available when a compatible trailer is connected and a profile is configured and selected via the Trailering App. See Trailering App 0 306. The feature requires user installation of an accessory trailer camera on the rear exterior surface of the trailer per the accessory trailer camera installation instructions (see your
dealer for accessory trailer camera(s) and information). To select, touch Transparent Trailer View on the infotainment display when a camera view is active. To access this view when in a forward gear above 12 km/h (8 mph), touch CAMERA on the infotainment display and touch the Transparent Trailer View icon. Touch X to exit.
When the system is calibrated and the trailer position is known, one of three views will be shown; Transparent Trailer View, Left Transparent Trailer View or Right Transparent Trailer View. The Transparent Trailer View is shown when the position of the trailer is relatively straight behind the vehicle. The Left or Right Transparent Trailer View is shown when the position of the trailer is too far to the
left or right. When the system is not calibrated or trailer position is not known the Transparent Trailer Picture-in-Picture View will be shown.
. Rear Trailer View provides a view of the area behind the trailer. the feature is available when a trailer is connected. The feature requires user installation of an accessory trailer camera on the rear exterior surface of the trailer per the accessory trailer camera installation instructions (see your dealer for accessory trailer camera(s) and information). To select, touch Rear Trailer View/ Rear Side View with Available Articulation
Functionality/
Picture-in-Pictue Side View on the infotainment display when a camera view is active. Each touch will toggle through the Rear Trailer View, Trailer Tow Mirror View and Combo View. To access this view when in a forward gear above 12 km/h
(8 mph), touch CAMERA on the infotainment display and touch the Interior Rear Trailer View/Rear Side View with Available Articulation Functionality/
Picture-in-Picture Side View icon. Touch X
to exit.
. Rear Side View with Available Articulation Functionality provides a rearward split view of the left and right sides of the vehicle and trailer. When in a forward gear
the view well automatically pan to show more of the left or right side based on the position of the trailer.
The feature is available when a trailer is connected. To select, touch Rear trailer View/ Rear Side View with Available Articulation Functionality/
Picture-in-Picture Side View on the infotainment display when a camera view is active. Each touch will toggle through the Rear Trailer View, trailer tow Mirror view and Combo View. To access this view when in a forward gear above 12 km/h
(8 mph), Touch CAMERA on the infotainment display and touch the Rear Trailer View/Rear Side View with Available Articulation
Functionality/
Picture-in-Picture Side icon. Touch X to exit.
. Provides a rearward split view of the left and right sides of the vehicle and trailer with an overlay view of the area behind the trailer. The feature is available when a trailer is connected. the feature requires user installation of an accessory trailer camera on the rear exterior surface of the trailer per the accessory trailer camera installation instructions (see your dealer for accessory trailer camera(s) and information). To select, touch Rear Trailer View/ Rear Side View with Available Articulation Functionality/
Picture-in-Picture Side view on the infotainment display when a camera
view is active. Each press of the button will toggle through the Rear Trailer View, Trailer Tow mirror View and Combo View. To access this view when in a forward gear above 12 km/h
(8 mph), touch CAMERA on the infotainment display and touch the Rear Trailer View/Rear Side View with Available Articulation Functionality/
Picture-in-Picture Side View icon. Touch X
to exit.
HD Surround Vision with Trailer Camera Provisions
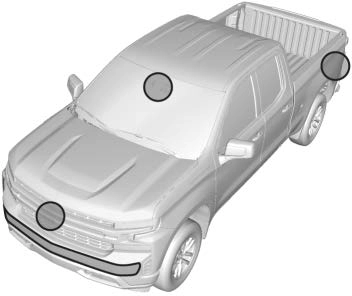
If equipped, this feature provides additional views to aid in trailering/ towing. The system shows multiple views in the infotainment display using five cameras mounted around the vehicle and up to two additional accessory cameras that can be mounted on or in a trailer. The front
camera is in the grille under the front emblem, the side cameras are on the bottom of the outside mirrors, the rear camera is in the tailgate handle and the bed camera is mounted on the rear of the cab.
Additionally, up to two accessory cameras can be mounted to the rear and/or interior of the trailer. See your dealer for accessory trailer cameras. To access, touch CAMERA on the infotainment display or shift to R (Reverse). To return to the previous screen when not in reverse, touch the Home or Back buttons on the infotainment display.
Available camera views:
Surround Vision (360 Degrees)
If equipped, the Surround Vision system can display various views surrounding the vehicle in the infotainment display using four cameras mounted around the vehicle. The front camera is in the grille under the front emblem, the side cameras are on the bottom of the outside mirrors, and the rear camera is in the tailgate handle.
The Surround Vision system can be accessed by selecting CAMERA in the infotainment display or when the vehicle is shifted into R (Reverse). To return to the previous screen sooner, when not in R (Reverse), press the Home or Back button on
the infotainment system, shift into P (Park), or, while in D (Drive), reach a vehicle speed of approximately 12 km/h (8 mph).
Available camera views:
Surround Vision
If equipped, this feature provides, additional views to aid in trailering/ towing. The Front Vision Camera and Surround Vision cameras are not supported. The system can show various views in the infotainment display using cameras mounted in and around the vehicle and trailer. The rear camera is in the tailgate handle and the cargo bed camera is mounted on the rear of
the cab. Up to two accessory cameras can be mounted to the rear and/or interior of the trailer. See your dealer for these accessory cameras.
The system can be accessed by selecting CAMERA in the infotainment display or when the vehicle is shifted into R (Reverse). To return to the previous screen sooner, when not in R (Reverse), press the Home or Back button on the infotainment system or shift into P (Park).
Available camera views:
Troubleshooting
The Transparent Trailer calibration may take longer than expected or not calibrate if:
Distortion may be observed in the calibrated Transparent Trailer View if:
The Transparent Trailer icon may appear grayed out if:
The preview may not be provided or the wrong preview may be
provided if:
A feature may be unavailable or not activating as expected if:
Check the customization settings where applicable.
A view may switch automatically if:
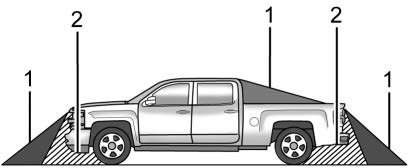
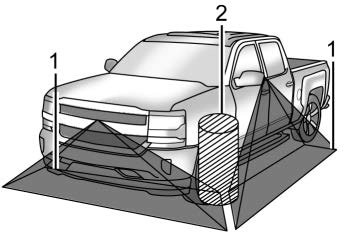
With Front and Rear Park Assist, as the vehicle moves at speeds of less than 8 km/h (5 mph) the sensors on the bumpers may detect objects up to 1.2 m (4 ft) in front and 2.5 m (8 ft) behind the vehicle within a zone 25 cm (10 in) high off the ground and below bumper level. These detection distances may be shorter during warmer or humid weather.
Blocked sensors will not detect objects and can also cause false detections. Keep the sensors clean of mud, dirt, snow, ice, and slush; and clean sensors after a car wash in freezing temperatures.

The instrument cluster may have a Park Assist display with bars that show “distance to object” and object
location information for the Front and Rear Park Assist system. As the object gets closer, more bars light up and the bars change color from yellow to amber to red.
When an object is first detected in the rear, one beep will be heard from the rear, or both sides of the Safety Alert Seat will pulse two times. When an object is very close
— <0.4 m (1.5 ft) in the vehicle rear or <0.3 m (1 ft) in the vehicle front — a continuous beep will sound from the rear or front depending on object location, or both sides of the Safety Alert Seat will pulse five times. Beeps for FPA are higher pitched than for RPA.
Rear Cross Traffic Alert (RCTA)
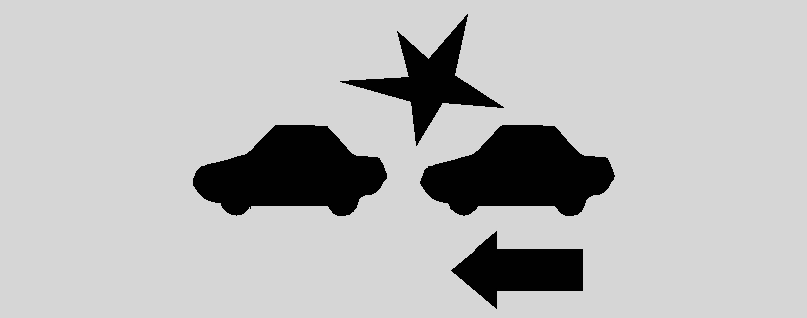
If equipped, when the vehicle is shifted into R (Reverse), RCTA shows a red warning triangle with a left or right pointing arrow on the infotainment display to warn of traffic coming from the left or right. This system detects objects coming from up to 20 m (65 ft) from the left or right side of the vehicle. When an object is detected, either three
beeps sound from the left or right or three Safety Alert Seat pulses occur on the left or right side, depending on the direction of the detected vehicle.
Use caution while backing up when towing a trailer, as the RCTA detection zones that extend out from the back of the vehicle do not move further back when a trailer is towed.
RCTA is disabled when the trailer connection status is displayed.
RCTA can be turned off. See “Collision/Detection Systems” under Vehicle Personalization 0 153.

Press X on the center stack to turn on or off the Front and Rear Park Assist. The indicator light next
to the button comes on when the features are on and turns off when the features have been disabled.
Front and Rear Park Assist can be turned Off, On, or On with Towbar. See “Park Assist” under Vehicle Personalization 0 153. If Park Assist is turned off through vehicle personalization, the Park Assist button will be disabled. To turn Park Assist on again, select On in vehicle personalization. The On with Towbar setting allows Park Assist to work properly with a trailer hitch. Some larger trailer hitches may not be compatible.
Turn off Park Assist when towing a trailer.
To turn the RPA symbols on or off, see “Rear Camera Park Assist Symbols” under Vehicle Personalization 0 153.
If equipped, when driving the vehicle in a forward gear, Forward Collision Alert (FCA), Lane
Departure Warning (LDW), Lane Keep Assist (LKA), Side Blind Zone Alert (SBZA), Lane Change Alert (LCA), Automatic Emergency Braking (AEB), and/or the Front Pedestrian Braking (FPB) System can help to avoid a crash or reduce crash damage.
If equipped, the FCA system may help to avoid or reduce the harm caused by front-end crashes. When approaching a vehicle ahead too quickly, FCA provides a red flashing alert on the windshield and rapidly beeps or pulses the driver seat.
FCA also lights an amber visual alert if following another vehicle much too closely.
FCA detects vehicles within a distance of approximately 60 m (197 ft) and operates at speeds above 8 km/h (5 mph).
FCA can be disabled through vehicle personalization. See “Collision/Detection Systems” under Vehicle Personalization 0 153.
 FCA warnings will not occur unless the FCA system detects a vehicle ahead. When a vehicle is detected, the vehicle ahead indicator will display green. Vehicles may not be detected on curves, highway exit ramps, or hills, due to poor visibility; or if a vehicle ahead is partially blocked by pedestrians or other objects. FCA will not detect another vehicle ahead until it is completely in the driving lane.
Collision Alert
With Head-Up Display
Without Head-Up Display
When your vehicle approaches another detected vehicle too rapidly, the red FCA display will flash on the windshield. Also, eight rapid
high-pitched beeps will sound from the front, or both sides of the Safety Alert Seat will pulse five times.
When this Collision Alert occurs, the brake system may prepare for driver braking to occur more rapidly which can cause a brief, mild deceleration. Continue to apply the brake pedal as needed. Cruise control may be disengaged when the Collision Alert occurs.
Tailgating Alert

The vehicle ahead indicator will display amber when you are following a vehicle ahead much too closely.
The Collision Alert control is on the steering wheel. Press [ to set the FCA timing to Far, Medium, or Near. The first button press shows the current setting on the DIC. Additional button presses will change this setting. The chosen setting will remain until it is changed and will affect the timing of both the Collision Alert and the Tailgating Alert features. The timing of both alerts will vary based on vehicle speed. The faster the vehicle speed, the farther away the alert will occur. Consider traffic and weather conditions when selecting the alert
timing. The range of selectable alert timings may not be appropriate for all drivers and driving conditions.
If your vehicle is equipped with Adaptive Cruise Control (ACC), changing the FCA timing setting automatically changes the following gap setting (Far, Medium, or Near).
The following distance to a moving vehicle ahead in your path is indicated in following time in seconds on the Driver Information Center (DIC). The minimum following time is 0.5 seconds away. If there is no vehicle detected ahead, or the vehicle ahead is out of sensor range, dashes will be displayed.
FCA may provide unnecessary alerts for turning vehicles, vehicles in other lanes, objects that are not vehicles, or shadows. These alerts are normal operation and the vehicle does not need service.
If the FCA system does not seem to operate properly, this may correct the issue:
If the vehicle has Forward Collision Alert (FCA), it also has AEB (1500 series only), which includes Intelligent Brake Assist (IBA). When the system detects a vehicle ahead in your path that is traveling in the same direction that you may be about to crash into, it can provide a boost to braking or automatically brake the vehicle. This can help avoid or lessen the severity of crashes when driving in a forward gear. Depending on the situation, the vehicle may automatically brake
moderately or hard. This automatic emergency braking can only occur if a vehicle is detected. This is shown by the FCA vehicle ahead indicator being lit. See Forward Collision Alert (FCA) System 0 264.
The system works when driving in a forward gear between 8 km/h
(5 mph) and 80 km/h (50 mph). It can detect vehicles up to approximately 60 m (197 ft).
AEB may slow the vehicle to a complete stop to try to avoid a potential crash. If this happens, AEB may engage the Electric Parking Brake (EPB) to hold the vehicle at a stop. Release the EPB or firmly press the accelerator pedal.
IBA may activate when the brake pedal is applied quickly by providing a boost to braking based on the speed of approach and distance to a vehicle ahead.
Minor brake pedal pulsations or pedal movement during this time is normal and the brake pedal should continue to be applied as needed. IBA will automatically disengage only when the brake pedal is released.
AEB and IBA can be disabled. See “Collision/Detection Systems” under Vehicle Personalization 0 153.
A system unavailable message may display if:
The AEB system does not need service.
If equipped, the FPB system may help avoid or reduce the harm caused by front-end crashes with nearby pedestrians when driving in a forward gear. FPB displays an amber indicator, ~, when a nearby pedestrian is detected ahead. When approaching a detected pedestrian too quickly, FPB provides a red flashing alert on the windshield and rapidly beeps or pulses the driver seat. FPB can provide a boost to braking or automatically brake the vehicle. This system includes Intelligent Brake Assist (IBA), and the Automatic Emergency Braking (AEB) system may also respond to pedestrians. See Automatic Emergency Braking (AEB) 0 266.
The FPB system can detect and alert to pedestrians in a forward gear at speeds between 8 km/h (5 mph) and 80 km/h (50 mph). During daytime driving, the system detects pedestrians up to a distance of approximately 40 m (131 ft).
During nighttime driving, system performance is very limited.
FPB can be set to Off, Alert, or Alert and Brake through vehicle personalization. See “Collision/ Detection Systems” under Vehicle Personalization 0 153.

FPB alerts and automatic braking will not occur unless the FPB system detects a pedestrian. When a nearby pedestrian is detected in front of the vehicle, the pedestrian ahead indicator will display amber.

With Head-Up Display

Without Head-Up Display
When the vehicle approaches a pedestrian ahead too rapidly, the red FPB alert display will flash on the windshield. Eight rapid
high-pitched beeps will sound from the front, or both sides of the Safety Alert Seat will pulse five times.
When this Pedestrian Alert occurs, the brake system may prepare for driver braking to occur more rapidly which can cause a brief, mild deceleration. Continue to apply the brake pedal as needed. Cruise control may be disengaged when the Front Pedestrian Alert occurs.
If FPB detects it is about to crash into a pedestrian directly ahead, and the brakes have not been applied, FPB may automatically brake moderately or brake hard. This can help to avoid some very low speed pedestrian crashes or reduce pedestrian injury. FPB can automatically brake to detected pedestrians between 8 km/h (5 mph) and 80 km/h (50 mph). Automatic braking levels may be reduced under certain conditions, such as higher speeds.
If this happens, Automatic Braking may engage the Electric Parking Brake (EPB) to hold the vehicle at a stop. Release the EPB. A firm press
of the accelerator pedal will also release Automatic Braking and the EPB.
Automatic Braking can be disabled through vehicle personalization. See “Front Pedestrian Detection” in “Collision/Detection Systems” under Vehicle Personalization 0 153.
If FPB does not seem to operate properly, cleaning the outside of the windshield in front of the rearview mirror may correct the issue.
If equipped, the SBZA system is a lane-changing aid that assists drivers with avoiding crashes that occur with moving vehicles in the side blind zone (or spot) areas.
When the vehicle is in a forward gear, the left or right side mirror display will light up if a moving vehicle is detected in that blind zone. If the turn signal is activated
and a vehicle is also detected on the same side, the display will flash as an extra warning not to change lanes. Since this system is part of the Lane Change Alert (LCA) system, read the entire LCA section before using this feature.
If equipped, the LCA system is a lane-changing aid that assists drivers with avoiding lane change crashes that occur with moving vehicles in the side blind zone (or spot) areas or with vehicles rapidly approaching these areas from behind. The LCA warning display will light up in the corresponding outside side mirror and will flash if the turn signal is on.
The LCA sensor covers a zone of approximately one lane over from both sides of the vehicle, or 3.5 m (11 ft). The height of the zone is approximately between 0.5 m (1.5 ft) and 2 m (6 ft) off the ground. The Side Blind Zone Alert (SBZA)


Left Side Mirror Right Side Mirror
warning area starts at approximately the middle of the vehicle and goes
Display
Display
LCA Detection Zones
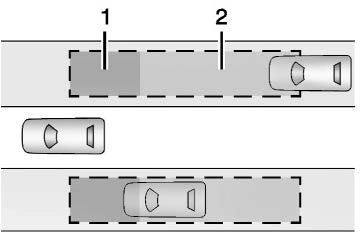
back 5 m (16 ft). Drivers are also warned of vehicles rapidly approaching from up to 25 m (82 ft) behind the vehicle.
The LCA symbol lights up in the side mirrors when the system detects a moving vehicle in the next lane over that is in the side blind zone or rapidly approaching that zone from behind. A lit LCA symbol indicates it may be unsafe to change lanes. Before making a lane change, check the LCA display, check mirrors, glance over your shoulder, and use the turn signals.
When the vehicle is started, both outside mirror LCA displays will briefly come on to indicate the system is operating. When the vehicle is in a forward gear, the left or right side mirror display will light up if a moving vehicle is detected in the next lane over in that blind zone or rapidly approaching that zone.
If the turn signal is activated in the same direction as a detected vehicle, this display will flash as an extra warning not to change lanes.
LCA is disabled when the trailer connection status is displayed.
A DIC message may display. The SBZA system still operates.
LCA can be disabled through vehicle personalization. When you disable LCA, SBZA is also disabled.
See Vehicle Personalization 0 153. If LCA is disabled by the driver, the LCA mirror displays will not light up.
The LCA system requires some driving for the system to calibrate to maximum performance. This calibration may occur more quickly if the vehicle is driving on a straight highway road with traffic and roadside objects (e.g., guardrails, barriers).
LCA displays may not come on when passing a vehicle quickly, for a stopped vehicle, or when towing a trailer. The LCA detection zones that extend back from the side of the vehicle do not move further back when a trailer is towed. Use caution while changing lanes when towing a trailer. LCA may alert to objects attached to the vehicle, such as a trailer, bicycle, or object extending out to either side of the vehicle.
Attached objects may also interfere with the detection of vehicles. This is normal system operation; the vehicle does not need service.
LCA may not always alert the driver to vehicles in the next lane over, especially in wet conditions or when driving on sharp curves. The system does not need to be serviced. The system may light up due to guardrails, signs, trees, shrubs, and other non-moving objects. This is normal system operation; the vehicle does not need service.
LCA may not operate when the LCA sensors in the left or right corners of the rear bumper are covered with mud, dirt, snow, ice, or slush, or in heavy rainstorms. For cleaning instructions, see "Washing the Vehicle" under Exterior Care 0 424. If the DIC still displays the system unavailable message after cleaning both sides of the vehicle toward the rear corners of the vehicle, see your dealer.
If the LCA displays do not light up when moving vehicles are in the side blind zone or are rapidly approaching this zone and the system is clean, the system may need service. Take the vehicle to your dealer.
See Radio Frequency Statement
0 468.
If equipped, LDW may help avoid crashes due to unintentional lane departures. LDW uses a camera sensor to detect the lane markings at speeds of 56 km/h (35 mph) or greater. It may provide an alert if the vehicle is crossing a lane without using a turn signal in that direction. LDW light will not alert if the turn signal is active in the direction of lane departure, or if LDW detects that you are accelerating, braking or actively steering.
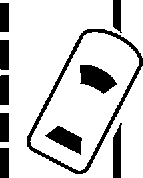
LDW utilizes a camera sensor installed on the windshield ahead of the rearview mirror to detect lane markings.
To turn LDW on and off, press @ on the instrument panel to the left of the steering wheel. The control indicator will light when LDW is on.
When LDW is on, @ is green if LDW is available to warn of a lane departure. If the vehicle crosses a detected lane marking without using the turn signal in that direction, @ changes to amber and flashes.
Additionally, there will be three beeps, on the right or left, depending on the lane departure direction. LDW will not alert if the turn signal is active in the direction of lane departure or if LDA detects that you are accelerating, braking or actively steering.
The system may not detect lanes as well when there are:
. Banked roads.
If the LDW system is not functioning properly when lane markings are clearly visible, cleaning the windshield may help.
LDW alerts may occur due to tar marks, shadows, cracks in the road, temporary or construction lane markings, or other road imperfections. This is normal system operation; the vehicle does not need service. Turn LDW off if these conditions continue.
If equipped, LKA may help avoid crashes due to unintentional lane departures. This system uses a camera to detect lane markings between 60 km/h (37 mph) and 180 km/h (112 mph). It may assist
by gently turning the steering wheel if the vehicle approaches a detected lane marking. It may also provide a Lane Departure Warning (LDW) alert if the vehicle crosses a detected lane marking. LKA can be
overridden by turning the steering wheel. This system is not intended to keep the vehicle centered in the lane. LKA will not assist and alert if the turn signal is active in the direction of lane departure, or if it detects that you are accelerating, braking or actively steering.
LKA uses a camera sensor installed on the windshield ahead of the rearview mirror to detect lane markings. It may provide brief steering assist if it detects an unintended lane departure. It may further provide an audible alert or the driver seat may pulse indicating that a lane marking has been crossed.
To turn LKA on and off, press A on the center stack. If equipped, the indicator light on the button comes on when LKA is on and turns off when LKA is disabled.
When on, A is white, if equipped, indicating that the system is not ready to assist. A is green if LKA is ready to assist. LKA may assist by gently turning the steering wheel if the vehicle approaches a detected lane marking. A is amber when assisting. It may also provide a Lane Departure Warning (LDW) alert by flashing A amber if the vehicle crosses a detected lane marking. Additionally, there may be three beeps, or the driver seat may pulse three times, on the right or left, depending on the lane departure direction.
Take Steering
The LKA system does not continuously steer the vehicle.
If LKA does not detect active driver steering, an alert and chime may be provided. Steer the vehicle to dismiss. LKA may become temporarily unavailable after repeated take steering alerts.
The system performance may be affected by:
If the LKA system is not functioning properly when lane markings are clearly visible, cleaning the windshield may help.
A camera blocked message may display if the camera is blocked. Some driver assistance systems may have reduced performance or not work at all. An LKA or LDW unavailable message may display if the systems are temporarily unavailable. This message could be due to a blocked camera. The LKA system does not need service.
Clean the outside of the windshield behind the rearview mirror.
LKA assistance and/or LDW alerts may occur due to tar marks, shadows, cracks in the road, temporary or construction lane markings, or other road imperfections. This is normal system operation; the vehicle does not need service. Turn LKA off if these conditions continue.
Download Manual