Audio Set [Type C/Type D (touchscreen)]
The explanation of functions described in this manual may differ from the actual operation, and the shapes of screens and buttons and the letters and characters displayed may also differ from the actual appearance. Additionally, depending on future software updates, the content may successively change without notice.
- Commander switch
- Touch panel
- Voice recognition with steering switch and microphone
For safety reasons, some operations are disabled while the vehicle is being driven.
 Volume dial operation
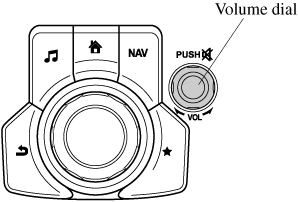
Press the volume dial to switch the audio MUTE on and off. Turn the volume dial to adjust the volume. The volume increases by turning the dial clockwise, and decreases by turning it anticlockwise. Switches around commander knob The following operations can be done by pressing the switches around the commander knob.
  : Displays the home screen.
  : Displays the Entertainment screen.
  : Displays the Navigation screen (Only navigation-equipped vehicles).
The following operations can be done by pressing the switches around the commander knob. : Displays the home screen. : Displays the Entertainment screen. : Displays the Navigation screen (Only navigation-equipped vehicles).For operation of the Navigation screen, refer to the navigation system manual. If the SD card for the navigation system is not inserted, the compass indicating the direction in which the vehicle is moving is displayed.  : Displays the Favourites screen. Long-press to store particular items in Favourites. (Radio, phonebook and destination of the navigation system can be programmed.)
  : Returns to previous screen. Commander knob operation
: Displays the Favourites screen. Long-press to store particular items in Favourites. (Radio, phonebook and destination of the navigation system can be programmed.) : Returns to previous screen. Commander knob operation
(Selection of icons on screen)
- Tilt or turn the commander knob and move the cursor to the desired icon.
- Press the commander knob and select the icon.
Long-press operation of the commander knob is also possible for some functions.
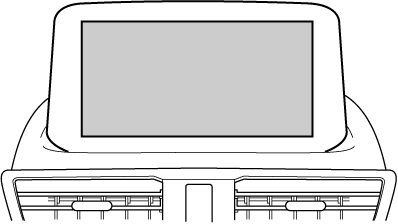
Do not press the screen strongly or press it with a sharp-pointed object. Otherwise, the screen could be damaged.
For safety reasons, operation of the centre display is disabled while the vehicle is being driven. However, items not displayed in grey can be operated using the commander switch while the vehicle is being driven.
Basic Operation Method
TOUCH & TAP
- Touch or tap on the item indicated on the screen.
- The operation is launched and the next item is displayed.
- Touch the setting item displaying a slider bar.
- Touch the slider with your finger and move to the desired level.
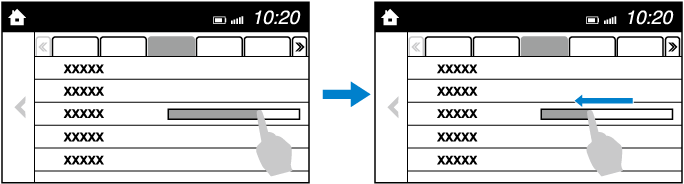
- Touch the screen with your finger and move up or down.
- Items which were not displayed can be displayed.
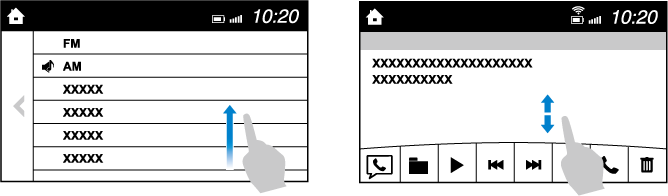
- Touch the
 .
.
- Touch the .
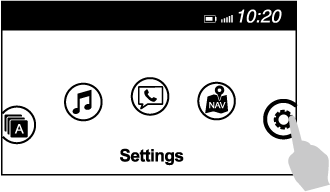
Home screen
| Icon | Function |
|---|---|
 |
Applications Information such as average fuel economy, maintenance, and warnings can be verified. Depending on the grade and specification, the screen display may differ. |
 |
Entertainment Operates audio such as the radio and CDs. The audio source most recently used is displayed. An audio source which cannot be used at that time is skipped and the previous audio source is displayed. To change the audio source, select the icon displayed at the bottom of the screen. |
 |
Communication Bluetooth® related functions are available. |
 |
Navigation Navigation screen is displayed (vehicles with navigation system). If the SD card for the navigation system is not inserted, the compass indicating the direction in which the vehicle is moving is displayed. The compass may not indicate the correct bearing when the vehicle is stopped or travelling at a slow speed. |
 |
Settings Overall setting menu (Such as display, sound, Bluetooth® and Language). Depending on the grade and specification, the screen display may differ. |
Volume/Display/Sound Controls
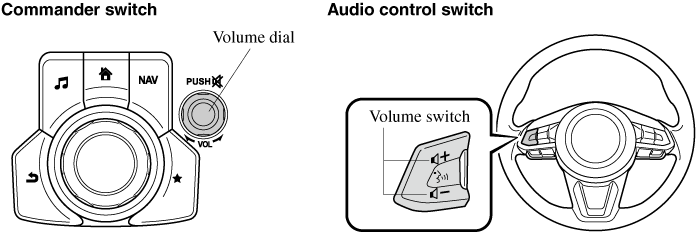
Volume adjustment Turn the commander switch volume dial. The volume switch on the steering switch can also be pressed. Display setting Select the  icon on the home screen to display the Settings screen. Select the
  tab to select the item you would like to change. Display OFF/Clock The centre display can be turned off. Select
  to turn the display off.
icon on the home screen to display the Settings screen. Select the tab to select the item you would like to change. Display OFF/Clock The centre display can be turned off. Select to turn the display off.When  is selected the centre display turns off and the clock is displayed. The centre display can be turned back on as follows:
 : Switches screen automatically according to headlight illumination condition*1
  : Daytime screen setting
  : Nighttime screen setting
icon on the home screen to display the Settings screen. Select the
: Nighttime screen setting
icon on the home screen to display the Settings screen. Select the  tab to select the item you would like to change.
is selected the centre display turns off and the clock is displayed. The centre display can be turned back on as follows:
- Touch the centre display.
- Operate the commander switch.
: Switches screen automatically according to headlight illumination condition*1 : Daytime screen setting : Nighttime screen setting
- The display is constantly on daytime screen when the illumination dimmer is cancelled.
- Select
 .
. - Select
 .
.
icon on the home screen to display the Settings screen. Select the tab to select the item you would like to change.
| Indication | Setting value |
|---|---|
| Bass (Low pitch sound) |  Side: Low pitch enhancement Side: Low pitch enhancement  Side: Low pitch reduction Side: Low pitch reduction |
| Treble (Treble sound) | Side: Treble enhancement Side: Treble reduction |
| Fade (Front/Rear volume balance) | Front: Front speaker volume enhancement Rear: Rear speaker volume enhancement |
| Balance (Left/right volume balance) | Right: Right speaker volume enhancement Left: Left speaker volume enhancement |
| ALC*1 (Automatic volume adjustment) | Off―Adjustment at seven levels |
| Bose® Centerpoint*2 (Automatic surround level adjustment) | On/Off |
| Bose® AudioPilot*2 (Automatic volume adjustment) | On/Off |
| Beep (Audio operation sound) | On/Off |
- Standard audio
- Bose® Sound System
Bose® Centerpoint (Automatic surround level adjustment) Centerpoint®*3 lets vehicle owners enjoy a Bose® surround sound experience from their existing CDs and MP3s. Specifically engineered to meet the unique demands of reproducing surround sound in a vehicle. Converts stereo signals to multiple channels allowing greater precision when reproducing the sound. An enhanced algorithm to simultaneously create a wider, more spacious sound field. *3 Centerpoint® is a registered trademark of Bose Corporation.
Bose® AudioPilot (Automatic volume adjustment) When driving, background noise can interfere with enjoying music. AudioPilot®*4 noise compensation technology continuously adjusts the music to compensate for background noise and vehicle speed. It reacts only to sustained noise sources and not intermittent ones, such as speed bumps. An enhanced DSP algorithm allows faster and more effective compensation for unusual situations, such as driving on a very rough road or at high speeds. *4 AudioPilot® is a registered trademark of Bose Corporation.
Operating the Radio (Type C)
Radio ON Select the  icon on the home screen to display the Entertainment screen. When selecting the desired radio, the following icons are indicated in the lower part of the centre display. AM/FM Radio
icon on the home screen to display the Entertainment screen. When selecting the desired radio, the following icons are indicated in the lower part of the centre display. AM/FM Radio
| Icon | Function |
|---|---|
 |
Displays the Entertainment menu. Use to switch to a different audio source. |
 |
Displays the station list. Select  to display the frequencies of up to ten radio stations on the auto memory preset list. Select the desired frequency. to display the frequencies of up to ten radio stations on the auto memory preset list. Select the desired frequency. |
 |
Displays the Favourites list. Long-press to store radio station currently being aired. |
 |
You can search for receivable radio stations. Scanning stops at each station for about five seconds. Select again to continue receiving the radio station. |
 |
You can change the radio frequency manually. Rotate the commander knob, slide the screen, or touch the radio frequency. Press  or or  to change the radio frequency one step at a time. When or is long-pressed, the radio frequency changes continually. It stops when you remove your hand from the icon or the commander knob. to change the radio frequency one step at a time. When or is long-pressed, the radio frequency changes continually. It stops when you remove your hand from the icon or the commander knob. |
 |
Automatic radio station selection. When long-pressed, the radio frequency changes continually. It stops when you remove your hand from the icon or the commander knob. |
 |
|
 |
Displays sound settings to adjust audio quality level. |
Favourites Radio Selected stations can be registered for convenient operation. Up to 50 stations can be registered. The Favourites list is common to AM and FM radio. Registering to Favourites Long-press the  icon to register the current radio station. The registration can also be performed using the following procedure.
icon to register the current radio station. The registration can also be performed using the following procedure.
- Select the icon to display the Favourites list.
- Select
 .
. - Select
 .
. - The station is added to the bottom of the Favourites list.
If the battery is disconnected, your Favourites list will not be deleted.
- Select the icon to display the Favourites list.
- Select the radio frequency to tune in the radio station.
- Select the icon to display the Favourites list.
- Select .
- Select
 .
. - Select the radio frequency you want to delete.
- Select .
- Select the icon to display the Favourites list.
- Select .
- Select
 .
. - Select a radio frequency. The selected radio station can be moved.
- Slide the radio station or move it using the commander switch, then select
 .
.
Operating the Radio (Type D)
Radio ON Select the icon on the home screen to display the Entertainment screen. When selecting the desired radio, the following icons are indicated in the lower part of the centre display. AM/FM Radio
icon on the home screen to display the Entertainment screen. When selecting the desired radio, the following icons are indicated in the lower part of the centre display. AM/FM Radio
| Icon | Function |
|---|---|
|
Displays the Entertainment menu. Use to switch to a different audio source. |
 |
Displays the list of receivable RDS radio stations (FM only). |
|
Displays the station list (AM only). Select to display the frequencies of up to ten radio stations on the auto memory preset list. Select the desired frequency. |
|
Displays the Favourites list. Long-press to store radio station currently being aired. |
|
You can search for receivable radio stations. Scanning stops at each station for about five seconds. Select again to continue receiving the radio station. |
|
You can change the radio frequency manually. Rotate the commander knob, slide the screen, or touch the radio frequency. Press or to change the radio frequency one step at a time. When  or is long-pressed, the radio frequency changes continually. It stops when you remove your hand from the icon or the commander knob. or is long-pressed, the radio frequency changes continually. It stops when you remove your hand from the icon or the commander knob. |
 |
Switches the TA mode on and off. |
|
Automatic radio station selection. When long-pressed, the radio frequency changes continually. It stops when you remove your hand from the icon or the commander knob. |
|
|
 |
Displays the FM settings screen (FM only). On/Off of Alternative frequency and Region lock can be set. |
|
Displays sound settings to adjust audio quality level. |
When the  or
or  icon is selected while FM is selected, each programme is selected.
or icon is selected while FM is selected, each programme is selected. icon to register the current radio station. The registration can also be performed using the following procedure.
- Select the icon to display the Favourites list.
- Select .
- Select .
- The station is added to the bottom of the Favourites list.
If the battery is disconnected, your Favourites list will be not deleted.
- Select the icon to display the Favourites list.
- Select the radio frequency to tune in the radio station.
- Select the icon to display the Favourites list.
- Select .
- Select .
- Select the radio frequency you want to delete.
- Select .
- Select the icon to display the Favourites list.
- Select .
- Select .
- Select a radio frequency. The selected radio station can be moved.
- Slide the radio station or move it using the commander switch, then select .
 icon while in FM mode to switch to the FM settings screen. AF/REG on or off switching can be performed as follows: (AF mode on/off) Select On/Off on the FM settings screen.
(REG mode on/off) While the AF mode is on, select On/Off. Traffic announcement (TA) Select  during FM/AM reception to switch to the TA mode. If a TA broadcast is received while in the TA mode, the TA broadcast intercedes even while using other functions (FM, CD, USB device, AUX, BT audio, Aha™ radio, or Stitcher™ radio), and “Traffic Announcement” is displayed. If a TA is received on the Entertainment screen,
  is displayed on the screen.
during FM/AM reception to switch to the TA mode. If a TA broadcast is received while in the TA mode, the TA broadcast intercedes even while using other functions (FM, CD, USB device, AUX, BT audio, Aha™ radio, or Stitcher™ radio), and “Traffic Announcement” is displayed. If a TA is received on the Entertainment screen, is displayed on the screen.Select to cancel the received TA and return to TA reception stand-by. If a TA is received on a screen other than the Entertainment screen, the selection screens for  , , and
  are displayed on the screen. If is selected, the selection screen turns off when a TA is received while continuing to receive TAs. Selection from Station List List of receivable RDS radio stations is displayed. You can easily select the station you want to listen to from the list. If a radio station name is not available, the frequency is displayed. In addition, radio stations which have been programmed to a Genre code (Programme types like Rock, News, and so on) can also be displayed separately by category.
to cancel the received TA and return to TA reception stand-by. If a TA is received on a screen other than the Entertainment screen, the selection screens for , , and are displayed on the screen. If is selected, the selection screen turns off when a TA is received while continuing to receive TAs. Selection from Station List List of receivable RDS radio stations is displayed. You can easily select the station you want to listen to from the list. If a radio station name is not available, the frequency is displayed. In addition, radio stations which have been programmed to a Genre code (Programme types like Rock, News, and so on) can also be displayed separately by category.
It may take longer to display the station list depending on the reception conditions.
- Select the
 icon to display the radio station list.
 - Select the radio frequency to tune in the radio station.
- Select the
 on the station list screen to display the genre list screen.
 - Select the genre to display the radio station list in the genre.
Only one Genre can be selected.
Operating the Digital Audio Broadcasting (DAB) Radio (Type D) (Some Models)
What is DAB radio? DAB radio is a digital broadcasting system for radio. DAB radio provides a high-quality radio sound source using an auto frequency switching function in boundary areas. By displaying the radio text, information such as the song name and artist name can be displayed.
Radio ON
This unit is also compatible with DAB radio.
radio.- Select on the home screen to display the Entertainment screen.
- Select
 , the following icons are displayed at the bottom of the screen.
| Icon | Function |
|---|---|
|
Displays the Entertainment menu. Use to switch to a different audio source. |
|
Displays the station list (ensemble and station). Select  to update the station list. Select to update the station list. Select  to select the ensemble you want to display. to select the ensemble you want to display. |
|
Displays the favourites list. Press and hold to store the currently tuned station to the favourites list. |
|
Searches your desired station from the station list. Tunes to each station in the station list for 10 seconds. Select again when your desired station is tuned.
If the station list is not available, it switches to the station list update screen. Perform the station list updating.
|
|
Switches the TA mode on and off. |
|
Returns to the previous station. Touch and hold to return to the top station in the previous ensemble. |
|
Goes to the next station. Touch and hold to go to the top station in the next ensemble. |
|
Displays the DAB radio setting screen. |
|
Displays sound settings to adjust audio quality level. |
Example of use (Update station list and listen to DAB radio)
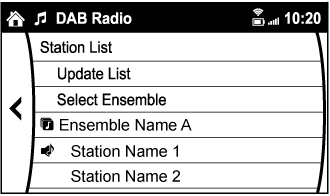
- Select the icon and display the following screen.
- Select to update the station list.
- Select to select the ensemble you want to display.
- Select a desired station to start radio reception.
- Select the icon while using DAB radio.
- Select the desired item and perform the setting. The items which can be set are as follows:
| Item | Setting | Function |
|---|---|---|
| BAND Settings | Band III/L Band/Both | Frequency band can be changed. |
| DAB-FM Link | On/Off | On: If the reception condition is bad, an FM station which is providing the same broadcast is searched and switched to. |
| DAB-DAB Link | On/Off | On: If the reception condition is bad, a DAB station which is providing the same broadcast is searched and switched to. |
| Radio Text | On/Off | On: Radio text is displayed. |
- The radio text may not be displayed depending on the radio station.
- The radio text cannot be displayed in DAB-FM mode.
- If there is no DAB radio signal, “Signal Lost” is displayed on the screen. Change the ensemble or radio station, or perform station list updating.
Operating the Compact Disc (CD) Player (Some Models)
| Type | Playable data |
|---|---|
| Music/MP3/WMA/AAC CD player |
|
If a disc has both music data (CD-DA) and MP3/WMA/AAC files, playback of the two or three file types differs depending on how the disc was recorded.
There will be a short lapse before play begins while the player reads the digital signals on the CD.
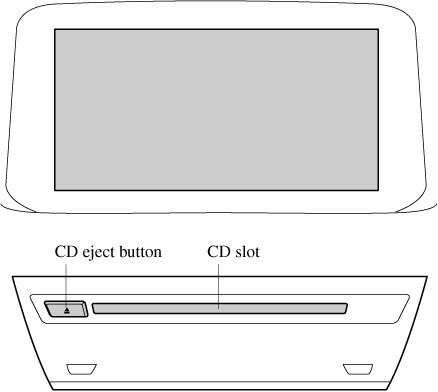
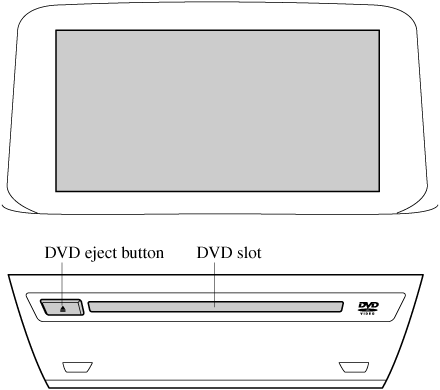
 ) to eject the CD.
Playback Select the icon on the home screen with a CD inserted and display the Entertainment screen. When  is selected, the following icons are indicated in the lower part of the centre display.
icon on the home screen with a CD inserted and display the Entertainment screen. When is selected, the following icons are indicated in the lower part of the centre display.
| Icon | Function |
|---|---|
|
Displays the Entertainment menu. Use to switch to a different audio source. |
|
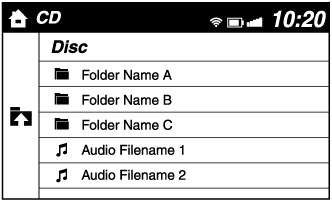
(Music CD) Displays the track list of the CD. Select the track you want to play. (MP3/WMA/AAC CD) Displays the top level folder/file list. Select the folder you want to select. The files in the selected folder are displayed. Select the file you want to play. |
 |
(MP3/WMA/ACC CDs only) Displays the file list of the folder currently being played. Select the song you want to listen to. |
 |
(Music CD) Replays the song currently being played repeatedly. Select it again to cancel. (MP3/WMA/AAC CD) Replays the song currently being played repeatedly. When selected again, the songs in the folder are played repeatedly. Select it again to cancel. |
 |
(Music CD) Plays songs on the CD in random order. Select it again to cancel. (MP3/WMA/AAC CD) Plays songs in the folder in random order. When selected again, the songs on the CD are played in random order. Select it again to cancel. |
|
(Music CD) The beginning of each track on a CD is played to aid in searching for a desired track. When selected again, the operation is cancelled and the song currently being played continues. (MP3/WMA/AAC CD) The beginning of each track in a folder is played to aid in searching for a desired track. When selected again, the operation is cancelled and the song currently being played continues. If the audio is operated during scan-play, the track being scan-played is played normally. Then, the audio operation is performed. |
|
If selected within a few seconds of a song which has started to play, the previous song is selected. If more than a few seconds have elapsed after a song has begun to play, the song currently being played is replayed from the beginning. Long-press to fast reverse. It stops when you remove your hand from the icon or the commander knob. |
 |
Plays a CD. When selected again, playback is temporarily stopped. |
|
Advances to the beginning of the next song. Long-press to fast forward. It stops when you remove your hand from the icon or the commander knob. |
|
Displays sound settings to adjust audio quality level. |
Example of use (When searching for a song from the top level of an MP3/WMA/AAC CD)
- Select the icon to display the folder/file list at the top level.
- When the folder is selected, folders/file lists in the folder are displayed.
- Select the desired song.
- Select
 to move to a folder one level higher.
 - The appearance of the repeat and shuffle icons changes depending on the type of operation in which the function is used.
Operating the Digital Versatile Disc (DVD) Player (Some Models)
| Type | Playable data |
|---|---|
| DVD VIDEO/DVD-VR player | DVD VIDEO/DVD-VR file |
There will be a short lapse before play begins while the player reads the digital signals on the DVD.
) to eject the DVD.Playback Select the icon on the home screen with a DVD inserted and display the Entertainment screen. When  is selected, the DVD top menu screen and the controller are displayed. When starting the playback by operating the controller, the following icons are displayed at the bottom of the screen.
icon on the home screen with a DVD inserted and display the Entertainment screen. When is selected, the DVD top menu screen and the controller are displayed. When starting the playback by operating the controller, the following icons are displayed at the bottom of the screen.
| Icon | Function |
|---|---|
|
Displays the Entertainment menu. Use to switch to a different audio source. |
|
Returns to the DVD menu screen. |
|
Returns to the beginning of the previous chapter if the icon is selected within a few seconds after the playback of the current chapter has started. Returns to the beginning of the current chapter if the icon is selected a few seconds after the playback of the current chapter has started. Long-press during playback to fast reverse. Long-press during pause to play in reverse in slow motion. It stops when you remove your hand from the icon or the commander knob. |
|
Plays the DVD. Select again to pause the playback. |
|
Advances to the beginning of the next chapter. Long-press during playback to fast forward. Long-press during pause to play in slow motion. It stops when you remove your hand from the icon or the commander knob. |
 |
Changes camera angle each time the icon is selected (usable DVDs only). |
 |
Changes display/non-display of the sub titles (usable DVDs only). |
 |
Changes the parental lock setting. Parental lock level and PIN code setting changes are possible. |
|
Pauses the playback and displays the DVD setting screen. Select  to adjust the sound quality. Select to adjust the sound quality. Select  to change the aspect ratio (horizontal to vertical ratio of the screen). 16:9 Widescreen, 4:3 Letterbox, and 4:3 Pan-scan are available. to change the aspect ratio (horizontal to vertical ratio of the screen). 16:9 Widescreen, 4:3 Letterbox, and 4:3 Pan-scan are available. |
 |
Adjusts the screen. Displays the video setting screen at the bottom of the screen. |
- For safety reasons, images are not displayed while the vehicle is being driven.
- Slide the
 of the controller to move the controller.
 - If the mode is switched to DVD mode once the DVD playback has stopped, the playback restarts without displaying the DVD menu screen.
- Select the icon.
- Select to adjust the sound quality.
- Select the icon.
- Select .
- Select a desired aspect ratio.
 icon is selected, the following tabs are displayed at the bottom of the screen.
| Tab | Function |
|---|---|
 |
Screen brightness can be adjusted using the slider. |
 |
Screen contrast can be adjusted using the slider. |
 |
Colour tone of the screen can be adjusted using the slider. |
 |
Screen colour can be adjusted using the slider. |
 |
Screen settings can be reset to initial values. Select . |
How to use Auxiliary jack/USB port
Audio can be heard from the vehicle's speakers by connecting a commercially-available portable audio unit to the auxiliary jack. Use a commercially-available, non-impedance (3.5 ) stereo mini plug lead. In addition, audio can be played from the vehicle audio device by connecting a USB device to the USB port.
) stereo mini plug lead. In addition, audio can be played from the vehicle audio device by connecting a USB device to the USB port.Settings
Depending on the grade and specification, the screen display may differ.
icon on the home screen and display the Settings screen. Switch the tab and select the setting item you want to change. You can customize settings in the setup display as follows:
| Tab | Item | Function |
|---|---|---|
| AD-Disp | Height Brightness Control Other | |
| Display | ||
| Safety | Distance Recognition Support System SBS/SCBS Other | |
| Sound | ||
| Clock | Adjust Time | Displays the currently set time is displayed. Press to advance the hour/minute, and select to move the hour/minute back. AM/PM can only be selected with the 12-hour clock display. |
| GPS Sync | Synchronizes with GPS when turned on. When turned off, the time can be changed from “Adjust Time”. | |
| Time Format | Changes the display between 12 and 24-hour clock time. | |
| Time Zone Select | When it's not synchronized with GPS, select the region you want to specify. | |
| Daylight Savings Time | Turns the daylight saving time setting on/off. When ON, the time advances 1 hour. When OFF, it returns to normal time. | |
| Vehicle | Rain Sensing Wiper Door Lock Other | |
| Devices | Bluetooth® | |
| Network Management | Wi-Fi™ is used to obtain Navi POI/Real Time Traffic function (Such as gas prices, weather, nearest restaurant) | |
| System | Tool Tips | Turns button explanations ON/OFF. |
| Language | Changes the language. | |
| Temperature | Changes the setting between Fahrenheit and Celsius. | |
| Distance | Changes the setting between miles and kilometres. | |
| Music Database Update | Used to update Gracenote®. Gracenote is used with USB Audio, and provides:
|
|
| Factory Reset | Memory and settings are initialized to the factory settings. The initialization launches by selecting the button. |
|
| About | Agreements and Disclaimers | Verify the disclaimer and agree. |
| Version Information | Can verify the current audio unit OS version and Gracenote Database version. |
Applications
Depending on the grade and specification, the screen display may differ.
 icon on the home screen to display the Applications screen. The following information can be verified.
| Top screen | Item | Function |
|---|---|---|
| Fuel Economy Monitor | Fuel Consumption Control Status Effectiveness Display Settings | |
| Vehicle Status Monitor | Maintenance | Scheduled Maintenance Tyre Rotation Oil Change |
| Warning Guidance | Warnings currently active can be verified. |
Download Manual