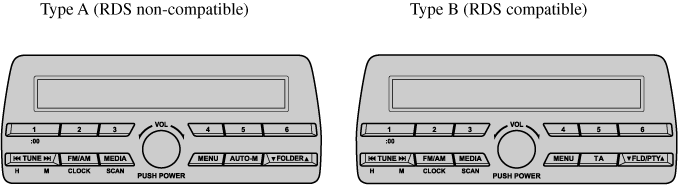
Audio Set [Type A/Type B (non-touchscreen)]
Power/Volume/Sound Controls
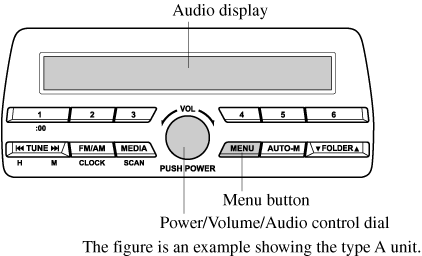
Power ON/OFF Switch the ignition to ACC or ON. Press the power/volume dial to turn the audio system on. Press the power/volume dial again to turn the audio system off. Volume adjustment To adjust the volume, turn the power/volume dial. Turn the power/volume dial clockwise to increase volume, anticlockwise to decrease it. Audio sound adjustment
*1 Type B *2 Depending on the model, this function may not be available.
AF (Setting Alternative Frequency (AF)) (Type B) The AF function of the Radio Data System (RDS) can be set on or off. REG (Setting Regional Programme (REG)) (Type B) The REG function of the Radio Data System (RDS) can be set on or off. ALC (Automatic volume adjustment) The automatic level control (ALC) changes the audio volume automatically according to the vehicle speed. The faster the vehicle speed, the higher the volume increases. ALC has ALC OFF and ALC LEVEL 1 to 7 modes. At ALC LEVEL 7, the amount that the volume can increase is at the maximum.
- Press the menu button (
 ) to select the function. The selected function will be indicated.
 - Turn the audio control dial to adjust the selected functions as follows:
| Indication | Setting value | |
|---|---|---|
| Turn Anticlockwise | Turn Clockwise | |
| AF*1 (Setting Alternative Frequency (AF)) | Off | On |
| REG*1 (Setting Regional Programme (REG)) | Off | On |
| ALC (Automatic volume adjustment) | Level decrease | Level increase |
| BASS (Low pitch sound) | Decrease bass | Increase bass |
| TREB (Treble sound) | Decrease treble | Increase treble |
| FADE (Front/back volume balance) | Shift the sound to the front | Shift the sound to the rear |
| BAL (Left/right volume balance) | Shift the sound to the left | Shift the sound to the right |
| BEEP (Audio operation sound) | Off | On |
| BT SETUP*2 | Select mode | |
12Hr  24Hr (12 Hr/24 Hr time adjustment) 24Hr (12 Hr/24 Hr time adjustment) |
12Hr (Flashing) | 24Hr (Flashing) |
If not operated for several seconds, the display returns to the previous display. To reset bass, treble, fade, and balance, press the menu button () for 2 seconds. The unit will beep and “CLEAR” will be displayed.
) for 2 seconds. The unit will beep and “CLEAR” will be displayed.Select the mode according to the driving conditions. BEEP (Audio operation sound) The setting for the operation sound when pressing and holding a button can be changed. The initial setting is ON. Set to OFF to mute the operation sound. BT SETUP mode (Some Models) Music and other audio such as voice data recorded on portable audio devices and mobile phones available on the market which are equipped with the Bluetooth® transmission function can be listened to via wireless transmission over the vehicle's speakers. Using the BT SETUP mode, these devices can be programmed to the Bluetooth® unit or changed. 12Hr  24Hr (12 Hr/24 Hr time adjustment) Rotating the audio control dial switches the display between 12 and 24-hour clock time.
24Hr (12 Hr/24 Hr time adjustment) Rotating the audio control dial switches the display between 12 and 24-hour clock time.Clock
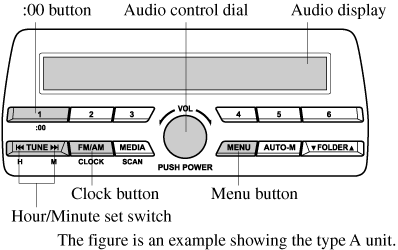
Setting the time The clock can be set at any time when the ignition is switched to ACC or ON.
- To adjust the time, press the clock button (
 ) for about 2 seconds until a beep is heard.
 - The clock's current time will flash. Time adjustment
- To adjust the time, press the hour/minute set button (
 ,
,  ) while the clock's current time is flashing.
 - The hours advance while the hour set button () is pressed. The minutes advance while the minute set button () is pressed.
- To adjust the time, press the hour/minute set button (
- Press the clock button () again to start the clock.
- Press the clock button () for about 2 seconds until a beep is heard.
- Press the :00 button (1).
- When the button is pressed, the time will be reset as follows: (Example) 12:01―12:29→12:00 12:30―12:59→1:00
- When the :00 button (1) is pressed, the seconds will start at “00”.
- Switching between 12 and 24-hour clock time: Press the menu button () several times until 12 and 24-hour clock time are displayed. Turn the audio control dial in either direction, select the desired clock setting while the preferred clock time is flashing.
Operating the Radio (Type A)
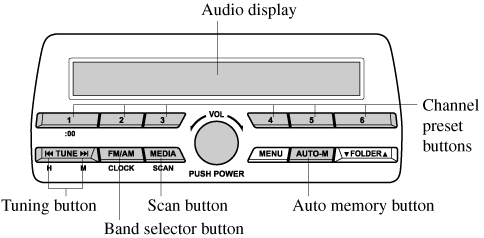
Radio ON Press a band selector button () to turn the radio on. Band selection Successively pressing the band selector button () switches the bands as follows: FM1→FM2→AM. The selected mode will be indicated.
Tuning The radio has the following tuning methods: Manual, Seek, Scan, Preset channel, and Auto memory tuning. The easiest way to tune stations is to set them on preset channels. Manual tuning Select the station by pressing the tuning button (, ) lightly. Seek tuning Automatic search for radio stations starts when the tuning button (, ) is pressed until a beep sound is heard. The search stops when a station is found.
Scan tuning Press and hold the scan button ( ) to automatically sample strong stations. Scanning stops at each station for about 5 seconds. To hold a station, press and hold the scan button () again during this interval. Preset channel tuning The 6 preset channels can be used to store 6 AM and 12 FM stations.
 ) for about 2 seconds until a beep is heard; the system will automatically scan and temporarily store up to 6 stations with the strongest frequencies in each selected band in that area.
) to turn the radio on. Band selection Successively pressing the band selector button () switches the bands as follows: FM1→FM2→AM. The selected mode will be indicated.
If the FM broadcast signal becomes weak, reception automatically changes from STEREO to MONO for reduced noise.
, ) lightly. Seek tuning Automatic search for radio stations starts when the tuning button (, ) is pressed until a beep sound is heard. The search stops when a station is found.
If you continue to press and hold the button, the frequency will continue changing without stopping.
) to automatically sample strong stations. Scanning stops at each station for about 5 seconds. To hold a station, press and hold the scan button () again during this interval. Preset channel tuning The 6 preset channels can be used to store 6 AM and 12 FM stations.
- To set a channel first select AM, FM1, or FM2. Tune to the desired station.
- Press a channel preset button for about 2 seconds until a beep is heard. The preset channel number or station frequency will be displayed. The station is now held in the memory.
- Repeat this operation for the other stations and bands you want to store. To tune one in the memory, select AM, FM1, or FM2 and then press its channel preset button. The station frequency or the channel number will be displayed.
) for about 2 seconds until a beep is heard; the system will automatically scan and temporarily store up to 6 stations with the strongest frequencies in each selected band in that area. After scanning is completed, the station with the strongest frequency will be tuned and its frequency displayed. Press and release the auto memory button () to recall stations from the auto-stored stations. One stored station will be selected each time and its frequency and channel number will be displayed.
) to recall stations from the auto-stored stations. One stored station will be selected each time and its frequency and channel number will be displayed.
If no stations can be tuned after scanning operations, “A” will be displayed.
Operating the Radio (Type B)
Radio ON Press a band selector button () to turn the radio on. Band selection Successively pressing the band selector button () switches the bands as follows: FM1→FM2→MW/LW. The selected mode will be indicated.
Tuning The radio has the following tuning methods: Manual, Seek, Scan, Preset channel, and Auto memory tuning. The easiest way to tune stations is to set them on preset channels. Manual tuning Select the station by pressing the tuning button (, ) lightly. Seek tuning Automatic search for radio stations starts when the tuning button (, ) is pressed until a beep sound is heard. The search stops when a station is found.
Scan tuning Press and hold the scan button () to automatically sample strong stations. Scanning stops at each station for about 5 seconds. To hold a station, press and hold the scan button () again during this interval. Preset channel tuning The 6 preset channels can be used to store 6 MW/LW and 12 FM stations.
Alternative frequency (AF) AF functions on FM stations. Press the menu button () and select the AF mode to turn it on and “AF” will be displayed. If the radio reception of the current station weakens, the system switches to an alternative station automatically.
) to turn the radio on. Band selection Successively pressing the band selector button () switches the bands as follows: FM1→FM2→MW/LW. The selected mode will be indicated.
If the FM broadcast signal becomes weak, reception automatically changes from STEREO to MONO for reduced noise.
, ) lightly. Seek tuning Automatic search for radio stations starts when the tuning button (, ) is pressed until a beep sound is heard. The search stops when a station is found.
If you continue to press and hold the button, the frequency will continue changing without stopping.
) to automatically sample strong stations. Scanning stops at each station for about 5 seconds. To hold a station, press and hold the scan button () again during this interval. Preset channel tuning The 6 preset channels can be used to store 6 MW/LW and 12 FM stations.
- To set a channel first select MW/LW, FM1, or FM2. Tune to the desired station.
- Press a channel preset button for about 2 seconds until a beep is heard. The preset channel number or station frequency will be displayed. The station is now held in the memory.
- Repeat this operation for the other stations and bands you want to store. To tune one in the memory, select MW/LW, FM1, or FM2 and then press its channel preset button. The station frequency or the channel number will be displayed.
The radio data system (RDS) does not function if it is out of the system's service coverage area.
) and select the AF mode to turn it on and “AF” will be displayed. If the radio reception of the current station weakens, the system switches to an alternative station automatically. If you wish to continue a regional programme, press the menu button () and select the REG mode to turn it on. “REG ON” is displayed. To cancel it, press the audio control dial and select the REG mode to turn it off. “REG OFF” is displayed. Traffic announcement (TA) If the traffic announcement button ( ) is pressed, the unit switches to TA mode and “TA” is displayed.
) and select the REG mode to turn it on. “REG ON” is displayed. To cancel it, press the audio control dial and select the REG mode to turn it off. “REG OFF” is displayed. Traffic announcement (TA) If the traffic announcement button () is pressed, the unit switches to TA mode and “TA” is displayed. If a TA broadcast is received while in the TA mode, the TA broadcast intercedes even while using other functions (FM, CD, USB device, AUX, or BT audio), and “Traffic Info” is displayed. During a TA broadcast, press the traffic announcement button () to end the broadcast and return to the previous mode. Programme-type information (PTY) Some FM stations transmit programme-type codes. This code enables alternative stations transmitting the same programme-type code to be found quickly. Press the programme-type information button ( ,
, ) while in FM mode. The programme-type code and “PTY” will be displayed during reception. If there is no programme-type code, “None” will be displayed. (To choose a programme-type:)
) to end the broadcast and return to the previous mode. Programme-type information (PTY) Some FM stations transmit programme-type codes. This code enables alternative stations transmitting the same programme-type code to be found quickly. Press the programme-type information button (,) while in FM mode. The programme-type code and “PTY” will be displayed during reception. If there is no programme-type code, “None” will be displayed. (To choose a programme-type:)
- Press the Programme-type information button (,) when the programme-type code is displayed.
- Operate any one of the following:
- Press the pre-programmed channel preset button (1 to 6).
- Press the Programme-type information button (,).
- Press the Programme-type information button (,) when the programme-type code is displayed.
- Press the Programme-type information button (,) until the beep sounds. The unit will scan for broadcasts, if none are found, “Nothing” will be displayed and the unit will return to the previously tuned band.
- Press the Programme-type information button (,) when the programme-type code is displayed.
- Press the Programme-type information button (,) and select the programme type.
- While the programme type is displayed, press a channel preset button for about 2 seconds.
Operating the Compact Disc (CD) Player (Some Models)

| Type | Playable data |
|---|---|
| Music/MP3/WMA/AAC CD player |
|
If a disc has both music data (CD-DA) and MP3/WMA/AAC files, playback of the two or three file types differs depending on how the disc was recorded.
There will be a short lapse before play begins while the player reads the digital signals on the CD.
 ) to eject the CD. Playback Press the media button () to switch to CD mode and start playback.
The CD mode cannot be selected if a CD has not been inserted.
) to advance through a track at high speed. Press and hold the reverse button () to reverse through a track at high speed. Track search Press the track up button () once to skip forward to the beginning of the next track. Press the track down button () within a few seconds after playback begins to track down to the beginning of the previous track.Press the track down button () after a few seconds have elapsed to start playback from the beginning of the current track. Folder search (during MP3/WMA/AAC CD playback) To change to the previous folder, press the folder down button (), or press the folder up button () to advance to the next folder. Music scan During music CD playback This function scans the titles on a CD and plays 10 seconds of each song to aid you in finding a song you want to listen to.
) after a few seconds have elapsed to start playback from the beginning of the current track. Folder search (during MP3/WMA/AAC CD playback) To change to the previous folder, press the folder down button (), or press the folder up button () to advance to the next folder. Music scan During music CD playback This function scans the titles on a CD and plays 10 seconds of each song to aid you in finding a song you want to listen to.Press and hold the scan button () during playback to start the scan play operation (the track number will flash). Press and hold the scan button () again to cancel scan playback. During MP3/WMA/AAC CD playback This function scans the titles in a folder currently being played and plays 10 seconds of each song to aid you in finding a song you want to listen to. Press and hold the scan button () during playback to start the scan play operation (the track number will flash). Press and hold the scan button () again to cancel scan playback.
Repeat playback During music CD playback
MP3/WMA/AAC CD
Display scroll Only 13 characters can be displayed at one time. To display the rest of the characters of a long title, press and hold the text button (3). The display scrolls the next 13 characters. Press and hold the text button (3) again after the last 13 characters have been displayed to return to the beginning of the title.
Message display If “CHECK CD” is displayed, it means that there is some CD malfunction. Check the CD for damage, dirt, or smudges, and then properly reinsert it. If the message appears again, insert another known good CD. If the message continues to appear, take the unit to an expert repairer, we recommend an Authorised Mazda Repairer for service.
) during playback to start the scan play operation (the track number will flash). Press and hold the scan button () again to cancel scan playback. During MP3/WMA/AAC CD playback This function scans the titles in a folder currently being played and plays 10 seconds of each song to aid you in finding a song you want to listen to. Press and hold the scan button () during playback to start the scan play operation (the track number will flash). Press and hold the scan button () again to cancel scan playback.
If the unit is left in scan, normal playback will resume where scan was selected.
- Press the repeat button (1) during playback to play the current track repeatedly. “TRACK RPT” is displayed (
 is displayed next to RPT at the bottom of the display area).
 - Press the button again to cancel the repeat playback.
- Press the repeat button (1) during playback to play the current track repeatedly. “TRACK RPT” is displayed ( is displayed next to RPT at the bottom of the display area).
- To cancel the repeat playback, press the button again after 3 seconds.
- Press the repeat button (1) during playback, and then press the button again within 3 seconds to play the tracks in the current folder repeatedly. “FOLDER RPT” is displayed (
 is displayed next to RPT at the bottom of the display area).
 - Press the button again to cancel the repeat playback.
- Press the random button (2) during playback to play the tracks on the CD randomly. “DISC RDM” is displayed (
 is displayed next to RDM at the bottom of the display area).
 - Press the button again to cancel the random playback.
- Press the random button (2) during playback to play the tracks in the folder randomly. “FOLDER RDM” is displayed ( is displayed next to RDM at the bottom of the display area).
- To cancel the random playback, press the button again after 3 seconds.
- Press the random button (2) during playback, and then press the button again within 3 seconds to play the tracks on the CD randomly. “DISC RDM” is displayed ( is displayed next to RDM at the bottom of the display area).
- Press the button again to cancel the random playback.
| Button | Information displayed on audio display |
|---|---|
 |
Track number/Elapsed time |
| Track number | |
| Track name | |
| Album name | |
| Artist name |
| Button | Information displayed on audio display |
|---|---|
|
File number/Elapsed time |
| Folder number/File number | |
| File name | |
| Folder name | |
| Album name | |
| Song name | |
| Artist name |
- The information viewable in the display is only CD information (such as artist name, song title) which has been recorded to the CD.
- This unit cannot display some characters. Characters which cannot be displayed are indicated by an asterisk (
 ).
).
The number of characters which can be displayed is restricted.
How to use Auxiliary jack/USB port
Audio can be heard from the vehicle's speakers by connecting a commercially-available portable audio unit to the auxiliary jack. Use a commercially-available, non-impedance (3.5 ) stereo mini plug lead. Contact an expert repairer, we recommend an Authorised Mazda Repairer for details. In addition, audio can be played from the vehicle audio device by connecting a USB device to the USB port.
) stereo mini plug lead. Contact an expert repairer, we recommend an Authorised Mazda Repairer for details. In addition, audio can be played from the vehicle audio device by connecting a USB device to the USB port.Error Indications
If you see an error indication on the audio display, find the cause in the chart. If you cannot clear the error indication, take the vehicle to an expert repairer, we recommend an Authorised Mazda Repairer.
| Indication | Cause | Solution |
|---|---|---|
| CHECK CD | CD is inserted upside down | Insert the CD properly. If the error indication continues to display, consult an expert repairer, we recommend an Authorised Mazda Repairer. |
| CD is defective | Insert another CD properly. If the error indication continues to display, consult an expert repairer, we recommend an Authorised Mazda Repairer. |
Download Manual