Bulb replacement
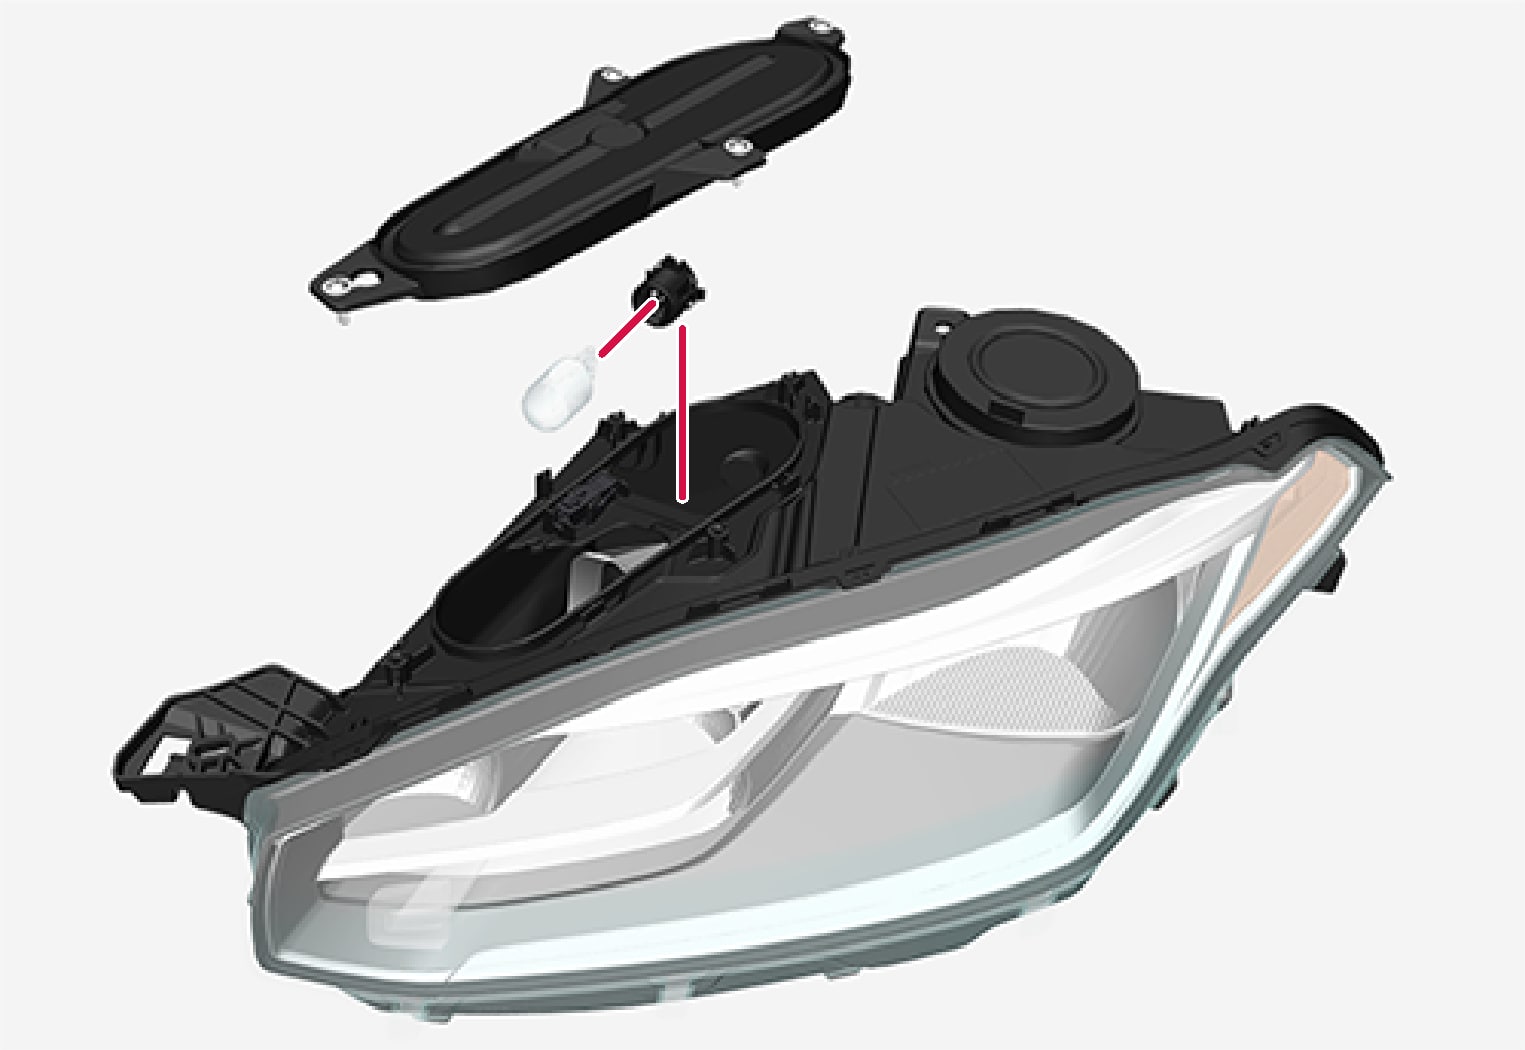
Replacing the front direction indicator bulb
The direction indicator bulb in the halogen headlamp can be replaced without assistance from a workshop.
Before the bulb can be replaced, the plastic cover over the headlamp must be removed.
Before the bulb can be replaced, the oval cover on the headlamp must be removed.

Left-hand headlamp.
Press the catches together and pull the bulb holder straight out.
Replace with a new bulb holder with bulb.
Fit the bulb holder into the socket and press it into place.
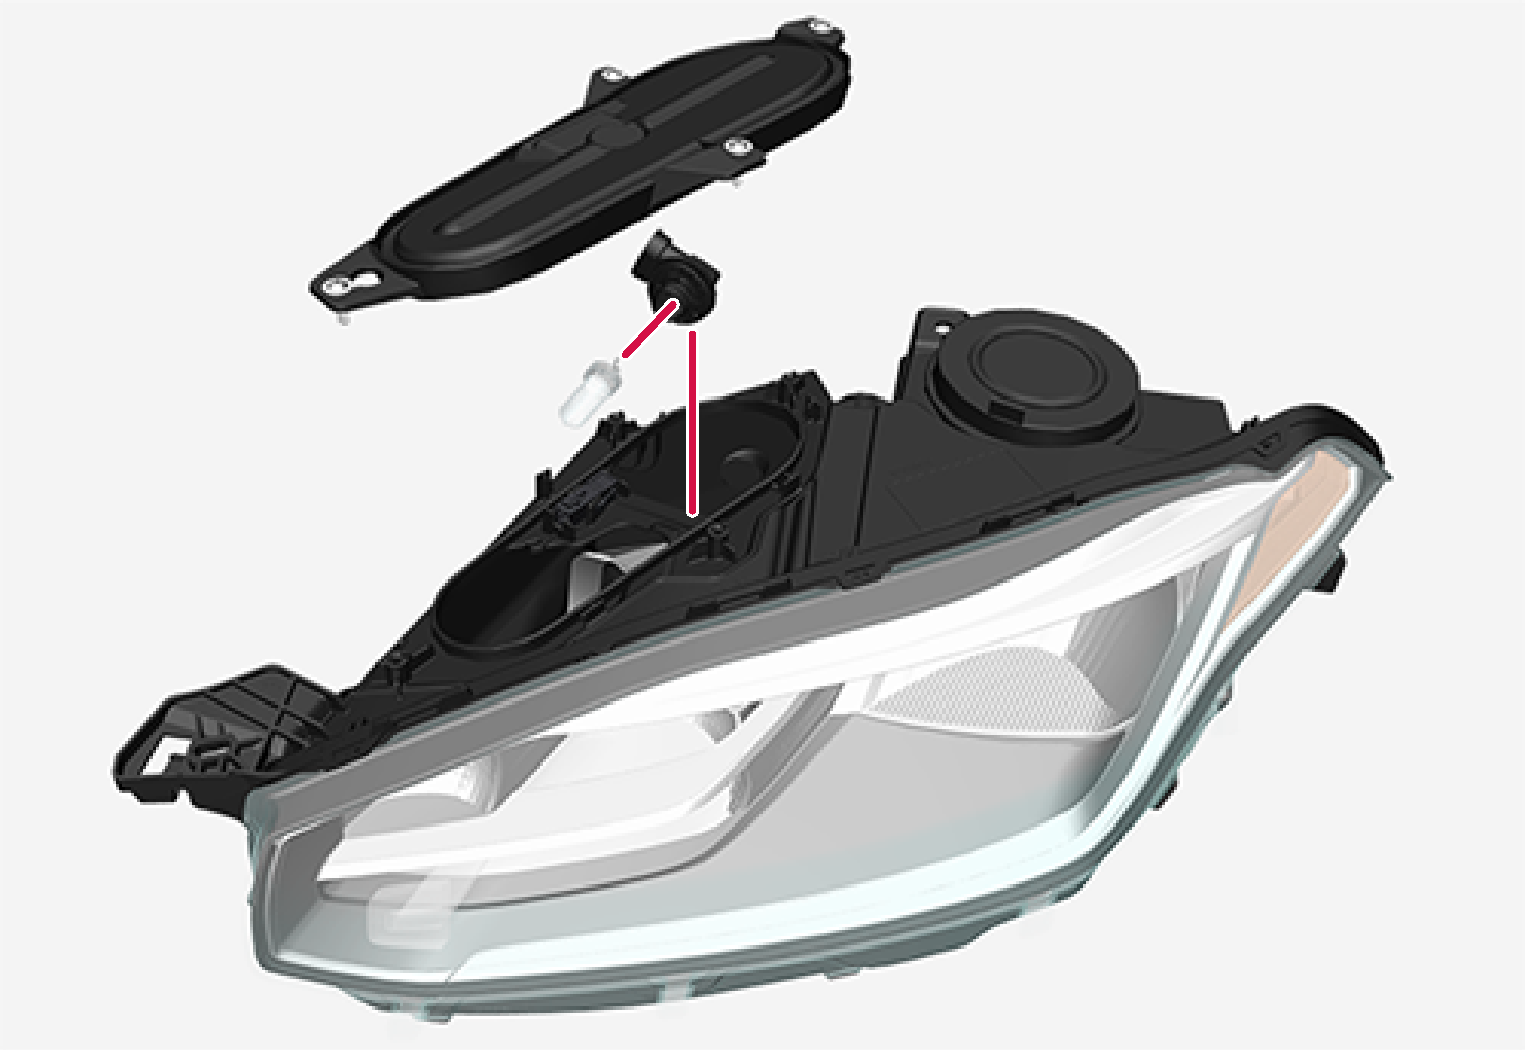
Replacing the dipped beam bulb
The dipped beam bulb in the halogen headlamp can be replaced without assistance from a workshop.
Before the bulb can be replaced, the plastic cover over the headlamp must be removed.
Important
Never touch the glass part of the bulbs with your fingers. Grease from your fingers is vaporised by the heat, coating the reflector and then causing damage.
Left-hand headlamp.
Detach the headlamp's round rubber cover.
Unplug the connector from the bulb.
Detach the bulb by pushing it gently upwards and pulling it straight out.
Fit a new bulb in the socket. The bulb's guide pin must be aimed straight upwards.
Press in the connector.
Refit the headlamp's round rubber cover.
Replacing the main beam lamp
The main beam bulb in the halogen headlamp can be replaced without assistance from a workshop.
Before the bulb can be replaced, the plastic cover over the headlamp must be removed.
Before the bulb can be replaced, the oval cover on the headlamp must be removed.
Important
Never touch the glass part of the bulbs with your fingers. Grease from your fingers is vaporised by the heat, coating the reflector and then causing damage.
Left-hand headlamp.
Detach the bulb by turning the bulb holder upward and then pulling straight out.
Carefully prize the plastic cover at the connector's lock lug so that the lock lug releases.
Unplug the connector from the bulb.
Replace the bulb.
Fit the bulb in the socket and turn downward.
Bulb replacement
Lamp types vary depending on model and equipment level. If a bulb breaks, it can be replaced according to the method described in the Owner's Manual.
Contact a workshop if faults occur in lamps other than bulbs.
If a fault occurs in LED lamps, the entire lamp unit usually must be replaced.
Note
For information about bulbs not covered in this Owner's Manual, contact a Volvo dealer or a certified Volvo service technician.
Warning
The car's electrical system must be in ignition position 0 when replacing bulbs.
Important
Never touch the glass part of the bulbs with your fingers. Grease from your fingers is vaporised by the heat, coating the reflector and then causing damage.
Note
If an error message remains after the broken bulb has been replaced then we recommend visiting an authorised Volvo workshop.
Note
Outside lighting such as headlamps and rear lamps may temporarily have condensation on the inside of the lens. This is normal, all exterior lighting is designed to withstand this. Condensation is normally vented out of the lamp housing when the lamp has been switched on for a time.
Removing the plastic cover for bulb replacement
The bulb in the halogen headlamp can be replaced without the help of a workshop, but the plastic cover over the headlamp must be removed before a bulb can be replaced.
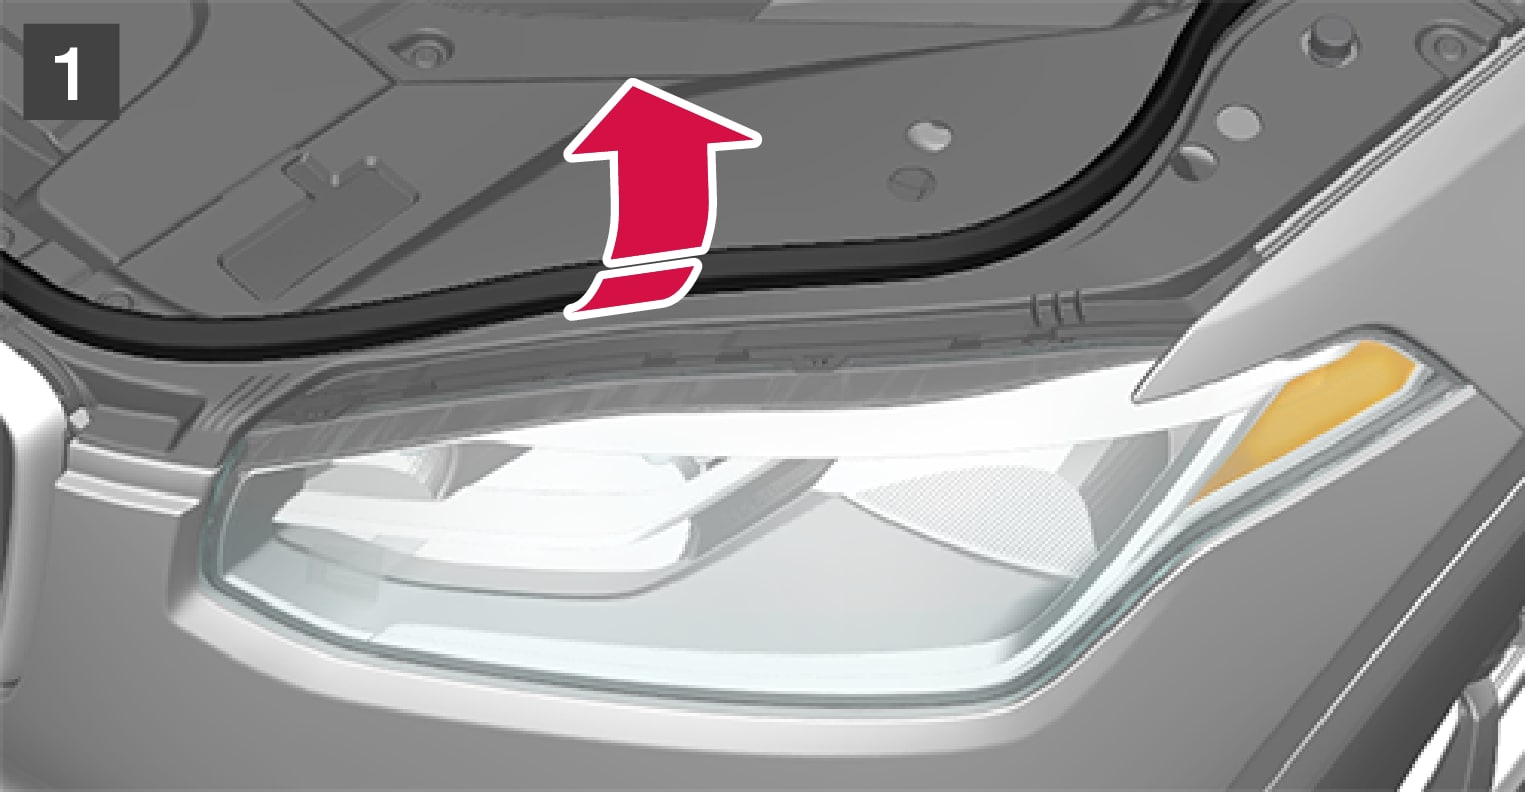
 Lift off the rubber strip by pressing it inward in the engine compartment.
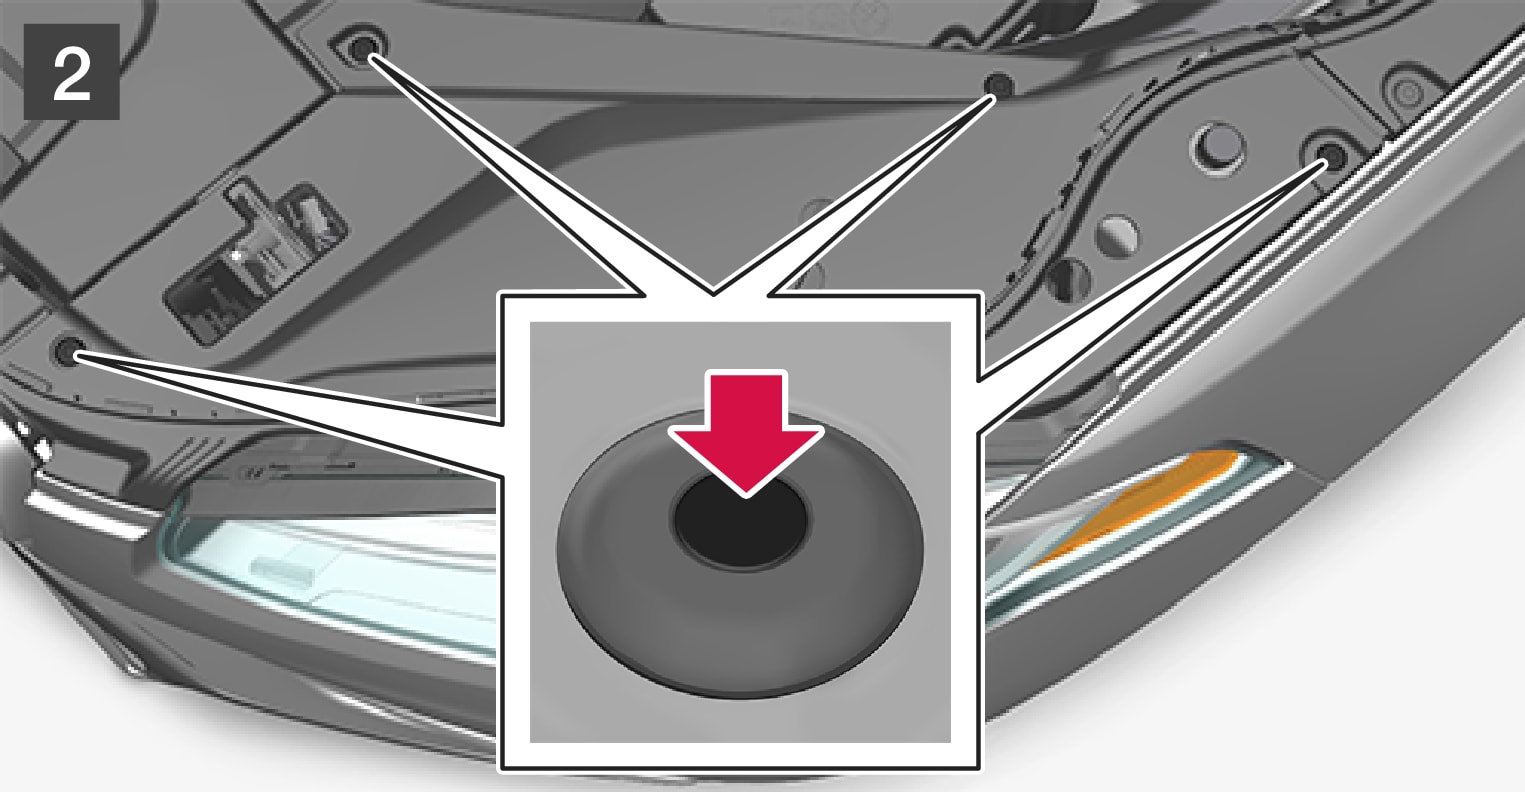
 Press down the pins into the plastic cover's four clips using a screwdriver or similar and lift away the cover.
Refit the cover in reverse order.
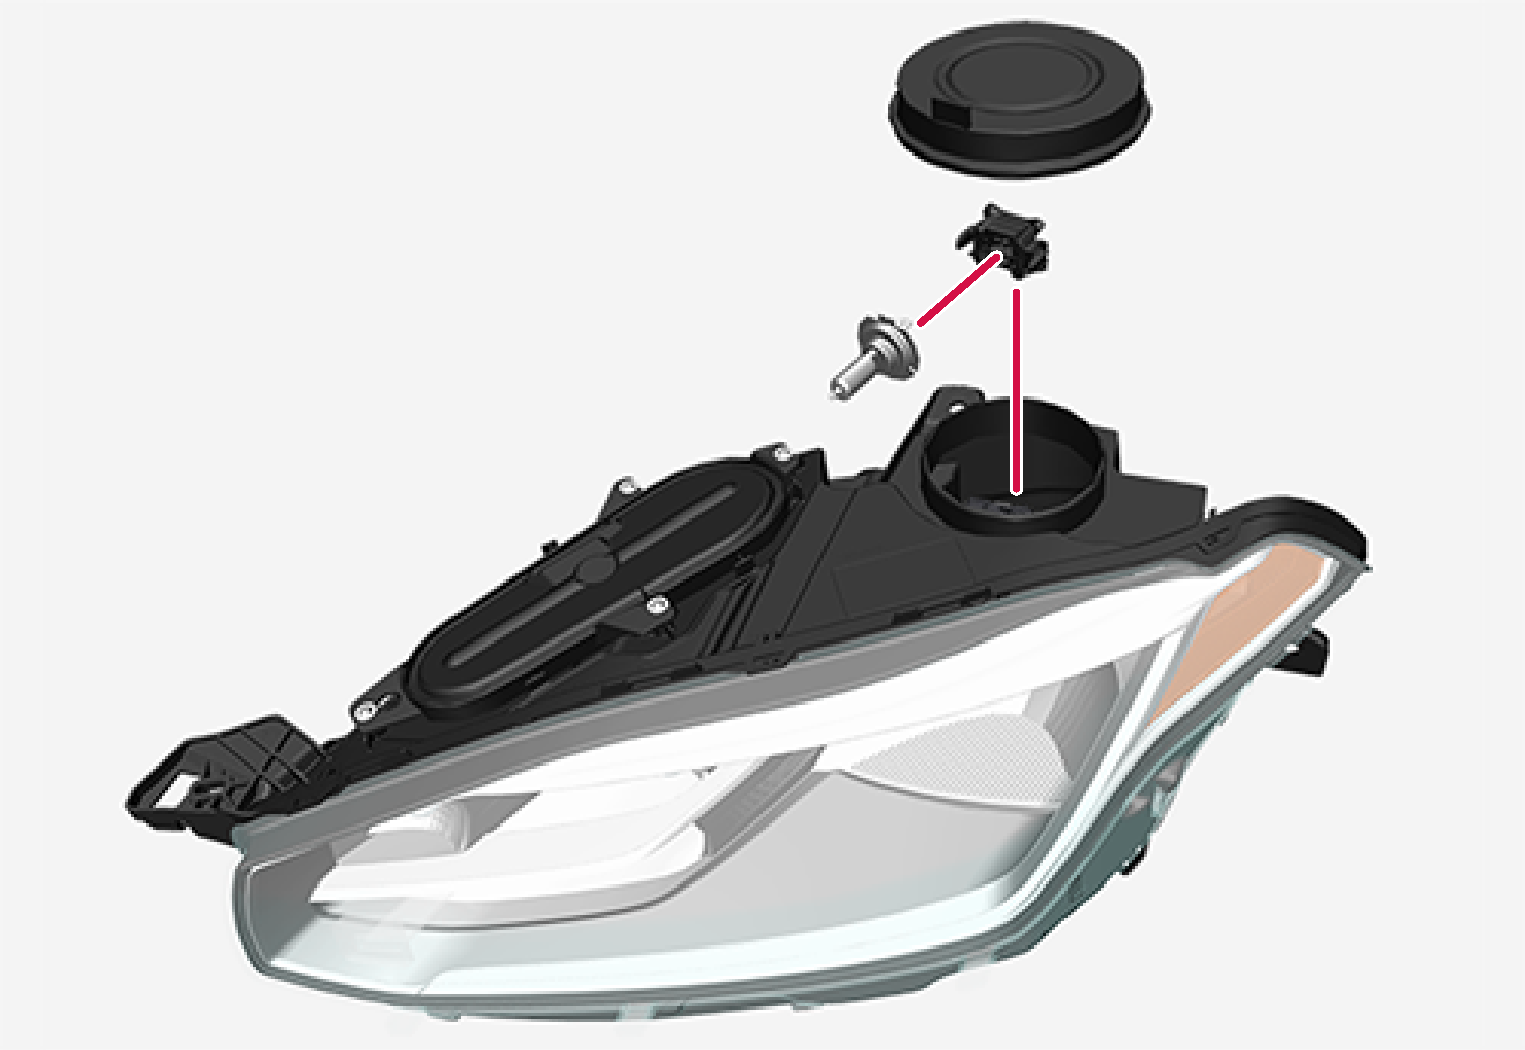
Removing the headlamp's oval cover
Most of the headlamp's bulbs become accessible when the oval cover has been removed.
Before the oval cover can be removed, the plastic cover over the headlamp must first be lifted off.
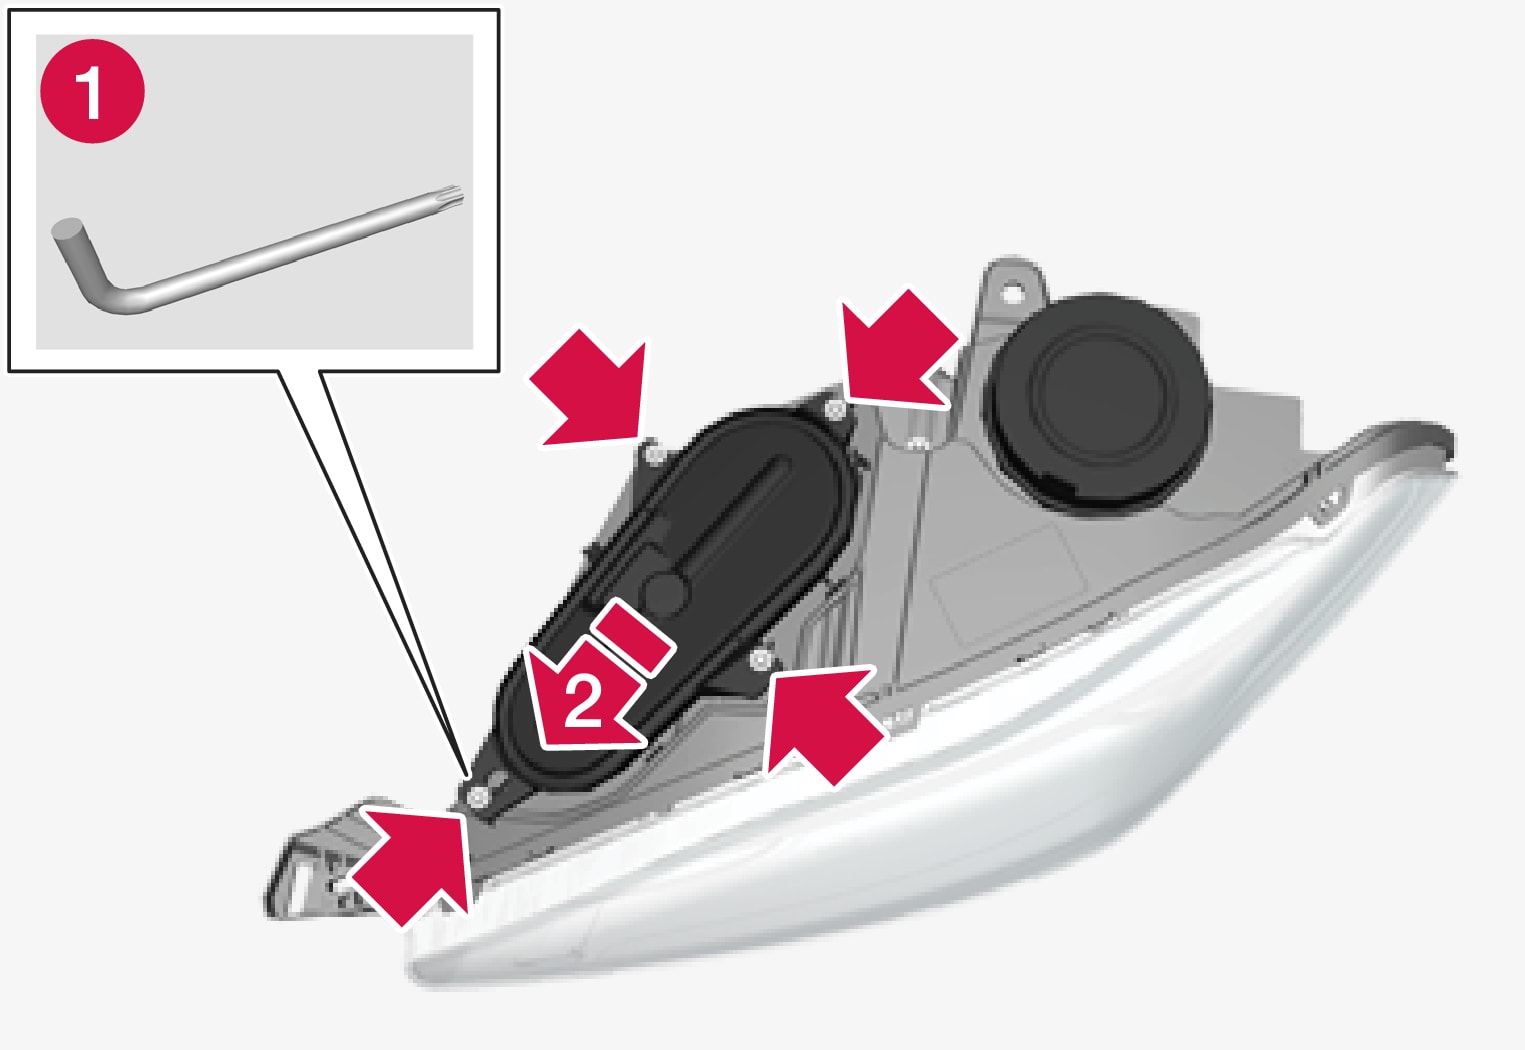
Left-hand headlamp.
Unscrew the cover's four screws using a tool for Torx, dimension T20 (1). Do not unscrew fully, 3-4 turns is sufficient.
 Slide the cover to one side.
Remove the cover.
Reinstall the cover in reverse order.
Replacing daytime running light bulb/position lamp bulb, front
The daytime running light bulb/position lamp bulb in the halogen headlamp can be replaced without assistance from a workshop.
Before the bulb can be replaced, the plastic cover over the headlamp must be removed.
Before the bulb can be replaced, the oval cover on the headlamp must be removed.
Note
The bulb for the daytime running light/position lamp is easier to access if the main beam bulb is detached. The main beam bulb is fitted diagonally above the daytime running light bulb/position lamp bulb. Detach the main beam bulb by rotating its bulb holder upwards and then pulling straight out.
Important
Never touch the glass part of the bulbs with your fingers. Grease from your fingers is vaporised by the heat, coating the reflector and then causing damage.
Left-hand headlamp.
Pull the bulb holder for the daytime running light bulb/position lamp bulb straight out.
Detach the bulb by pulling it straight out.
Replace the bulb.
Fit the bulb holder into the socket and press it into place.
If the main beam bulb's bulb holder has been removed, fit it into the socket and screw in.
Exterior lamp positions
The exterior lighting of the car uses a number of different lamps. An LED type lamp must be replaced by a workshop. An authorised Volvo workshop is recommended.
Lamps, front (car with halogen headlamps)
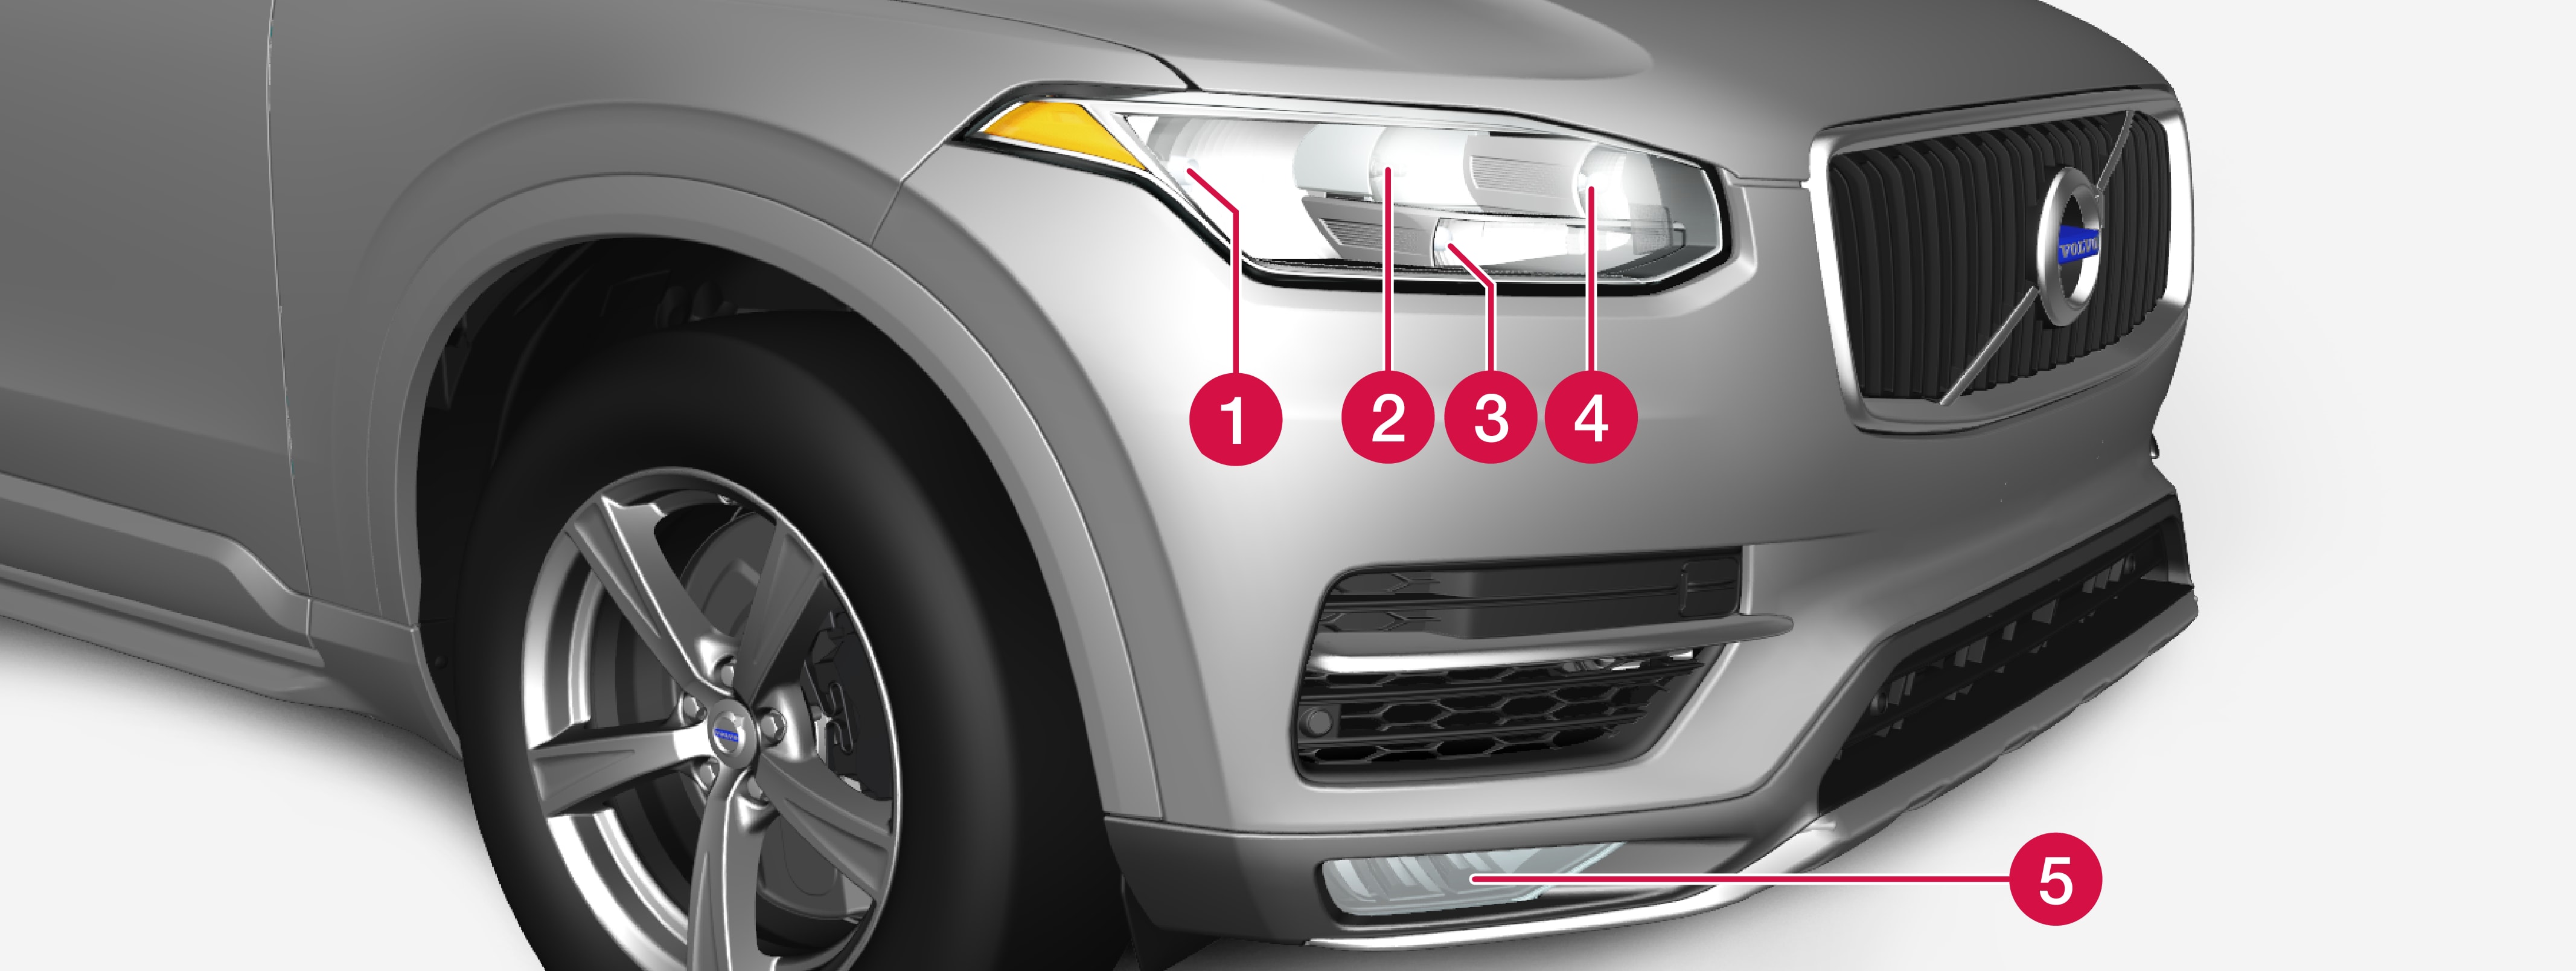
 Dipped beam
 Main beam
 Daytime running lights/position lamps
 Indicator
 Front fog lamps/cornering lights (LED)
Lamps, rear

Brake light (LED)
Position lamps (LED)
Reversing lamp
Position lamps (LED)
Direction indicator (LED)
 Fog lamp (LED)
 Brake light - central, high-level (LED)
Bulb specifications
Specifications for replaceable bulbs.
Contact a workshop if faults occur in lamps other than bulbs. If a fault occurs in LED lamps, the entire lamp unit usually must be replaced.
|
Function |
W |
Type |
|---|---|---|
|
Dipped beam |
55 |
H7 |
|
Main beam |
65 |
H9 |
|
Front direction indicators |
24 |
PY24W PWY24W |
|
daytime running lights/position lamps, front |
21/5 |
W21/5W |
Checking trailer lamps
When connecting a trailer - check that all the trailer lamps work before departure.
Direction indicators and brake lights on the trailer
If one or more of the trailer's direction indicators or brake light bulbs is broken, the driver display shows a symbol and a message. Other lights on the trailer must be checked manually by the driver before setting off.
|
Symbol |
Message |
|---|---|
|
|
|
|
|
|
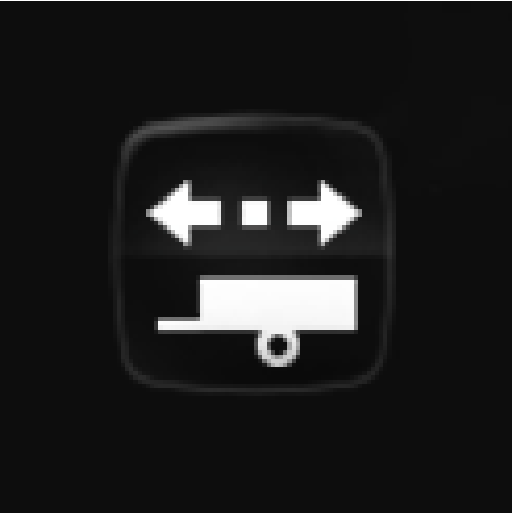

If any lamp for the trailer's direction indicators is broken, the driver display symbol for direction indicators will also flash more quickly than normal.
Rear fog lamp on trailer
When connecting the trailer, the rear fog lamp may not light up on the car. In such cases, the rear fog lamp function switches to the trailer. Upon activation of the rear fog lamp, check therefore that the trailer is equipped with a rear fog lamp to travel safely.
Checking trailer lamps
Automatic checking
After a trailer is connected electrically, it is possible to check that the trailer lamps are working via an automatic lamp activation. The function helps the driver check that the trailer lamps are working before starting off.
The car must be switched off to perform the check.
When a trailer is connected to the towbar, the Automatic Trailer Lamp Check message is shown in the driver display.
Confirm the message by pressing the right-hand steering wheel keypad's O button.
The lamp check starts.
Exit the car to check lamp functionality.
All trailer lamps start to flash - then the lamps are switched on one at a time.
Visually check that all lamps available on the trailer are operational.
After a moment, all lamps on the trailer flash again.
The check is complete.
Switching off automatic checking
The automatic checking function can be switched off in the centre display.
Press Settings in the top view.
Press My CarLights and Lighting.
Deselect Automatic Trailer Lamp Check.
Manual checking
If the automatic checking is switched off then it is possible to start the check manually.
Press Settings in the top view.
Press My CarLights and Lighting.
Select Manual Trailer Lamp Check.
The lamp check starts. Exit the car to check lamp functionality.