Opening, closing and locking the doors
141
Grip the driver’s door handle to unlock the door. Holding the driver’s door handle for approximately 2 seconds unlocks all the doors. Grip the front passenger’s door handle to unlock all the doors.*
Make sure to touch the sensor on the back of the handle.
The doors cannot be unlocked for 3 seconds after the doors are locked.
*: The door unlock settings can be changed. (P. 147)
Check that the door is securely locked.
142 3-2. Opening, closing and locking the doors
Vehicles with a smart key sys- tem
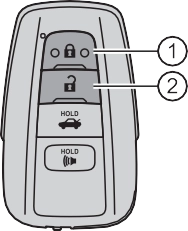 Locks all the doors
Check that the door is securely locked.
Pressing the button unlocks the driver’s door. Pressing the button again within 3 seconds unlocks the other doors.
Press and hold to open the windows*2 and the moon roof*1, 2 or pan- oramic moon roof.*1, 2 (P. 176, 180, 184)
*1: If equipped
*2: This setting must be customized at your Toyota dealer.
3-2. Opening, closing and locking the doors
143
Vehicles without a smart key system Locks all the doors
Turn and hold to close the win- dows*2 and moon roof.*1, 2 (P. 176, 180)
Turning the key unlocks the driver's door. Turning the key again unlocks the other doors.
Turn and hold to open the windows*2 and moon roof.*1, 2
(P. 176, 180)
*1: If equipped
*2: This setting must be customized at your Toyota dealer.
The doors can also be locked and unlocked with the mechanical key. (P. 523)
144 3-2. Opening, closing and locking the doors
Doors:
A buzzer sounds and the emergency flashers flash to indicate that the doors have been locked/unlocked. (Locked: Once; Unlocked: Twice)
Windows and moon roof or panoramic moon roof:
A buzzer sounds to indicate that the windows and moon roof or panoramic moon roof are operating.
If a door is not opened within approximately 60 seconds after the vehicle is unlocked, the security feature automatically locks the vehicle again.
When the door cannot be locked even if the lock sensor on the surface of the door handle is touched by a finger, touch the lock sensor with the palm.
When gloves are being worn, remove the gloves.
If an attempt to lock the doors is made when a door is not fully closed, a buzzer sounds continuously. Fully close the door to stop the buzzer, and lock the vehicle once more.
Locking the doors will set the alarm system. (P. 82)
Use the mechanical key to lock and unlock the doors. (P. 523) Replace the key battery with a new one if it is depleted. (P. 466)
3-2. Opening, closing and locking the doors
145
The front doors can be opened by pulling the inside handle even if the lock buttons are in the lock position.
Vehicles without a smart key system
The door cannot be locked if either of the front doors is open and the key is in the engine switch.
Vehicles with a smart key system
The door cannot be locked if the engine switch is in ACCESSORY or IGNITION ON mode, or the electronic key is left inside the vehi- cle.
The key may not be detected correctly and the door may be locked.
146 3-2. Opening, closing and locking the doors
inside the vehicle when the lock is set.
Unlock Lock
These locks can be set to prevent children from opening the rear doors. Push down on each rear door switch to lock both rear doors.
For instructions on customizing, refer to P. 567.
|
Function |
Operation |
|
Speed linked door locking function |
All doors are automatically locked when vehicle speed is approxi- mately 12 mph (20 km/h) or higher. |
|
Shift position linked door locking function |
All doors are automatically locked when shifting the shift lever out of P. |
|
Shift position linked door unlocking function |
All doors are automatically unlocked when shifting the shift lever to P. |
|
Driver’s door linked door unlocking function |
All doors are automatically unlocked when driver’s door is opened. |
3-2. Opening, closing and locking the doors
147
Turn the engine switch off.

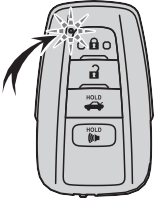
 When the indicator light on the key surface is not on, press and hold
  , or for approximately 5 seconds while pressing and holding
 .
.

 The setting changes each time an operation is performed, as shown below. (When changing the setting continuously, release the buttons, wait for at least 5 seconds, and repeat step .)
*1: 4.2-inch display

 *2: 7-inch display
Vehicles with an alarm: To prevent unintended triggering of the alarm, unlock the doors using the wireless remote control and open and close a door once after the settings have been changed. (If a door is not opened within 60 sec-
onds after  is pressed, the doors will be locked again and the alarm will automatically be set.)
In case that the alarm is triggered, immediately stop the alarm. (P. 83)
148 3-2. Opening, closing and locking the doors
In the event that the vehicle is subject to a strong impact, all the doors are unlocked. Depending on the force of the impact or the type of accident, how- ever, the system may not operate.
If the vehicle reaches a speed of 3 mph (5 km/h), the master warning light flashes and a buzzer sounds to indicate that the door(s) are not yet fully closed.
The open door(s) is displayed on the multi-information display.
Vehicles without a smart key system
P. 136
Vehicles with a smart key system
P. 156
Some functions can be customized. (P. 565)
3-2. Opening, closing and locking the doors
149
switch.
Opening the trunk from outside the vehicle
While carrying the electronic key, press the button on the trunk lid.
When all the doors are unlocked using one of the following meth- ods, the trunk can be opened without the electronic key:
150 3-2. Opening, closing and locking the doors
Vehicles with a smart key sys- tem
Press and hold the switch.
A buzzer sounds.
Turn the key clockwise to release the trunk lid.
Vehicles with a smart key system
The trunk can be also opened using the mechanical key. (P. 524)
3-2. Opening, closing and locking the doors
151
The trunk light turns on when the trunk is opened.
In this case, the trunk lid can be opened by pressing the trunk release but- ton on the trunk lid.
If the vehicle reaches a speed of 3 mph (5 km/h), the master warning light flashes and a buzzer sounds to indicate that the trunk is not yet fully closed.
The trunk lid can be opened by pulling up the glow-in-the-dark lever located on the inside of the trunk lid.
The lever will continue to glow for some time after the trunk lid is closed.
Use the mechanical key to unlock the trunk. (P. 524)
Replace the key battery with a new one if it is depleted. (P. 466)
Some functions can be customized. (P. 565)
152 3-2. Opening, closing and locking the doors
3-2. Opening, closing and locking the doors
153
WARNING
Observe the following precautions.
Failure to do so may cause parts of the body to be caught, resulting in seri- ous injury.
154 3-2. Opening, closing and locking the doors
 Antennas outside the cabin
 Antennas inside the cabin
 Antenna inside the trunk
 Antenna outside the trunk
 When locking or unlocking the doors
The system can be operated when the electronic key is within about 2.3 ft. (0.7 m) of either of the front out- side door handles. (Only the doors detecting the key can be operated.)
The system can be operated when the electronic key is inside the vehicle.
The system can be operated when the electronic key is within about
2.3 ft. (0.7 m) of the trunk release button.
: If equipped
3-2. Opening, closing and locking the doors
155
A combination of exterior and interior alarms as well as warning messages shown on the multi-information display are used to prevent theft of the vehicle and accidents resulting from erroneous operation. Take appropriate mea- sures in response to any warning message on the multi-information display. (P. 505)
When only an alarm sounds, circumstances and correction procedures are as follows.
|
Alarm |
Situation |
Correction procedure |
|
Exterior alarm sounds once for 5 seconds |
An attempt was made to lock the vehicle while a door was open. |
Close all of the doors and lock the doors again. |
|
The trunk was closed while the electronic key was still inside the trunk and all the doors were locked. |
Retrieve the electronic key from the trunk and close the trunk lid. |
|
|
Interior alarm pings repeatedly |
The engine switch was turned to ACCESSORY mode while the driver’s door was open (The driver’s door was opened when the engine switch was in ACCESSORY mode). |
Turn the engine switch off and close the driver’s door. |
|
The engine switch was turned off while the driver’s door was open. |
Close the driver’s door. |
156 3-2. Opening, closing and locking the doors
The battery-saving function will be activated in order to prevent the electronic key battery and the vehicle battery from being discharged while the vehicle is not in operation for a long time.
When battery-saving mode is set, battery depletion is minimized by stopping the electronic key from receiving radio waves.
 Press
Press  twice while pressing and holding
  . Confirm that the electronic key indicator flashes 4 times.
While the battery-saving mode is set, the
smart key system cannot be used. To cancel the function, press any of the elec- tronic key buttons.
The smart key system, wireless remote control and engine immobilizer sys- tem use weak radio waves. In the following situations, the communication between the electronic key and the vehicle may be affected, preventing the smart key system, wireless remote control and engine immobilizer system from operating properly. (Ways of coping: P. 523)
3-2. Opening, closing and locking the doors
157
158 3-2. Opening, closing and locking the doors
*: This setting can be customized at your Toyota dealer.
3-2. Opening, closing and locking the doors
159
m) of the vehicle.
Make sure to carry the electronic key when operating the system. Do not get the electronic key too close to the vehicle when operating the system from the outside of the vehicle.
Depending on the position and holding condition of the electronic key, the key may not be detected correctly and the system may not operate properly. (The alarm may go off accidentally, or the door lock prevention function may not operate.)
Some functions can be customized. (P. 565)
Use the wireless remote control or mechanical key. (P. 142, 150, 523)
160 3-2. Opening, closing and locking the doors
For vehicles sold in the U.S.A.
3-2. Opening, closing and locking the doors
 For vehicles sold in Canada
161

162 3-2. Opening, closing and locking the doors
3-3. Adjusting the seats
163
Seat position adjustment lever
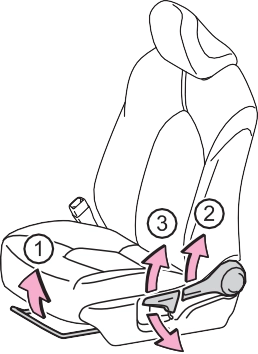 Seatback angle adjustment lever
Vertical height adjustment lever
Power seat
Seat position adjustment switch
Seatback angle adjustment switch
Seat cushion (front) angle adjustment switch
Vertical height adjustment switch
Lumbar support adjustment switch (driver’s side only)
164 3-3. Adjusting the seats
3-3. Adjusting the seats
165
The seatbacks of the rear seats can be folded down.
for the seatback you wish to fold down and then fold the seatback down.
: If equipped
166 3-3. Adjusting the seats
3-3. Adjusting the seats
167
Pull the head restraint up.
Push the head restraint down while pressing the lock release button.
Head restraints cannot be adjusted or removed.
Pull the head restraint up while pressing the lock release button.
Front seats: If the head restraint touches the ceiling, making the removal difficult, change the seat height or angle.
(P. 163)
168 3-3. Adjusting the seats
Front seats
Align the head restraint with the installa- tion holes and push it down to the lock position.
Press and hold the lock release button when lowering the head restraint.
Rear seats
Align the head restraint with the installa- tion holes and push it down to the lowest lock position while pressing the lock release button.
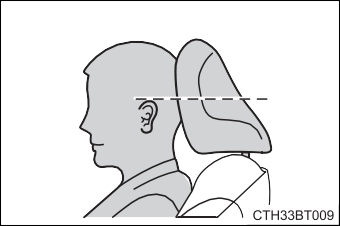 Make sure that the head restraints are adjusted so that the center of the head restraint is closest to the top of your ears.
Download Manual