Driving procedures
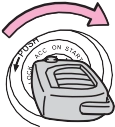
Turn the engine switch to the “START” position and start the engine.
“LOCK”
The steering wheel is locked and the key can be removed. (The key can be removed only when the shift lever is in P.)
Some electrical components such as the audio system can be used.
All electrical components can be used.
For starting the engine.
1 Shift the shift lever to P. (P. 213)
2 Push in the key and turn it to the “LOCK” position.
4-2. Driving procedures
207
Depress the brake pedal and then turn the engine switch to the “START” position to start the engine.
The engine immobilizer system may not have been deactivated. (P. 79) Contact your Toyota dealer.
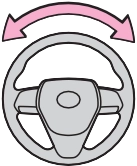
 When starting the engine, the engine switch may seem stuck in the “LOCK” position. To free it, turn the key while turn- ing the steering wheel slightly left and right.
A buzzer sounds if the driver’s door is opened while the engine switch is in the “LOCK” or “ACC” position to remind you to remove the key.
208 4-2. Driving procedures
and a message will be displayed on the multi-information display.
If it is not displayed, the engine cannot be started.
When operating the engine switch, one short, firm press is enough. It is not necessary to press and hold the switch.
The engine will crank until it starts or for up to 30 seconds, whichever is less.
Continue depressing the brake pedal until the engine is completely started.
The engine can be started from any engine switch mode.
Set the parking brake (P. 220, 221), and shift the shift lever to P. Press the engine switch.
Driving-related data will be displayed on the multi-information display.
4-2. Driving procedures
209
Off*
The emergency flashers can be used.
The multi-information display will not be displayed.
Some electrical components such as the audio system can be used.
A message indicating how to start the engine will be displayed on the multi-information display.
All electrical components can be used.
*: If the shift lever is in a position other than P when turning off the engine, the engine switch will be turned to ACCESSORY mode, not to off.
Check that the parking brake is set. Shift the shift lever to P.
Check that “Turn Power Off” is displayed on the multi-information display and then press the engine switch once.
Check that “Turn Power Off” on the multi-information display is turned off.
210 4-2. Driving procedures
If the vehicle is left in ACCESSORY mode for more than 20 minutes or IGNI- TION ON mode (with the engine is not running) for more than an hour with the shift lever in P, the engine switch will automatically turn off. However, this function cannot entirely prevent battery discharge. Do not leave the vehicle with the engine switch in ACCESSORY or IGNITION ON mode for long peri- ods of time when the engine is not running.
P. 139
P. 159
P. 160
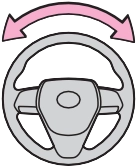
After turning the engine switch off and opening and closing the doors, the steering wheel will be locked due to the steering lock function. Operating the engine switch again automatically cancels the steering lock.
 A message informing the driver that the steering wheel is locked will be displayed on the multi-information display.
Check that the shift lever is set in P. Press the engine switch while turning the steer- ing wheel left and right.
To prevent the steering lock motor from overheating, the motor may be sus- pended if the engine is turned on and off repeatedly in a short period of time. In this case, refrain from operating the engine. After about 10 seconds, the steering lock motor will resume functioning.
The system may be malfunctioning. Have the vehicle inspected by your Toyota dealer immediately.
P. 466
4-2. Driving procedures
211
P. 526
212 4-2. Driving procedures
4-2. Driving procedures
213
 Vehicles without a smart key system:
While the engine switch is in the “ON” position and the brake pedal depressed*, shift the shift lever while pushing the shift release button on the shift knob.
Vehicles with a smart key system:
While the engine switch is in IGNITION ON mode and the brake pedal depressed*, shift the shift lever while pushing the shift release button on the shift knob.
 Shift the shift lever while pushing the shift release button on the shift knob.
 Shift the shift lever normally.
When shifting the shift lever between P and D, make sure that the vehicle is completely stopped and the brake pedal is depressed.
*: For the vehicle be able to be shifted from P, the brake pedal must be depressed before the shift release button is pushed. If the shift release button is pushed first, the shift lock will not be released.
214 4-2. Driving procedures
|
Shift position |
Objective or function |
|
P |
Parking the vehicle/starting the engine |
|
R |
Reversing |
|
N |
Neutral |
|
D |
Normal driving*1 |
|
S |
S mode driving*2 (P. 214) |
*1: Shifting to the D position allows the system to select a gear suitable for the driving conditions. Setting the shift lever to the D position is recommended for normal driving.
*2: Selecting shift ranges using S mode restricts the upper limit of the possible gear ranges, controls engine braking force, and prevents unnecessary upshifting.
When the shift lever is in the S position, the shift lever or paddle shift switches (if equipped) can be operated as follows:
Shift lever Paddle shift switches (if equipped)
1 Upshifting Downshifting
The initial shift range in S mode is set automatically to 4, 5 or 6 according to vehicle speed. However, the initial shift range may be set to 3 if AI-SHIFT has operated while the shift lever was in the D posi- tion. (P. 217)
*1: Vehicles with 4.2-inch display
*2: Vehicles with 7-inch display
4-2. Driving procedures
215
|
Meter display |
Function |
|
S2 - S8 |
A gear in the range between 1 and the selected gear is automatically chosen depending on vehicle speed and driving conditions |
|
S1 |
Setting the gear at 1 |
A lower shift range will provide greater engine braking forces than a higher shift range.
Upshifting Downshifting
The selected shift range, from 1 to 8, or D will be displayed on the multi-information display.
*1: Vehicles with 4.2-inch display
*2: Vehicles with 7-inch display
216 4-2. Driving procedures
Shift range selection in the D position will be deactivated in the following situ- ations:
To help ensure safety and driving performance, downshifting operation may sometimes be restricted. In some circumstances, downshifting may not be possible even when the shift lever or paddle shift switches are operated. (A buzzer will sound twice.)
Even when performing the following actions with the intent of enabling engine braking, engine braking will not occur because cruise control or dynamic radar cruise control with full speed range or dynamic radar cruise control will not be canceled.
P. 193
The shift lock system is a system to prevent accidental operation of the shift lever in starting.
The shift lever can be shifted from P only when the engine switch is in the “ON” position (vehicles without a smart key system) or IGNITION ON mode (vehicles with a smart key system), the brake pedal is depressed and the shift release button is pushed.
4-2. Driving procedures
First, check whether the brake pedal is being depressed.
217
If the shift lever cannot be shifted even though the brake pedal is depressed and the shift release button is pushed, there may be a problem with the shift lock system. Have the vehicle inspected by your Toyota dealer immediately. The following steps may be used as an emergency measure to ensure that the shift lever can be shifted.
Releasing the shift lock:
Set the parking brake.
Vehicles without a smart key system: Turn the engine switch to the “LOCK” position.
Vehicles with a smart key system: Turn the engine switch off. Depress the brake pedal.
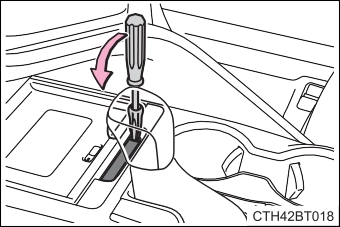 4 Pry the cover up with a flathead screw- driver or equivalent tool.
To prevent damage to the cover, cover the tip of the screwdriver with a rag.
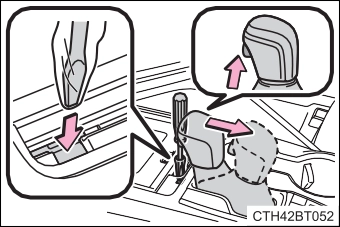 5 Press and hold the shift lock override button and then push the button on the shift knob.
The shift lever can be shifted while both buttons are pressed.
This may indicate a malfunction in the automatic transmission system. Have the vehicle inspected by your Toyota dealer immediately.
(In this situation, the transmission will operate in the same manner as when the shift lever is in D.)
The AI-SHIFT automatically selects the suitable gear according to driver per- formance and driving conditions.
The AI-SHIFT automatically operates when the shift lever is in D. (Shifting the shift lever to the S position or paddle shifting cancels the function.)
218 4-2. Driving procedures
4-2. Driving procedures
219
Lane change to the right (move the lever partway and release it)
The right hand signals will flash 3 times.
The left hand signals will flash 3 times.
Vehicles without a smart key system:
The engine switch is in the “ON” position. Vehicles with a smart key system:
The engine switch is in IGNITION ON mode.
Check that a light bulb in the front or rear turn signal lights has not burned out.
Operate the lever again.
Operate the lever in the opposite direction.
220 4-2. Driving procedures
depress the parking brake pedal with your left foot while depress- ing the brake pedal with your right foot.
(Depressing the pedal again releases the parking brake.)
*1: For U.S.A.
*2: For Canada
P. 192
A buzzer will sound if the vehicle is driven with the parking brake engaged. “Release Parking Brake” is displayed on the multi-information display.
P. 355
*: If equipped
4-2. Driving procedures
221
A mode can be selected from the following modes.
Even when in automatic mode, the parking brake can be set and released manually. (P. 222)
Turns automatic mode on (while the vehicle is stopped, pull and hold the parking brake switch until a message is shown on the multi-information display)
Operate the shift lever with the brake pedal depressed.
Operate the parking brake switch while depressing the brake pedal.
*1: For U.S.A.
*2: For Canada
*: If equipped
222 4-2. Driving procedures
Sets the parking brake
The parking brake indicator light and parking brake light will turn on.
Pull and hold the parking brake switch if an emergency occurs and it is necessary to operate the park- ing brake while driving.
Operate the parking brake switch while depressing the brake pedal. Make sure that the parking brake indicator light or parking brake light turn off.
(P. 498)
*1: For U.S.A.
*2: For Canada
4-2. Driving procedures
223
P. 192
The parking brake is automatically released when slowly depress the acceler- ator pedal.
The parking brake will be released automatically under the following condi- tions:
If the automatic release function does not operate, manually release the park- ing brake.
If the parking brake is operated repeatedly over a short period of time, the system may restrict operation to prevent overheating. If this happens, refrain from operating the parking brake. Normal operation will return after about 1 minute.
Operate the parking brake switch. If the message does not disappear after operating the switch several times, the system may be malfunctioning. Have the vehicle inspected by your Toyota dealer immediately.
When the parking brake operates, a motor sound (whirring sound) may be heard. This does not indicate a malfunction.
IGNITION ON mode: Comes on until the parking brake is released. Not in IGNITION ON mode: Stays on for approximately 15 seconds.
224 4-2. Driving procedures
A buzzer will sound if the vehicle is driven with the parking brake engaged. “Release Parking Brake” is displayed on the multi-information display.
Warning messages and buzzers are used to indicate a system malfunction or to inform the driver of the need for caution. If a warning message is shown on the multi-information display, read the message and follow the instructions.
P. 497
P. 355
4-2. Driving procedures
225
The brake hold standby indicator (green) comes on. While the sys- tem is holding the brakes, the brake hold operated indicator (yel- low) will illuminate.
*1: Brake hold standby indicator
*2: Brake hold operated indicator
The brake hold system cannot be turned on in the following conditions:
If either of the above is detected when the brake hold system is enabled, the system will turn off and the brake hold standby indicator light will go off. In addition, if any of the conditions are detected while the system is holding the brakes, a warning buzzer will sound and a message will be shown on the multi-information display. The parking brake will then be set automatically.
*: If equipped
226 4-2. Driving procedures
Perform any of the following operations to release the parking brake.
When the brake hold standby indicator (green) does not illuminate even when the brake hold switch is pressed with the brake hold system operating condi- tions met, the system may be malfunctioning. Have the vehicle inspected at your Toyota dealer.
Warning messages and buzzers are used to indicate a system malfunction or to inform the driver of the need for caution. If a warning message is shown on the multi-information display, read the message and follow the instructions.
P. 498
Download Manual