Disclaimer: Not affiliated with or endorsed by Honda Motor Company. For informational purposes only. Full Disclaimer
How to Replace the Headlight on a Honda CRV
Updated:
Your Honda CRV's headlight replacement is a reasonably easy procedure that can significantly increase driving safety and visibility, particularly at night or in inclement weather.
Here's how to change the headlight on your Honda CRV, whether the bulb is burnt out or you just want to upgrade to a brighter one.
1. Assemble the Equipment and Supplies Required

Ensure that you have the necessary tools and materials before beginning the procedure of changing the headlight on your Honda CRV.
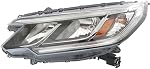
The replacement headlight bulb is the most crucial component. Make sure the bulb you buy is the right kind for the particular CRV model you have.
Additionally, you might want to keep some disposable gloves handy so that your fingers stay away from the new light bulb. It can also be useful to have a small screwdriver or socket wrench for removing the bulb's cover or retainer clip, as well as a clean cloth or paper towels for cleaning.
Shop From Amazon


2. Inspect the Headlight Bulb
Depending on the model year, there are some differences in how to access the headlight bulb in your Honda CRV, but generally speaking, you need to lift the hood and find the headlight housing's rear.
Usually done from the engine bay, this may include removing a few parts, such as the protective cover or the air filter box. For detailed information on how to access the headlight bulb in your model, refer to your owner's handbook.
3. Remove the Retainer Clip or Bulb Cover

Once the back of the headlight housing is accessible, the retention clip or rubber cover that holds the headlight bulb in place is typically located there.
As directed by your owner's handbook, carefully remove the lid or unclip the retainer. Taking this step is necessary to access the bulb itself.
4. Change Out Your Headlight Bulb

It's time to change the bulb now that it can be accessed. If the bulb in your Honda CRV is halogen, take care not to touch the glass portion of the replacement bulb with your bare fingers, as your skin's oils may cause it to burn out too soon. To handle the new bulb, use a clean cloth or disposable gloves.
To begin, remove the electrical connector from the old bulb's back. When disconnecting the connector, proceed with caution as it can be held in place by a wire or plastic clip.
Shop From Amazon


Next, unscrew the old bulb from the headlight housing by rotating it counterclockwise, or about a quarter of a turn. Remove it with caution.
Now, place the replacement bulb into the socket by gently pushing it in and turning it a quarter of a turn clockwise to lock it in place. Reinstall the wiring connector on the new bulb's back.
5. Reassemble and Test

It's now time to put the previously removed parts back together once the electrical connector has been reattached and the new bulb has been installed.
This could involve tightening the retention clasp or replacing the rubber cover. Verify that everything is seated and fastened correctly.
It is essential to test the new headlight bulb after reassembly to ensure it is operating properly. To check both settings, turn on your headlights and high beams.
You've successfully changed the headlight on your Honda CRV if the replacement bulb lights as intended. If not, make sure the wiring connector, electrical connections, and bulb installation are all done correctly.
In Summary
On your Honda CRV, changing the headlights is an easy task that can increase driving safety and save costs. You can change your car's headlight by assembling the required equipment, accessing the headlight, removing the retainer clip or bulb cover, changing the headlight, and putting everything back together.
For detailed instructions that pertain to your particular CRV model, always refer to your owner's manual. Throughout the process, take care to follow all safety precautions and standards. You can drive more safely and with more visibility when your headlights are working.

Nick Marchenko, PhD
Industrial Engineer & Automotive Content Specialist
Nick writes in-depth guides on car clubs, engine specs, vehicle ownership, and modifications, combining engineering knowledge with automotive passion.
Full profile → LinkedIn →You May Also Like
How To Prepare Honda CR-V For Towing
2 years agoYour Honda CR-V is designed for versatility and reliability. Not only is it a comfortable vehicle for daily commutes, but it’s also capable of towing—whether that’s a small trailer f...
Honda CR-V Free VIN Decoder: With Examples
2 years agoEach Honda CR-V is distinguished by a unique Vehicle Identification Number, commonly abbreviated as VIN. This alphanumeric code encapsulates critical data about the car, including its make, production...
How To Choose the Best Light Bulbs For Honda CR-V? Complete Guide
2 years agoEnsuring your Honda CR-V's headlights are in optimal condition is crucial for maintaining visibility on the road, no matter the time of day or weather conditions. Like any component, light bulbs e...
How To Tint Windows of the Honda CR-V?
2 years agoHonda CR-V window tinting is not just an upgrade in style; it's a smart investment with numerous advantages. Firstly, it helps keep the CR-V cooler on sunny days by reducing heat penetration into...
Honda CR-V 1.6 Diesel Engine Problems
2 years agoThe fourth generation of the Honda CR-V (RM), produced from 2012 to 2018, is a compact SUV that sits above the HR-V in the Japanese manufacturer's lineup. A facelift in 2015 brought subtle changes...
How To Fix A Honda CR-V Brake Light Fault - DIY Giude
2 years agoHey there, Honda CR-V owners! If you're facing a brake light issue in your CR-V, especially if it's from the 2012-2016 generation, you've landed at the right place. Today, I'm going to...