Controls
Steering Wheel Adjustment
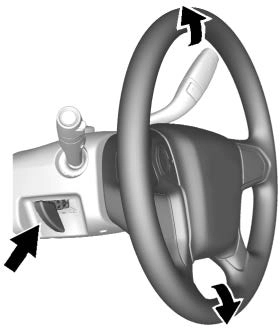
To adjust the steering wheel:
Tilt and Telescoping Steering Wheel
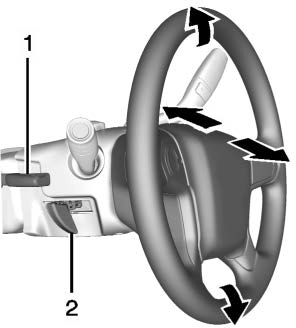
To adjust the tilt and telescoping steering wheel, if equipped:
Do not adjust the steering wheel while driving.
Steering Wheel Controls
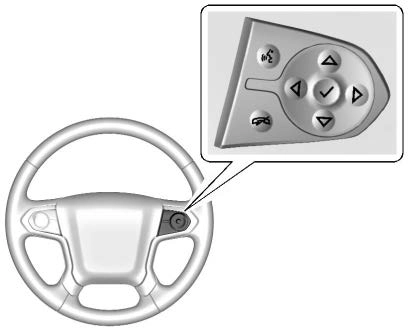
If equipped, some audio controls can be adjusted at the steering wheel.
g : For vehicles with OnStar or a Bluetooth system, press to interact with those systems. See OnStar
Overview 0 464, Bluetooth
(Overview) 0 203 or Bluetooth
(Infotainment Controls) 0 205, or “Bluetooth (Overview)” in the infotainment manual.
i : Press to reject an incoming call or end a current call. Press to
mute or unmute the infotainment system when not on a call.
o or p : Press to go to the previous or next menu option.
w or x : Press to go to the next or previous selection.
V : Press to select a highlighted menu option.
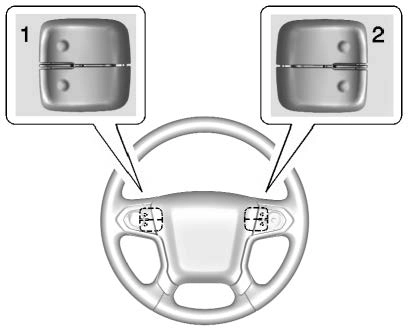
The favorite and volume switches are on the back of the steering wheel.
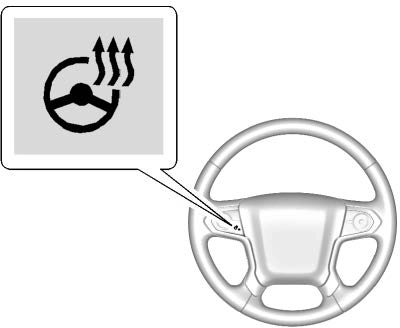
( : If equipped, press to turn it on or off. A light next to the button displays when the feature is
turned on.
The steering wheel takes about three minutes to start heating.
To sound the horn, press a on the steering wheel.
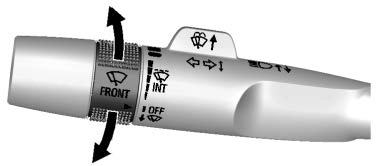
The windshield wiper control is on the turn signal lever.
The windshield wipers are controlled by turning the band with  on it.
1 : Fast wipes.
w : Slow wipes.
3 INT : Turn the band up for more frequent wipes or down for less frequent wipes.
OFF : Turns the windshield wipers off.
8 : For a single wipe, turn to 8, then release. For several wipes, hold the band on 8 longer.
Clear ice and snow from the wiper blades before using them. If frozen to the windshield, carefully loosen or thaw them. Damaged wiper blades should be replaced. See Wiper Blade Replacement 0 356.
Heavy snow or ice can overload the wiper motor. An internal circuit breaker to the motor will stop the motor until it cools down.
Wiper Parking
If the ignition is turned off while the wipers are on w, 1, or 3 INT, they will immediately stop.
If the windshield wiper lever is then moved to OFF before the driver door is opened or within 10 minutes, the wipers will restart and move to the base of the windshield.
If the ignition is turned off while the wipers are performing wipes due to windshield washing, the wipers continue to run until they reach the base of the windshield.
L m : Push the paddle marked with the windshield washer symbol at the top of the turn signal lever, to spray
washer fluid and activate the wipers. The wipers will continue until the paddle is released or the maximum wash time is reached. When the paddle is released, additional wipes may occur depending on how long the windshield washer had been activated. See Washer Fluid 0 347 for information on filling the windshield washer fluid reservoir.
The vehicle may have a compass display on the Driver Information Center (DIC). The compass receives its heading and other information from the Global Positioning System (GPS) antenna, StabiliTrak/ Electronic Stability Control (ESC), and vehicle speed information.
The compass system is designed to operate for a certain number of miles or degrees of turn before needing a signal from the GPS satellites. When the compass display shows CAL, drive the vehicle for a short distance in an open area where it can receive a GPS signal. The compass system will automatically determine when a GPS signal is restored and provide a heading again.
To set the time:
24 hour clock.
Auto Set requires an active OnStar or connected service plan.
If auto timing is set, the time displayed on the clock may not update immediately when driving into a new time zone.
To set the date:
To set the clock display:
Power Outlets 12-Volt Direct Current
Accessory power outlets can be used to plug in electrical equipment, such as a cell phone or MP3 player.
The vehicle may have up to four accessory power outlets.
Vehicles with a Center Console
Vehicles with Bench Seats
Lift the cover to access and replace when not in use.
The power outlets on the center stack and in front of the cupholders are powered at all times. The power outlets inside the storage area and on the rear of the console are powered when the ignition is on or in ACC/ACCESSORY, or when Retained Accessory Power (RAP) is active.
Certain power accessory plugs may not be compatible with the accessory power outlet and could overload vehicle or adapter fuses. If a problem is experienced, see your dealer.
When adding electrical equipment, be sure to follow the proper installation instructions included with the equipment. See Add-On Electrical Equipment 0 318.
Base Shown, Uplevel Similar
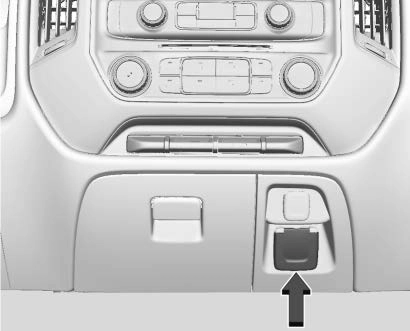
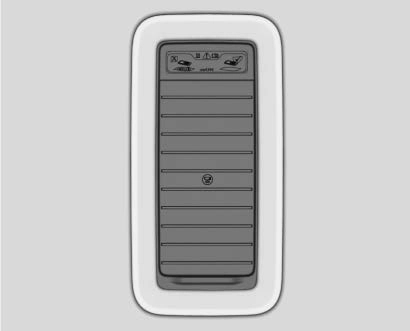
If equipped with this power outlet, it can be used to plug in electrical equipment that uses a maximum limit of 150 watts.
If equipped with a center console, the 110/120-volt power outlet is in front of the cupholders in the center console.
If equipped with bench seats, the 110/120-volt power outlet is on the center stack.
An indicator light on the outlet turns on to show it is in use. The light comes on when the ignition is on, equipment requiring less than 150 watts is plugged into the outlet, and no system fault is detected.
The indicator light does not come on when the ignition is off or if the equipment is not fully seated into the outlet.
If equipment is connected using more than 150 watts or a system fault is detected, a protection circuit shuts off the power supply and the indicator light turns off. To reset the circuit, unplug the item and plug it back in or turn the RAP off and then back on. See Retained Accessory Power (RAP) 0 251.
The power outlet is not designed for the following, and may not work properly if they are plugged in:
compressor-driven refrigerators and electric power tools
microcomputer-controlled electric blankets and touch sensor lamps
The vehicle may have wireless charging on top of the center console. See Center Console Storage 0 123. The system operates at 145 kHz and wirelessly charges one Qi compatible smartphone. The power output of the system is capable of charging at a rate up to 1 amp (5W), as requested by the compatible smartphone. See Radio Frequency Statement 0 460.
The vehicle must be on, in ACC/ ACCESSORY, or Retained Accessory Power (RAP) must be active. The wireless charging feature may not correctly indicate charging when the vehicle is in RAP. See Retained Accessory Power (RAP) 0 251.
The operating temperature is −20 °C (−4 °F) to 60 °C (140 °F) for the charging system and 0 °C (32 °F) to 35 °C (95 °F) for the smartphone.
To charge a compatible smartphone:
To maximize the charge rate, ensure the smartphone is fully seated and centered in the holder with nothing under it.
 A thick smartphone case may prevent the wireless charger from working, or may reduce the charging performance. See your dealer for additional information.
it 180 degrees, and wait three seconds before placing/
aligning the smartphone on the pad again.
Software Acknowledgements
Certain Wireless Charging Module product from LG Electronics, Inc. ("LGE") contains the open source software detailed below. Refer to the indicated open source licenses (as are included following this notice) for the terms and conditions of their use.
OSS Notice Information
To obtain the source code that is contained in this product, please visit http://opensource.lge.com. In addition to the source code, all referred license terms, warranty disclaimers and copyright notices are available for download. LG Electronics will also provide open source code to you on CD-ROM for a charge covering the cost of performing such distribution (such as the cost of media, shipping, and handling) upon email request to [email protected]. This offer is
valid for three (3) years from the date on which you purchased the product.
Freescale-WCT library
Copyright (c) 2012-2014 Freescale Semiconductor, Inc.. All rights reserved.
THIS SOFTWARE IS PROVIDED BY THE COPYRIGHT HOLDERS AND CONTRIBUTORS "AS IS" AND ANY EXPRESS OR IMPLIED WARRANTIES, INCLUDING, BUT NOT LIMITED TO, THE IMPLIED WARRANTIES OF MERCHANTABILITY AND FITNESS FOR A PARTICULAR PURPOSE ARE DISCLAIMED. IN NO EVENT SHALL THE COPYRIGHT HOLDER OR CONTRIBUTORS BE LIABLE FOR ANY DIRECT, INDIRECT, INCIDENTAL, SPECIAL, EXEMPLARY, OR CONSEQUENTIAL DAMAGES (INCLUDING, BUT NOT LIMITED TO, PROCUREMENT OF SUBSTITUTE GOODS OR SERVICES; LOSS OF USE, DATA, OR PROFITS; OR BUSINESS INTERRUPTION) HOWEVER CAUSED AND ON ANY THEORY OF LIABILITY, WHETHER IN CONTRACT, STRICT LIABILITY, OR TORT (INCLUDING NEGLIGENCE OR OTHERWISE) ARISING IN ANY WAY OUT OF
THE USE OF THIS SOFTWARE, EVEN IF ADVISED OF THE POSSIBILITY OF SUCH DAMAGE.
Download Manual