Changing light bulbs
Introduction to the subject
In this chapter you will find information on the following subjects:
⇒ Indicator light
⇒ Information on light bulb replacement
⇒ Replacing light bulbs in the Halogen headlight
⇒ Replacing light bulbs in the Xenon headlight
⇒ Changing light bulbs in the front bumper
⇒ Replacing light bulbs in taillight in the rear hatch
⇒ Changing taillight bulbs in the vehicle body
⇒ Changing the light bulb in the license plate lamp
⇒ Changing the light bulb in the backup lamp
Changing a light bulb requires a certain amount of skill. If you are uncertain about how to proceed, Volkswagen recommends having the light bulb changed by an authorized Volkswagen dealer or an authorized Volkswagen Service Facility. Special training and knowledge are generally required when other vehicle parts must be disassembled to replace a bulb, or when HID – High Intensity Discharge (Xenon) lamps must be replaced.
You should always keep a box in the vehicle with all the replacement bulbs required for traffic safety. Replacement bulbs are available from your authorized Volkswagen dealer or Authorized Volkswagen Service Facility. The laws of some countries explicitly require you to have replacement bulbs in the vehicle.
Driving with outside lights that do not work may be against the law.
Additional light bulb specifications
Some factory-installed light bulbs in the headlights or the rear lights may have different specifications than conventional light bulbs. Specifications are on the glass bulb or on the metal base.
More information:
- Exterior views ⇒ Exterior views
- Lights and Vision ⇒ Lights and vision
- Preparations for working in the engine compartment ⇒ Preparations for working in the engine compartment
- Vehicle tool kit ⇒ Vehicle tool kit
- Fuses ⇒ Fuses

 Warning
Crashes and other accidents can happen when you cannot see the road ahead and when you cannot be seen by other motorists.
Warning
Improper replacement of burned out headlights and other light bulbs can cause serious personal injury.
- Stop! Always read and heed the WARNINGS before doing any work in the engine compartment ⇒ Preparations for working in the engine compartment . The engine compartment of any motor vehicle is a potentially dangerous area, and work in this area can lead to serious personal injury.
- HID – High Intensity Discharge (Xenon) get power from a high voltage source that can cause severe personal injury and even death if handled improperly.
- H7/H15 bulbs and HID – High Intensity Discharge (Xenon) are under high pressure and can explode if handled improperly.
- Always let a burned out light bulb cool down before replacing it.
- Never replace a light bulb unless you are familiar with all of the necessary procedures. In particular, never remove a headlight unless you know exactly how to carry out the job and have the correct tools and light bulbs.
- If you are uncertain about what to do, have the work performed by an authorized Volkswagen dealer, an authorized Volkswagen Service Facility, or another qualified workshop. Serious personal injury may result from improperly performed work.
- We strongly recommend that you always have HID – High Intensity Discharge (Xenon) lamps and H7/H15 bulbs replaced by a qualified technician.
- Do not touch the glass of light bulbs with your bare hands. Fingerprints left on the bulb evaporate due to the heat when the bulb is switched on and cause the reflector to cloud.
- There are sharp edges on and around the headlight housing in the engine compartment and the rear light housing. Wear hand protection if you replace bulbs.

 Note
Note
After replacing a headlight bulb or other light bulb, always make sure that the rubber covers or plastic caps have been properly and securely reinstalled to help prevent water from getting into the electrical connections and headlight housing and damaging the electrical system.
Indicator light
Read and follow the introductory information and safety information first⇒ Introduction to the subject
| Lights up | Possible cause | Proper response |
|---|---|---|
 |
Light bulb of the exterior vehicle lighting not working. | Replace the light bulb that isn't working. |
When the ignition is switched on, several warning and indicator lights come on briefly for a function check. They go out after a few seconds.
Warning
Failure to heed warning lights and instrument cluster text messages can cause the vehicle to break down in traffic and result in a collision and serious personal injury.
- Never ignore warning lights or text WARNINGS.
- Always stop the vehicle as soon as it is safe to do so.
Note
Failure to heed warning lights or text WARNINGS can result in vehicle damage.
Information on light bulb replacement
Read and follow the introductory information and safety information first⇒Introduction to the subject
Checklist
Steps for replacing a light bulb. Please carry out these steps only in the order listed ⇒ .

Stop the vehicle in a safe place on level and firm ground at a safe distance from traffic.
-
Apply the parking brake to help prevent the vehicle from moving Braking, stopping, and parking.
-
Turn the light switch to 0 position Lights.
-
Move the turn signal lever to neutral position Lights.
-
Automatic transmission: Shift the transmission into Park (P) Shifting.
-
Stop the engine and remove the key from the ignition switch Starting and stopping the engine.
-
Manual transmission: Engage a gear Shifting.
-
Let orientation lighting go out Lights.
-
Let the burned out light bulb cool down.
-
Check if the fuse is blown Fuses.
-
Replace the burned out light bulb according to instructions . Always replace a burned-out light bulb with a good bulb with the same specifications. Specifications are on the glass bulb or on the metal base.
-
Never touch the glass of the light bulb with your bare hands. Fingerprints can cloud the outer surface of the light bulb when heated, affecting the lighting power, clouding the reflector, and reducing the brightness.
-
Always make sure that the new bulb works. If the bulb does not work, it may not be installed correctly; the connection plug may not be completely seated; the corresponding fuse may be burned out; or the bulb may be bad.
-
Always have the headlights adjusted by an authorized Volkswagen dealer or an authorized Volkswagen Service Facility after a headlight bulb has been replaced.
Warning
Disregarding the safety-related checklist may lead to accidents and serious personal injuries.
- Always review and follow the checklist. Follow accepted safety practices and use common sense.
Note
Always insert and remove lamps carefully to avoid damage to the vehicle paint or to other parts of the vehicle.
Replacing light bulbs in the Halogen headlight
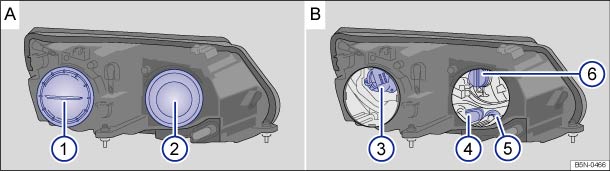
Fig. 201 In the engine compartment: Cover ① on the left headlight for the low beam bulb holder ③ and cover ② for the parking light bulb holder ④, turn signal bulb holder ⑤ and high beam or daytime running light bulb ⑥.
 Read and follow the introductory information and safety information first⇒Introduction to the subject
The following instructions only apply to vehicles with halogen headlight bulbs. Contact your authorized Volkswagen dealer or an authorized Volkswagen Service Facility for assistance with HID headlight replacement.
| Only perform these steps in the specified order: | ||||
|---|---|---|---|---|
| ⇒ Fig. 201 | Low beam headlight | Parking light | Turn signal | High beam headlight or daytime running light |
| 1. | Please review and follow the checklist ⇒ Information on light bulb replacement . | |||
| 2. | Open the engine hood  ⇒ Preparations for working in the engine compartment . ⇒ Preparations for working in the engine compartment . |
|||
| 3. | Turn the cover ① A on the back of the headlight counterclockwise until it stops and remove the cover. | Remove the rubber cover ② A on the back of the headlight. | ||
| 4. | Turn the bulb holder ③ B counterclockwise until it stops and remove it toward the rear with the bulb. | Unclip the bulb holder ④ B upward out of the guide and remove it toward the rear with the bulb. | Unclip the parking light bulb holder ④ B upward out of the guide and remove it toward the rear with the bulb. Turn the turn signal bulb holder ⑤ B counterclockwise until it stops and remove it toward the rear with the bulb. |
Turn the bulb ⑥ B counterclockwise until it stops and remove it toward the rear. |
| 5. | If necessary, press the locking mechanism on the bulb holder and pull the bulb straight out of the bulb holder. | |||
| 6. | Replace the burned out light bulb with a new bulb of the same type. | |||
| 7. | Reinsert the bulb holder ③ B into the headlight and turn it clockwise until it stops. | Reinsert the bulb holder ④ B into the headlight and clip it into the guide. | Reinsert the turn signal bulb holder ⑤ B into the headlight and turn it clockwise until it stop. Insert the parking light bulb holder ④ B into the headlight and clip it into the guide. |
Reinsert the bulb ⑥ B into the headlight and turn it clockwise until it stops. |
| 8. | Install the cover ① A on the back of the headlight (retainer vertical) and turn it clockwise until it stops. | Install the rubber cover ② A. | ||

The illustrations show the left headlight assembly from the rear. The right headlight assembly is the mirror image of the left headlight assembly.
Replacing light bulbs in the Xenon headlight
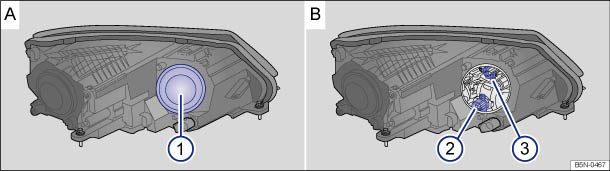
Fig. 202 In the engine compartment: cover ① on the left headlight for the turn signal bulb holder ② and the cornering light bulb holder ③.
Read and follow the introductory information and safety information first⇒Introduction to the subject
The headlight does not need to removed in order to replace the bulb.
Contact your authorized Volkswagen dealer or an authorized Volkswagen Service Facility for assistance with HID headlight replacement.
| Only perform these steps in the specified order: | ||
|---|---|---|
| ⇒ Fig. 202 | Turn signal | Cornering light |
| 1. | Follow the checklist and perform the steps ⇒ Information on light bulb replacement . | |
| 2. | Open the hood ⇒ Preparations for working in the engine compartment . |
|
| 3. | Remove the rubber cover ① A on the side of the headlight. | |
| 4. | Turn the bulb holder ② B counterclockwise until it stops and remove it toward the rear with the bulb. | Turn the bulb holder ③ B counterclockwise until it stops and remove it toward the rear with the bulb. |
| 5. | If necessary, press the locking mechanism on the bulb holder and pull the bulb straight out of the bulb holder. | |
| 6. | Replace burned out bulbs with new bulbs that are identical to the ones being replaced. | |
| 7. | Reinsert the bulb holder in the headlight and turn it clockwise until it stops. | |
| 8. | Install the rubber cover ① A. | |
The illustrations show the left headlight assembly from the rear. The right headlight assembly is the mirror image of the left headlight assembly.
Changing light bulbs in the front bumper

Fig. 203 In right front bumper: Removing light assembly.
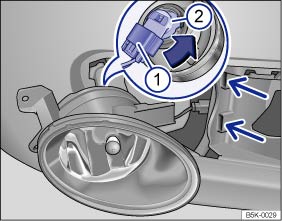
Fig. 204 Replacing light bulb in headlight.
Read and follow the introductory information and safety information first⇒Introduction to the subject
| Please carry out each step only in the order specified: | |
|---|---|
| 1. | Please review and follow the checklist ⇒ Information on light bulb replacement . |
| 2. | Remove the wire bracket from the vehicle tool kit and secure it in the opening in the cover ⇒ Fig. 203 . Pull the cover upward in the direction of the arrow. |
| 3. | Remove the screw ⇒ Fig. 203① using the screwdriver in the vehicle tool kit ⇒ Vehicle tool kit . |
| 4. | Remove the headlight. |
| 5. | Release the connector ⇒ Fig. 204① and disconnect it. |
| 6. | Turn the bulb holder ⇒ Fig. 204② counterclockwise in the direction of the arrow until it stops and remove it toward the rear with the bulb. |
| 7. | Replace the burned out light bulb with a new bulb of the same type. |
| 8. | Insert the bulb holder into the headlight assembly and turn it clockwise until it stops. |
| 9. | Connect the connector ⇒ Fig. 204① on the bulb holder ⇒ Fig. 204② . You must hear the connector click into place. |
| 10. | Insert the headlight. |
| 11. | Tighten the screw ⇒ Fig. 203① with the screwdriver. |
| 12. | Install cover in the bumper ⇒ Fig. 203 . |
Replacing light bulbs in taillight in the rear hatch
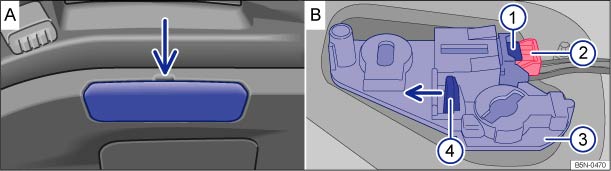
Fig. 205 In the rear lid: removing the cover and the bulb holder.
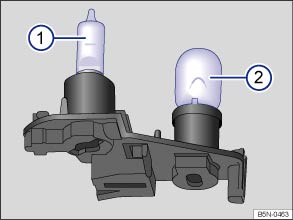
Fig. 206 Bulb holder with backup light bulb ②.
Read and follow the introductory information and safety information first⇒Introduction to the subject
| Please carry out each step only in the order specified: | |
|---|---|
| 1. | Please review and follow the checklist ⇒ Information on light bulb replacement . |
| 2. | Open the rear hatch ⇒ Rear hatch . |
| 3. | Using the screwdriver from the vehicle tool kit ⇒ Vehicle tool kit , carefully pry the cover off with the flat blade of the screw driver inserted in the opening ⇒ Fig. 205 A. |
| 4. | Remove the red locking mechanism ⇒ Fig. 205② B as illustrated and disconnect the electrical connector with the lever pressed down ⇒ Fig. 205① B. |
| 5. | Press the locking tab ⇒ Fig. 205④ B in the direction of the arrow and remove the bulb holder ⇒ Fig. 205③ B. |
| 6. | Replace burned out rear light bulbs ⇒ Fig. 206② with bulbs that are identical to the ones being replaced. |
| 7. | Insert the bulb holder. You must hear the locking tab click into place. |
| 8. | Insert the electrical connector into the bulb holder until it clicks into place. Press the red locking mechanism ⇒ Fig. 205② B back in. |
| 9. | Insert the cover. The cover must lock into place and be secure. |
Changing taillight bulbs in the vehicle body
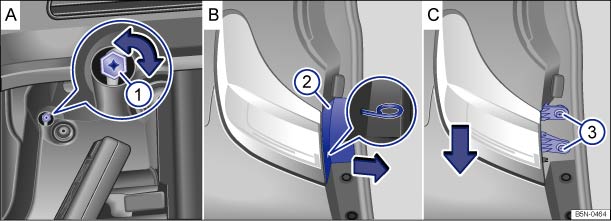
Fig. 207 In the side of the luggage compartment: releasing the tail light, removing the trim panel and removing the screws.
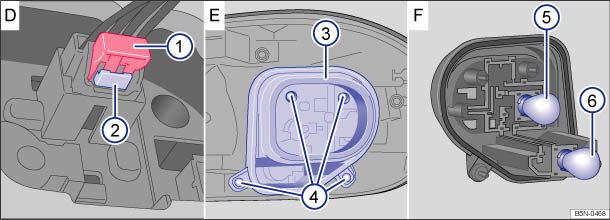
Fig. 208 Removed tail light: removing the bulb holder and replacing the tail light and brake light bulb ③ or turn signal bulb ④.
Read and follow the introductory information and safety information first⇒Introduction to the subject
Please perform these steps only in the order listed.
Removing the tail lights
| 1. | Please review and follow the checklist ⇒ Information on light bulb replacement . |
| 2. | Open the rear hatch ⇒ Rear hatch . |
| 3. | Insert the wire bracket from the vehicle tool kit (⇒ Vehicle tool kit ) into the small hole in the trim panel ⇒ Fig. 207② B. Remove the trim panel in the direction of the arrow using the wire bracket. |
| 4. | Open the side storage compartment in the luggage compartment ⇒ Other storage compartments . |
| 5. | Using the Phillips screwdriver from the vehicle tool kit, turn the locking mechanism ⇒ Fig. 207① A 90 ° counterclockwise until it stops. |
| 6. | Remove the screws ⇒ Fig. 207③ C. |
| 7. | Pull the tail light out of the body carefully until the electrical connector is visible. |
| 8. | Remove the red locking mechanism ⇒ Fig. 208① D as illustrated and disconnect the electrical connector with the lever ⇒ Fig. 208② D pressed down. |
| 9. | Lay the tail light on a clean and level surface. |
Changing light bulbs
| 10. | Remove the screws ⇒ Fig. 208④ E. |
| 11. | Remove the bulb holder ⇒ Fig. 208③ E from the tail light. |
| 12. | Replace burned out tail light, brake light ⇒ Fig. 208⑤ F or turn signal bulbs ⇒ Fig. 208⑥ F with bulbs that are identical to the ones being replaced. |
| 13. | Insert the bulb holder in the tail light and screw it in ⇒ Fig. 208 E. |
Installing the tail lights
| 14. | Turn the locking mechanism ⇒ Fig. 207① A 90 ° clockwise until it stops. |
| 15. | Insert the electrical connector into the bulb holder until it clicks into place. Press the red locking mechanism ⇒ Fig. 208① D back in. |
| 16. | Insert the tail light into the opening on the body carefully. |
| 17. | Hold the tail light in the correct position with one hand and tighten the screws with the other hand ⇒ Fig. 208③ C. |
| 18. | Insert the trim panel ⇒ Fig. 207② B into its original position, first at the bottom and then at the top. |
| 19. | Close the side storage compartment in the luggage compartment. |
| 20. | Close the rear hatch ⇒ Rear hatch . |
Changing the light bulb in the license plate lamp

Fig. 209 In the rear hatch: Clamped license plate lamp.
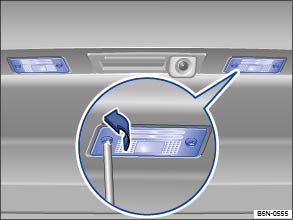
Fig. 210 In the rear hatch: Screwed license plate lamp.
Read and follow the introductory information and safety information first⇒Introduction to the subject
| Please carry out each step only in the order specified: | ||
|---|---|---|
| Clamped license plate lamp | Screwed license plate lamp | |
| 1. | Please review and follow the checklist ⇒ Information on light bulb replacement . | |
| 2. | Press the flat blade of the screwdriver from the vehicle tool kit in the direction of the arrow in the notch in the license plate lamp ⇒ Fig. 209 . | Remove the screws of the license plate lamp with the screwdriver from the vehicle tool kit. |
| 3. | Pull out the license plate lamp slightly. The connector must not be separated for this. | |
| 4. | Replace the burned out light bulb with a new bulb of the same type. | |
| 5. | Carefully insert the license plate lamp into the opening in the bumper. Ensure that the license plate lamp is installed in the correct direction. | Carefully insert the license plate lamp into the opening in the bumper. Make sure that the adhesive anti-glare strip faces forward. |
| 6. | Press the license plate lamp into the bumper until it audibly latches. | Tighten the securing screws of the license plate lamp with the screwdriver. |
Changing the light bulb in the backup lamp
Read and follow the introductory information and safety information first⇒Introduction to the subject
The light bulbs for the backup lights are Lifetime bulbs with a very long service life. If the bulb is defective, you cannot change it yourself because other vehicle components must be removed. Defective backup light bulbs should be changed by an authorized Volkswagen dealer or authorized Volkswagen Service facility.
Download Manual