Exterior lighting
Introduction
Before changing a light bulb, check if it is an incandescent bulb or an LED light. Generally, the average person can replace an incandescent bulb. If the exterior lighting on your vehicle is equipped with LED technology, it is not possible to change LED lights or individual LEDs by yourself. The failure of individual LEDs may be an indication that more LEDs will fail. If this is the case, have lights checked and/or replaced by an authorized Volkswagen dealer or authorized Volkswagen Service Facility.
Driving with exterior lighting that is inoperative may be against the law.
Additional bulb specifications
Some bulbs in the headlights or in the tail lights may have certain manufacturer specifications that differ from conventional light bulbs. The respective name will be on the bulb socket or glass bulb.
 WARNING
Accidents can occur if the road is not well lit and the vehicle cannot be seen by others on the road, or is very difficult to see by others.
WARNING
Changing the bulbs incorrectly can cause accidents and serious injuries.
-
Always read and observe the warnings before performing any work in the engine compartment ⇒ Safety precautions for working in the engine/motor compartment. The engine/motor compartment in any motor vehicle is a potentially dangerous area that can cause serious personal injury.
-
Halogen bulbs are under pressure and can break during a bulb change.
-
Only change bulbs when they have cooled down completely.
-
Never change a light bulb if you are not familiar with the required procedures. If you are not sure what to do, have the work performed by an authorized Volkswagen dealer or authorized Volkswagen Service Facility.
-
Do not touch the glass bulb with bare fingers. Fingerprints on the bulb will vaporize from the heat when the light is switched on and will cause the reflector to “darken”.
-
Components with sharp edges are located on the headlight housing in the engine/motor compartment and on the tail light housing. Protect your hands when changing a light bulb.
 NOTICE
If the rubber cover or plastic covers on the headlight housing were not installed correctly after a bulb change, this could cause damage to the electrical system, especially if water enters.
“Bulb replacement information” checklist
 Please read the introductory information and heed the Warnings and Notice ⇒
  and
and Introduction.
Checklist
Always perform the following steps for changing a bulb in the specified sequence → :
-
Park the vehicle a safe distance away from moving traffic on level and solid ground as soon as possible.
-
Set the electronic parking brake ⇒ Using the electronic parking brake.
-
Switch the lights off ⇒ Switching the lights on and off.
-
Turn off the turn signal if it is activated ⇒ Switching the turn signals on and off.
-
Automatic transmission: move the selector lever into the P position ⇒ Automatic transmission: selecting the selector lever position.
-
Stop the engine and remove the vehicle key from the ignition lock ⇒ Stopping the engine.
-
Allow the orientation lighting to turn off ⇒ “Coming home” and “Leaving home” function (orientation lighting).
-
Allow the affected light bulbs to cool down.
-
Check if you can see that a fuse is burnt out ⇒
Introduction. -
Change the affected light bulb according to the instructions →
. A light bulb may only be replaced with the same type of light bulb. The respective name will be on the bulb socket or glass bulb. -
Never touch a glass light bulb with bare hands. The fingerprints left behind would vaporize from the heat when the bulb is switched on and condense on the reflector, which would then reduce the headlight brightness.
-
Check the bulb function after a bulb is changed. If the bulb does not function, the bulb may not have been inserted correctly, may have fallen out, or the connector may not have been plugged in correctly.
-
Every time a bulb is changed in the front of the vehicle, have the headlight setting checked by an authorized Volkswagen dealer or authorized Volkswagen Service Facility.
WARNING
Failing to heed this checklist that is provided for your own safety can cause accidents and serious injuries.
-
Always follow the steps in the checklist and the general safety precautions.
NOTICE
Always remove and insert lights carefully to reduce the risk of damaging the vehicle paint or other vehicle components.
Replacing bulbs in the headlights (halogen bulbs)
Please read the introductory information and heed the Warnings and Notice ⇒ andIntroduction.
Fig. 161 In the engine compartment:  covers and
  bulbs in the left headlight.
The headlight does not need to be removed to replace the bulb.
Only perform these steps in the specified order:
-
Follow the checklist and perform the steps. ⇒ “Bulb replacement information” checklist
-
Open the hood
 ⇒ Safety precautions for working in the engine/motor compartment.
 -
Remove the rubber cover on the rear side of the headlight
 and
and  .
. -
Low beam headlight
 , parking light and daytime running light
  , turn signal
  , high beam headlight
  Turn the bulb holder counterclockwise all the way and remove it with the bulb toward the rear.
 -
Replace the burned out bulb with a new bulb that is identical to the one being replaced.
-
Low beam headlight
, parking light and daytime running light , turn signal , high beam headlight Insert the bulb holder into the headlight and turn clockwise until it stops. -
Attach the rubber cover on the rear side of the headlight
and . -
Close the hood ⇒ Safety precautions for working in the engine/motor compartment.
 The illustrations show the left headlight from behind. The layout on the right headlight is a mirror image of the left.
There are different versions of the headlights so the location and version of the covers, bulb holders, and bulbs may differ from the images.
It is not possible for you to replace the LEDs in LED daytime running lights. Contact an authorized Volkswagen dealer or authorized Volkswagen Service Facility.
Replacing bulbs in the front bumper
Please read the introductory information and heed the Warnings and Notice ⇒ andIntroduction.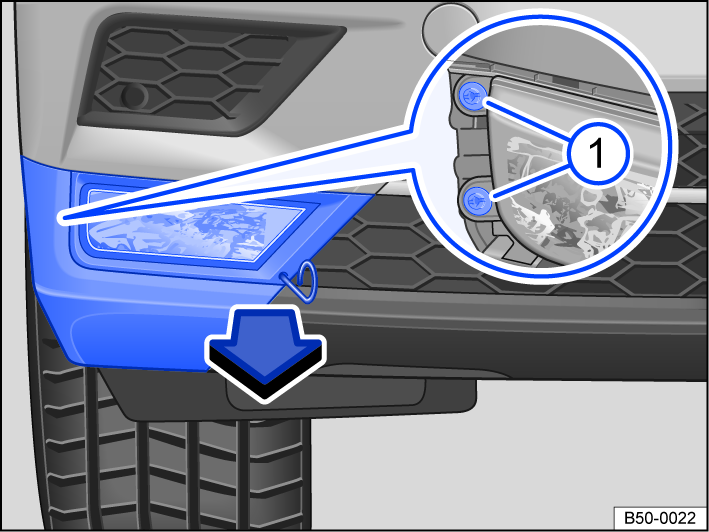
Fig. 162 In the right side of the front bumper: removing the fog lights.
Only perform these steps in the specified order:
-
Follow the checklist and perform the steps ⇒ “Bulb replacement information” checklist.
-
Remove the wire bracket from the vehicle tool kit and secure it in the opening in the cover fig. 162. Pull the cover forward in the direction of the arrow.
-
Remove the screw fig. 162
using the screwdriver in the vehicle tool kit ⇒ Placement. -
Pull the headlight out of the bumper toward the outer side of the vehicle.
-
Release the connector and disconnect it.
-
Turn the bulb holder counterclockwise until it stops and remove it toward the rear with the bulb.
-
Replace the burned out bulb with the same type of new bulb.
-
Insert the bulb holder in the headlight and turn it clockwise until it stops.
-
Slide the headlight into the openings from the outside and insert it into the bumper.
-
Tighten the screw fig. 162
with the screwdriver. -
Insert the cover in the bumper fig. 162.
-
Stow the wire bracket and screwdriver in the vehicle tool kit.
NOTICE
-
Make sure the connector on the headlight housing is positioned correctly to reduce the risk of damaging the electrical system from water entering the system.
-
When removing and inserting the headlight, be careful not to damage the paint.
Replacing bulbs in the tail lights
Please read the introductory information and heed the Warnings and Notice ⇒ andIntroduction.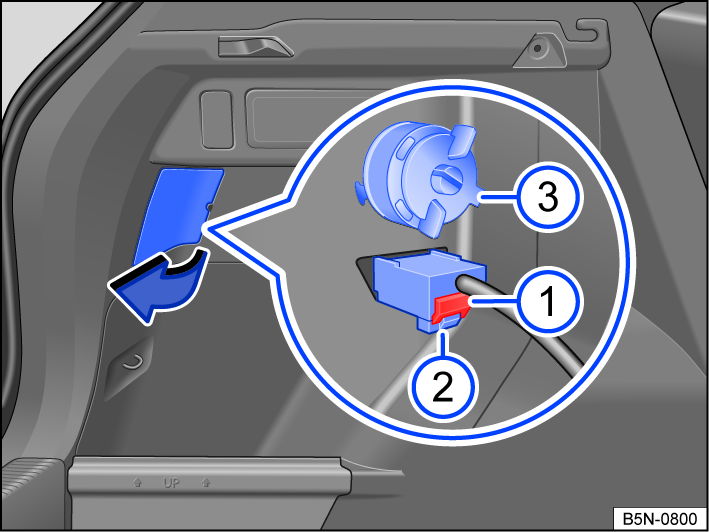
Fig. 163 Side of the luggage compartment: removing the tail light.
Removing the tail light
Only perform these steps in the specified order:
-
Follow the checklist and perform the steps ⇒ “Bulb replacement information” checklist.
-
Open the luggage compartment lid.
-
Open the section of the side trim panel in the luggage compartment near the tail light in the direction of the arrow fig. 163.
-
Remove the red locking mechanism fig. 163
on the connector and remove the connector fig. 163 . If necessary, use the screwdriver from the vehicle tool kit to loosen the red locking mechanism. -
Remove the screw counterclockwise fig. 163
. -
Carefully pull the tail light toward the rear and out of the body.
-
Remove the tail light and place it on a clean, flat surface.
Replacing a bulb
Only perform these steps in the specified order:
-
Turn the bulb holder counterclockwise until it stops and then remove it carefully from the tail light with the bulb.
-
Replace the burned out bulb with a new bulb that is identical to the one being replaced.
-
Insert the bulb holder carefully in the tail light and turn clockwise until the bulb holder locks into place.
Installing the tail light
Only perform these steps in the specified order:
-
Insert the tail light carefully into the opening on the body.
-
Hold the tail light in the installation position with one hand and tighten the screw with the other hand fig. 163
. -
Make sure the tail light is installed correctly and is secure.
-
Connect the connector to the bulb holder and press in.
-
Close the section of the side trim panel in the luggage compartment near the tail light in the opposite direction of the arrow.
-
Close the luggage compartment lid.
The illustration shows the left tail light. The right tail light housing is a mirror image of the left.
There are different versions of the tail lights. The locations and versions of the bulb holders and bulbs may vary from the images.
In LED tail lights, some lighting elements may be equipped with “standard” bulbs. These bulbs can be replaced.
Download Manual