Seat
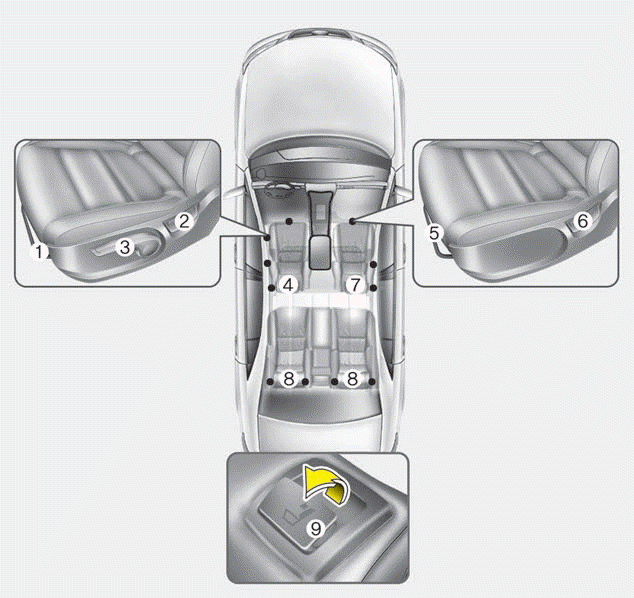
Driver’s seat
(1) Forward and backward
(2) Seatback angle
(3) Seat height adjustment*
(4) Headrest
Front passenger’s seat
(5) Forward and backward
(6) Seatback angle
(7) Headrest
Rear seat
(8) Headrest
(9) Seatback folding*
WARNING - Loose objects
Do not place anything in the driver's foot well or under the front seats. Loose objects in the driver's foot area could interfere with the operation of the foot pedals.
WARNING - Uprighting seat
Do not press the release lever on a manual seatback without holding and controlling the seatback. The seatback will spring upright possibly impacting you or other passengers.
WARNING - Seat cushion
Occupants should never sit on aftermarket seat cushions or sitting cushions. The passenger's hips may slide under the lap portion of the seat belt during an accident or a sudden stop.
WARNING - Driver responsibility for passengers
The driver must advise the passenger to keep the seatback in an upright position whenever the vehicle is in motion. If a seat is reclined during an accident, the restraint system's ability to restrain will be greatly reduced.
WARNING - Driver’s seat
- Never attempt to adjust the seat while the vehicle is moving. This could result in loss of control of your vehicle.
- Do not allow anything to interfere with the normal position of the seatback and seatback adjustment.
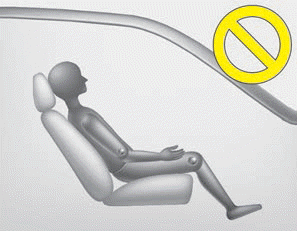
- Sit as far back as possible from the steering wheel while still maintaining comfortable control of your vehicle. A distance of at least 25 cm (10 in) from your chest to the steering wheel is recommended. Failure to do so could result in air bag inflation injuries to the driver.
WARNING - Seat adjustment
- Do not adjust the seat while wearing seat belts. Moving the seat forward will cause strong pressure on the abdomen.
- Do not place your hand near the seat bottom or seat track while adjusting the seat. Your hand could get caught in the seat mechanism.
WARNING - Small Objects
Use extreme caution when picking up small objects trapped under the seats or between the seat and the center console. Your hands might be cut or injured by the sharp edges of the seats mechanism.
Feature of Seat Leather
- Leather is made from the outer skin of an animal, which goes through a special process to be available for use. Since it is a natural substance, each part differs in thickness or density. Wrinkles may appear as a natural result of stretching and shrinking depending on the temperature and humidity.
- The seat cover is made of stretchable material to improve comfort of passengers.
- The parts contacting the body are curved and the side supporting area is high which provides driving comfort and stability.
- Wrinkles may appear naturally from usage. It is not a fault of the product.
CAUTION
- Belts with metallic accessories, zippers or keys inside your back pants pocket may damage the seat fabric.
- Make sure not to wet the seat. It may change the nature of natural leather.
- Jeans or clothes which contain bleach may contaminate the surface of the seat covering fabric and cause damage or discoloration.
✽ NOTICE
Wrinkles or abrasions which appear naturally from usage are not covered by warranty.
Front seat adjustment
Forward and backward
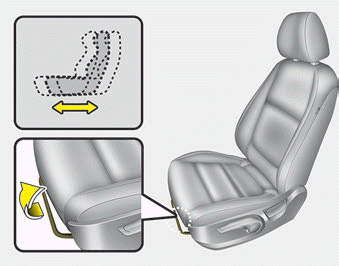
To move the seat forward or backward:
1. Pull the seat slide adjustment lever up and hold it.
2. Slide the seat to the position you desire.
3. Release the lever and make sure the seat is locked in place.
Adjust the seat before driving, and make sure the seat is locked securely by trying to move forward and backward without using the lever. If the seat moves, it is not locked properly.
WARNING - Unexpected seat movement
After adjusting a manual seat, always check that it is locked by shifting your weight to the front and back. Sudden or unexpected movement of the driver's seat could cause you to lose control of the vehicle.
Seatback angle
To recline the seatback:
1. Lean forward slightly and lift up the seatback recline lever.
2. Carefully lean back on the seat and adjust the seatback of the seat to the position you desire.
3. Release the lever and make sure the seatback is locked in place. (The lever MUST return to its original position for the seatback to lock.)
Seat Cushion height (if equipped, for driver’s seat)
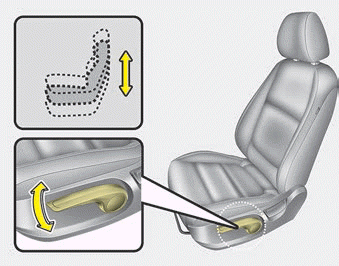
To change the height of the seat cushion, push the lever upwards or downwards.
- To lower the seat, push the lever down several times until the seat reaches the desired position.
- To raise the seat, push the lever up several times until the seat reaches the desired position.
Headrest (for front seat)
The driver's and front passenger's seats are equipped with a headrest for the occupant's safety and comfort.
The headrest not only provides comfort for the driver and front passenger, but also helps protect the head and neck in the event of a collision.
For maximum effectiveness in case of an accident, the headrest should be adjusted so the middle of the headrest is at the same height of the center of gravity of an occupant's head. Generally, the center of gravity of most people's head is similar with the height of the top of their eyes. Also, adjust the headrest as close to your head as possible.
For this reason, the use of a cushion that holds the body away from the seatback is not recommended.
WARNING - Headrest removal/adjustment
- Do not operate the vehicle with the headrests removed. Headrests can provide critical neck and head support in a crash.
- Do not adjust the headrest height while the vehicle is in motion. Driver may lose control of the vehicle.
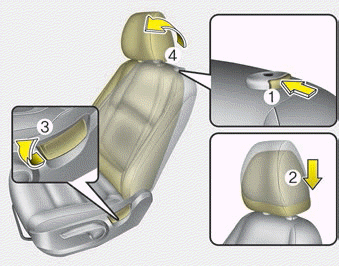
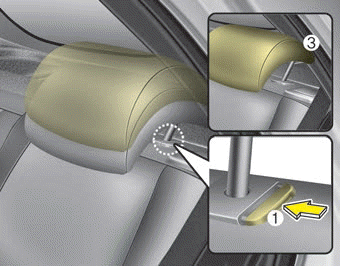
Adjusting the height up and down
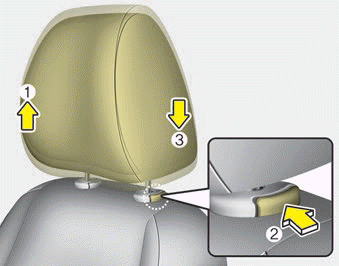
To raise the headrest, pull it up to the desired position (1). To lower the headrest, push and hold the release button (2) on the headrest support and lower the headrest to the desired position (3).
CAUTION
Excessive pulling or pushing may damage the headrest.

✽ NOTICE
If you recline the seatback towards the front with the headrest and seat cushion raised, the headrest may come in contact with the sunvisor or other parts of the vehicle.
Removal and installation
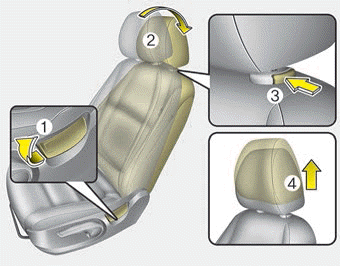
To remove the headrest:
1. Recline the seatback (2) with the recline lever(1).
2. Raise headrest as far as it can go.
3. Press the headrest release button (3) while pulling the headrest up (4).
WARNING - Headrest Removal
NEVER allow anyone to ride in a seat with the headrest removed. Headrests can provide critical neck and head support in a crash.
To reinstall the headrest :
1. Put the headrest poles (2) into the holes while pressing the release button (1).
2. Recline the seatback (4) with the recline lever (3).
3. Adjust the headrest to the appropriate height.
WARNING - Headrest Reinstallation
To reduce the risk of injury to the head or neck, always make sure the head rest is locked into position and adjusted properly after reinstalling.
Seatback pocket
The seatback pocket is provided on the back of the front passenger’s seatback.
WARNING - Seatback pocket
Do not put heavy or sharp objects in the seatback pocket. An occupant could contact such objects in a crash. Heavy objects in the front passenger seatback could also interfere with the air bag sensing system.
Rear seat adjustment
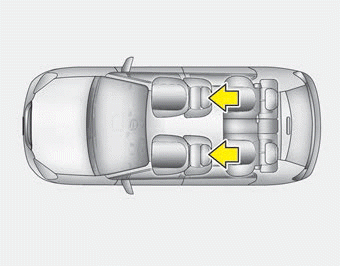
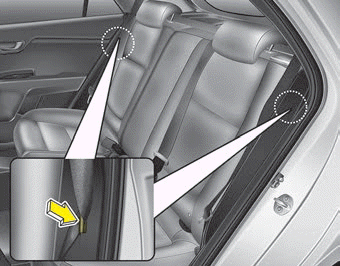
Headrest (for rear seat)
The rear seat is equipped with headrests in left and right side seating positions for the occupant's safety and comfort.
The headrest not only provides comfort for passengers, but also helps protect the head and neck in the event of a collision.
For maximum effectiveness in case of an accident, the headrest should be adjusted so the middle of the headrest is at the same height of the center of gravity of an occupant's head. Generally, the center of gravity of most people's head is similar with the height as the top of their eyes.
Also adjust the headrest as close to your head as possible. For this reason, the use of a cushion that holds the body away from the seatback is not recommended.
Adjusting the height up and down (if equipped)
To raise the headrest, pull it up to the desired position (1). To lower the headrest, push and hold the release button (2) on the headrest support and lower the headrest to the desired position (3).
Removal and installation
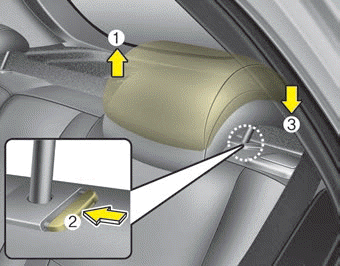
To remove the headrest, raise it as far as it can go then press the release button (1) while pulling the headrest upward (2).
To reinstall the headrest, put the headrest poles (3) into the holes while pressing the release button (1). Then adjust it to the appropriate height and ensure that it locks in position.
Folding the rear seat
The rear seatbacks may be folded to facilitate carrying long items or to increase the luggage capacity of the vehicle.
WARNING - Folded Seatback
Never allow passengers to sit on top of the folded down seatback while the vehicle is moving. This is not a proper seating position and no seat belts are available for use. This could result in serious injury or death in case of an accident or sudden stop.
WARNING - Objects
Objects carried on the folded down seatback should not extend higher than the top of the front seatbacks. This could allow cargo to slide forward and cause injury or damage during sudden stops.
To fold down the rear seatback (if equipped):
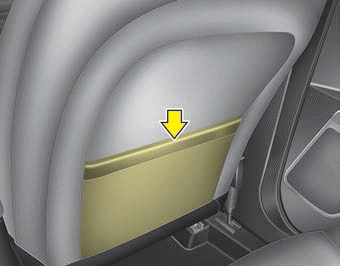
1. When folding the seat back, insert the rear seat belt buckle in the pocket between the rear seatback and cushion then make sure both seatbelts do not interfere with stowed luggage and cargo. Then, insert the seat belt into the two holes located on both sides.
2. Set the front seatback to the upright position and if necessary, slide the front seat forward.
3. Lower the rear headrests to lowest position.
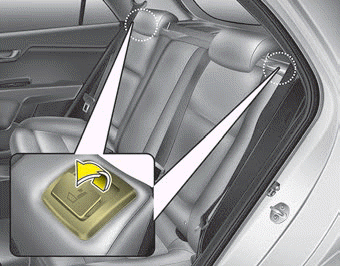
4. Pull the lock release lever and fold the rear seatback forward and down firmly.
To unfold the rear seat
1. To use the rear seat, lift and pull the seatback rearward. Pull the seatback firmly until it clicks into place. Make sure the seatback is locked in place. When you return the seatback to its upright position, always be sure it has locked into position by pushing on the top of the seatback.
2. Return the rear seat belt to the proper position.
3. When the seatback is completely installed, check the seatback folding lever again.
When returning the rear seatbacks to the upright position, remember to return the rear shoulder belts to their proper position.
CAUTION
Be careful when loading cargo through the rear passenger seats to prevent damage to the vehicle interior.
WARNING
Unless the driver’s position is properly set according to the driver’s physical figure, do not fold the rear seat. It may increase body injuries in a sudden stop or collision.
WARNING - Uprighting seat
When you return the seatback to its upright position, hold the seatback and return it slowly. If the seatback is returned without holding it, the back of the seat could spring forward resulting in injury caused by being struck by the seatback.
WARNING
When you return the rear seatback to its upright position after being folded down:
Be careful not to damage the seat belt webbing or buckle. Do not allow the seat belt webbing or buckle to get caught or pinched in the rear seat. Ensure that the seatback is completely locked into its upright position by pushing on the top of the seatback. Otherwise, in an accident or sudden stop, the seat could fold down and allow cargo enter the passenger compartment, which could result in serious injury or death.
WARNING - Cargo
Cargo should always be secured to prevent it from being thrown about the vehicle in a collision and causing injury to the vehicle occupants. Do not place objects in the rear seats, since they cannot be properly secured and may hit the front seat occupants in a collision.
WARNING - Objects
Objects carried on the folded down seatback should not extend higher than the top of the front seatbacks.This could allow cargo to slide forward and cause injury or damage during sudden stops.
Download Manual