Bulb Replacement
GENERAL INFORMATION
-
Before you replace a bulb, check the contacts to be sure they are not oxidized.
-
Replace the bulbs with the same type and wattage.
-
After replacing a light bulb, always check the correct orientation.
-
Before replacing a bulb that is not functioning, check that the fuse is intact.
Note:
Lens fogging can occur under certain atmospheric conditions. This will usually clear as atmospheric conditions change to allow the condensation to change back into a vapor. Turning the lamps on will usually accelerate the clearing process.
REPLACEMENT BULBS
|
Interior Bulbs |
|
|
Lamps |
Bulb Number |
|
Front Courtesy Light |
C5W |
|
Front Courtesy Lights (Sun Visors) |
C5W |
|
Rear Dome Light (Models Without Retractable Roof) |
C5W |
|
Rear Interior Lights (Models With Retractable Roof) |
C5W |
|
Interior Lights |
W5W |
|
Dome Light (Glove Compartment) |
W5W |
|
Exterior Bulbs |
|
|
Lamps |
Bulb Number |
|
Low Beam/High Beam Headlamps (LED Version) |
LED (Serviced at an authorized dealer) |
|
Low Beam/High Beam Headlamps |
H13 |
|
Front Position/Daytime Running Lights (DRL)/Front Turn Indicator |
PSY24W |
|
Front Direction Indicator Lamps (If Equipped With LED Headlamps) |
PSY24W |
|
Front Fog Lamps |
H11 |
|
Front Fog Lamps (LED Versions) |
LED (Serviced at an authorized dealer) |
|
Side Indicators (Front And Side View Mirror) |
WY5W |
|
Tail/Brake Lights/Turn Indicators (LED Versions) |
LED (Serviced at an authorized dealer) |
|
Tail/Brake Lights/Turn Indicators |
P21W |
|
Center High Mounted Stop Lamp (CHMSL) |
LED (Serviced at an authorized dealer) |
|
Reverse |
W16W |
|
License Plate Lamp |
W5W |
REPLACING EXTERIOR BULBS
CAUTION:
During bulb replacement do not touch the new glass bulb with your fingers. Oil contamination will severely shorten bulb life. If the bulb comes in contact with any oily surface, clean the bulb with rubbing alcohol.
Headlamps
Hi/Lo Beam Light Halogen
See the following steps to replace:
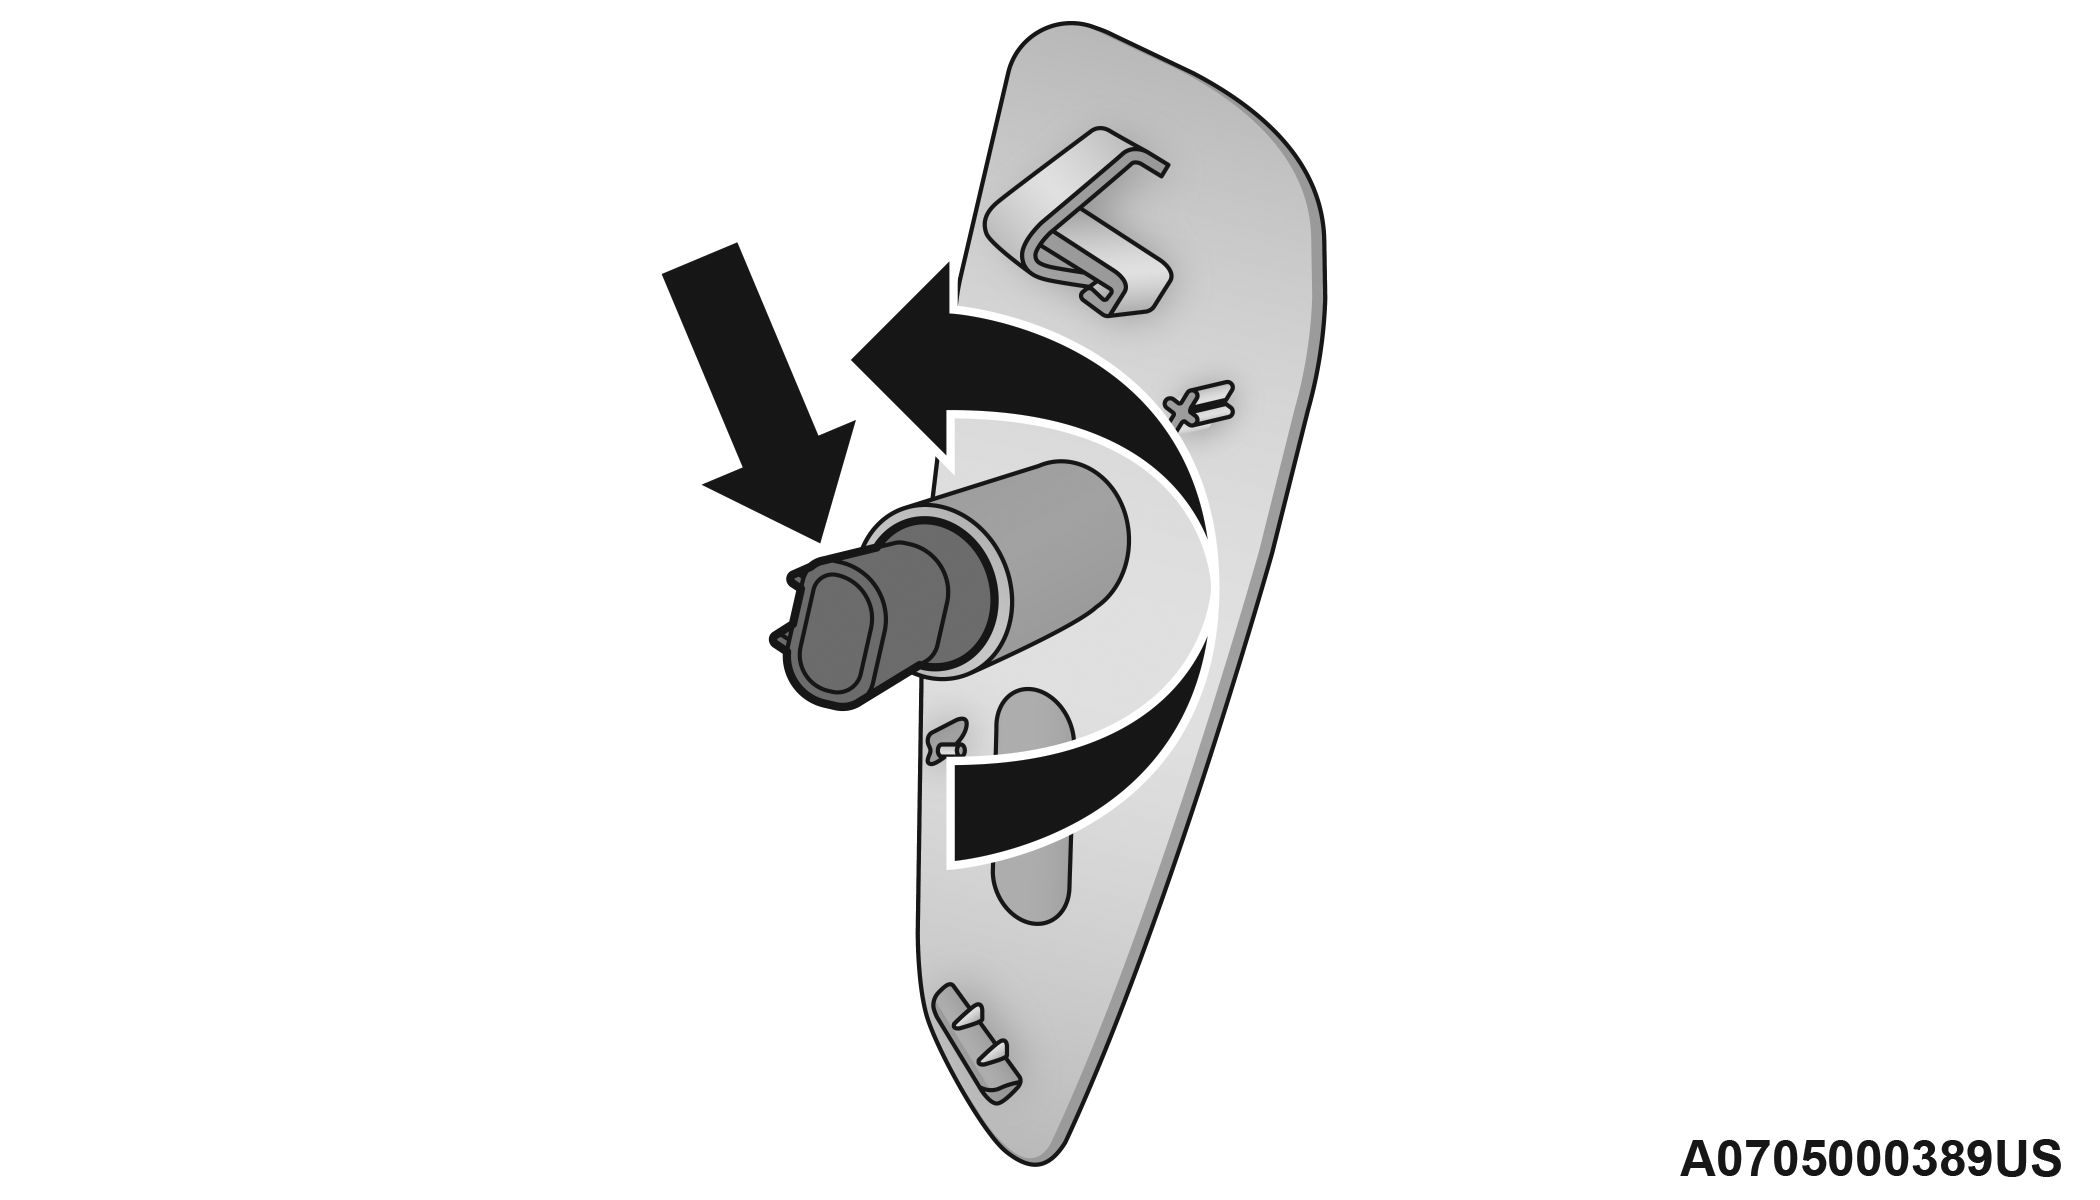
1. Open the engine compartment and remove the headlamp bulb cap.
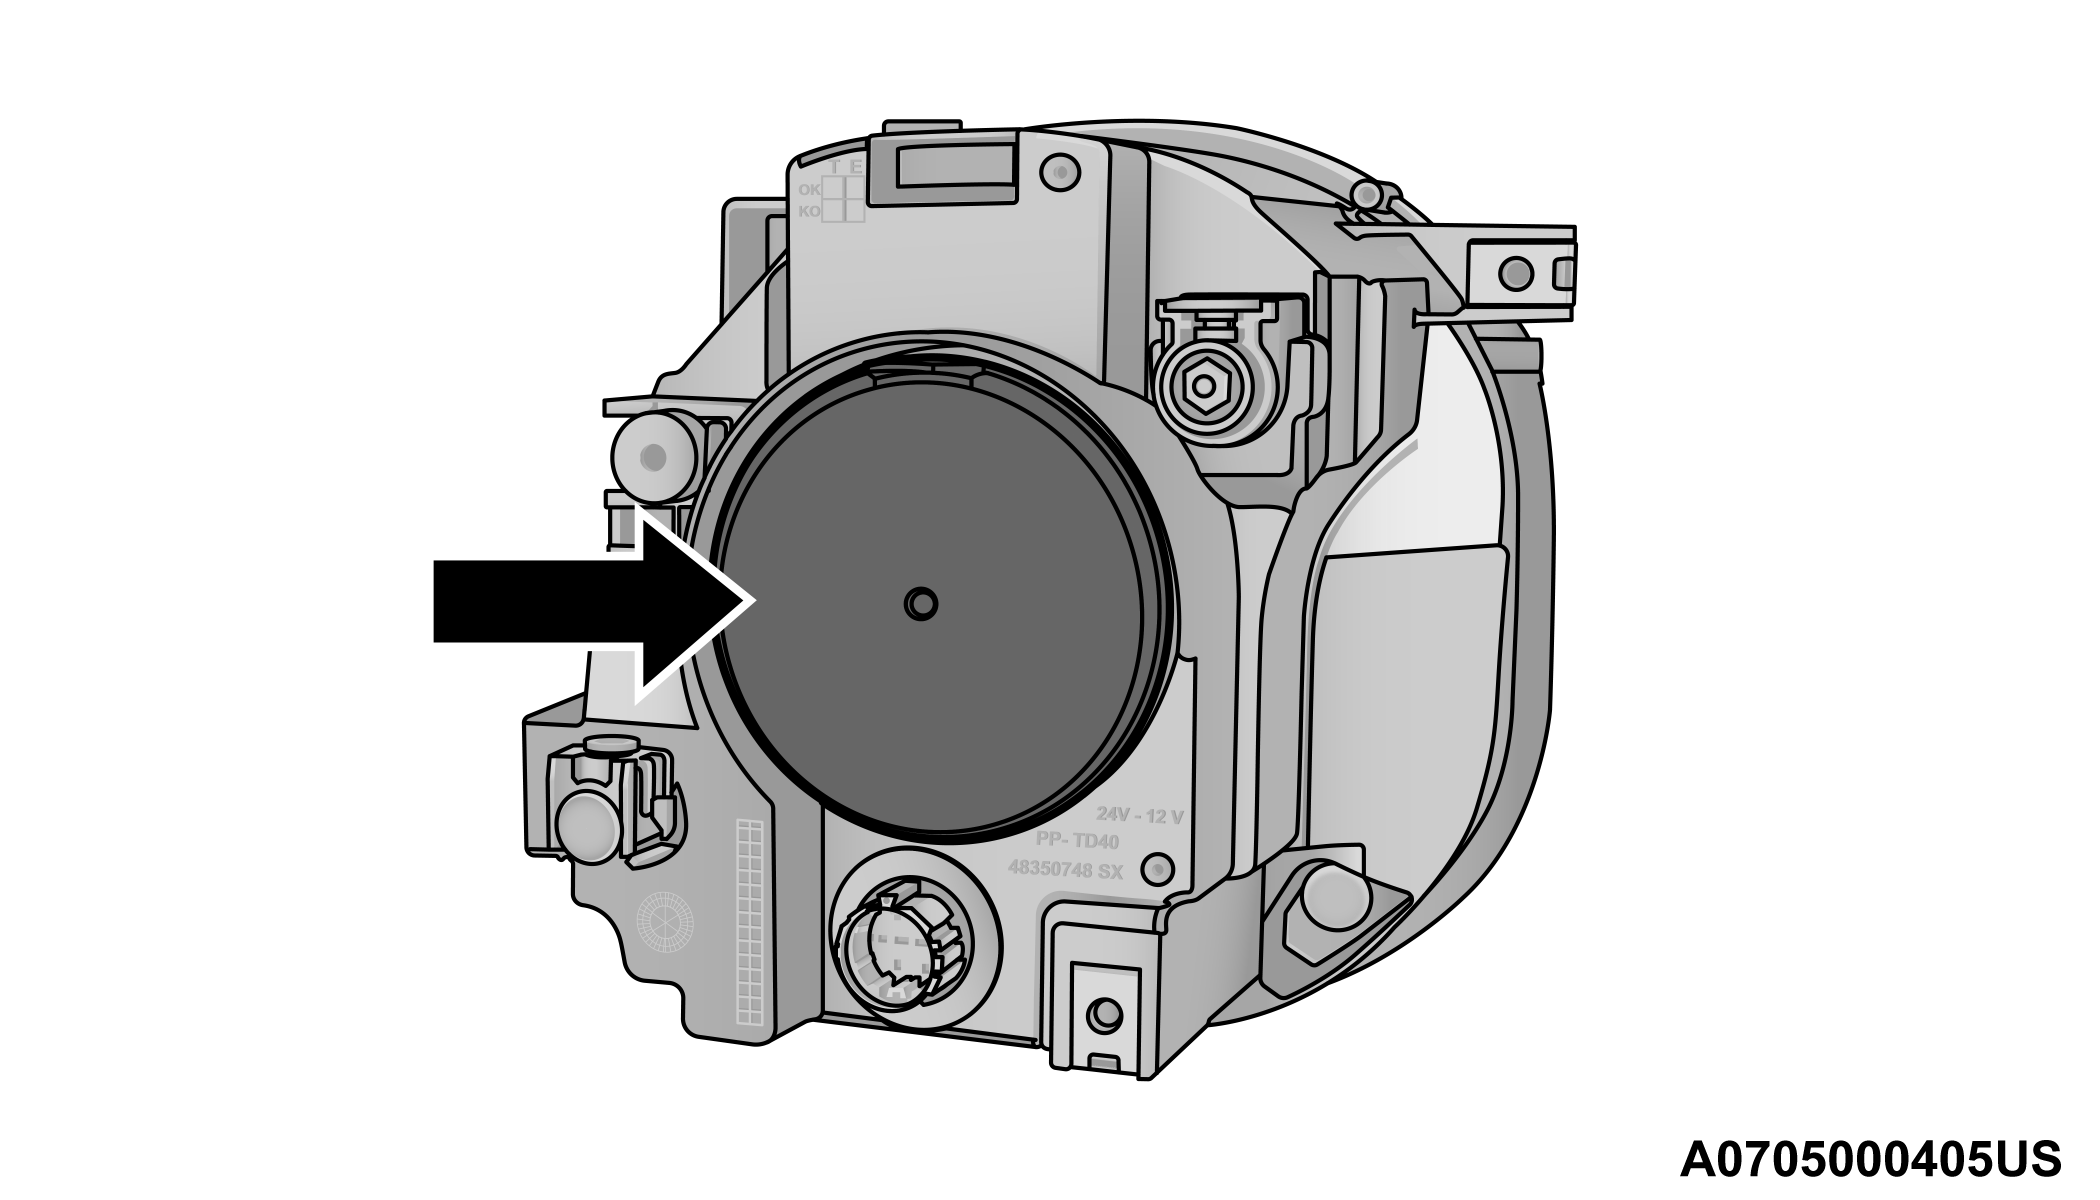
Headlamp Bulb Cap
2. Rotate the headlamp bulb socket counterclockwise then pull outwards.
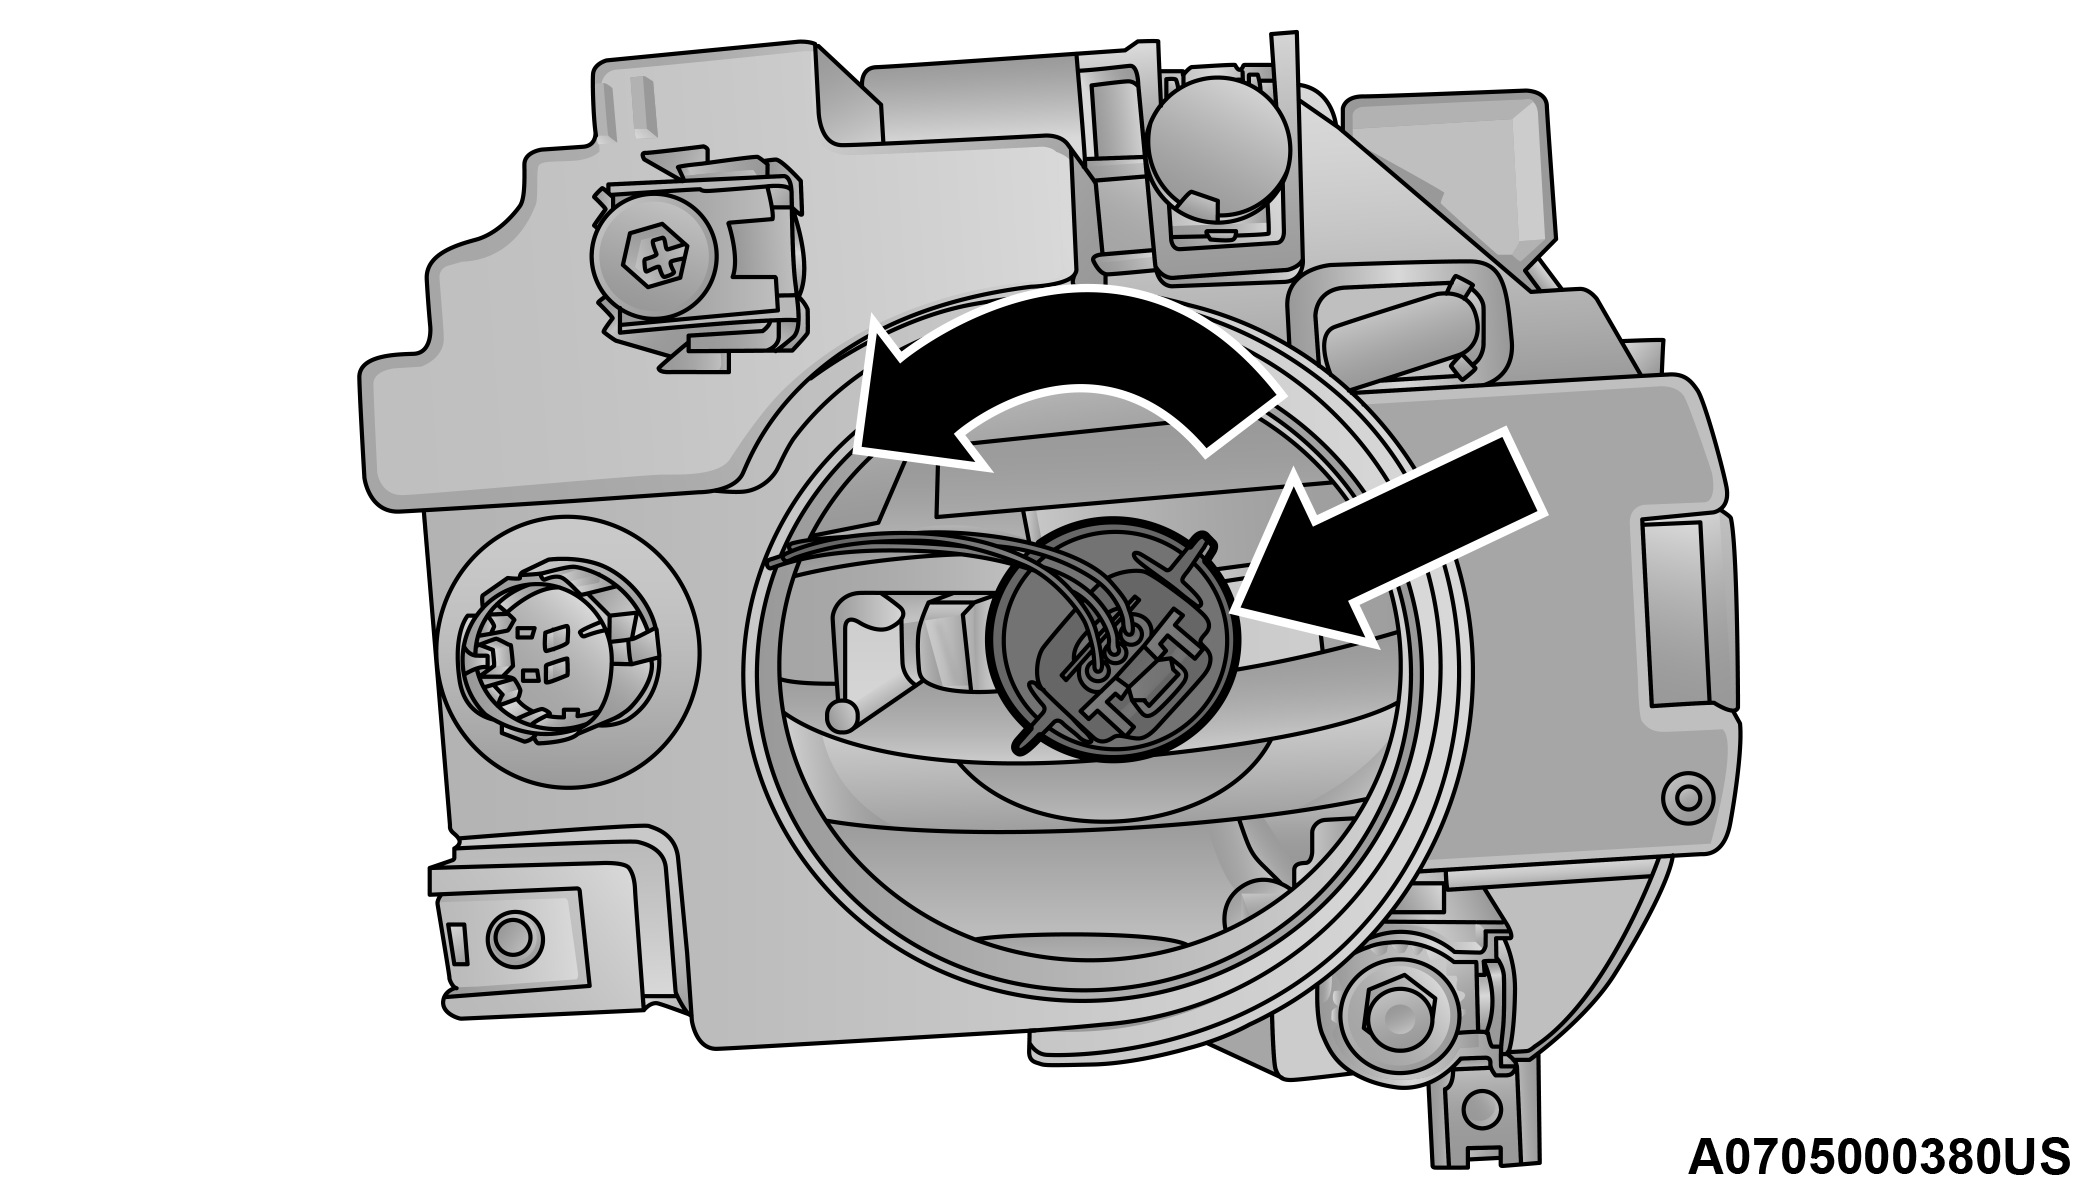
Headlamp Bulb Socket
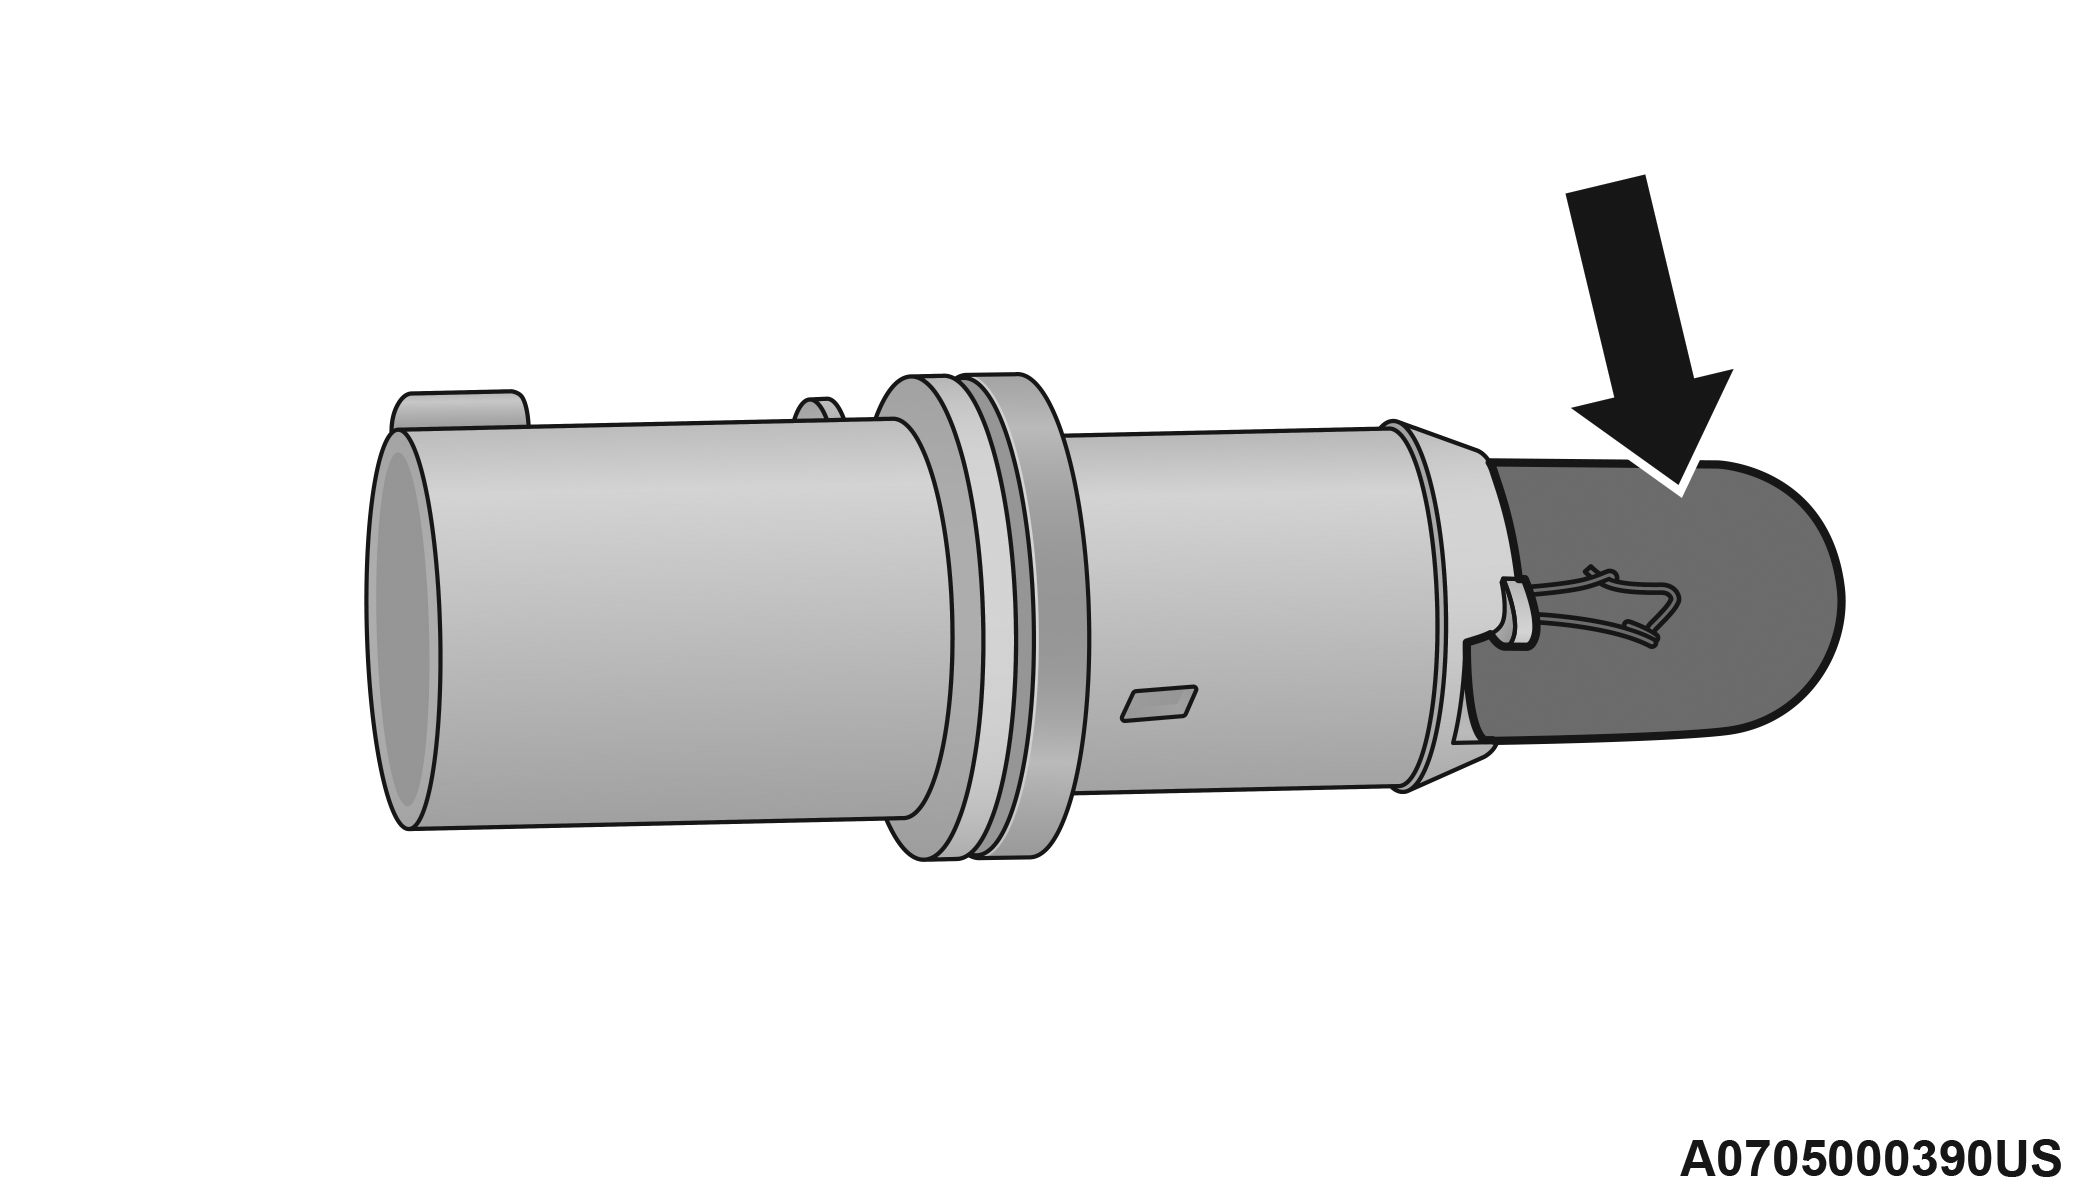
3. Push on the locking tab on the headlamp bulb connector and remove the bulb and socket.
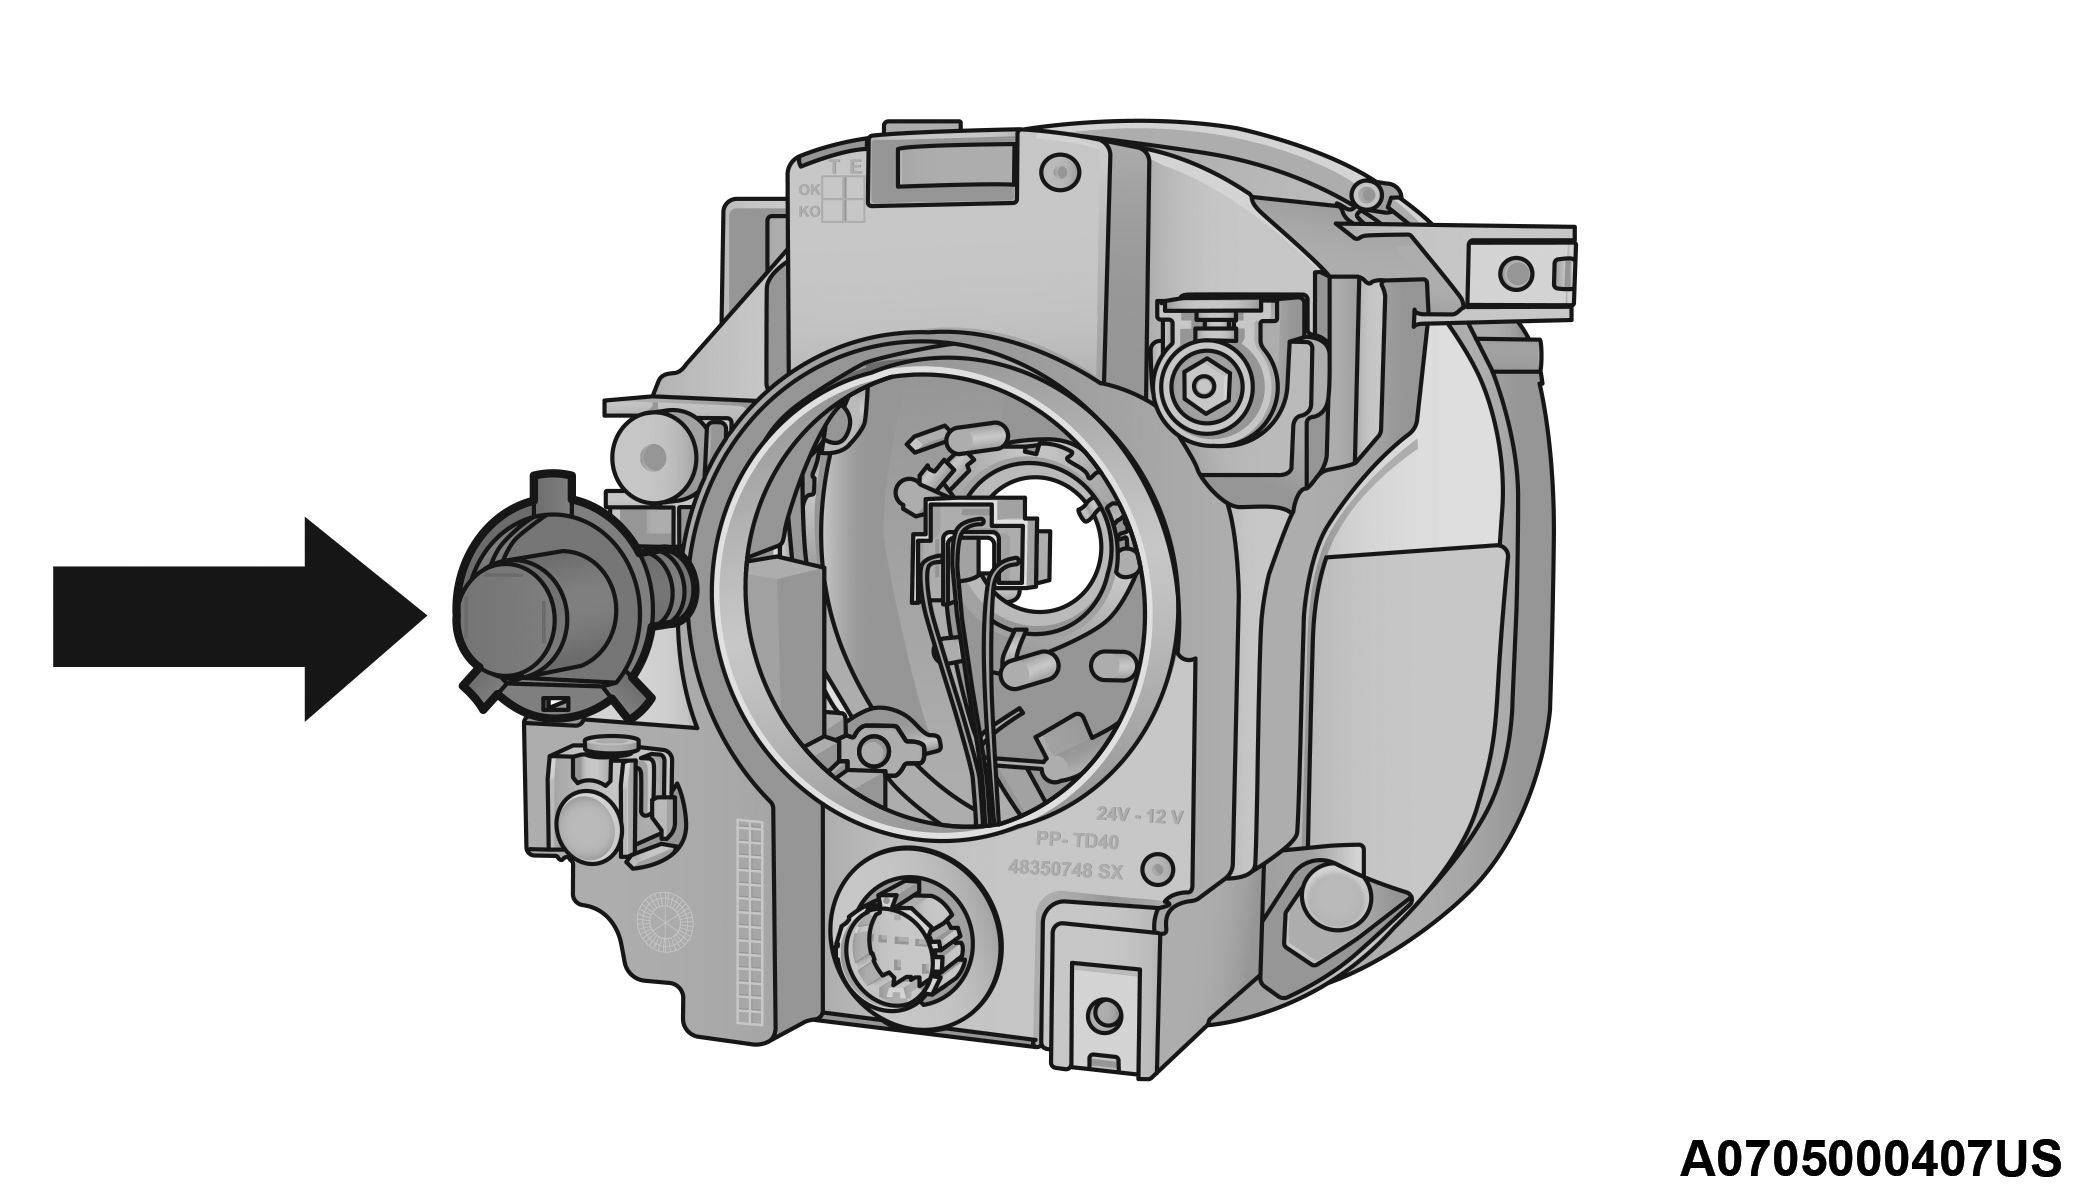
Headlamp Bulb
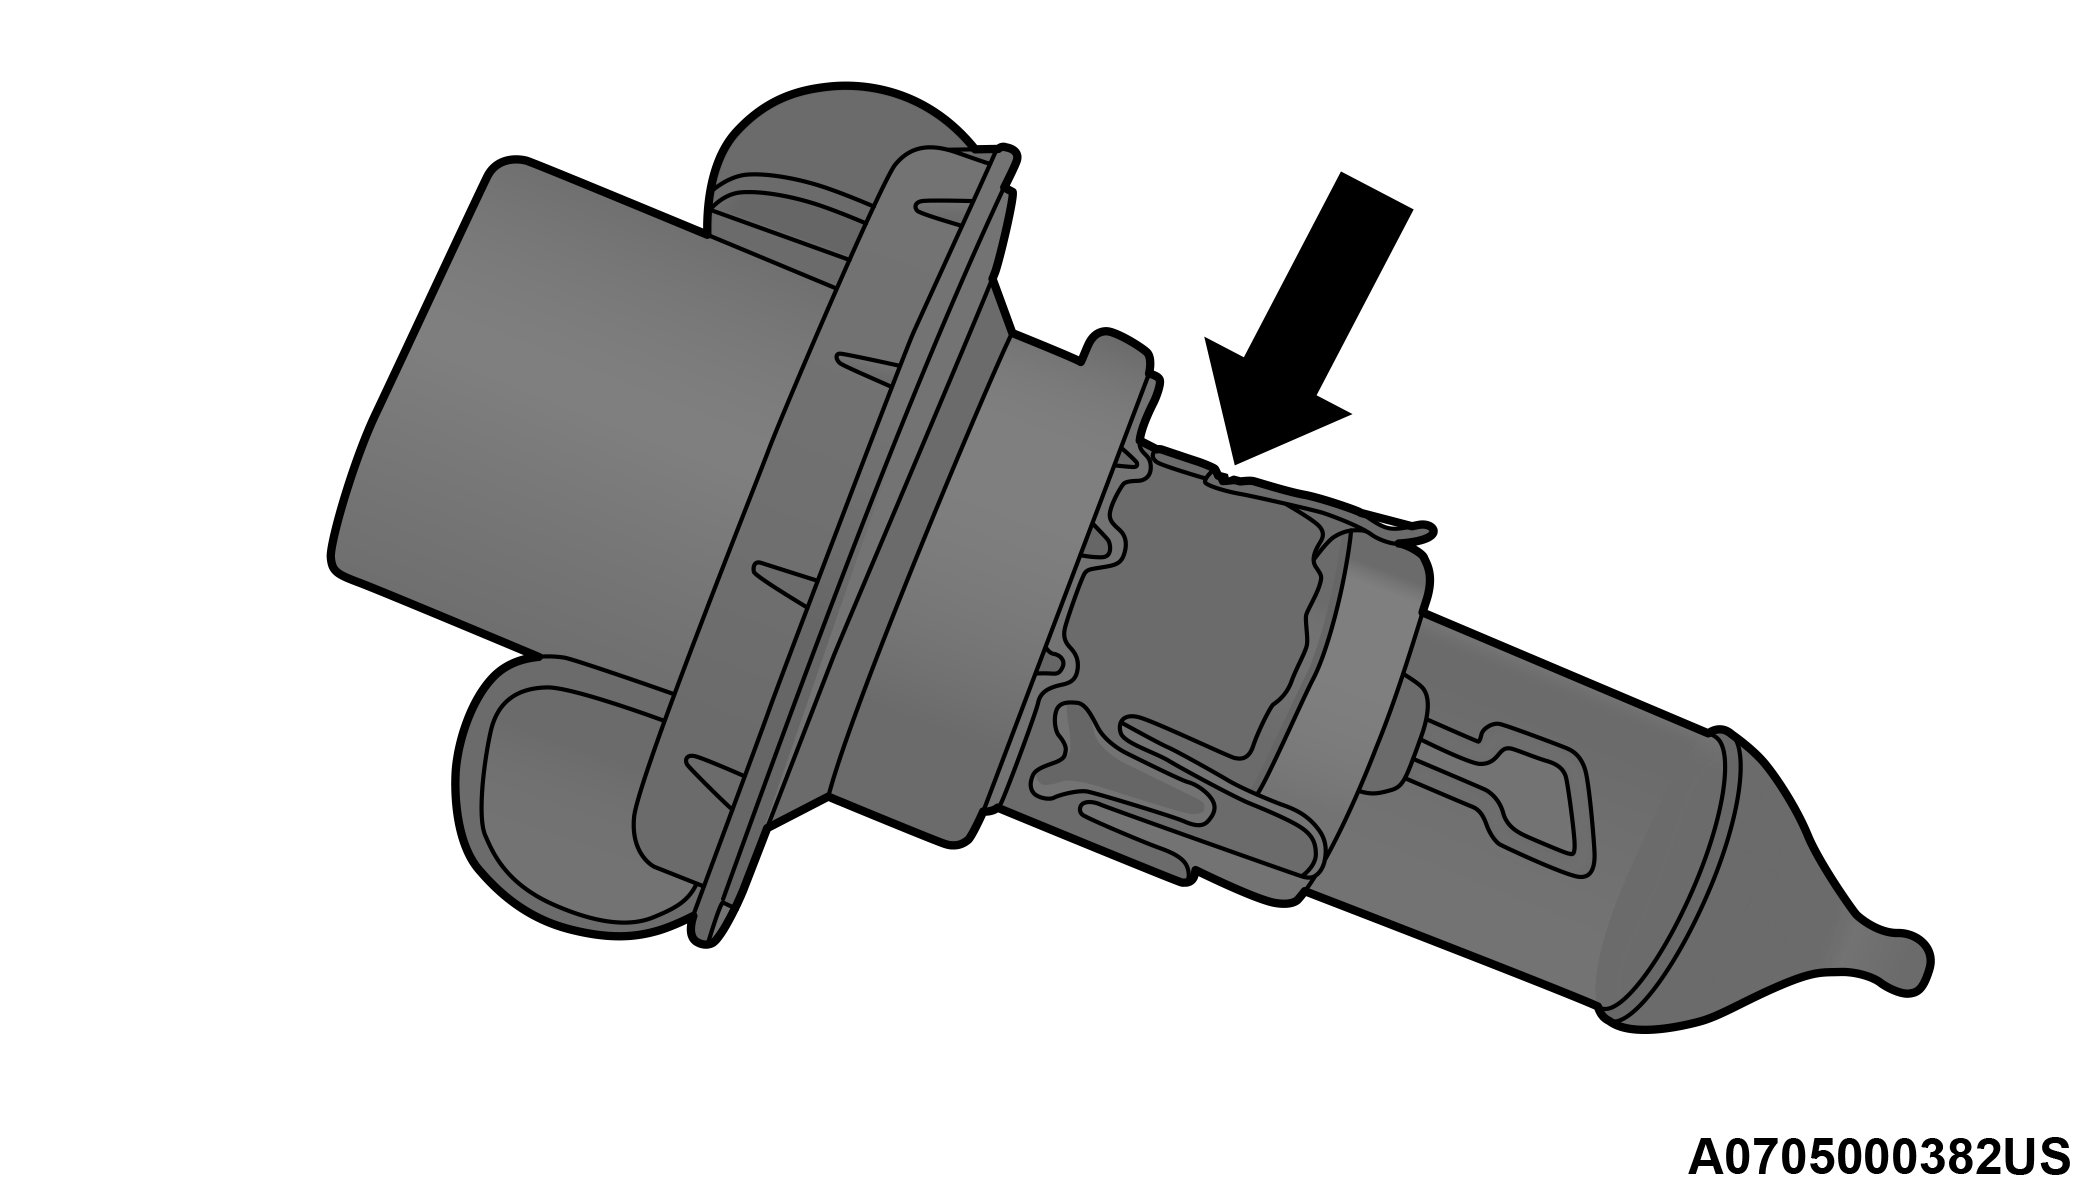
Headlamp Bulb
4. Install the new headlamp bulb making sure it is properly locked.
5. Install the headlamp bulb and socket; turn it clockwise making sure it is properly locked.
WARNING:
Carry out the operation of replacing lamps only with the engine off. Also make sure that the engine is cold, to avoid the danger of burns.
LED Headlamps – If Equipped
For replacement see an authorized dealer.
Position Lights/Daytime Running Lights/Fog Lights
See the following steps to replace:
1. Turn the front wheels completely.
2. Use a suitable tool to remove the access door.
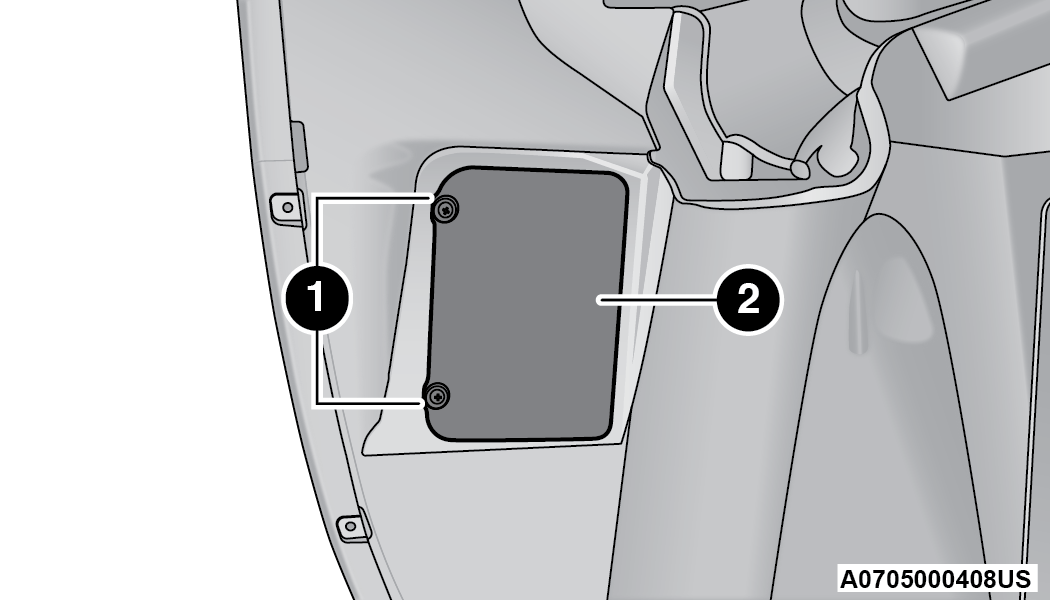
Position Light/Daytime Running Light/Fog Light Access
| 1 — Screws |
| 2 — Access Door |
3. Remove the electrical connector.
4. Releasing the two tabs, and remove the bulb and bulb socket from the housing.
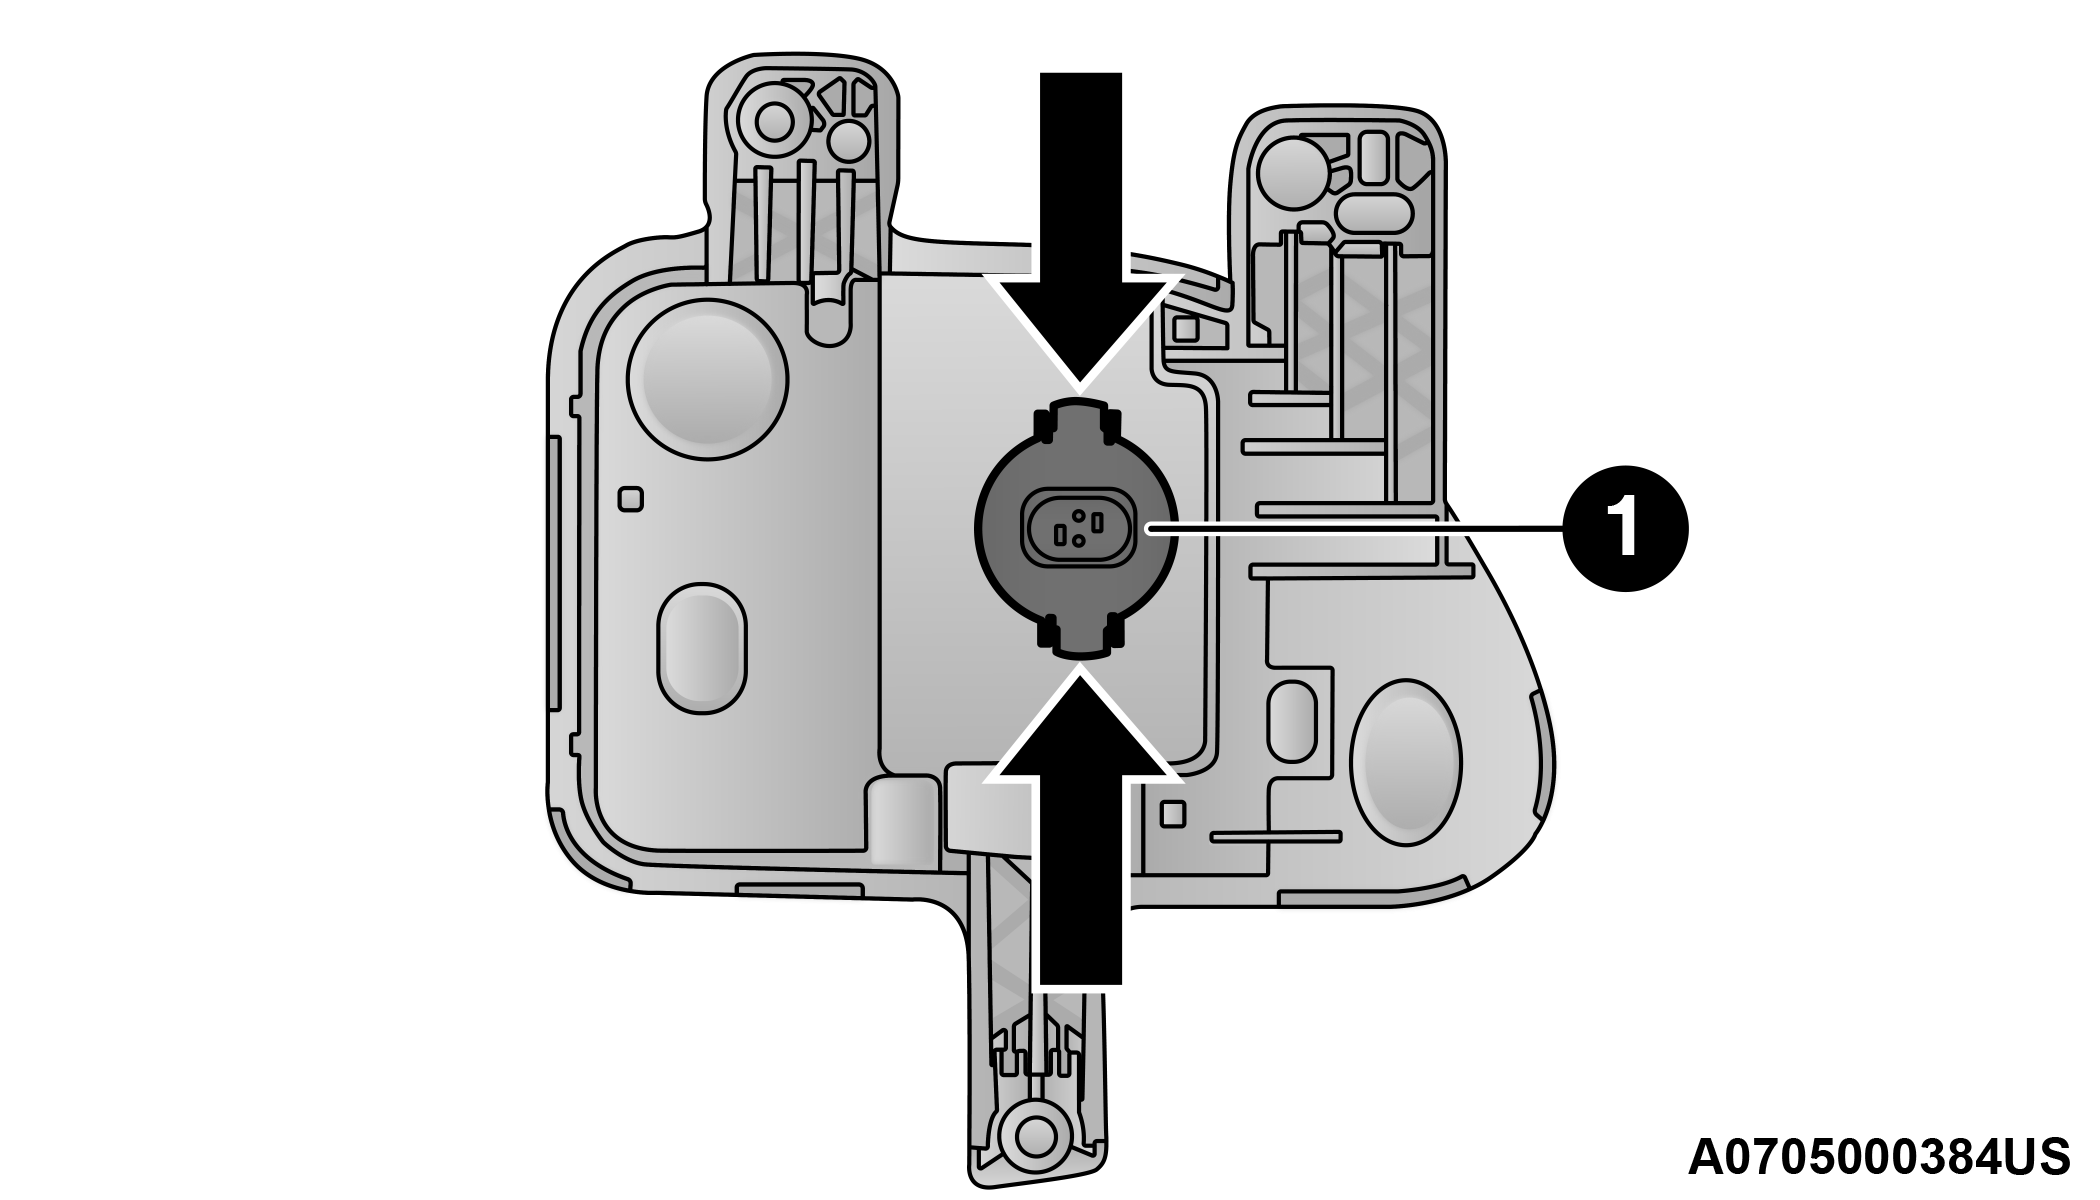
Position Light/Daytime Running Light Assembly
| 1 — Bulb Socket |
5. Install the new bulb and socket into the housing, and engage the two tabs, making sure that it is properly locked.
6. Reconnect the electrical connector.
7. Reinstall the access door.
Front Fog Lights
See the following steps to replace:
1. Turn the front wheels completely.
2. Use a suitable tool to remove the access door.
Position Light/Daytime Running Light/Fog Light Access
| 1 — Screws |
| 2 — Access Door |
3. By pushing the electrical connector tab remove the electrical connector.
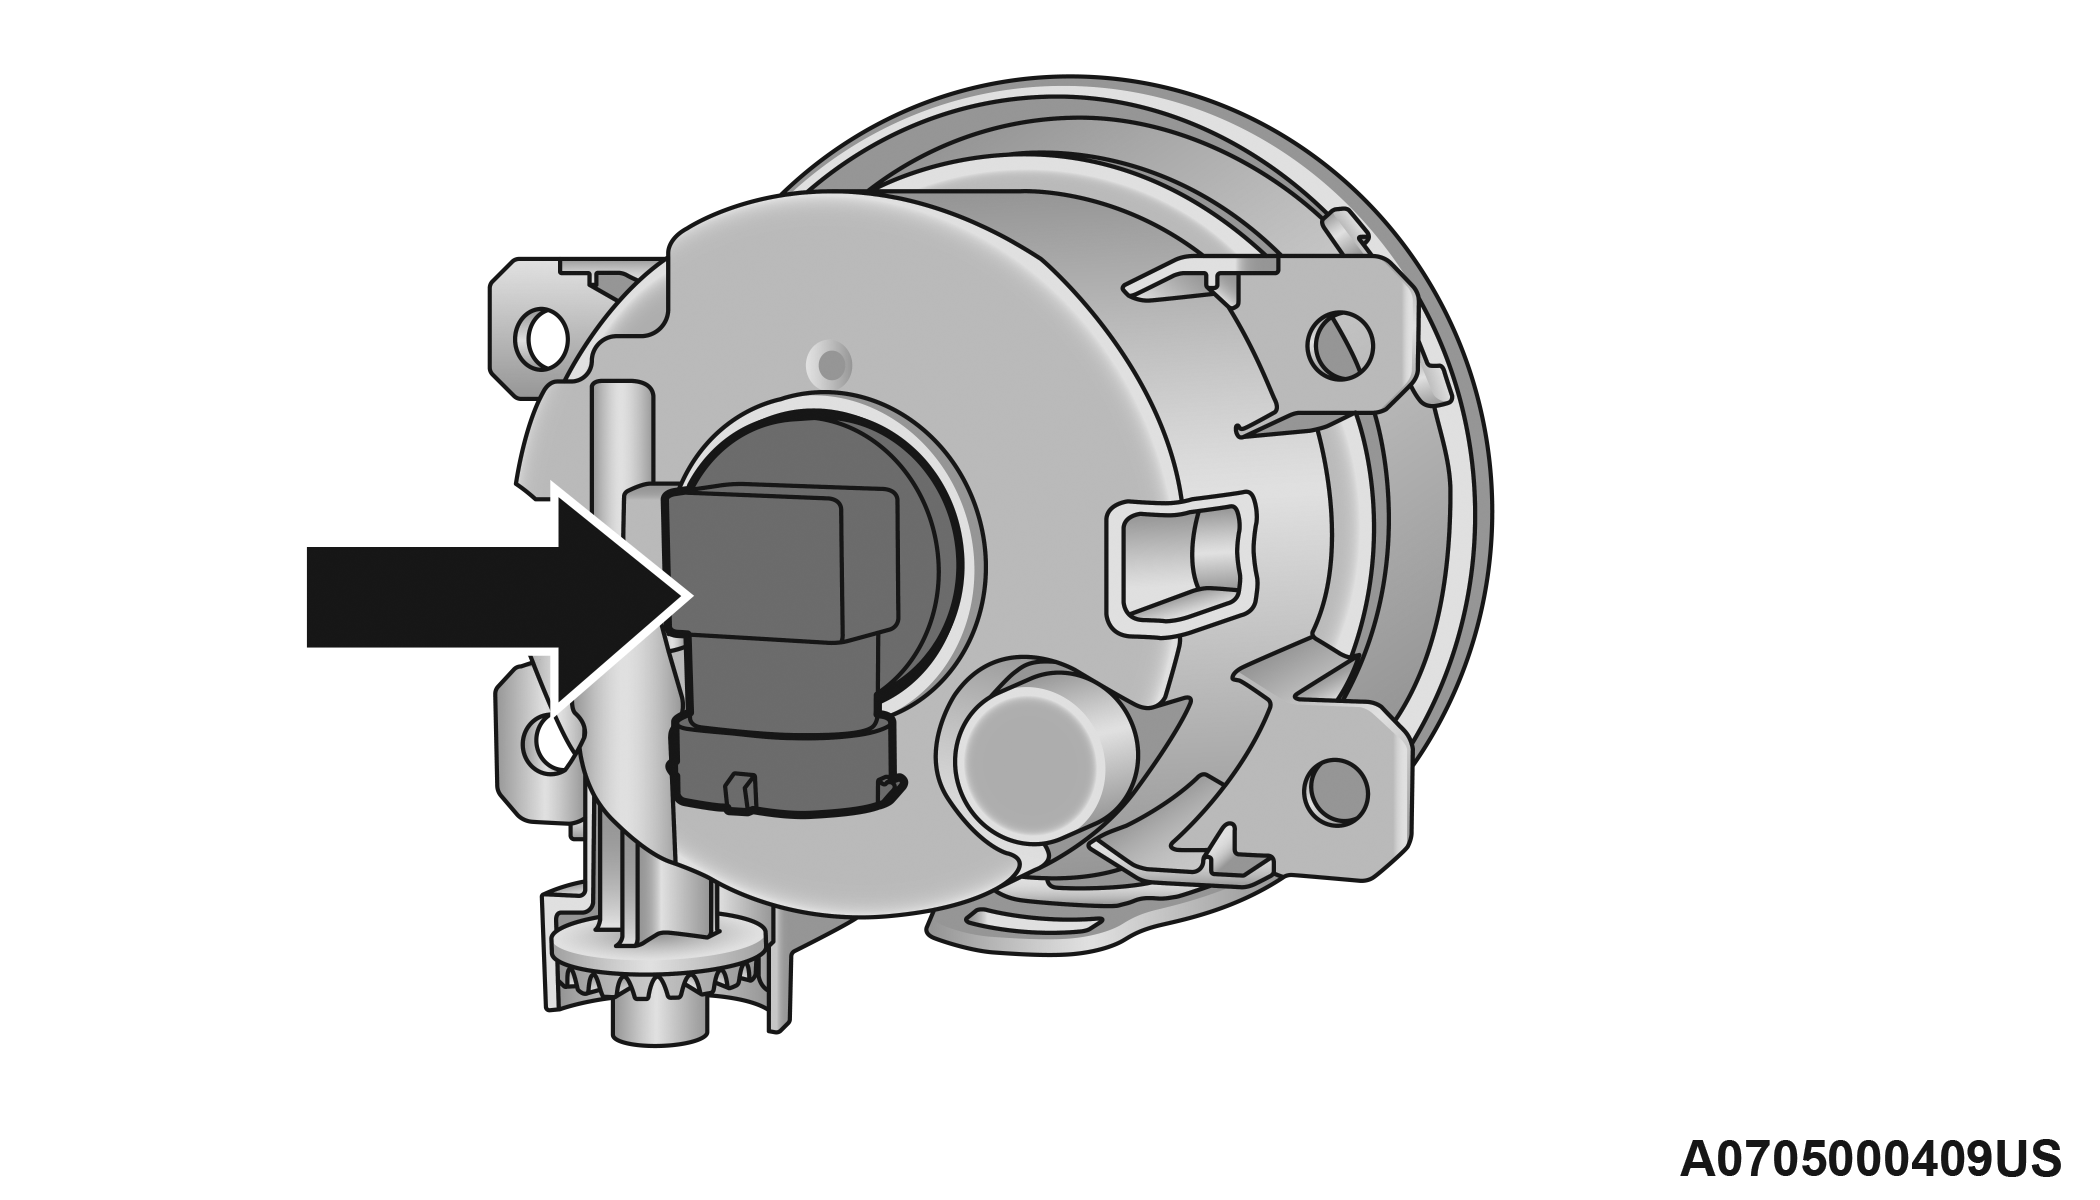
Fog Light Assembly
4. Rotate the bulb counterclockwise, and then replace the bulb.
5. nsert the new bulb in the socket, making sure the bulb is locked into place.
6. Reconnect the electrical connector.
7. Reinstall the access door.
LED Front Fog Lamps – If Equipped
For replacement see an authorized dealer.
Front Side Indicators
See the following steps to replace:
1. Operating from inside the engine compartment using a suitable tool release the retaining clip.
2. Remove lamp assembly by sliding it toward the outside.
Lamp Assembly
3. Remove the electrical connector by pushing the tab then disconnect the electrical connector.
4. Rotate counterclockwise to release the bulb socket from the lamp assembly, and remove it.
Bulb Socket
5. Remove the bulb from the socket.
Bulb
6. Insert the new bulb in the socket.
7. Reinstall the bulb and socket into the lamp assembly by turning it clockwise, making sure it is locked into place.
8. Reconnect the electrical connector.
9. Reinstall the lamp assembly on the car, making sure it is locked into place.
Side Indicators on External Rear View Mirrors – (If Equipped)
CAUTION:
The procedure is described as a guideline. For the replacement of the lamp it is recommended that you contact an authorized dealer.
See the following steps to replace:
1. Remove the mirror cap on the outside rear view mirror.
Mirror Cap
Removing the mirror cap
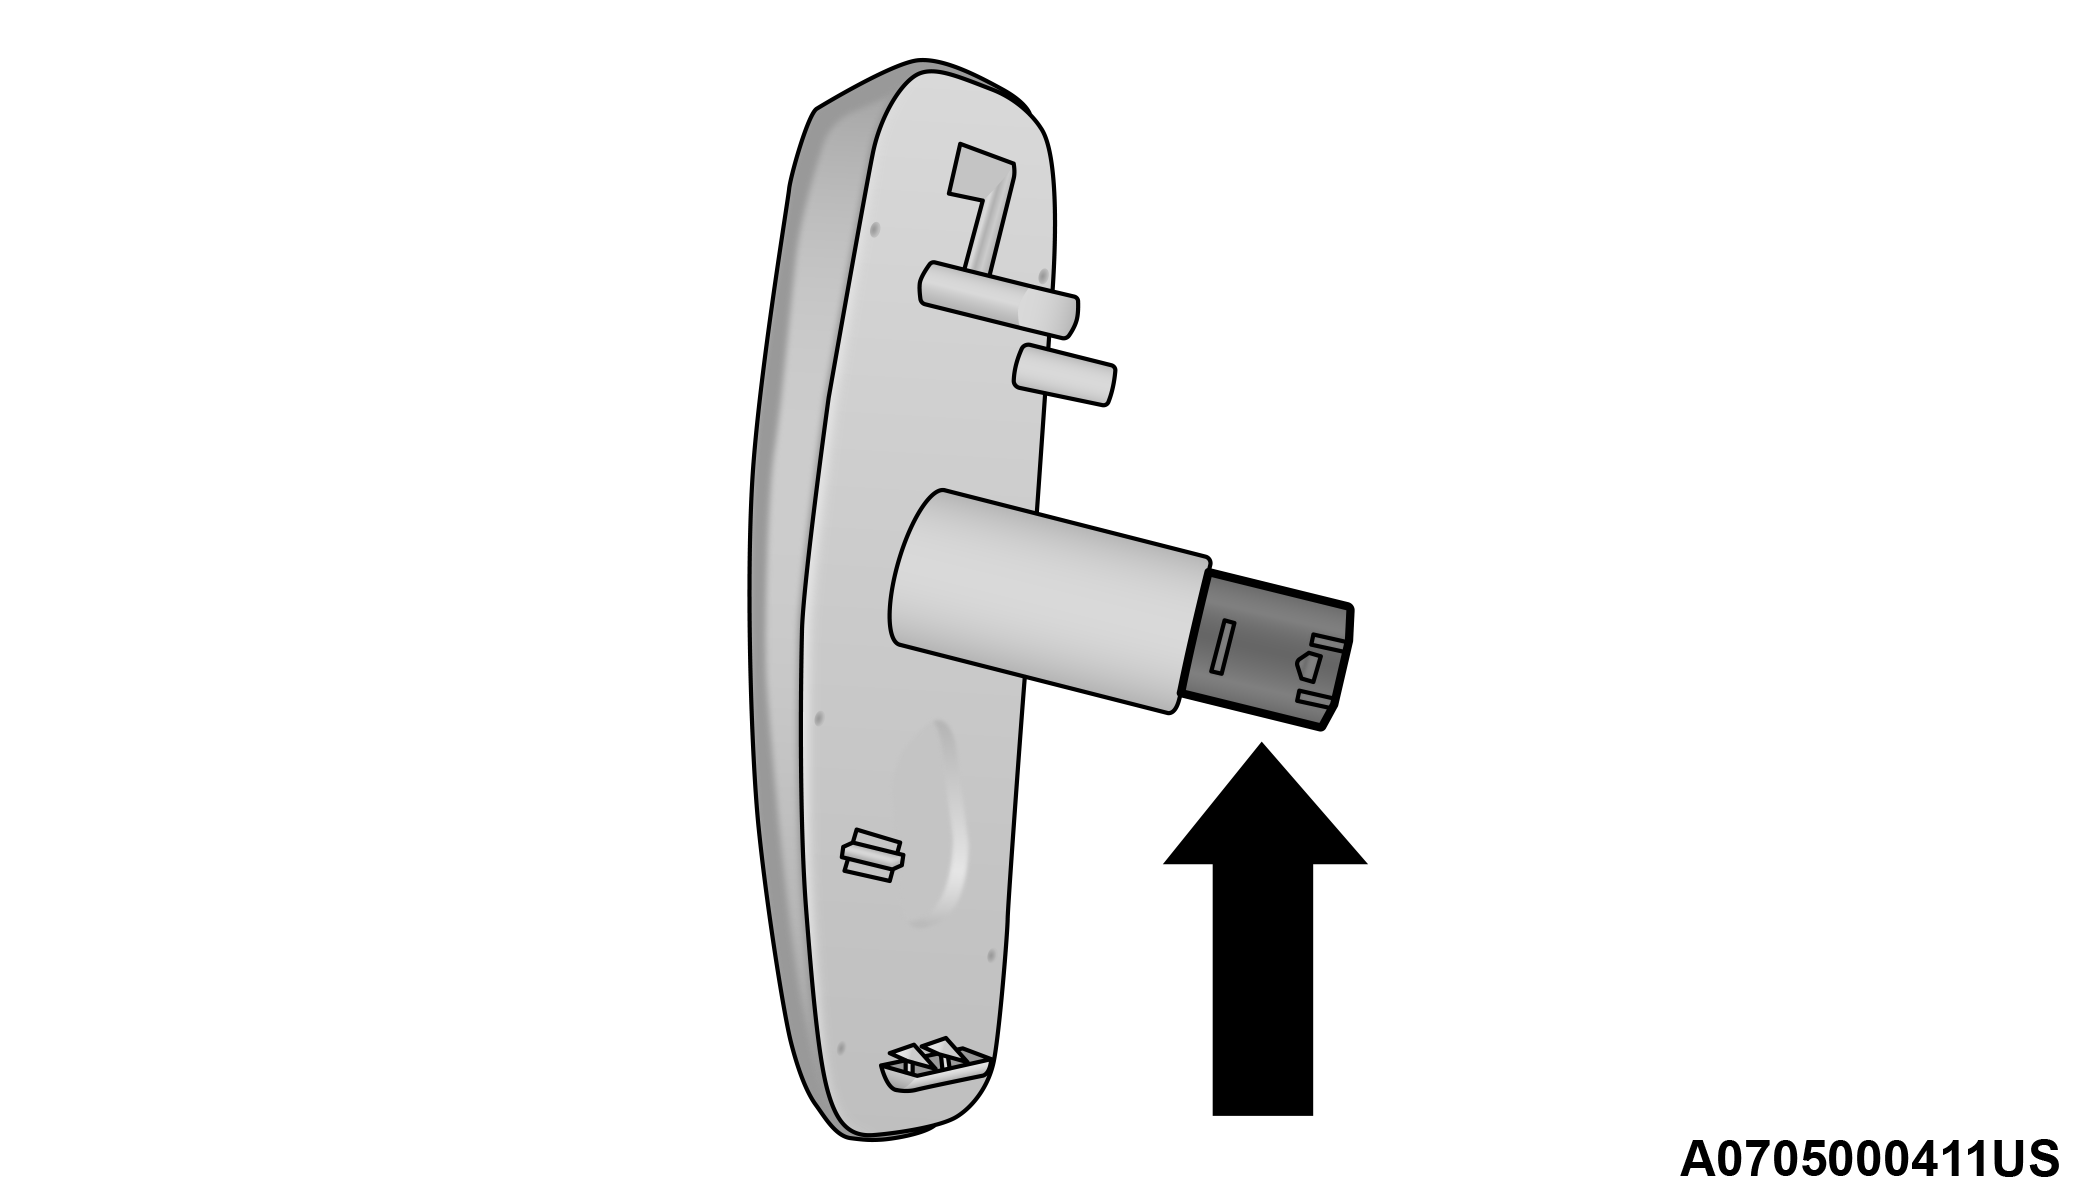
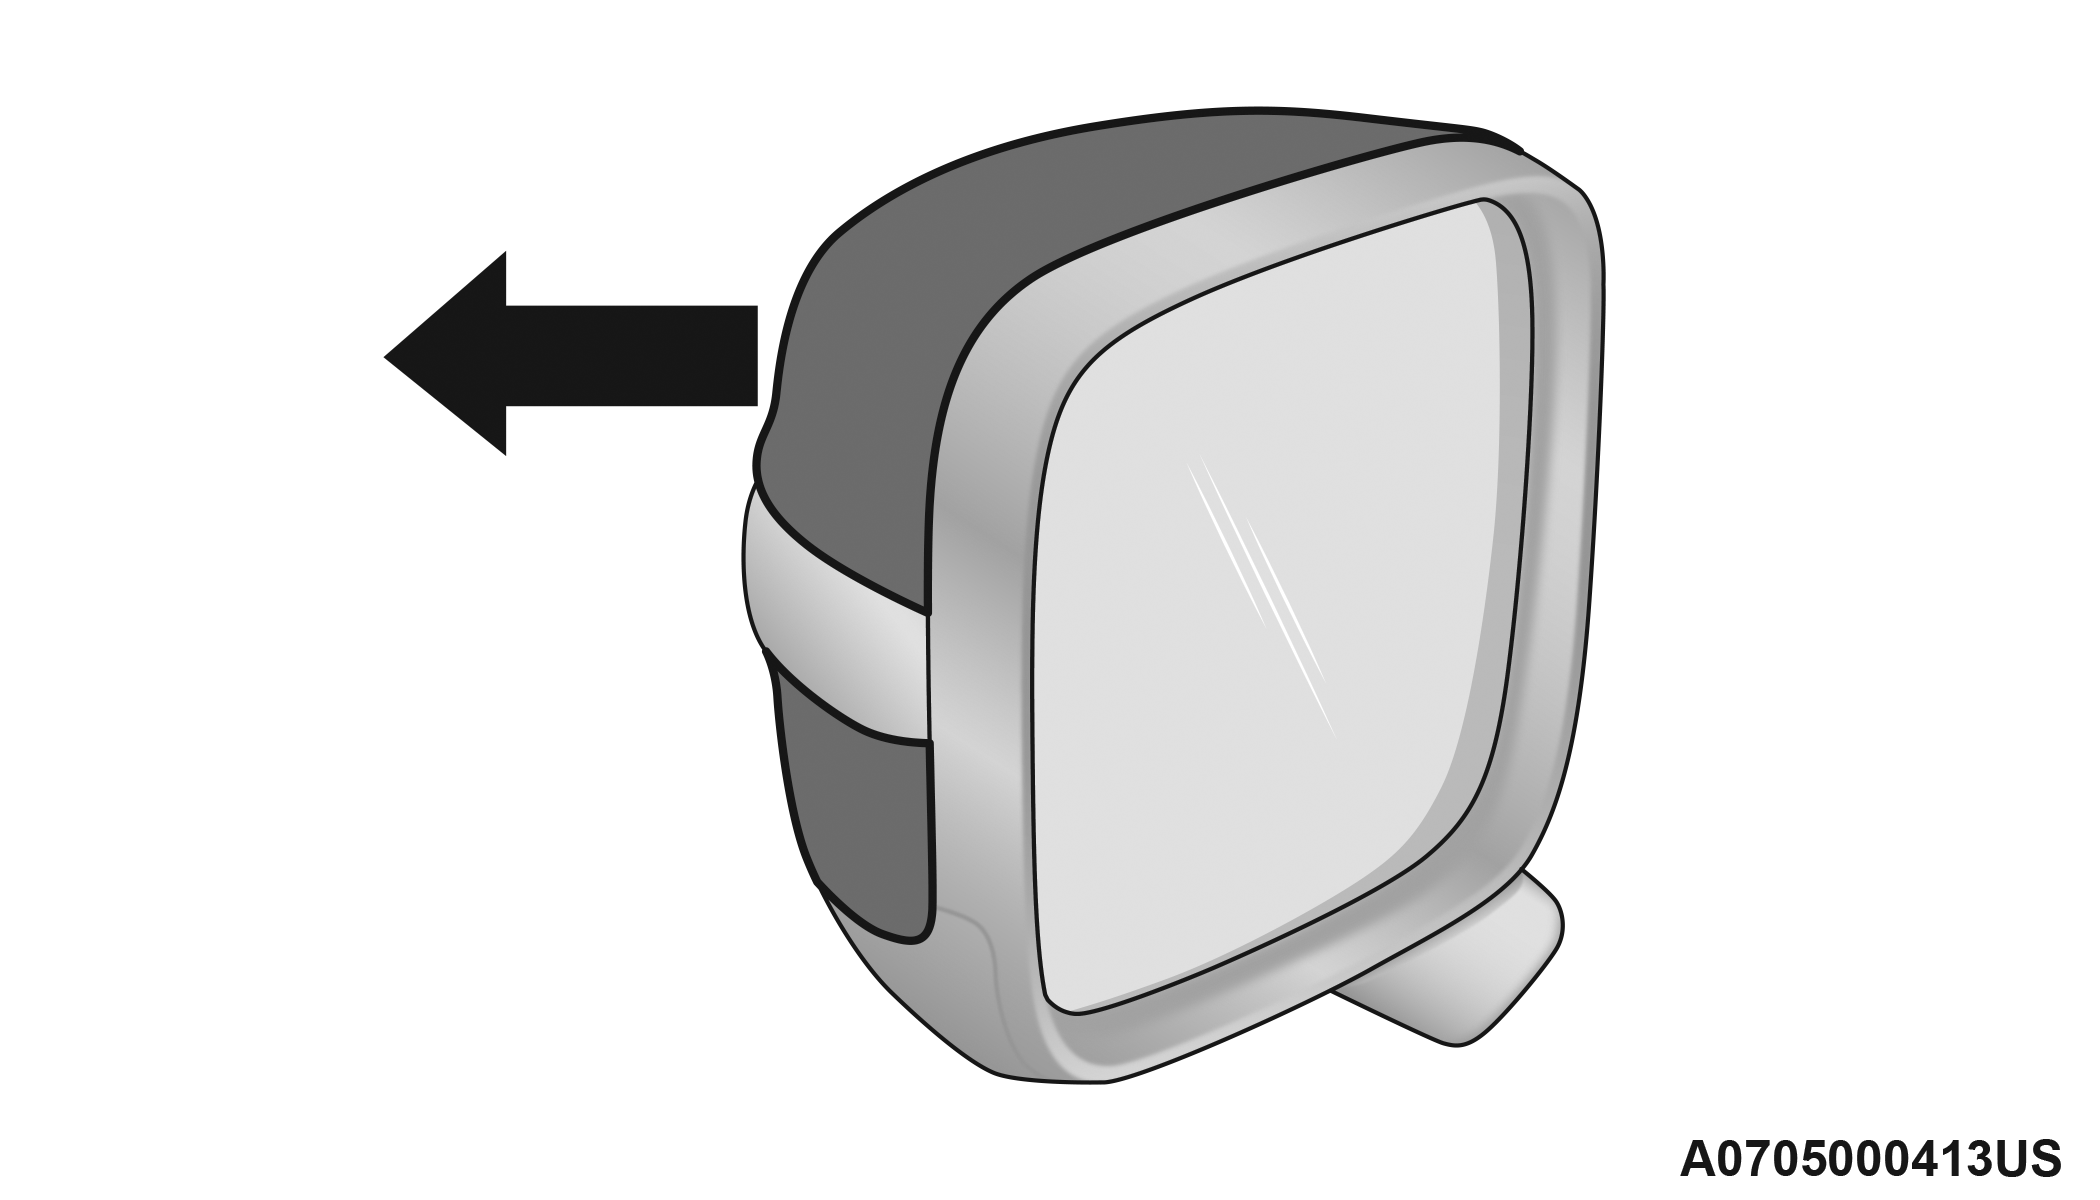
2. Remove the transparent lens assembly as shown.
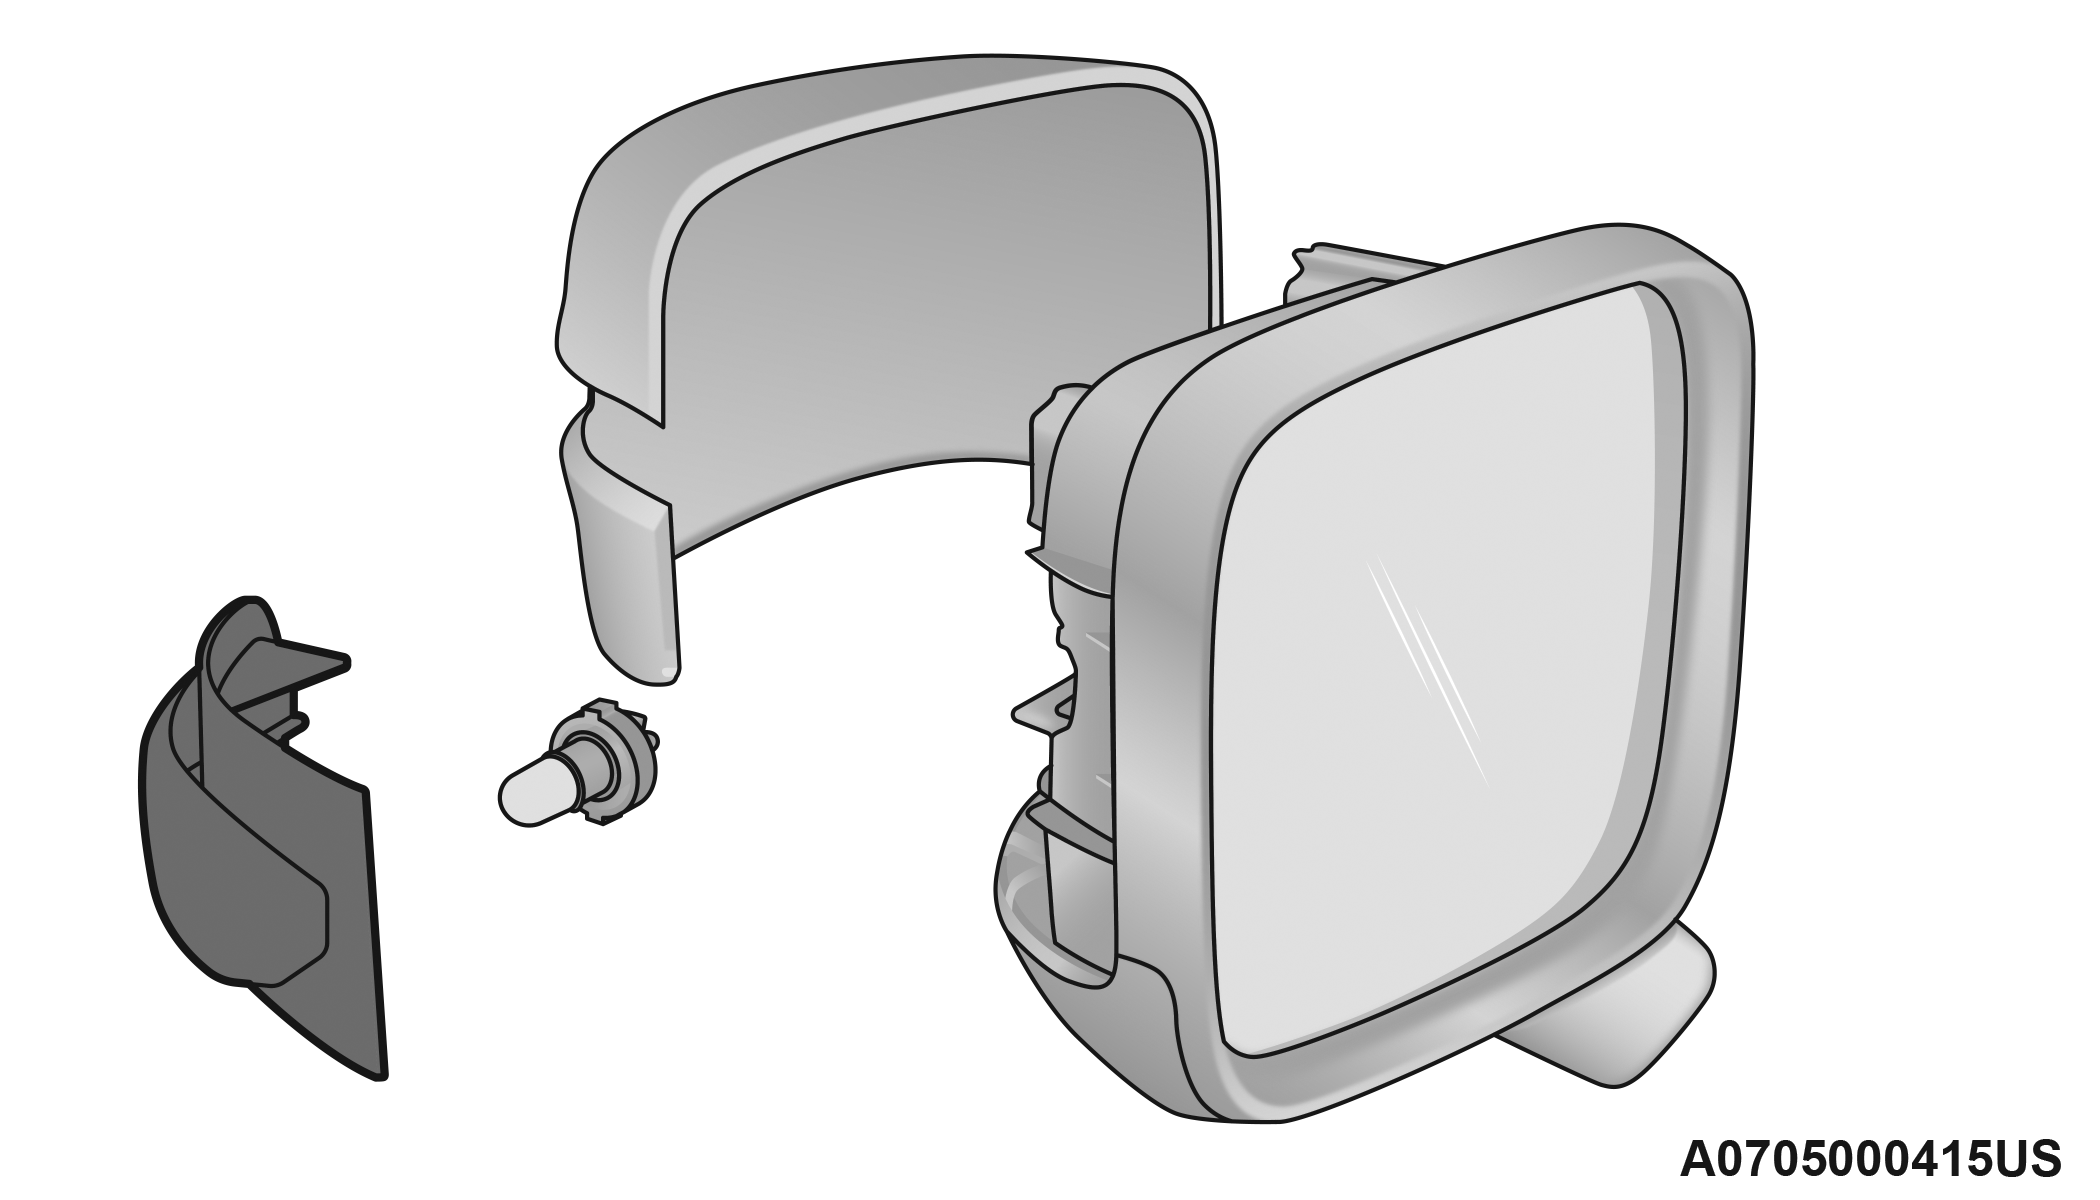
Transparent Lens
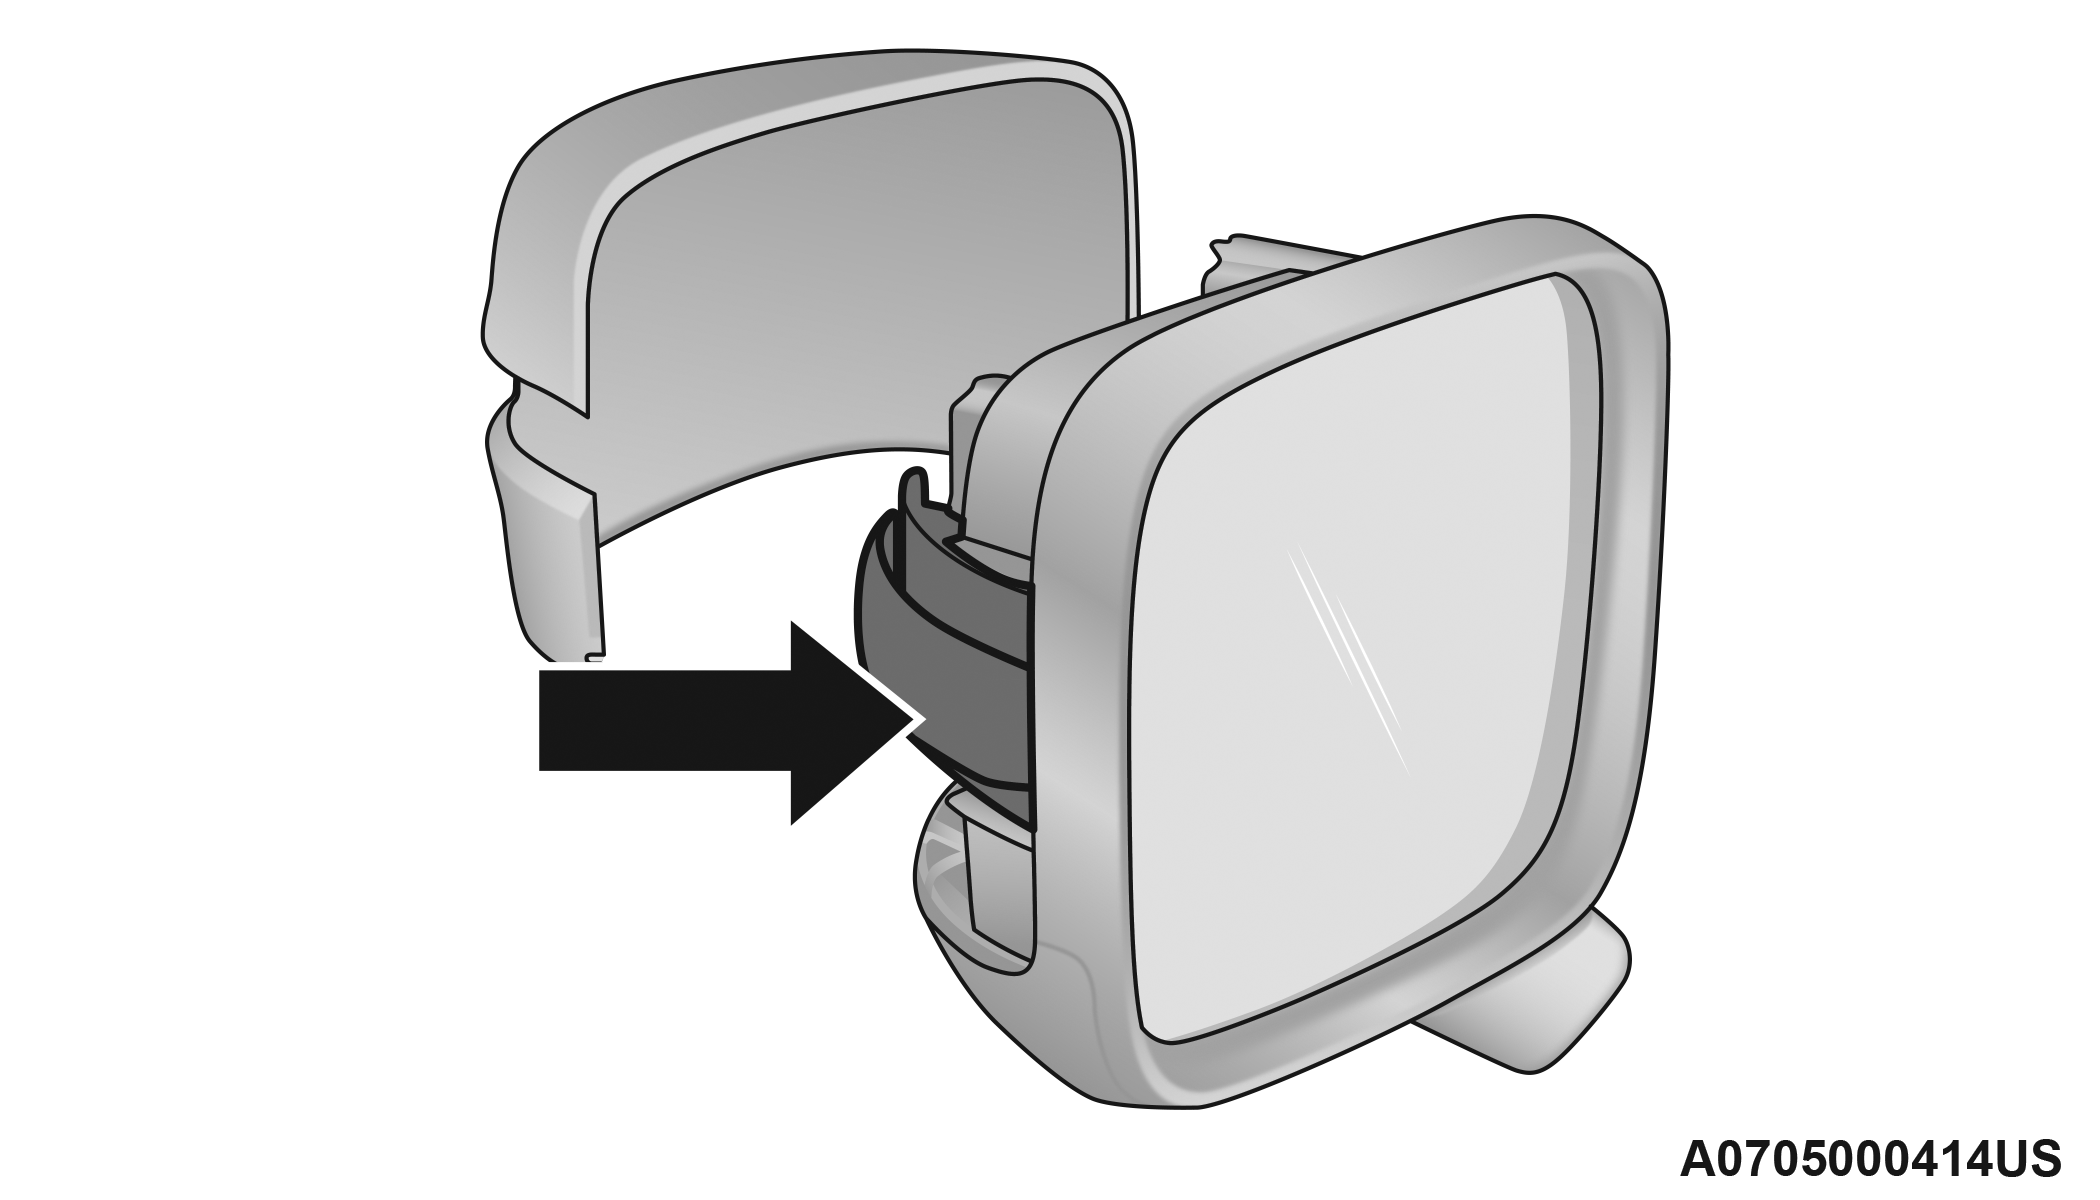
3. Remove the bulb socket and bulb from the transparent lens assembly by rotating the socket counterclockwise.
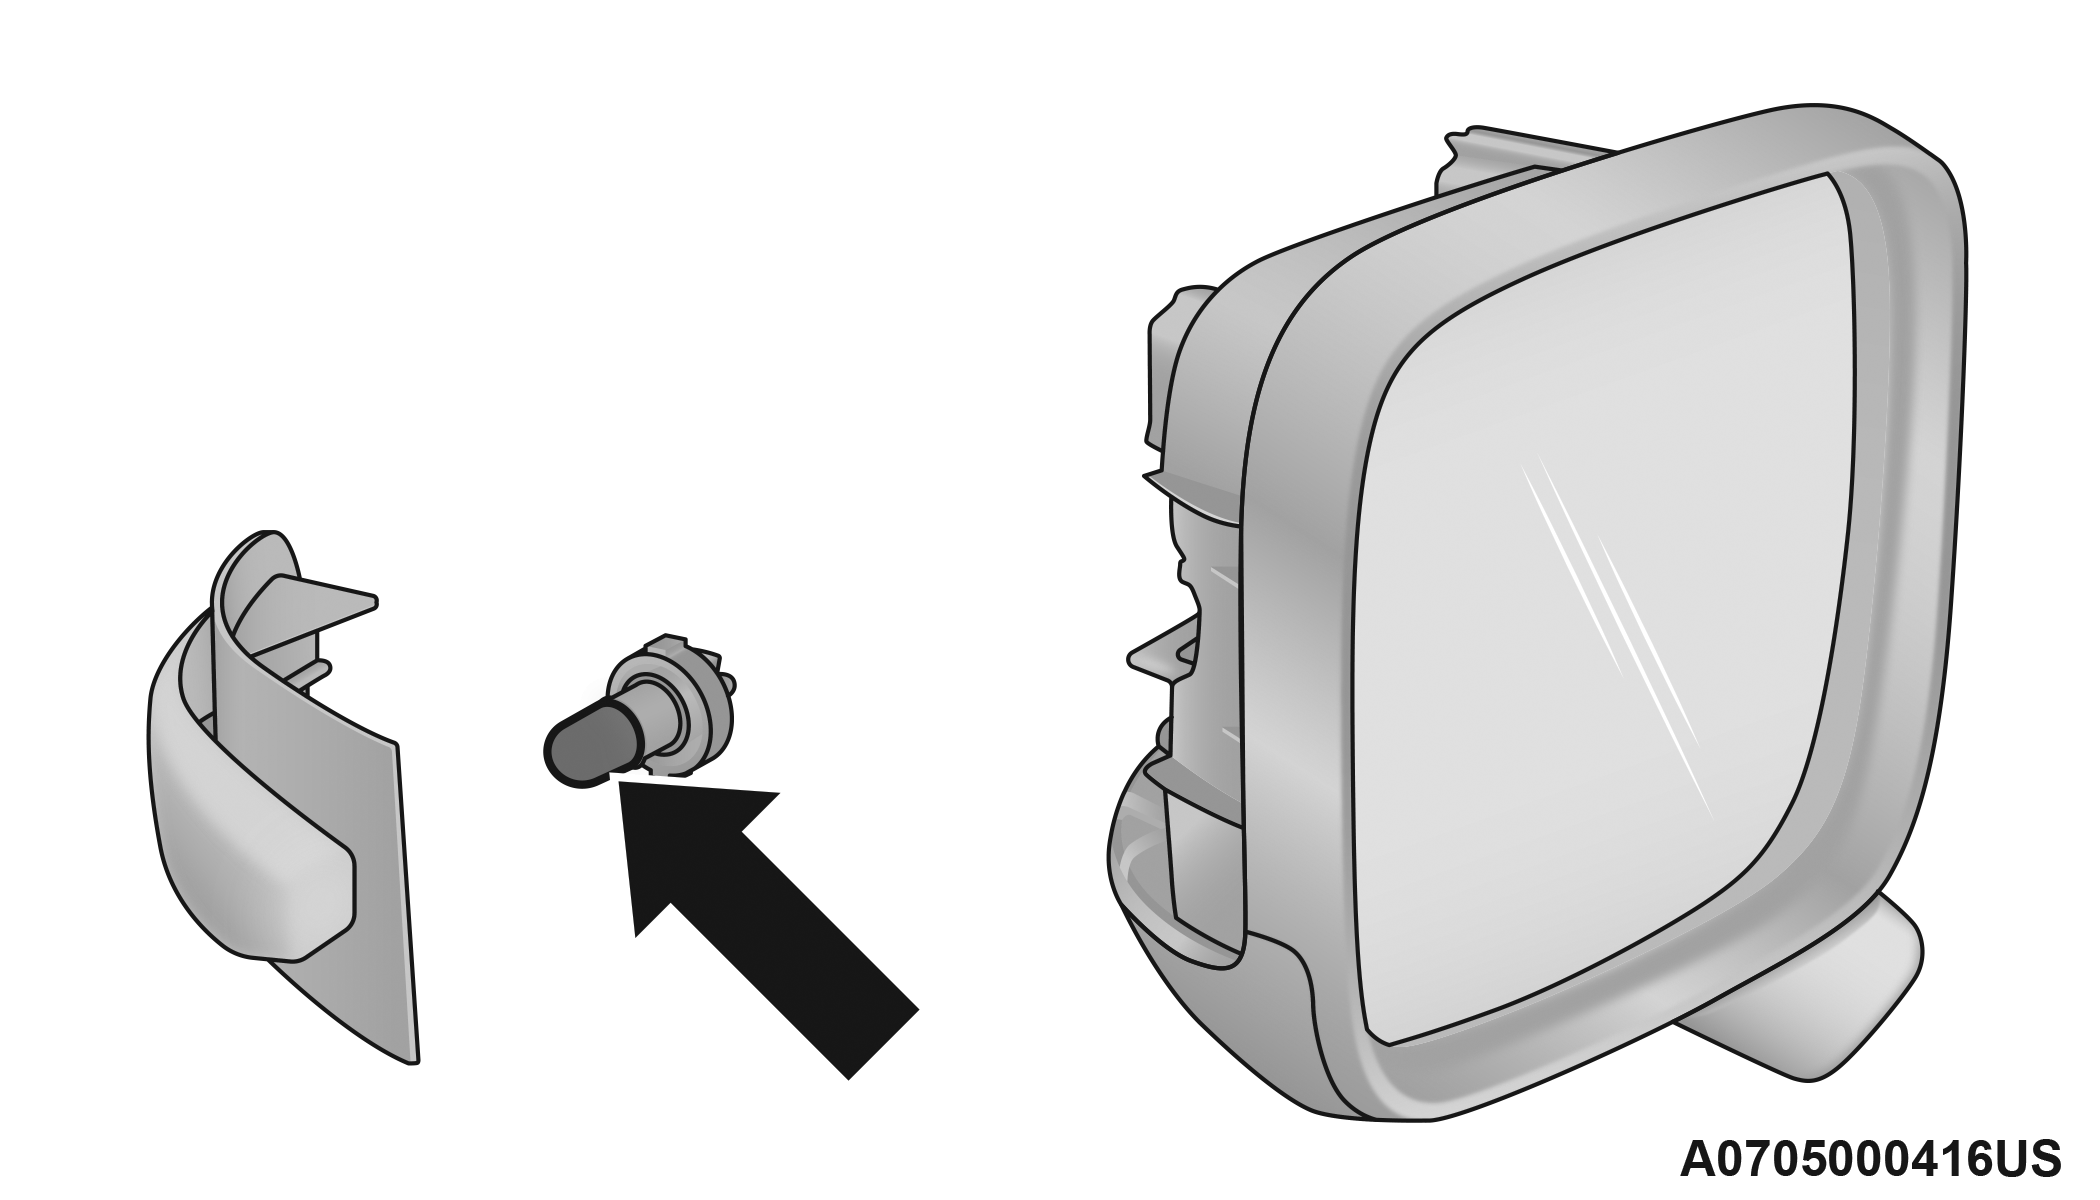
Transparent Lens Assembly
4. Remove the bulb from the bulb socket by pulling the bulb straight out.
5. Insert the new bulb, making sure that it is locked into place.
6. Reinstall the socket in to the transparent lens assembly.
7. Reinstall the cover on the outside rear view mirror, making sure it is locked into place.
Rear Tail Lamps
Contain the following:
-
Position lights
-
Stop lights
-
Direction indicator
-
REVERSE lights
See the following steps to replace:
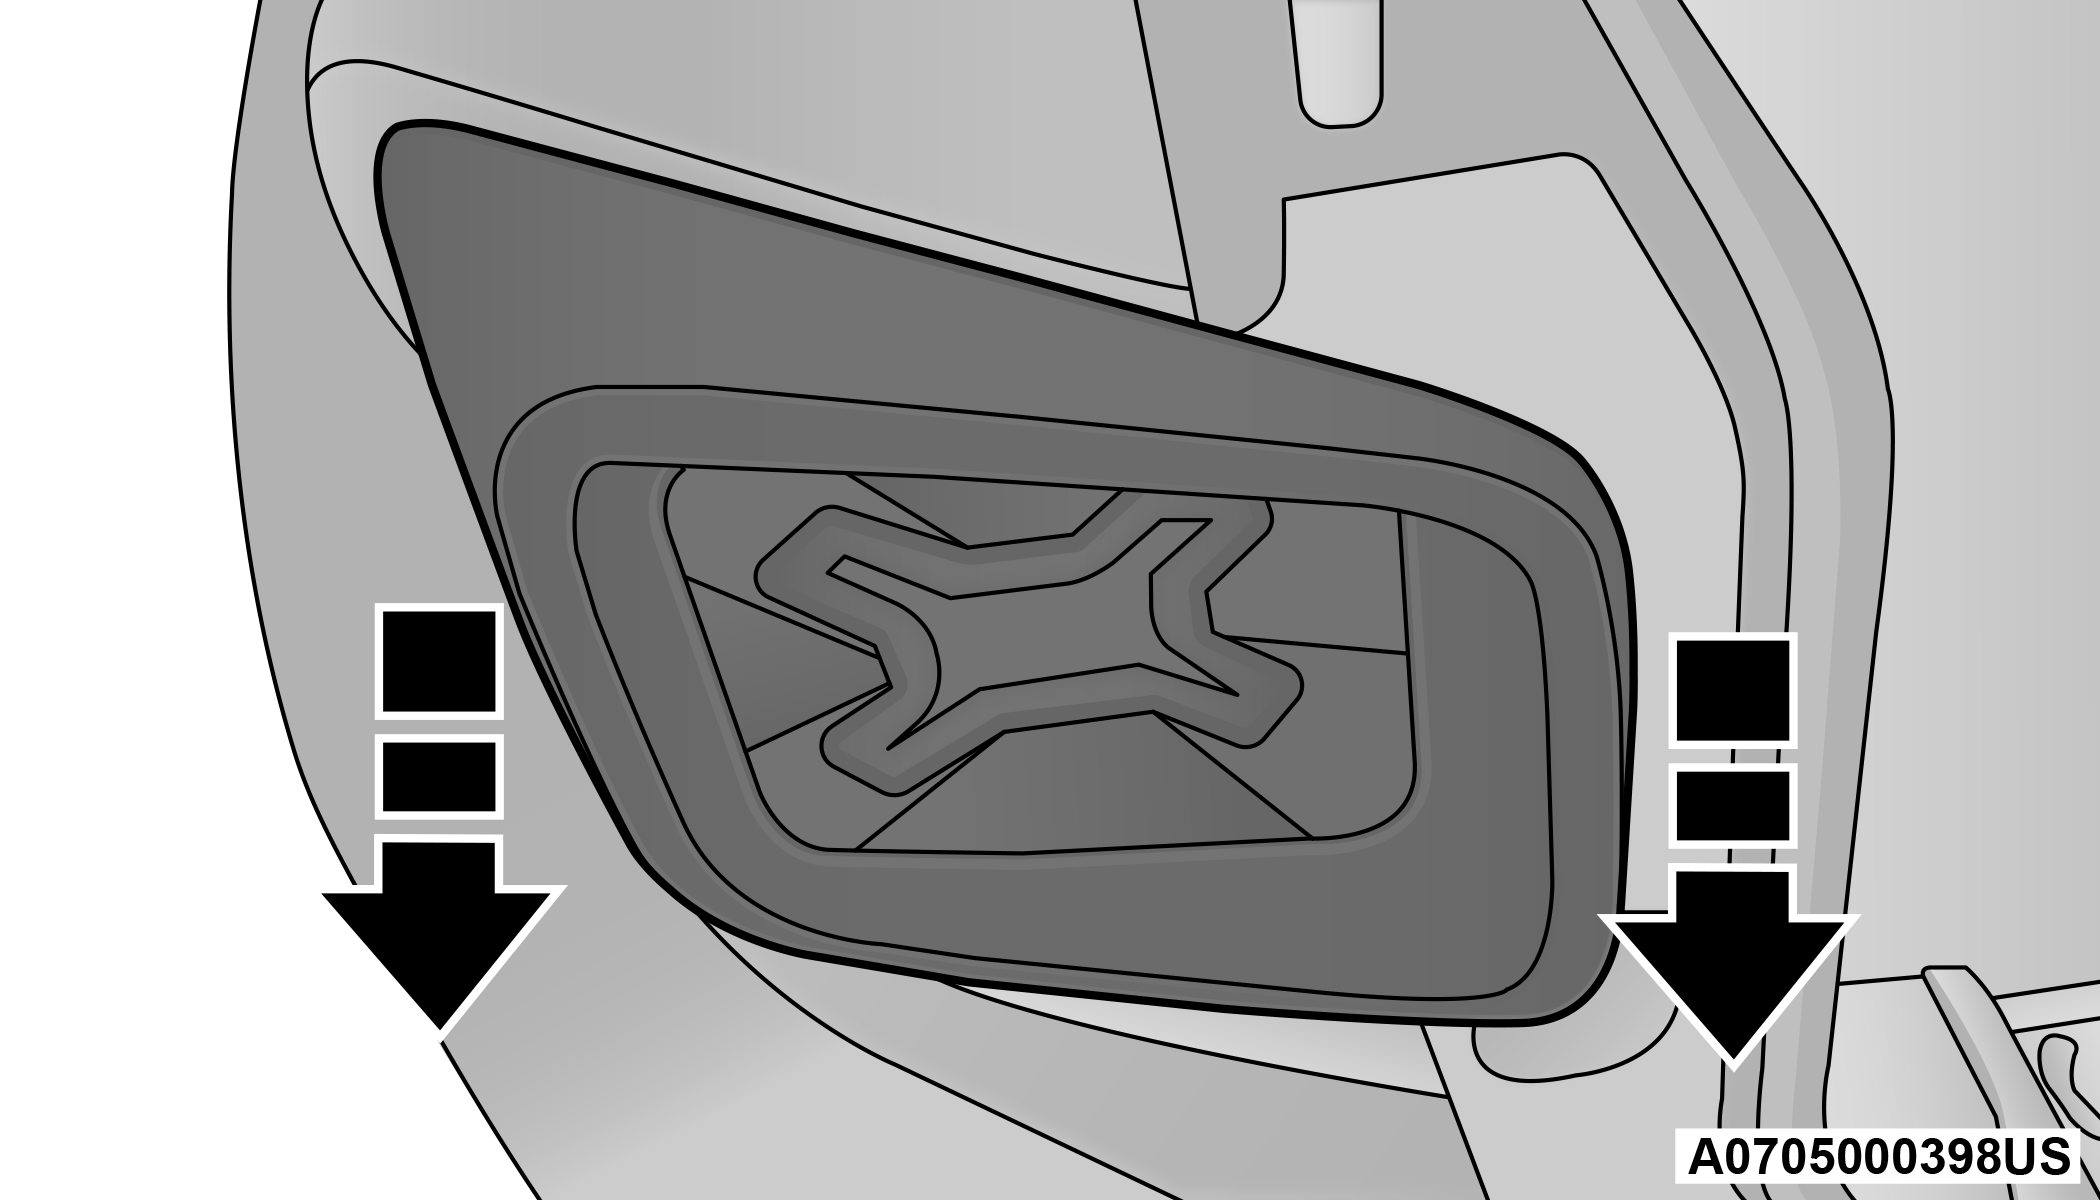
1. Open the liftgate.
2. Using a suitable tool remove the door as shown.
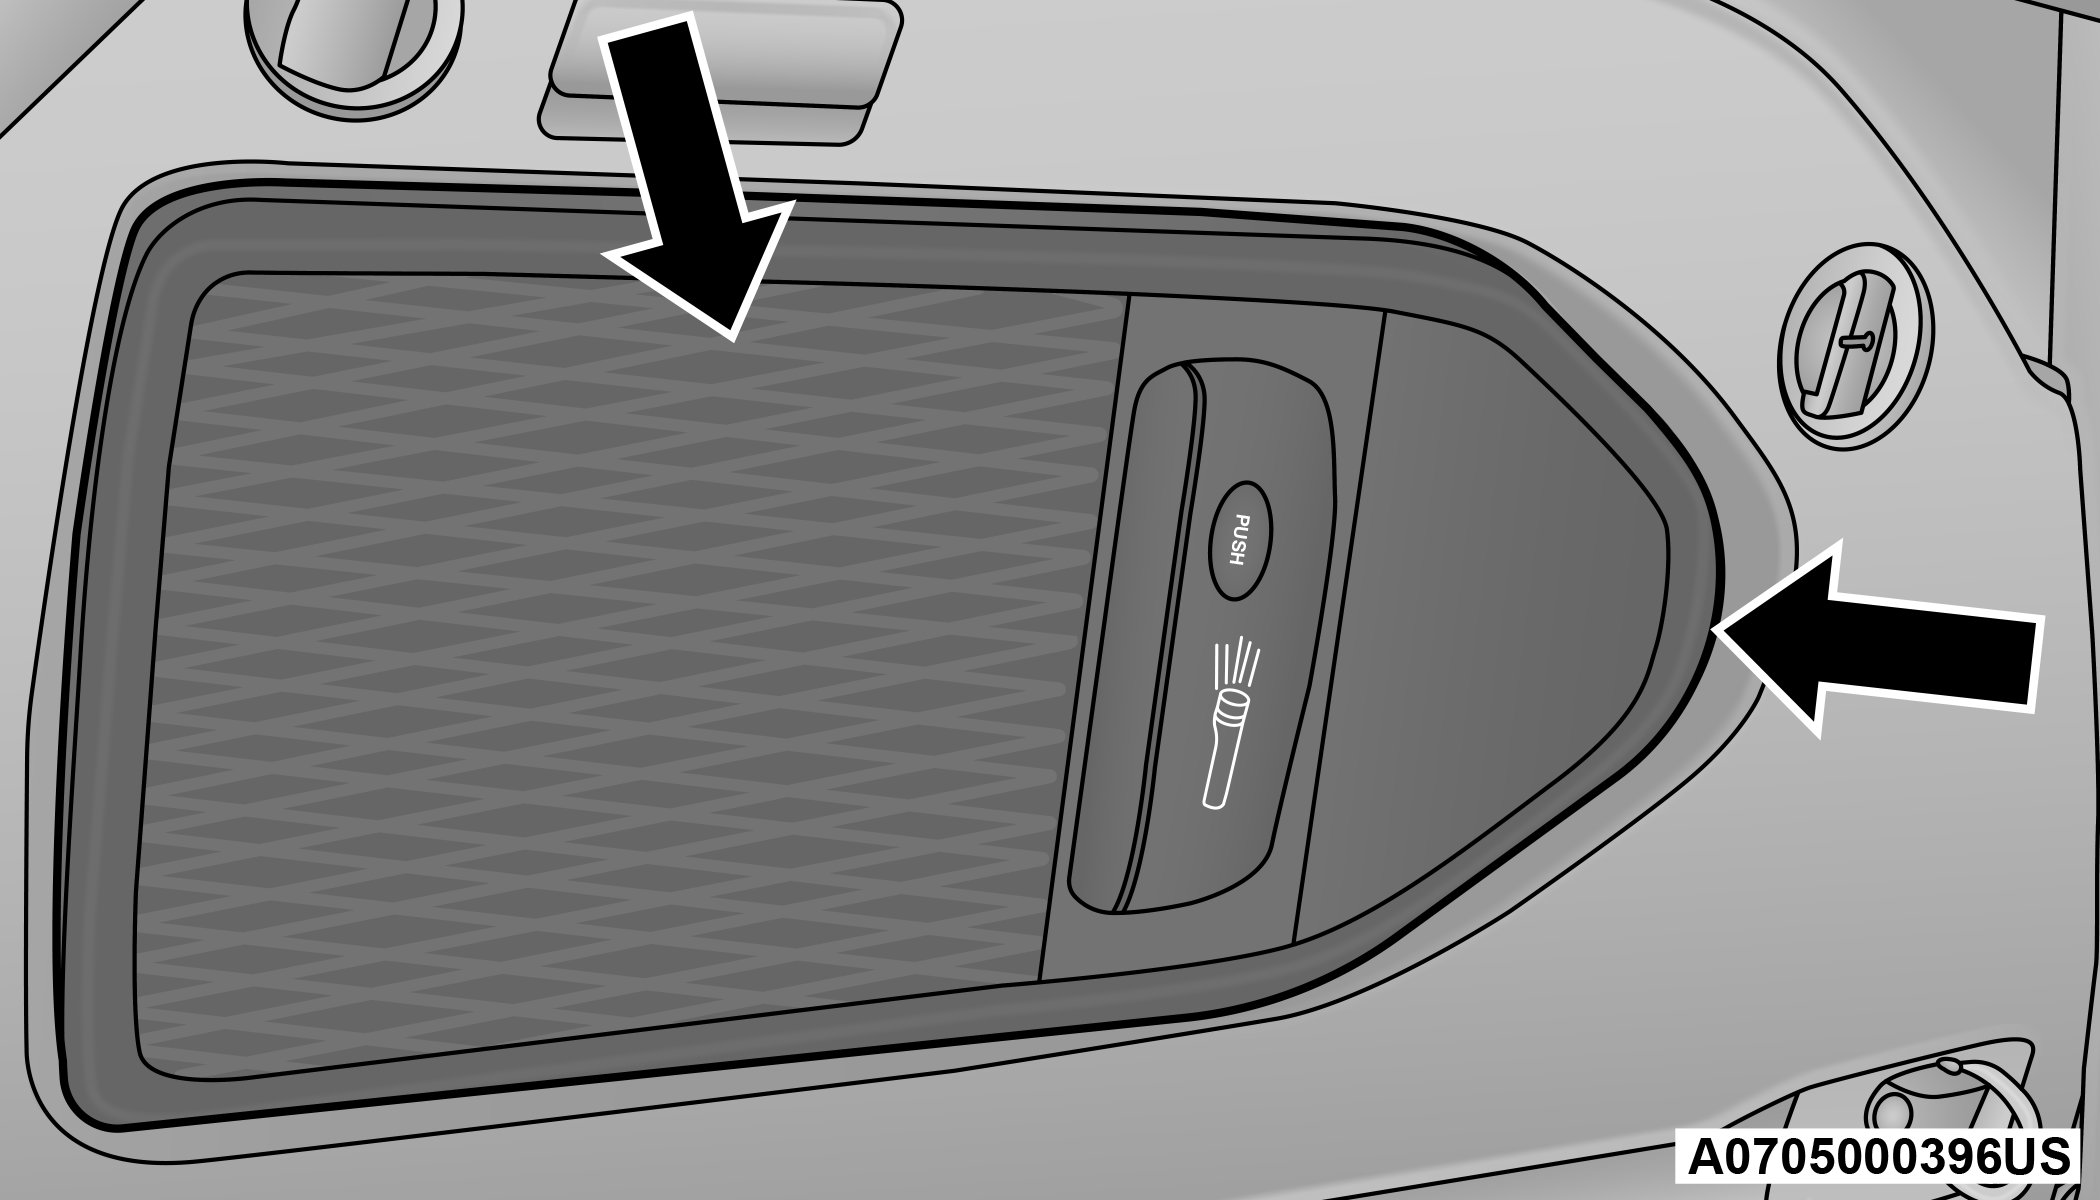
Trim Panel Door
3. Using a suitable tool remove fastener.
4. Disconnect the electrical connector by pushing the release.
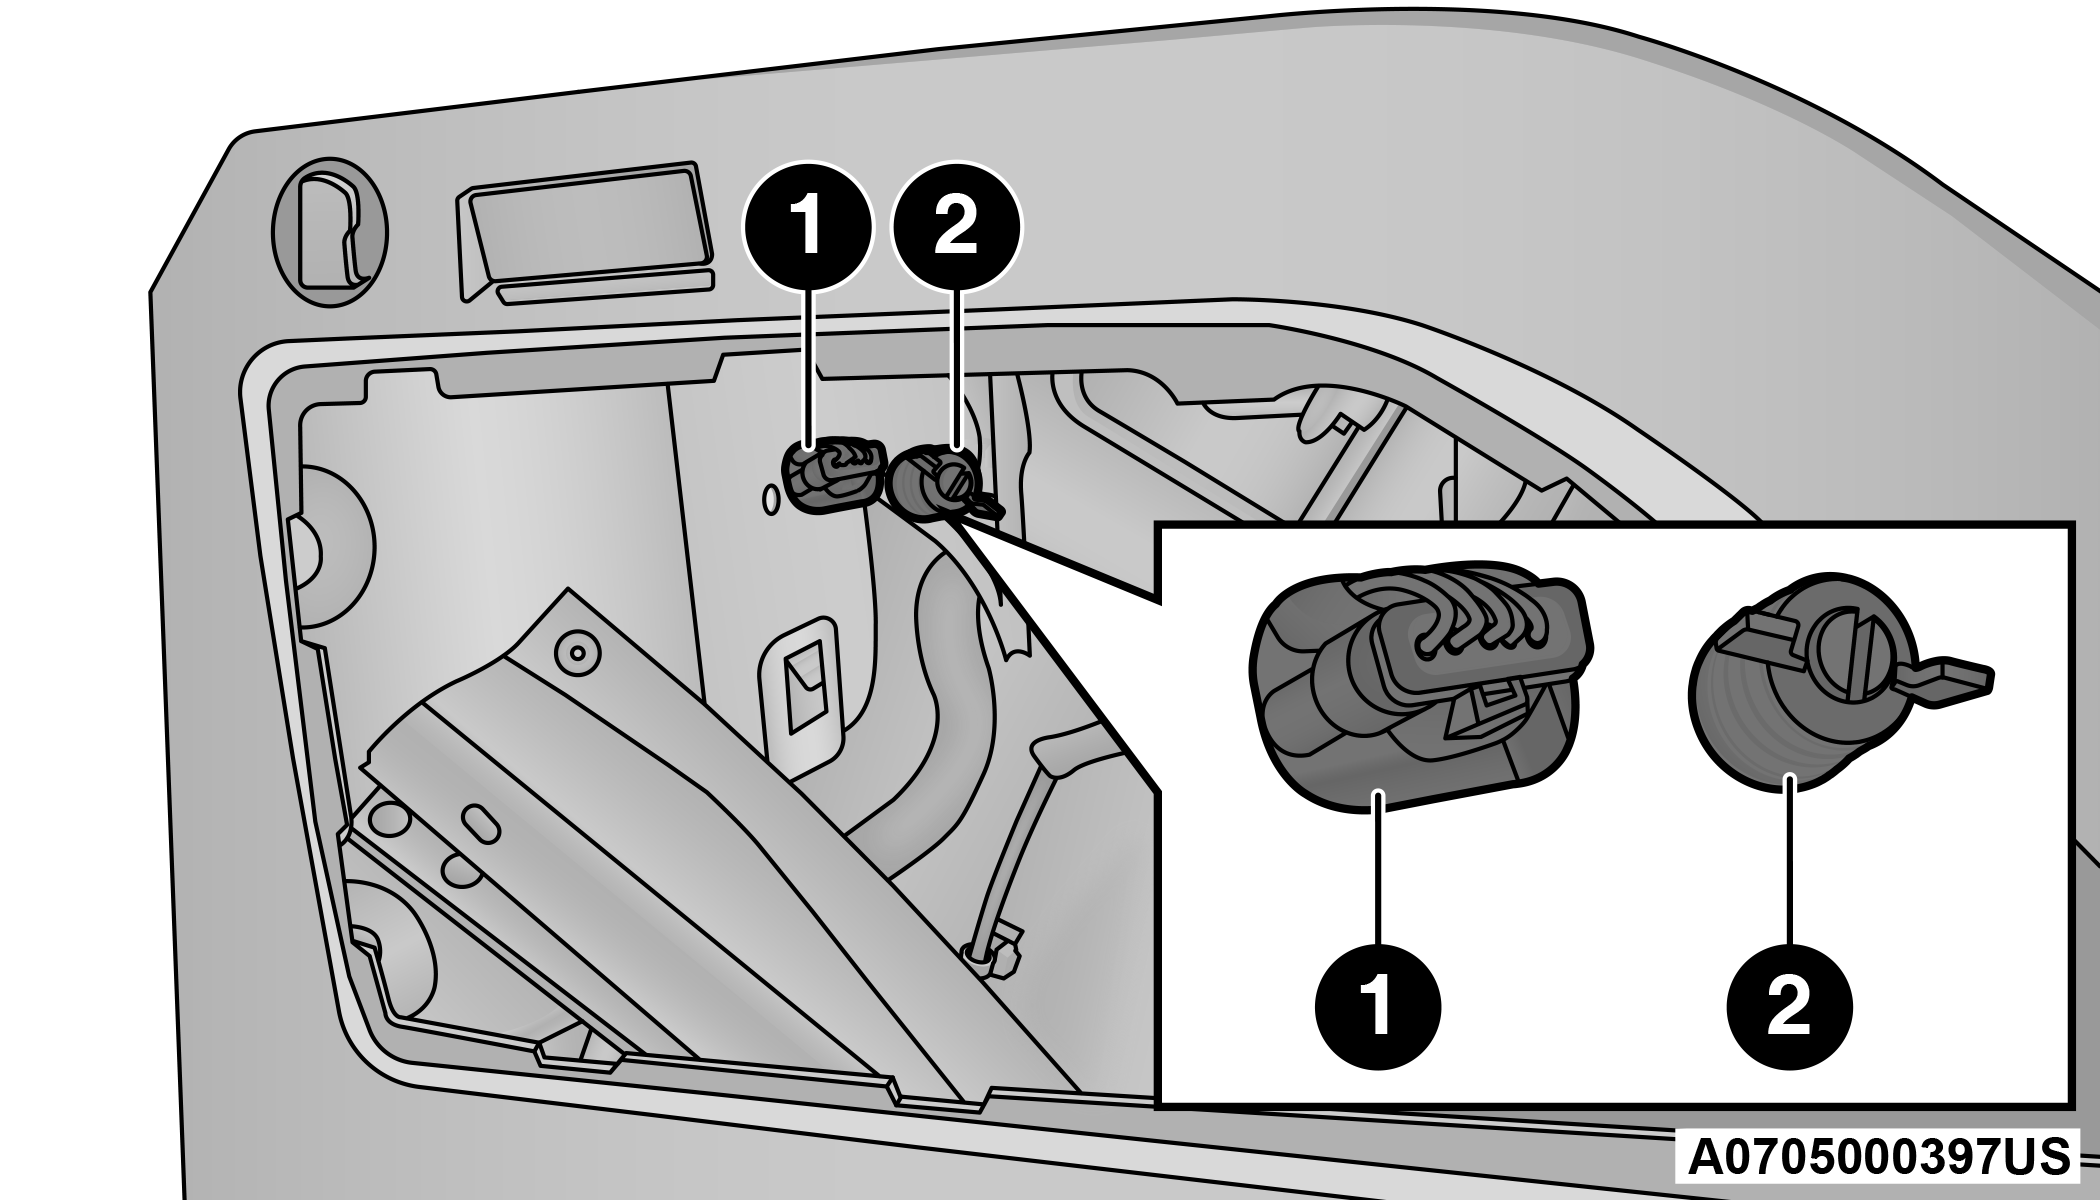
Rear Lamp Fastener and Electrical Connector
| 1 — Electrical Connector |
| 2 — Fastener |
5. Remove the rear tail lamp, sliding it toward the outside as shown.
Tail Lamp Removal
6. Unscrew the screws and remove the rear tail lamp holder.
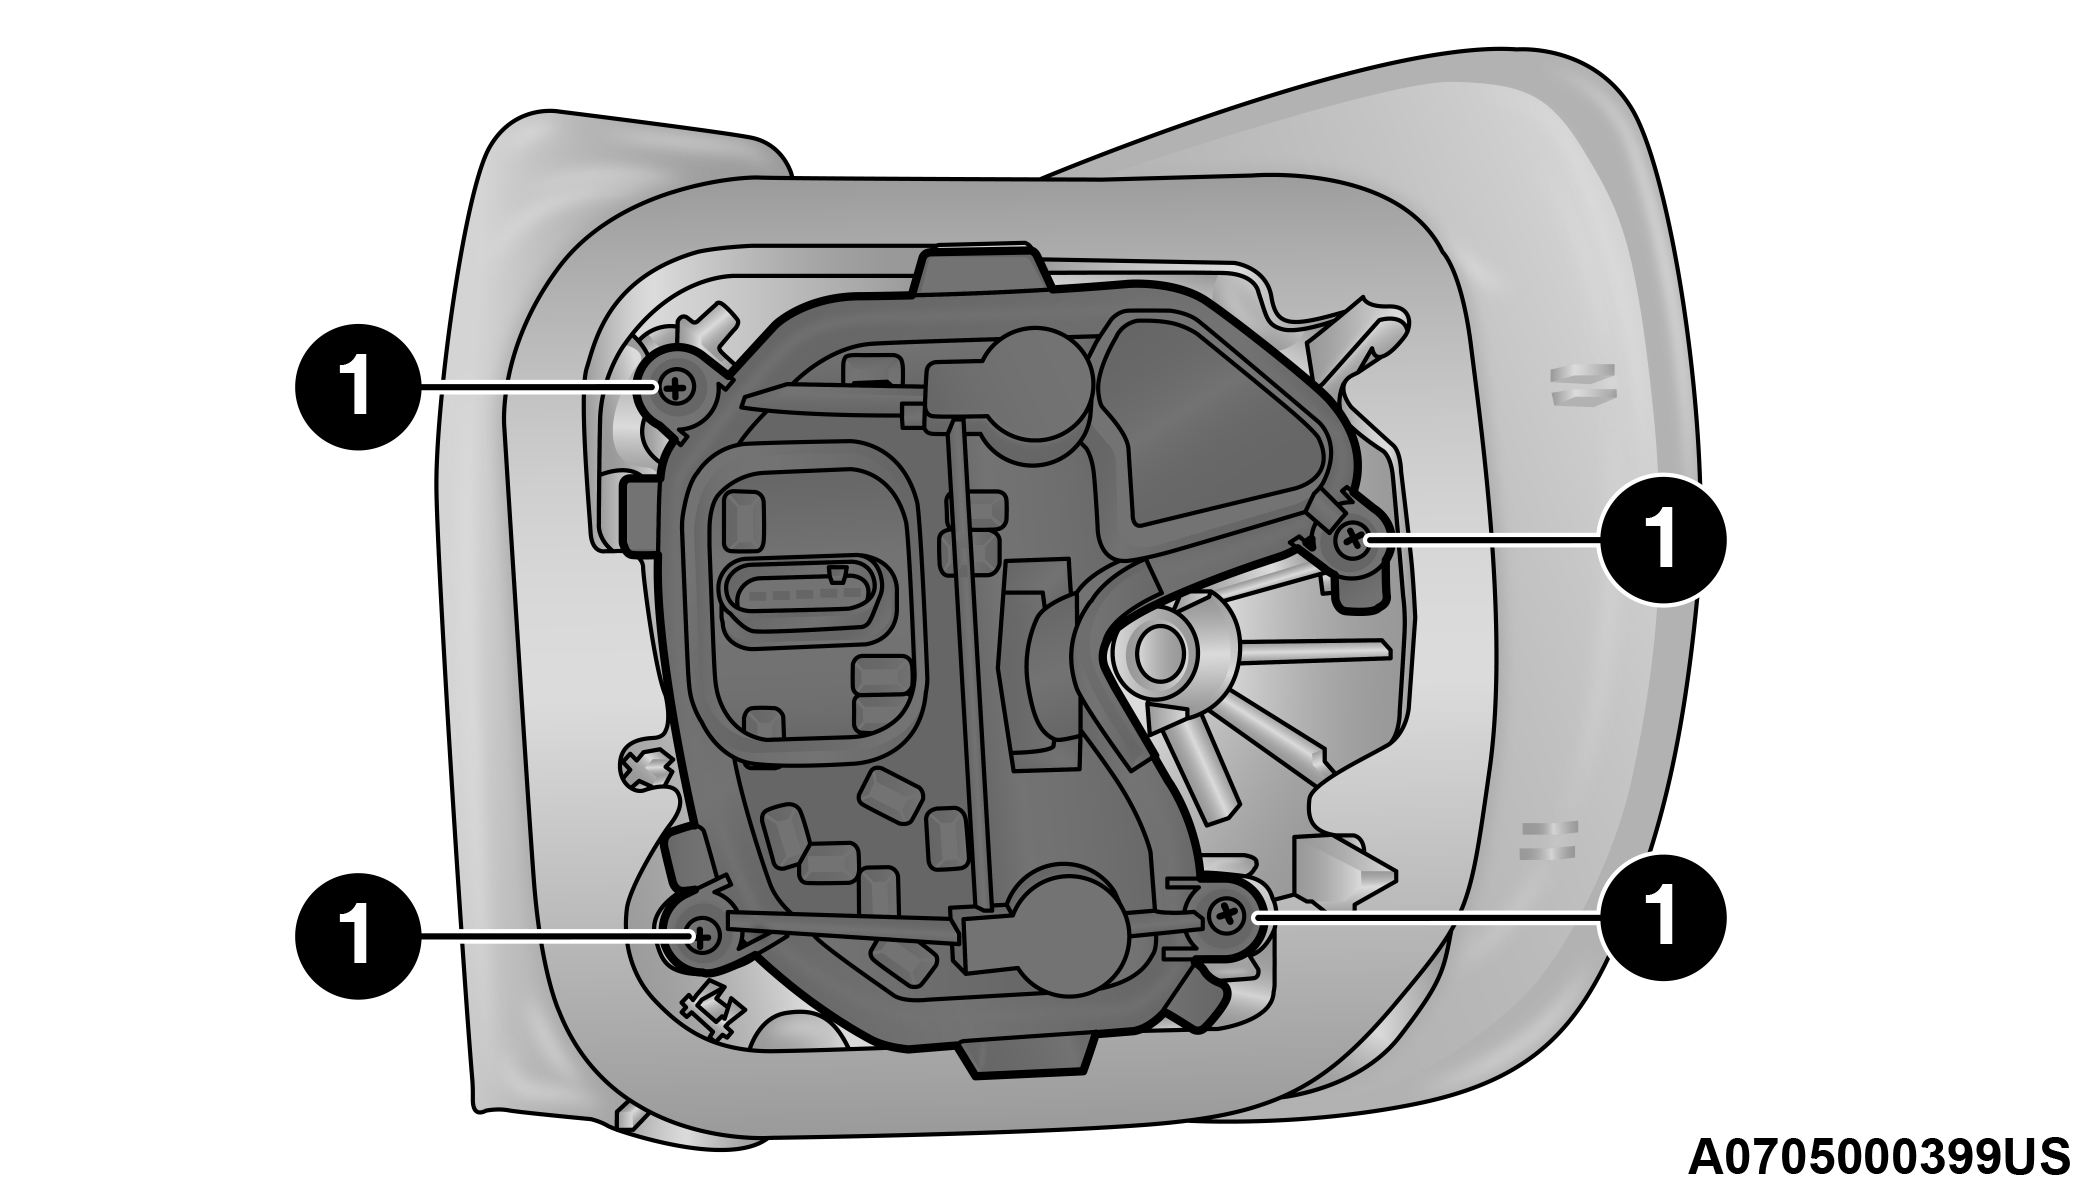
Rear Lamp Assembly
| 1 — Mounting Screws |
7. Replace the bulb as necessary.
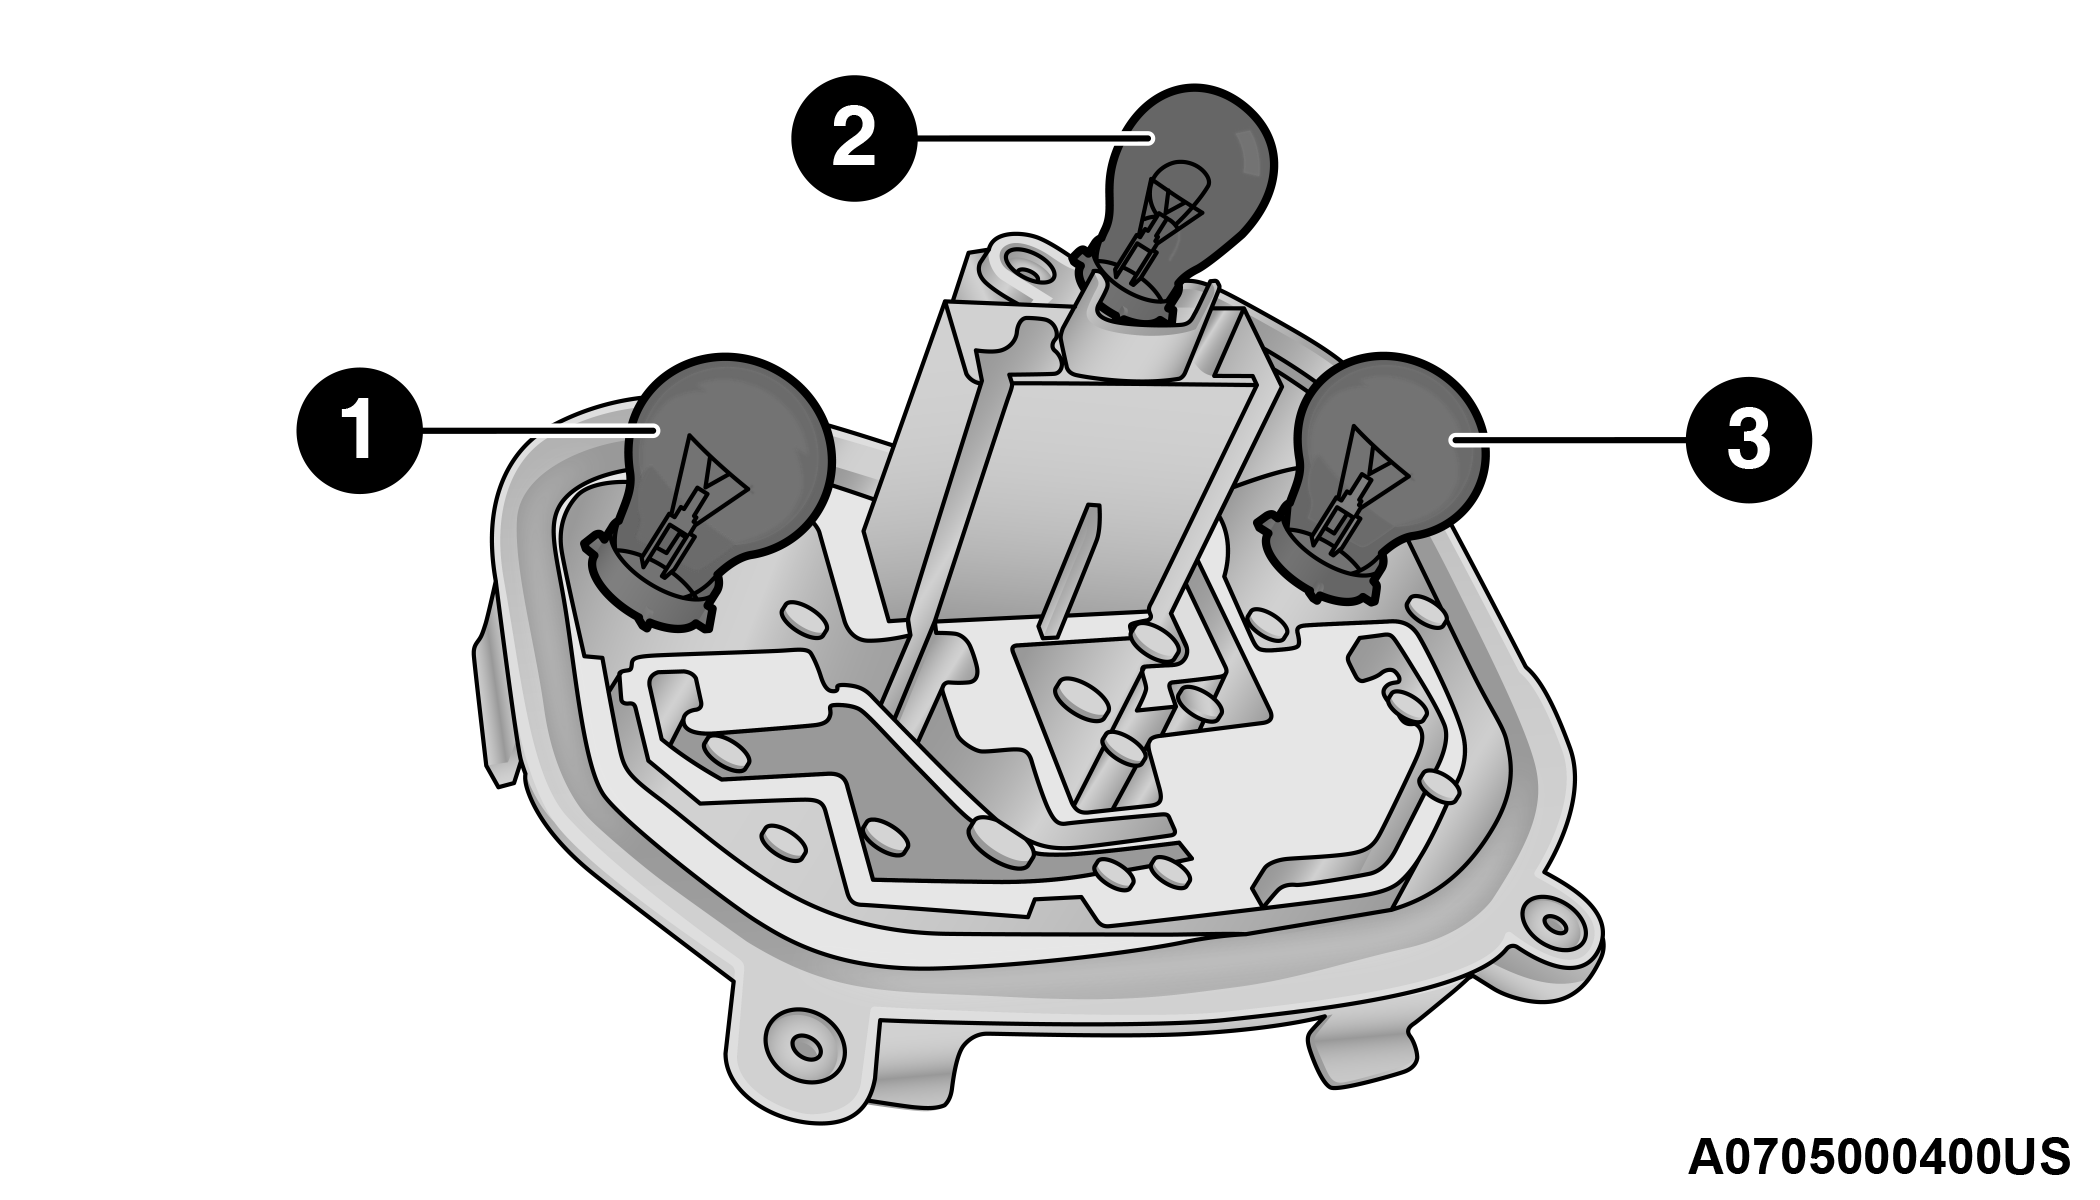
Rear Tail Lamp Holder
| 1 — Tail Light |
| 2 — Reverse Bulb |
| 3 — Position Light/Stop Light/Turn Signal |
8. Insert the new bulb, making sure it is properly locked.
9. Reassemble the lamp assembly on the rear tail lamp housing, tightening the screws.
10. Reposition the rear tail lamp on the car.
11. Secure the fastener of the rear tail lamp and reconnect the electrical connector.
12. Reinstall the door making sure it locked into place.
13. Finally close the liftgate.
LED Rear Tail Lamps – If Equipped
For replacement see an authorized dealer.
Reverse Lights – If Equipped With LED Tail Lamps
See the following steps to replace:
1. Use a suitable tool to remove the screws and remove the access door.
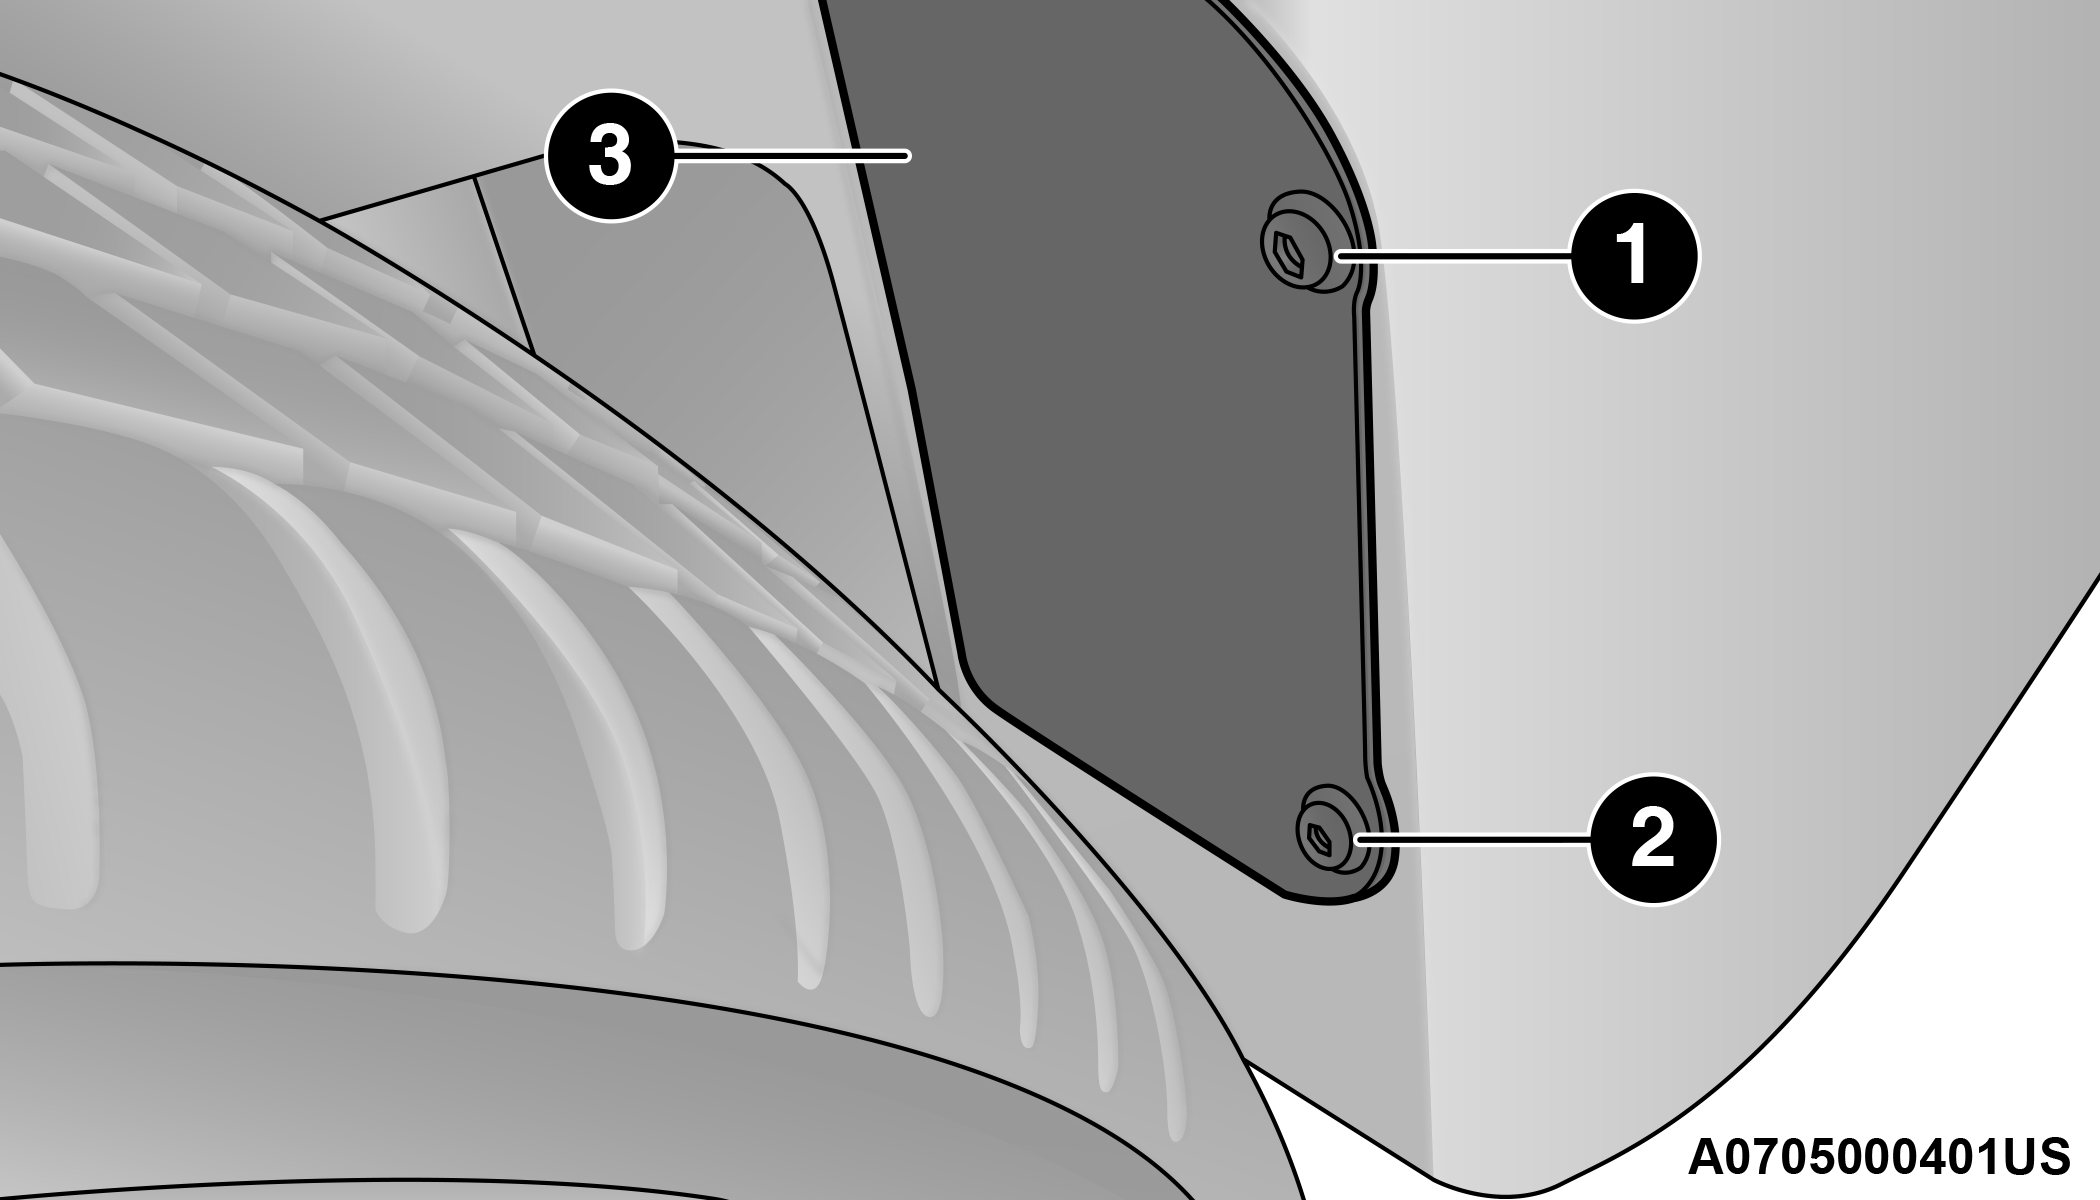
Reverse Light Access
| 1 — Screw |
| 2 — Screw |
| 3 — Access Door |
2. By pushing the electrical connector tab remove the electrical connector.
Reverse Light Assembly
| 1 — Bulb |
3. Rotate the bulb counterclockwise, and then replace the bulb.
4. Insert the new bulb in the socket, making sure the bulb is locked into place.
5. Reconnect the electrical connector.
6. Reinstall the access door.
Center High Mounted Stop Lamp (CHMSL)
The CHMSL is LED. For replacement see an authorized dealer.
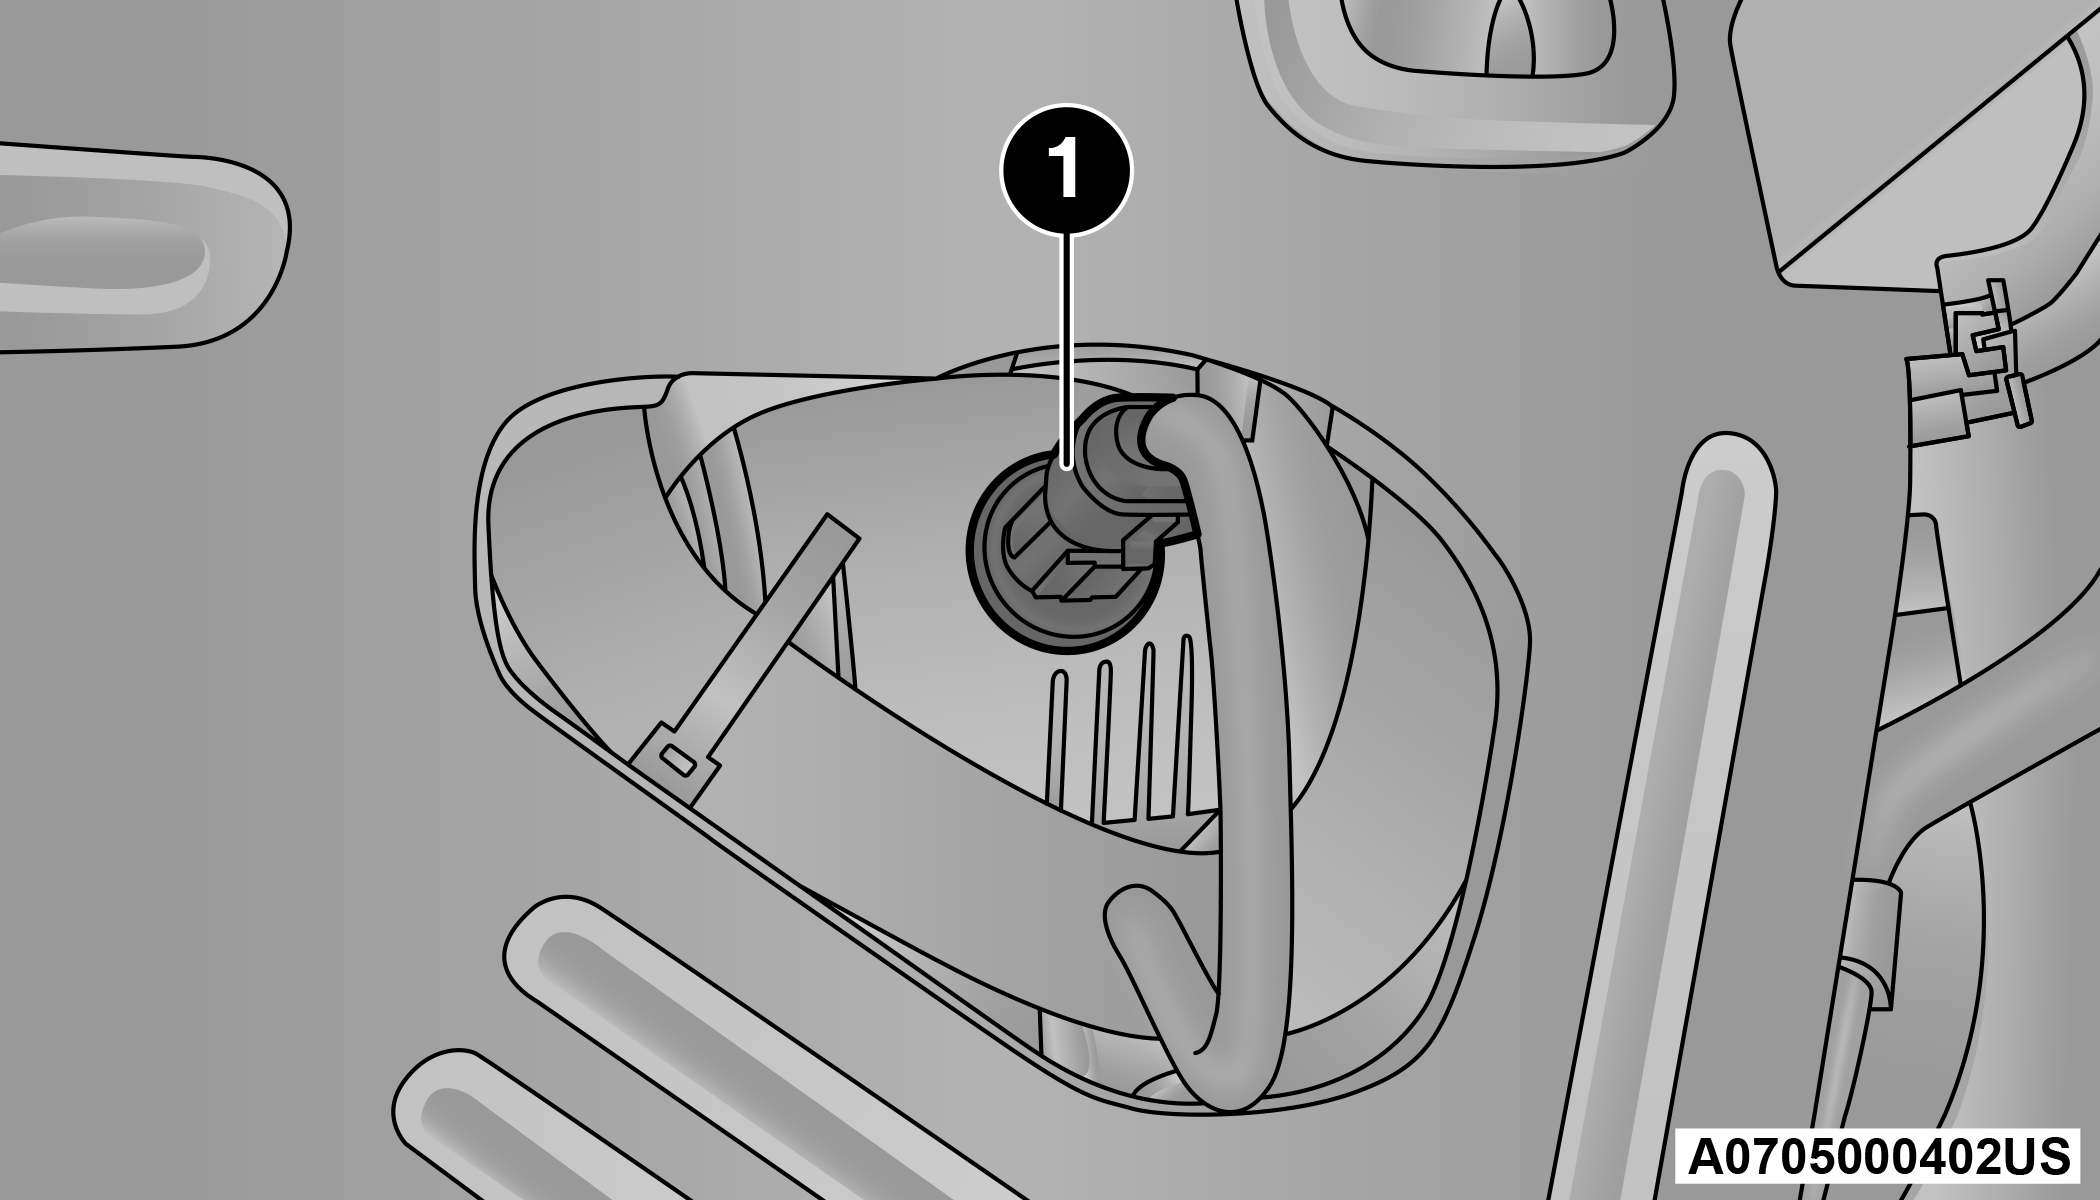
License Plate Lights
See the following steps to replace:
1. Using a suitable tool remove the license plate lens.
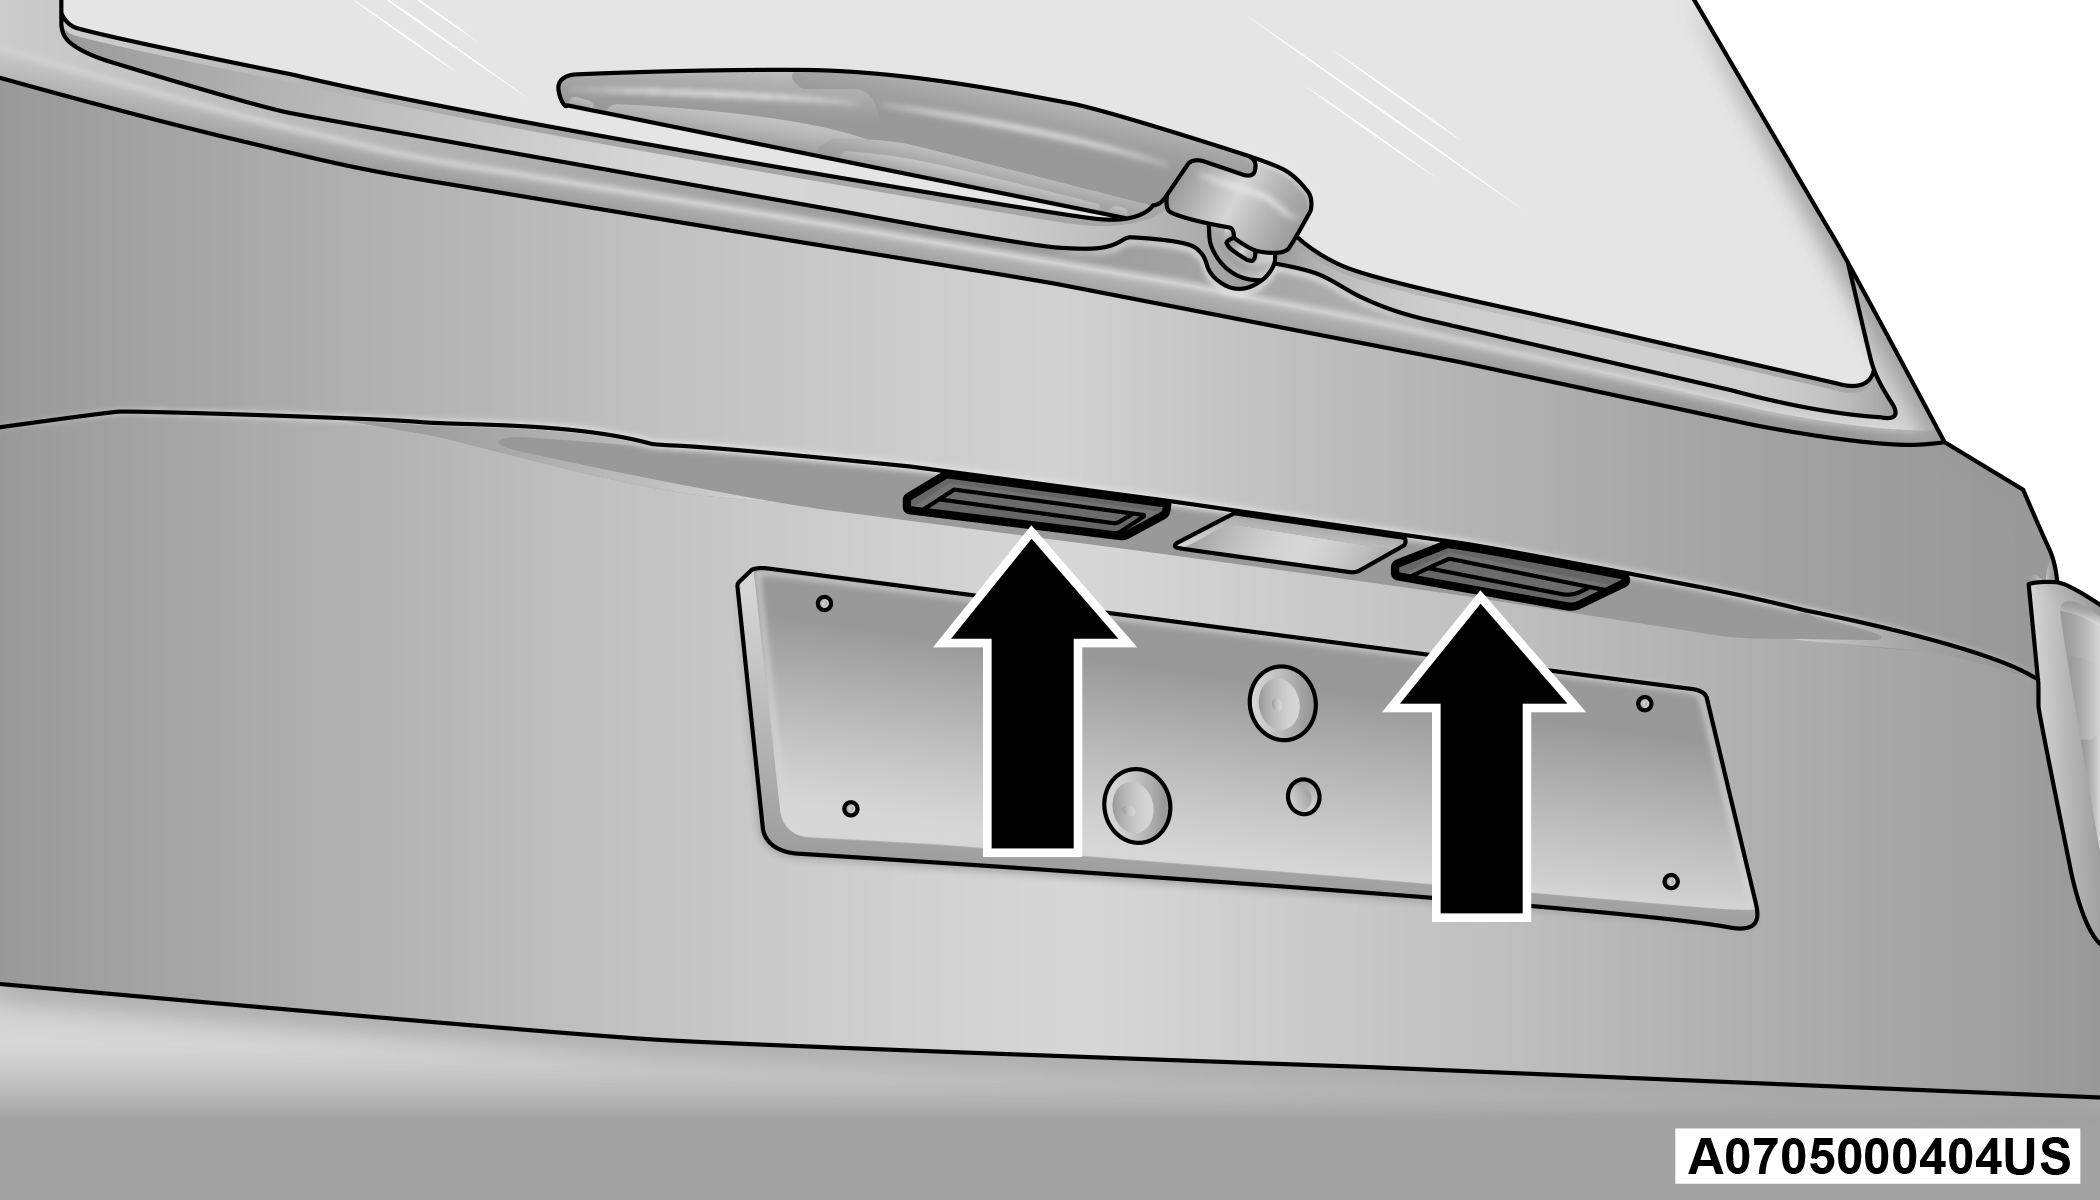
License Plate Light Location
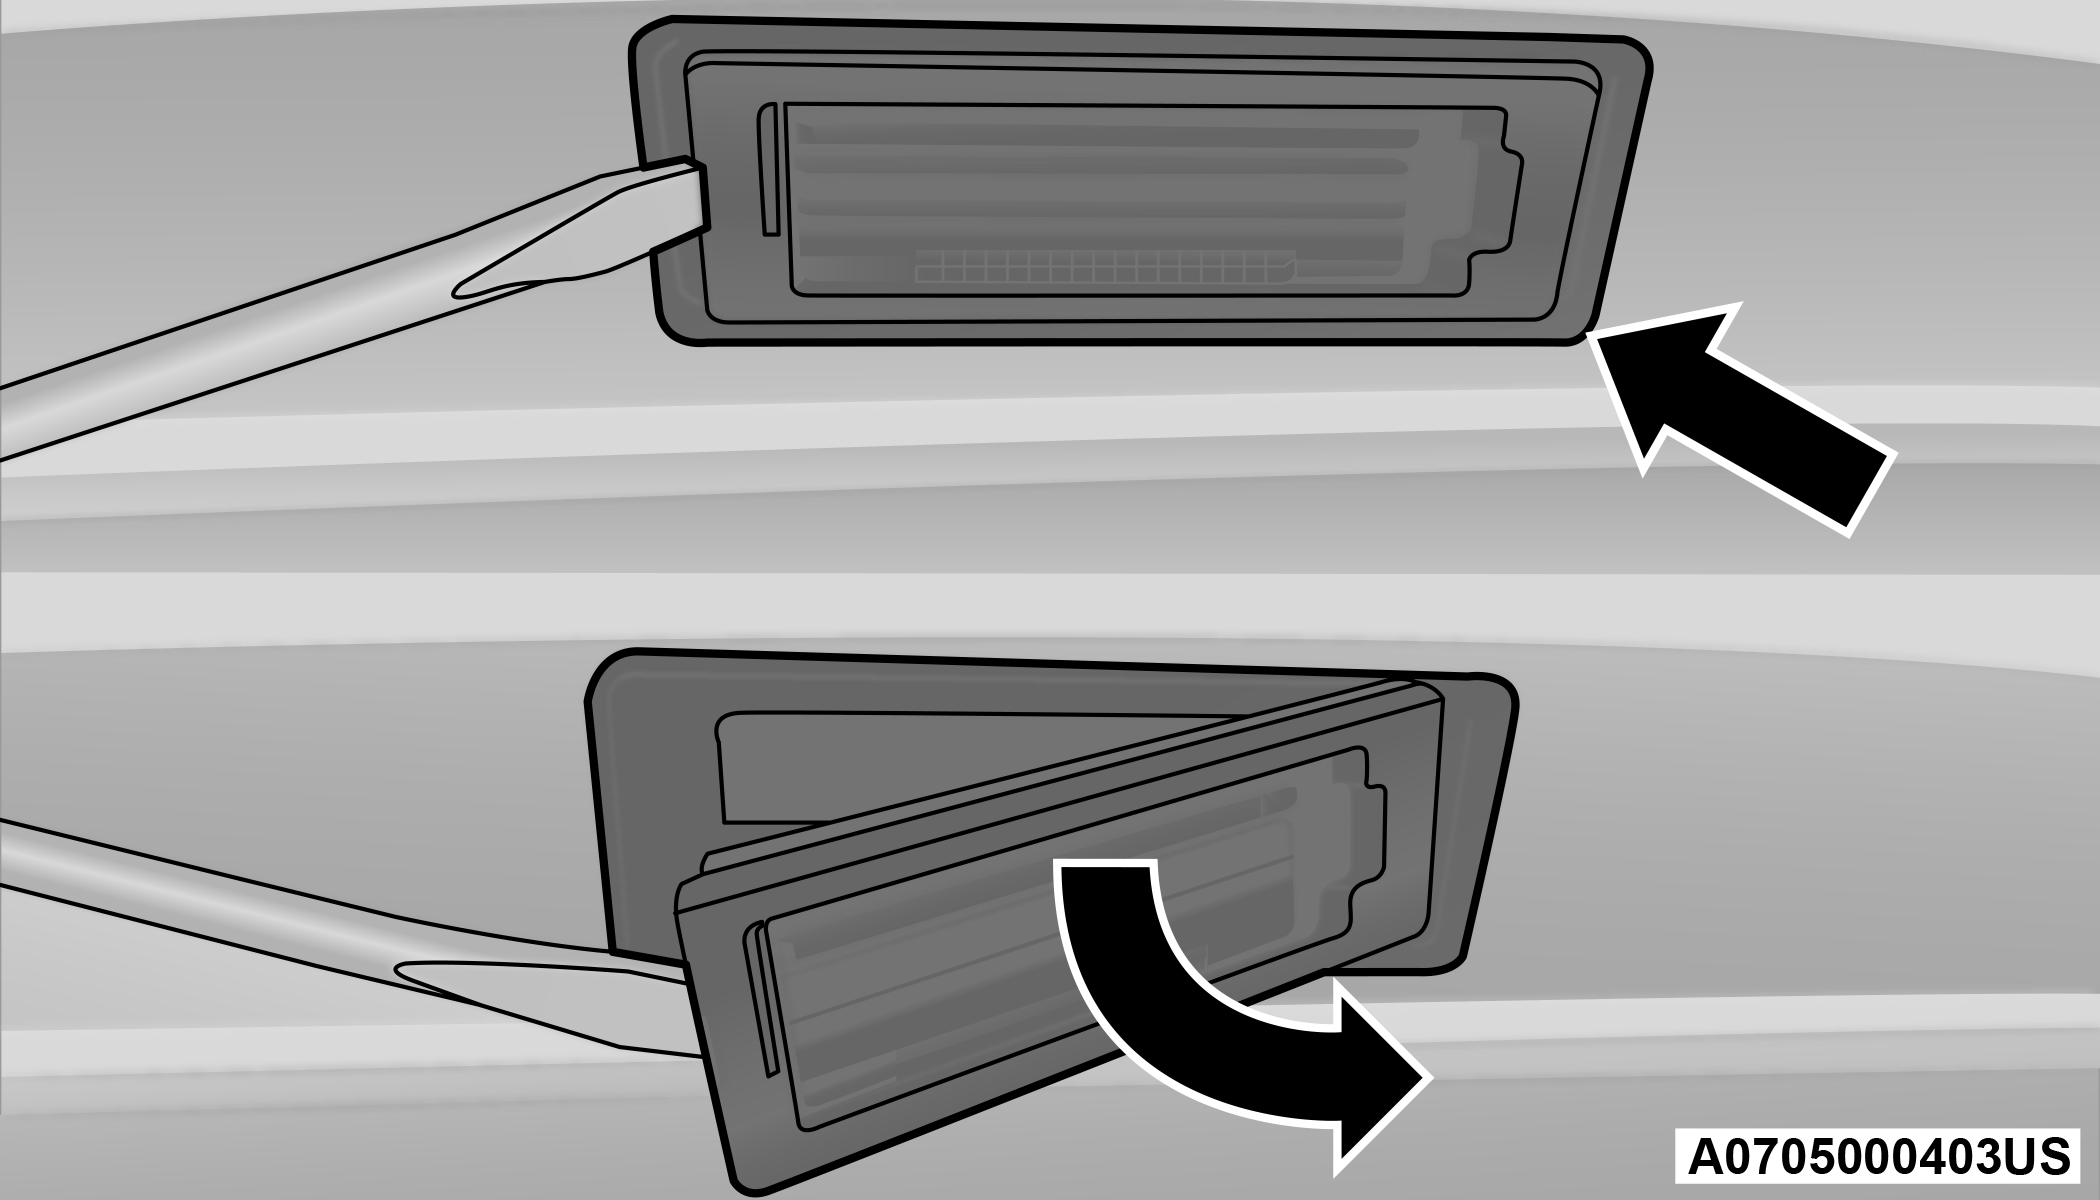
License Plate Light
2. Remove the bulbs from the individual side contacts.
3. Insert the new bulbs, and ensure that they are properly locked between the contacts.
4. Reinstall the license plate lens.
Note:
If removing the license plate lens using a screwdriver, be sure to cover the tip of the screwdriver with a cloth so no damage is done to the lenses or the vehicle paint.
REPLACING INTERIOR BULBS
Front Courtesy Light
See the following steps to replace:
1. Using a suitable tool remove the front courtesy light as shown.
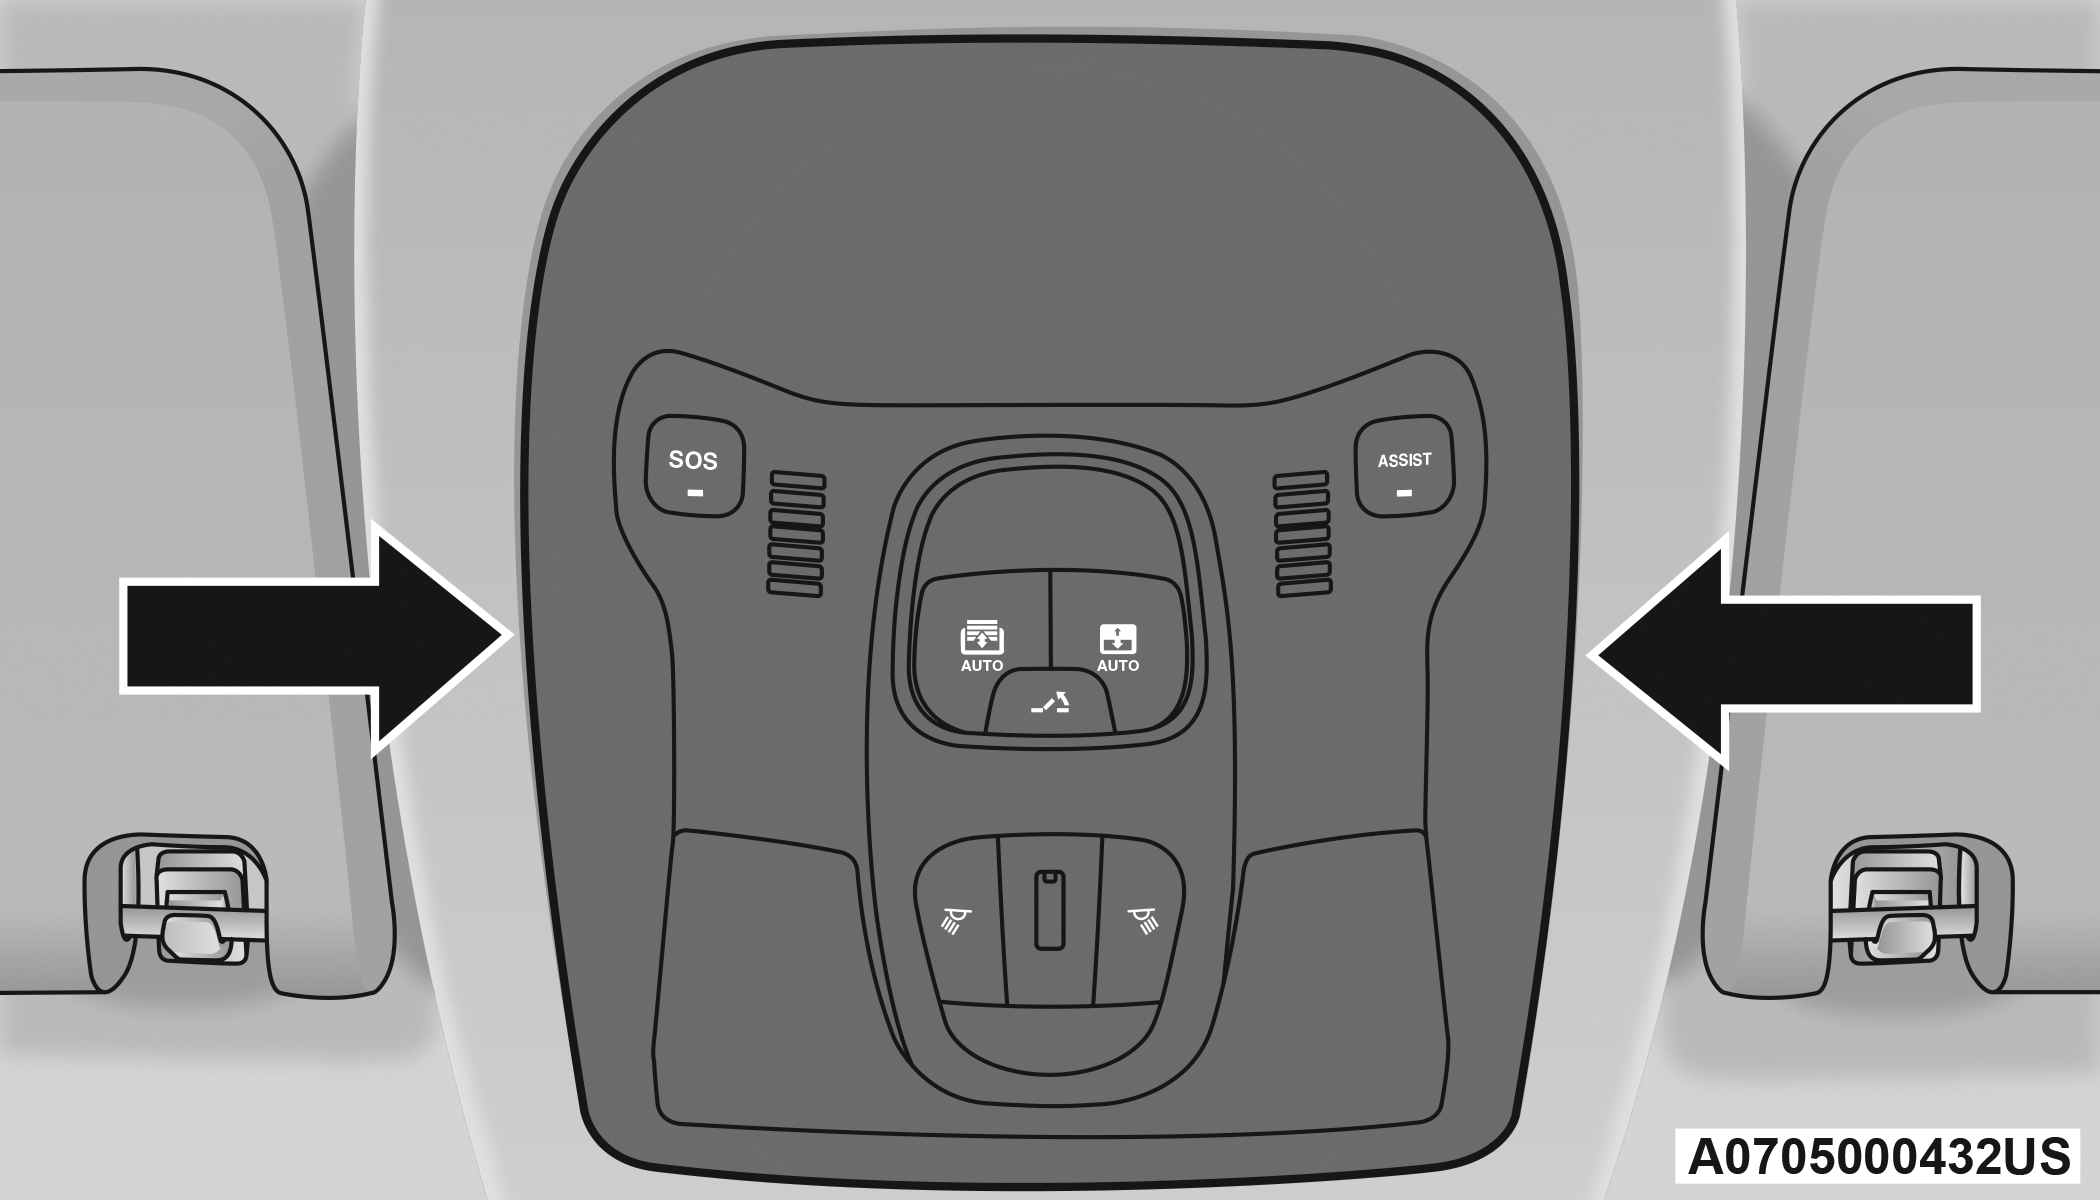
Front Courtesy Light Housing
2. Release the retainer clips and bulb housing as shown.
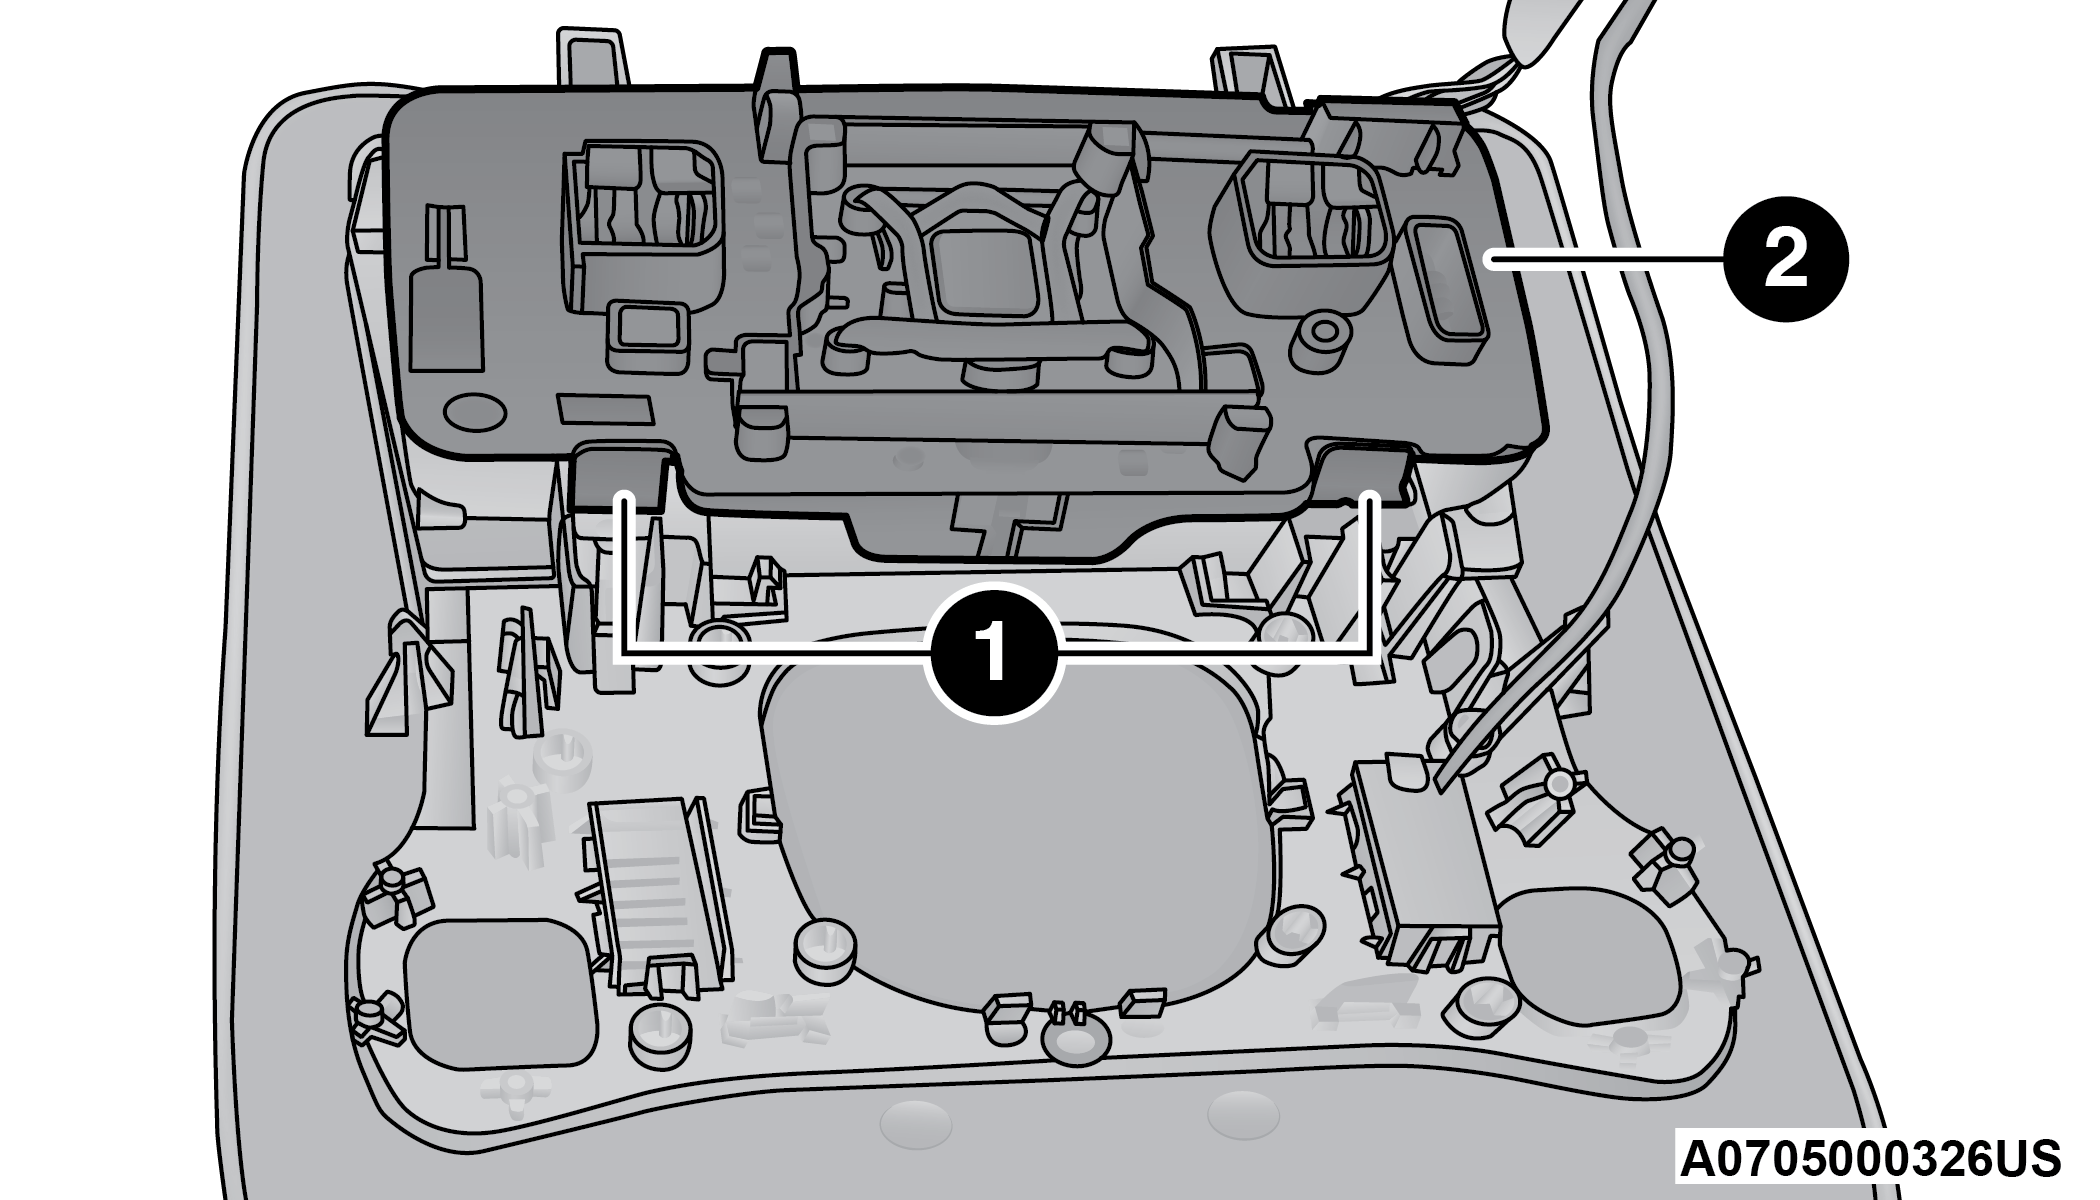
Front Courtesy Bulb Housing
|
1 — Retaining Clips |
|
2 — Bulb Housing |
3. Replace the bulbs by pulling straight out of bulb housing.
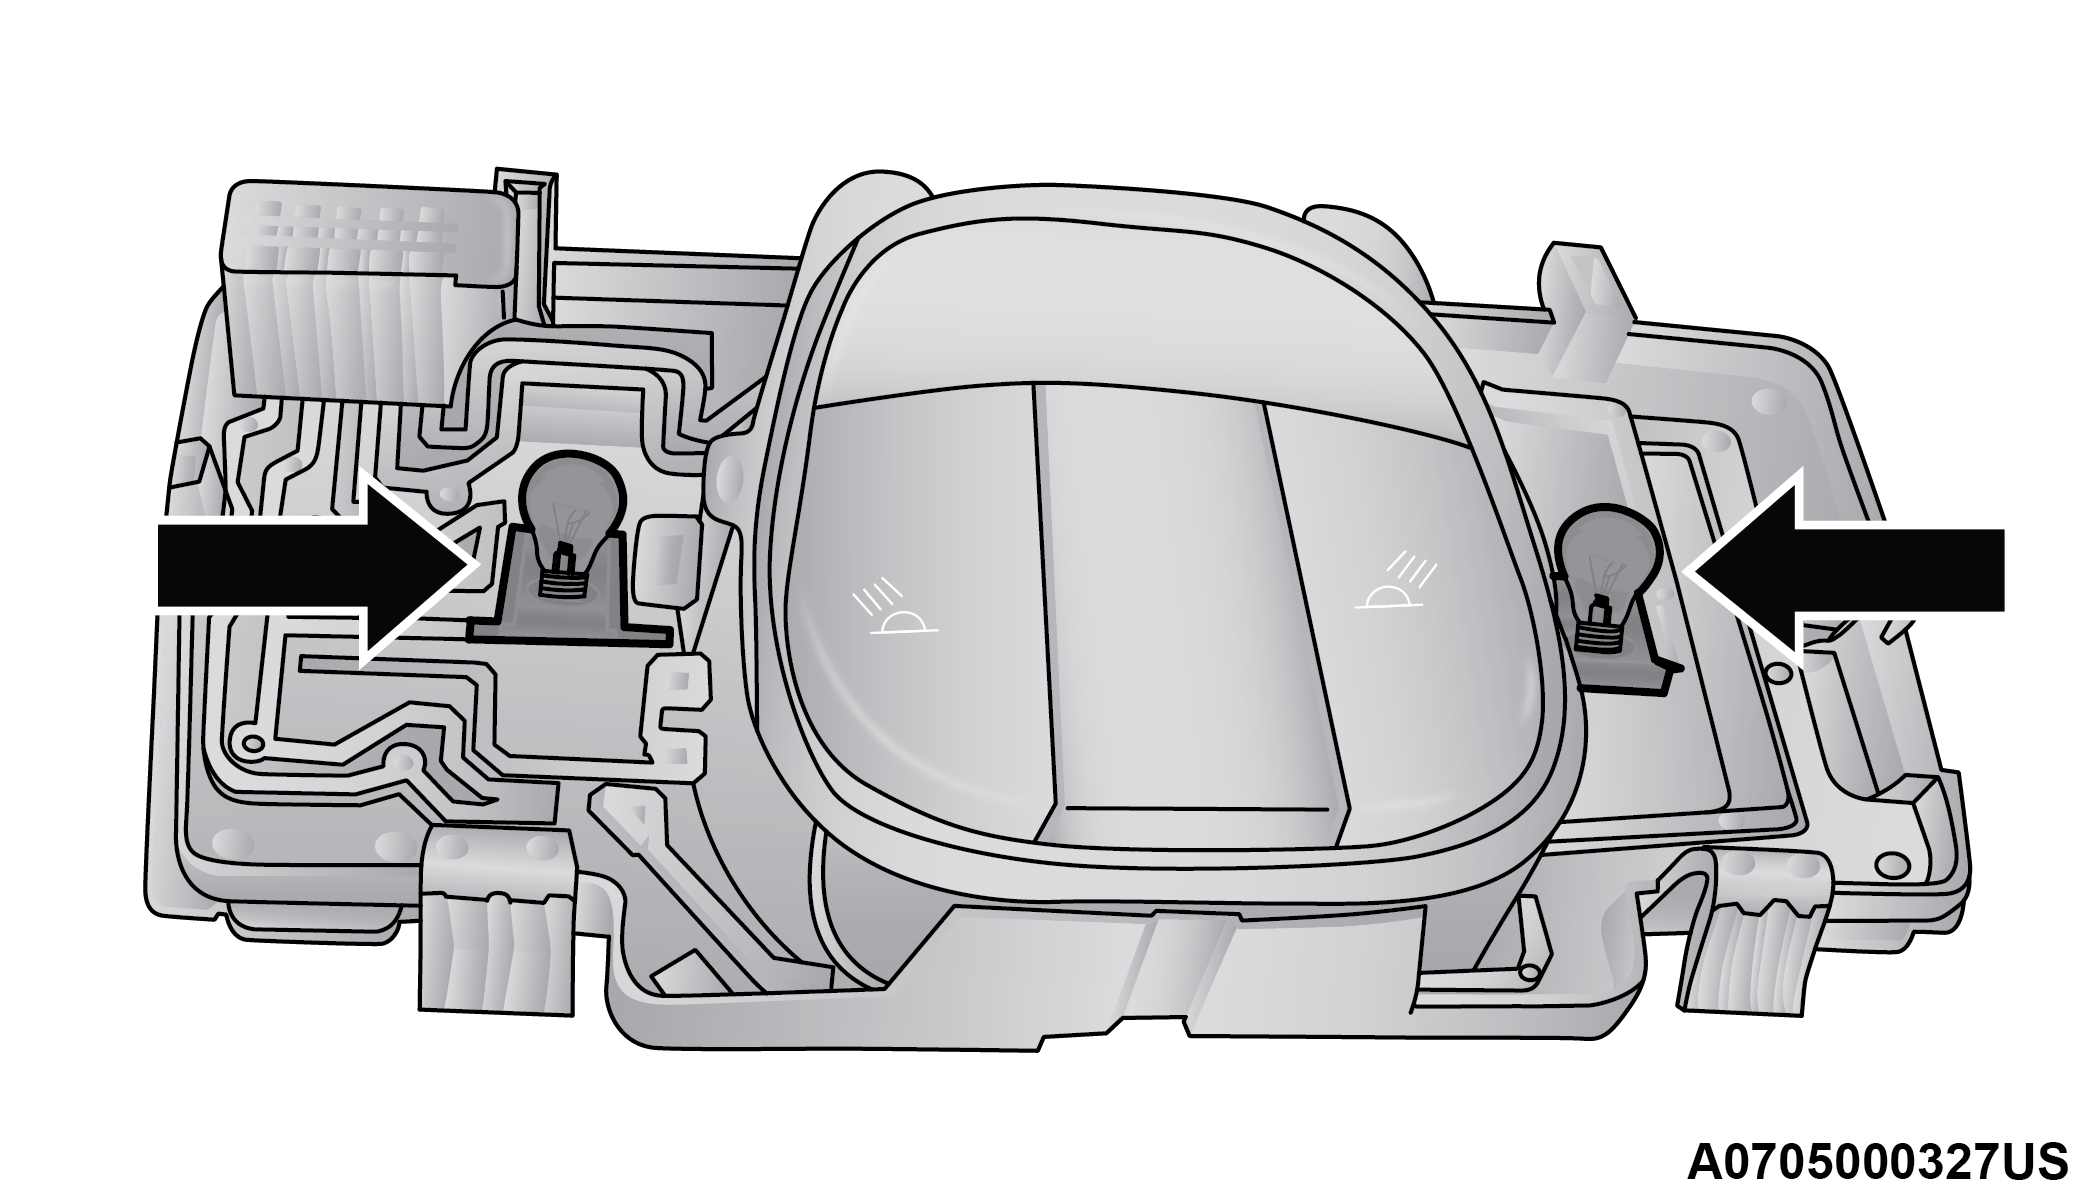
Front Courtesy Bulb Housing
4. Insert the new bulbs, making sure that they are properly locked.
5. Reassemble the bulb housing and courtesy light housing making sure that they are properly locked.
6. Install the front courtesy light making sure that it is properly locked.
Dome Light Vanity Mirror
See the following steps to replace:
1. Lift the cover of the mirror and pull out the visor mirror light cover.
2. Replace the bulb, releasing it from the side contacts, and then insert the new bulb, making sure that it is properly locked between the contacts.
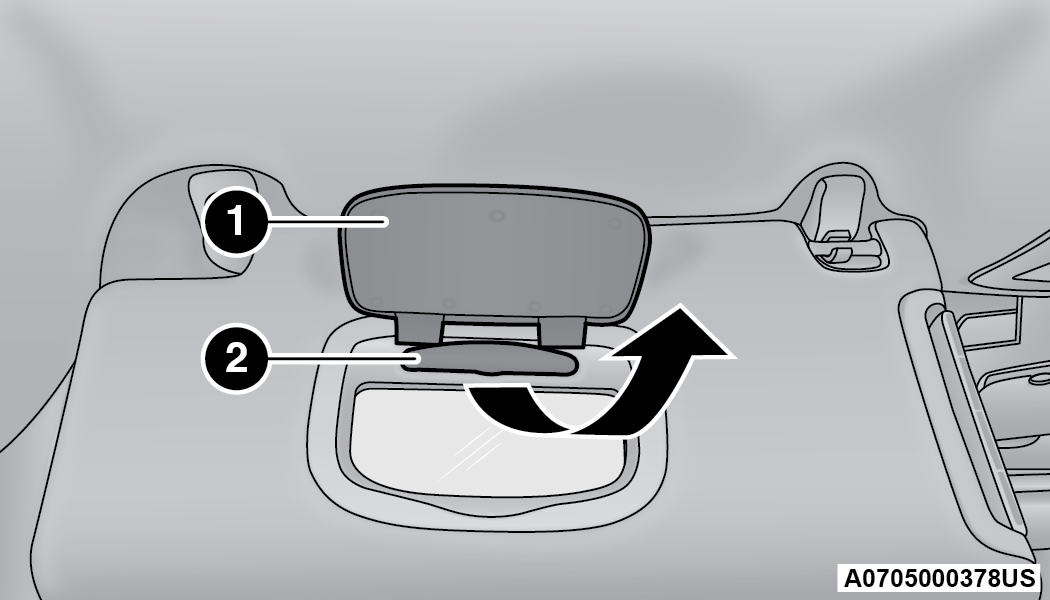
Visor
|
1 — Visor Mirror Cover |
|
2 — Visor Mirror Light |
3. Reinstall the visor mirror light cover making sure that it is properly locked.
4. Finally lower the visor mirror cover to the mirror.
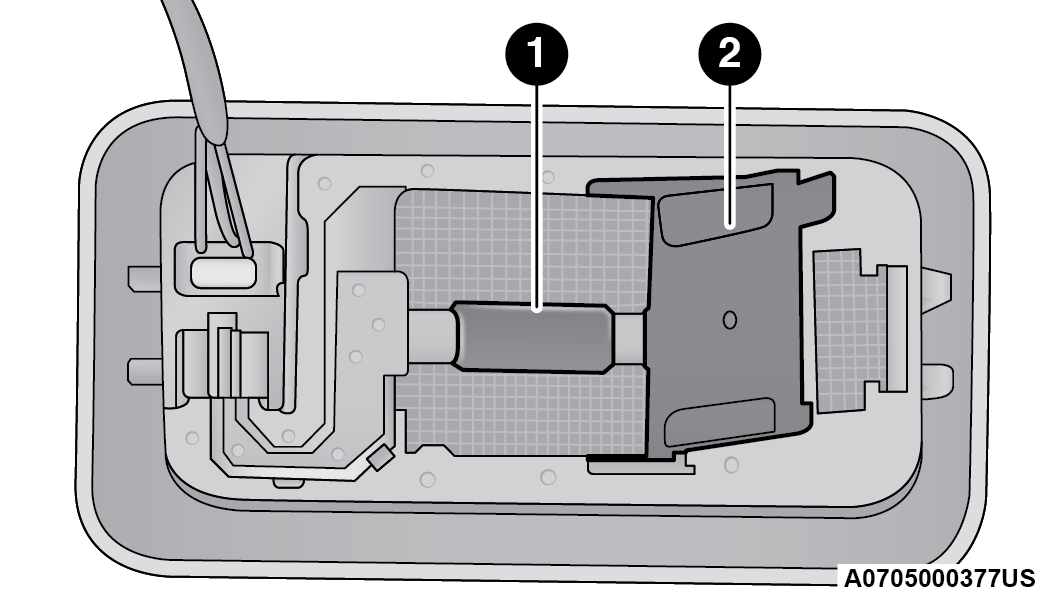
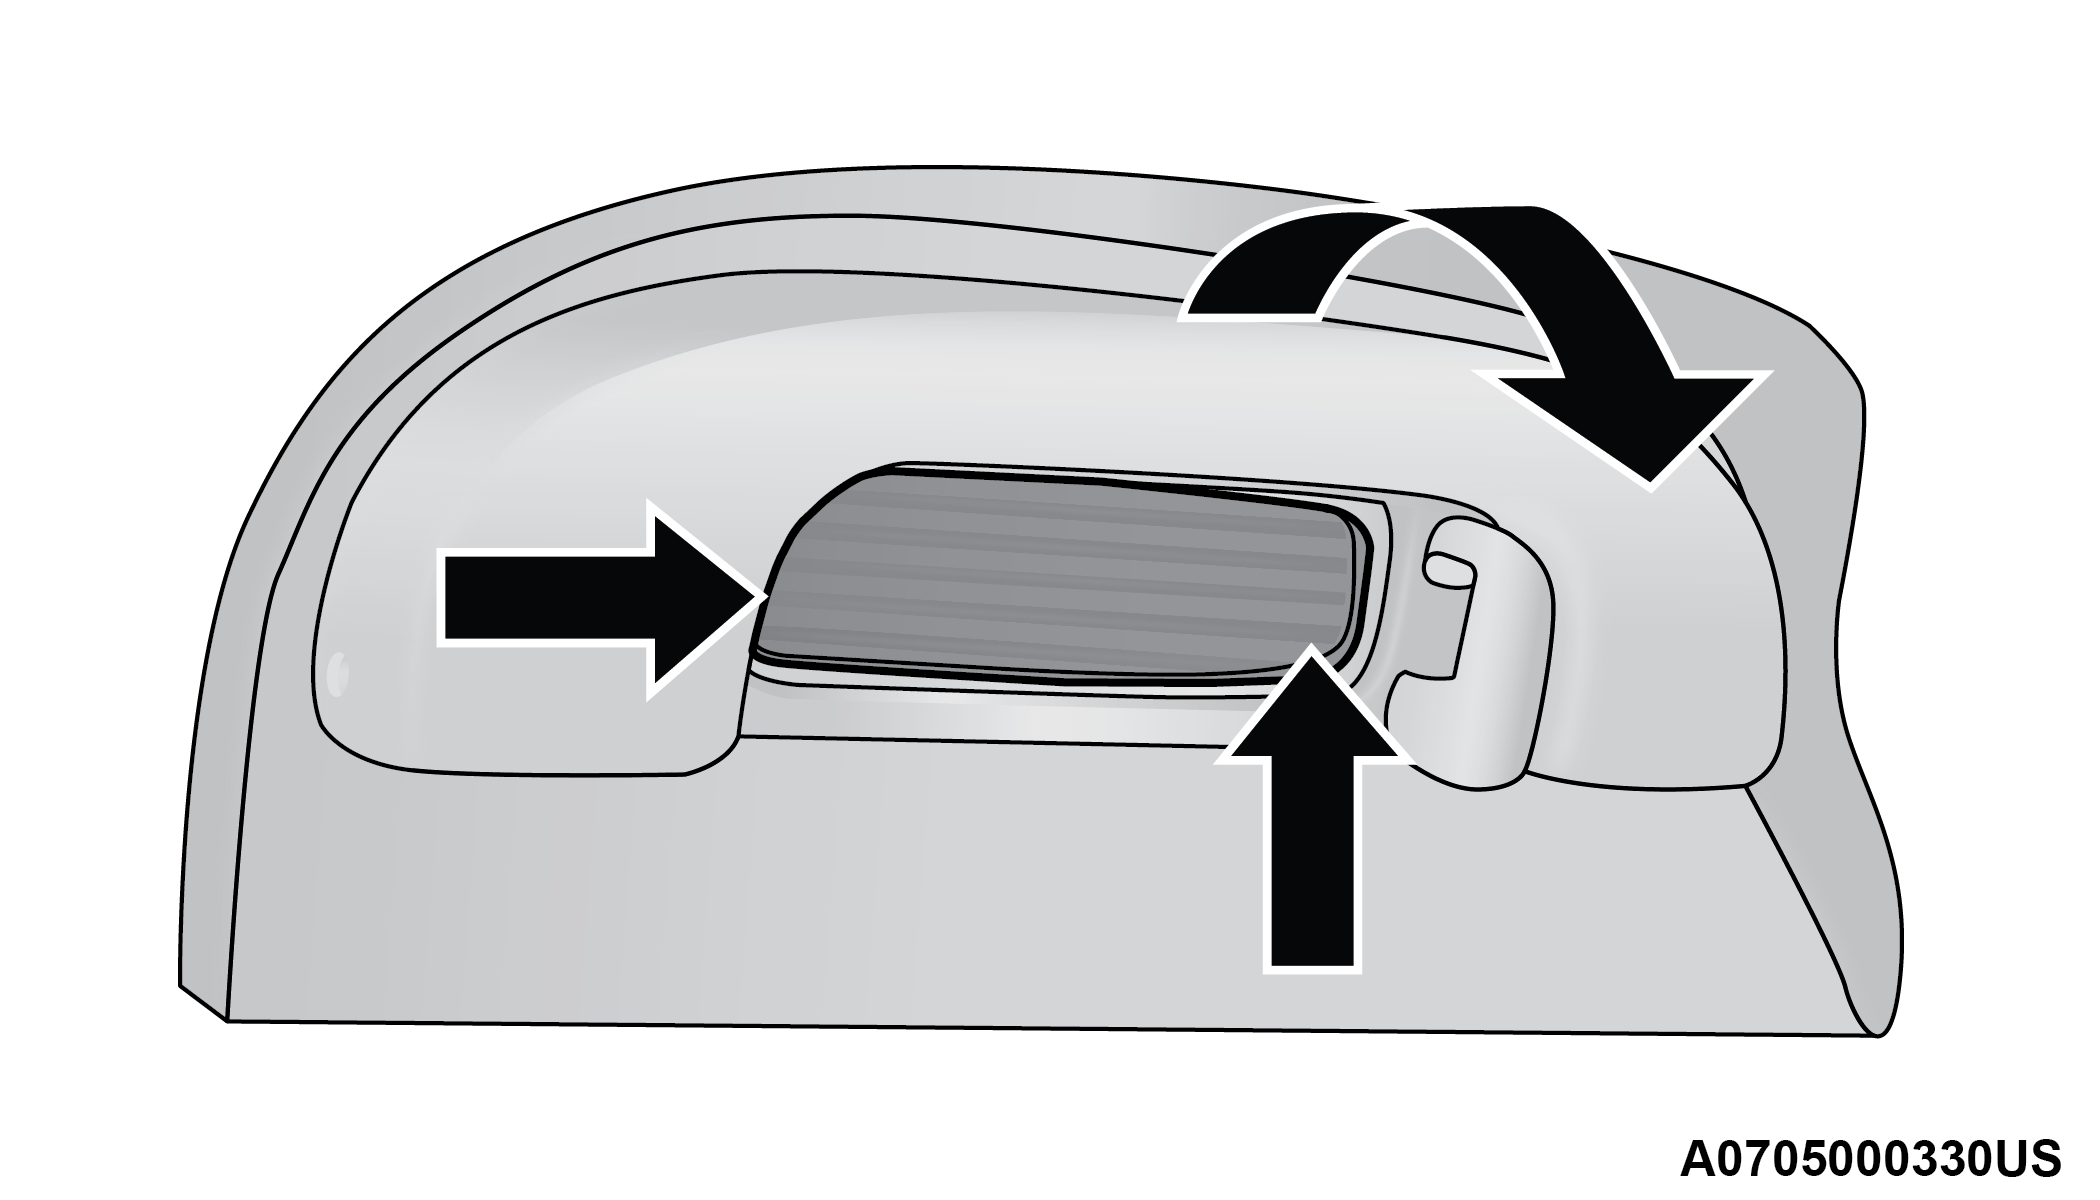
Dome Light Glove Compartment
See the following steps to replace:
1. Open the glove compartment.
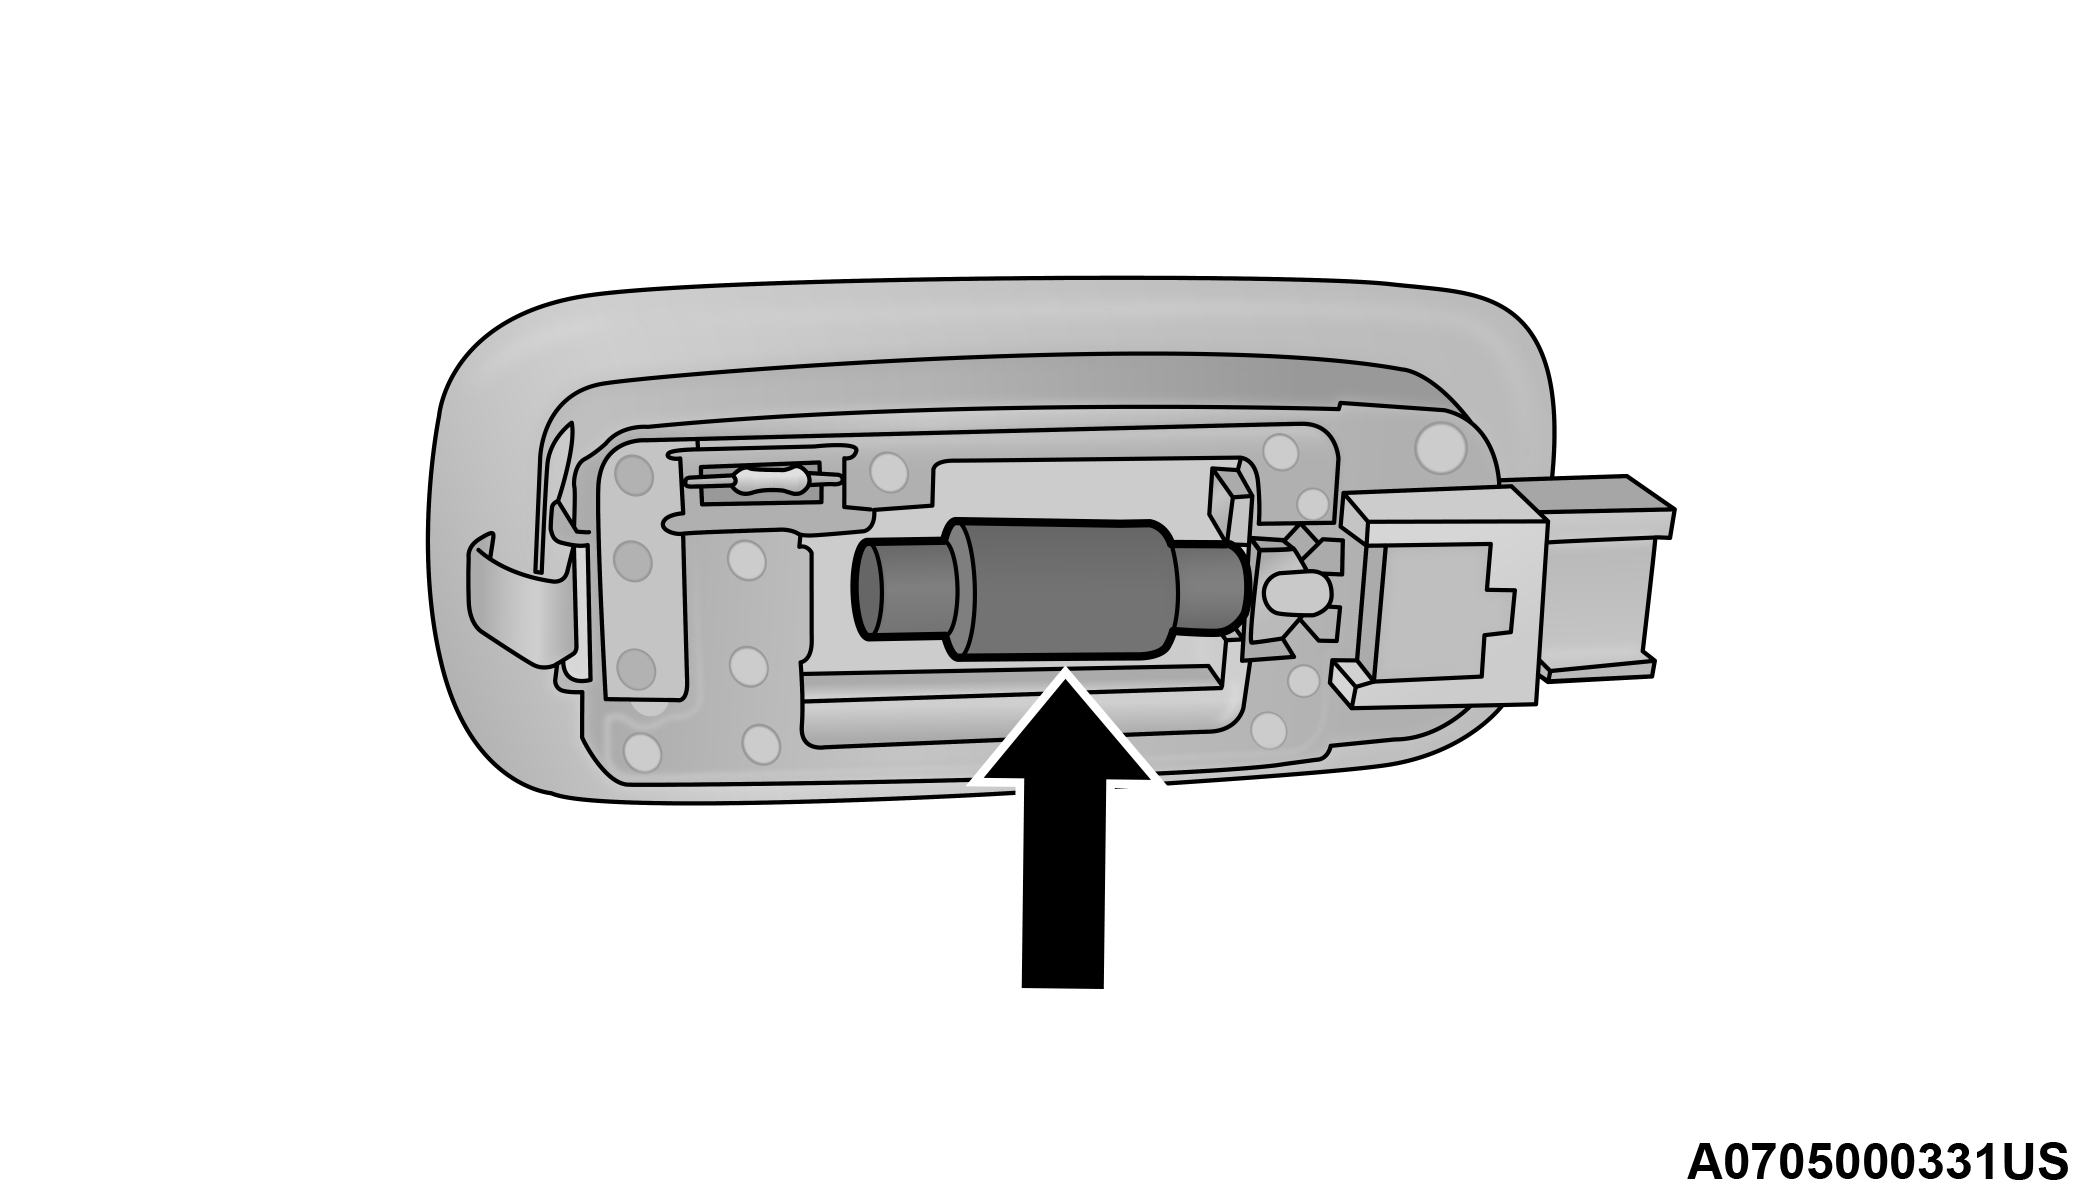
2. Place your fingers inside the light assembly, pull the bulb to replace it.
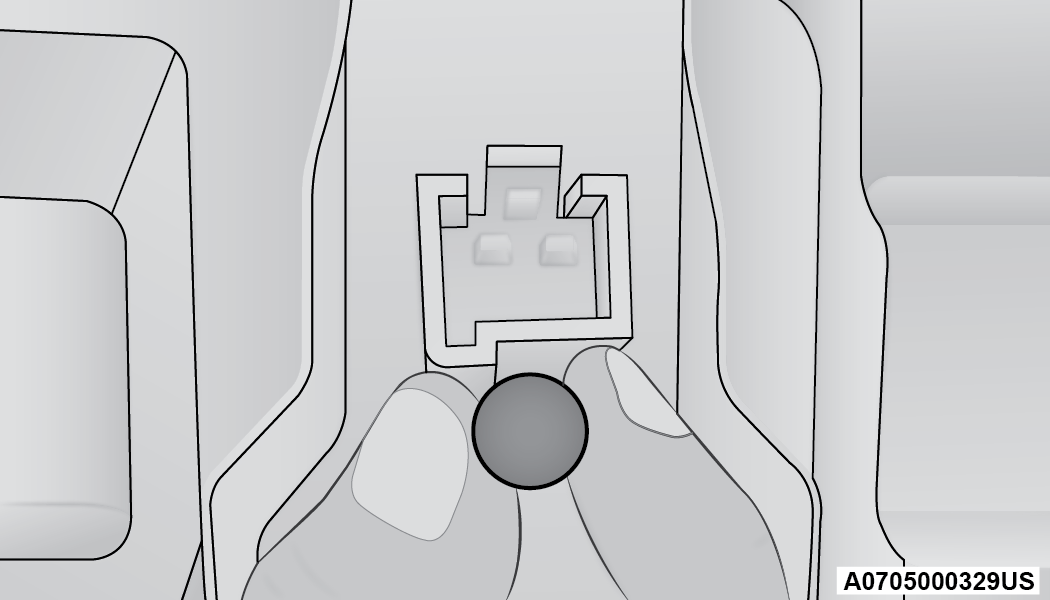
Bulb Removal/Installation
3. Insert the new bulb, making sure it is properly locked.
Rear Dome Light — Without Retractable Roof
See the following steps to replace:
1. Using a suitable tool release the lamp assembly at both the ends.
2. Open the flap and replace the bulb.
Rear Dome Light Housing
|
1 — Bulb |
|
2 — Flap |
3. Insert the new bulb, locking it between the contacts.
4. Reinstall the dome light.
Dome Light — MY SKY
See the following steps to replace:
1. Lower the handle in the direction shown remove the dome light.
Retractable Roof Light
2. Replace the bulb by removing it from the side contacts.
Bulb
3. Insert the new bulb, locking it between the contacts.
4. Reinstall the dome light.
Interior Cargo Lights
See the following steps to replace:
1. Open the luggage compartment and remove the dome light assembly.
2. Open the light cover and replace the bulb.
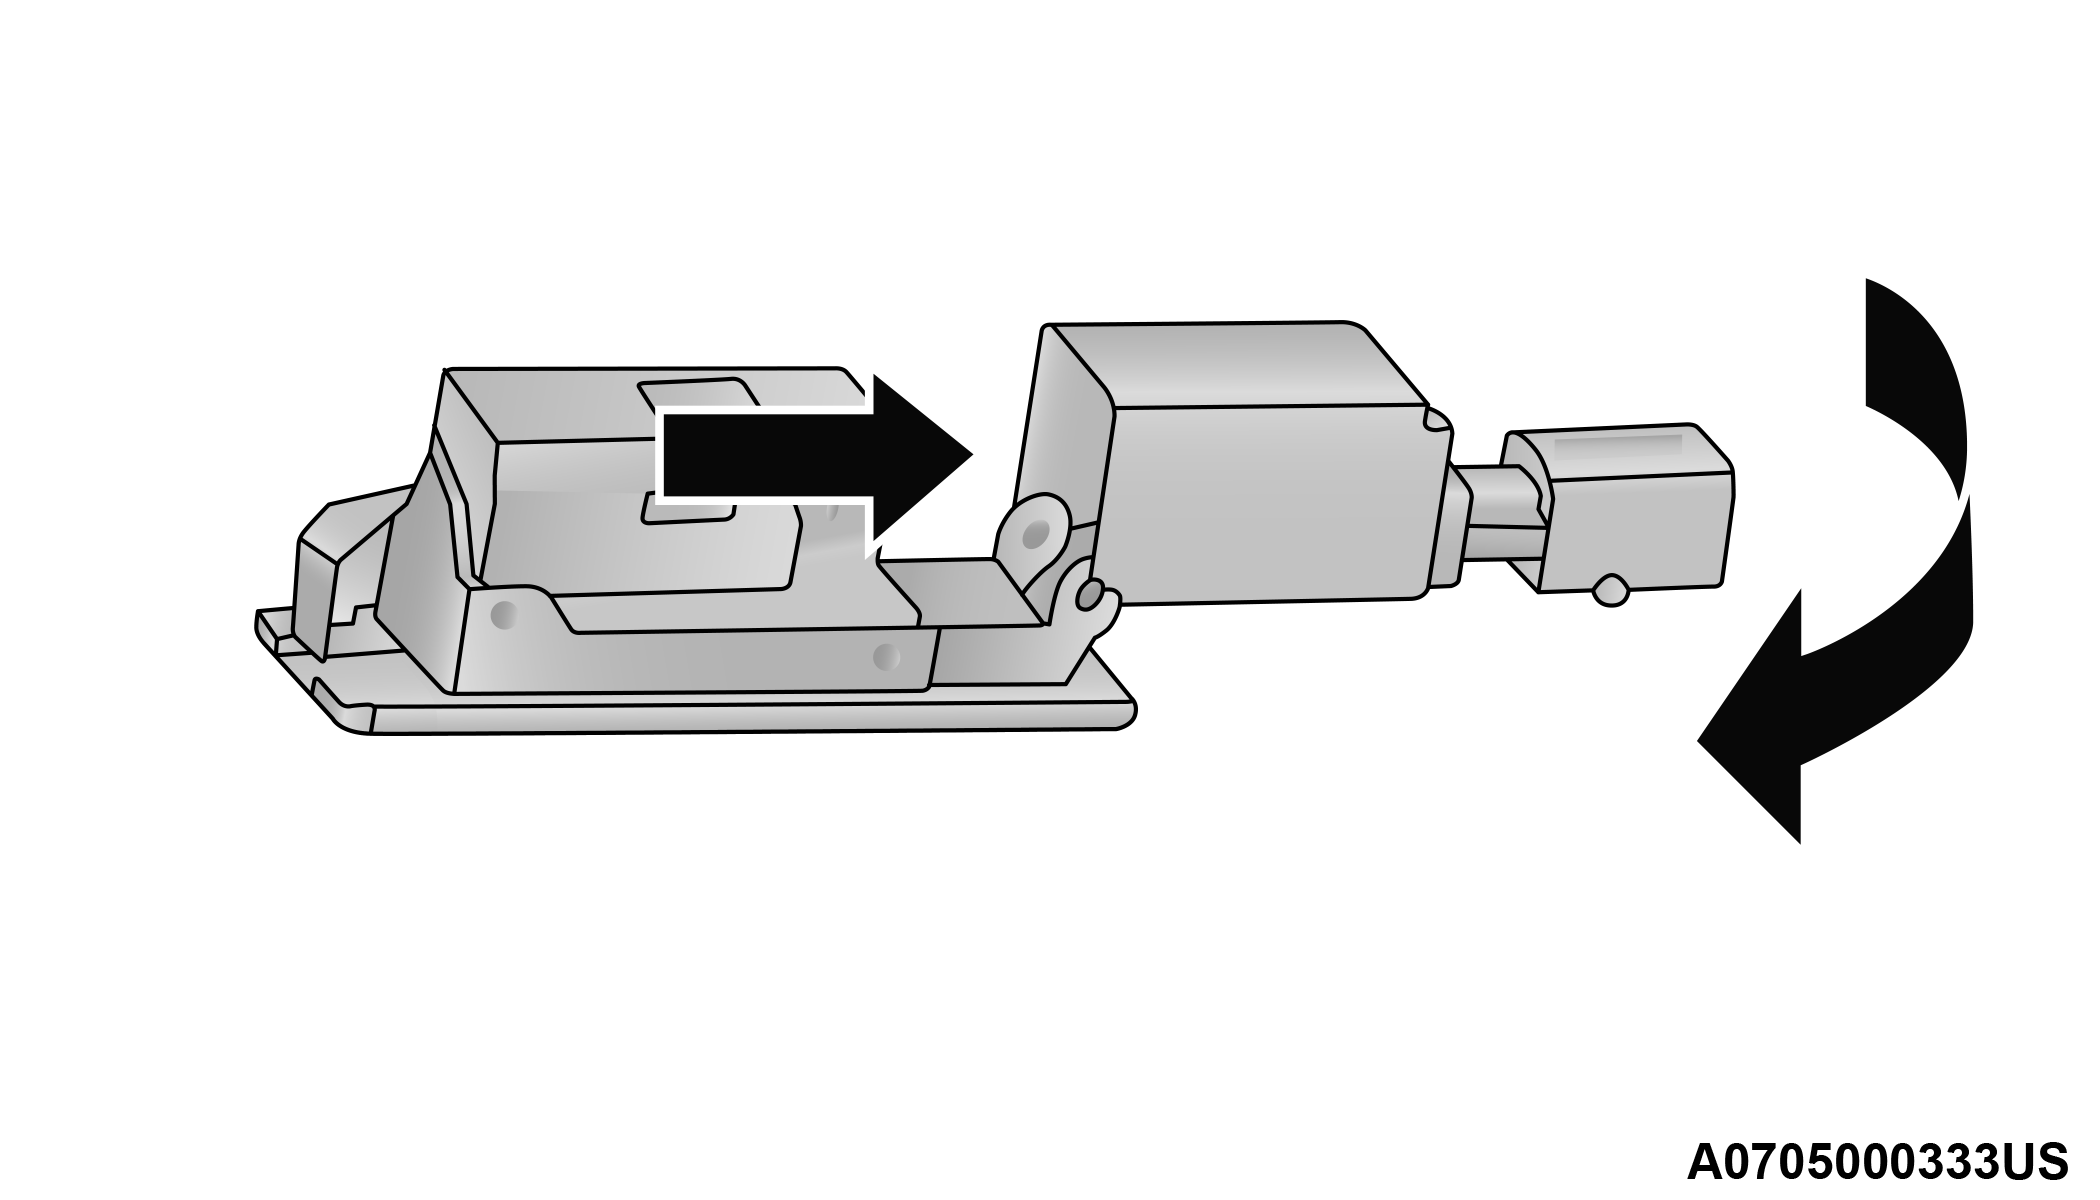
Light Cover
3. Close the light cover over the bulb.
4. Reinstall the dome light in its correct position.
WARNING:
-
Before proceeding with the replacement of the lamp wait for the exhaust pipes are cool: DANGER OF BURNS!
-
Modifications or repair of the electrical system performed incorrectly and without taking into account the technical characteristics can cause malfunctions with the risk of fire.
-
Halogen lamps contain gas under pressure, in the event of breakage be careful of the projection of fragments of glass.
-
Halogen lamps must be handled by touching only the metallic part. If the transparent bulb is in contact with the fingers, reduces the intensity of the emitted light and you can also affect the life of the lamp. In case of accidental contact, rub the bulb with a cloth dampened with alcohol and allow to dry.
Download Manual