Changing bulbs for rear lights in side panel
Overview of rear lights
Rear lights in side panel
- • Brake lights
- • Turn signals
The following instructions for changing the bulb refer to the left side of the vehicle. Follow the same procedure for changing the bulb on the other side of the vehicle.
Removing rear light
To change the bulbs, you must remove the rear light. Removing the light requires a certain degree of practical skill.
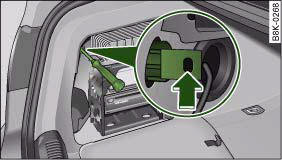
Luggage compartment: Location of retaining screw for rear light
Removing rear light from side panel
– Check which of the bulbs is defective.
– Open the boot lid.
– Remove the side trim.
– Insert the screwdriver (from the tool kit) through the side opening in the plastic screw ⇒ fig. 302.
– Turn the screwdriver anti-clockwise to loosen the screw and then carefully remove the screw.
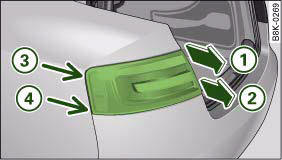
– Gradually ease the light housing out of the rubber mountings (positions ⇒ fig. 303 3 and 4) by pulling alternately in direction of arrows 1 and 2. If necessary use the tool for changing bulbs from your vehicle's toolkit to carefully apply some pressure between positions 3 and 4 ⇒ !.
– Unplug the electrical connector.
– Change the defective bulb.
![]() Caution
Caution
When removing or installing the rear light, take care not to cause any damage.
- • Removing the rear light in particular can lead to the paintwork or rear light becoming damaged. This is another reason why we recommend having the bulbs changed by a qualified workshop.
- • NEVER use metal tools (e.g. a screwdriver) or sharp or pointed plastic tools to lever out the rear light - risk of damaging the paint.
![]() Note
Note
Make sure you have a soft cloth ready to place under the glass on the rear light, to avoid any scratches.
Changing bulbs
All bulbs can be changed easily after removing the rear light.
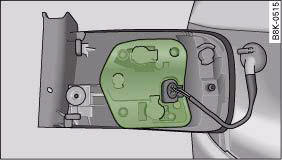
Rear light, mounting plate is highlighted
– Detach the bulb carrier.
– Renew the defective bulb (pull to remove from plug-in holder or turn to remove from bayonet holder).
– Attach the bulb carrier.
– Re-install the rear light.
Installing rear light
The rear light is easy to re-install.
Installing rear light
To re-install the rear light, follow the steps for removal in reverse sequence.
– Plug in the electrical connector. Make sure you hear it click into place.
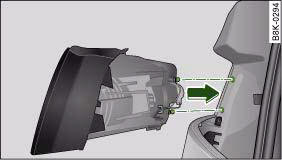
– Insert the rear light into the rear light carrier ⇒ fig. 305.
– Press the rear light into the two rubber mountings as far as it will go. The rear light must be flush with the body contour.
– Use the screw to secure the rear light from the luggage compartment.
– Make sure that all bulbs for the rear lights are working.
![]() Caution
Caution
Take care when installing the rear light to make sure there is no damage to the paintwork or any of its components.
Download Manual