Wheel change
 Introduction
Only change the wheel yourself if the vehicle is parked securely, you are familiar with the safety precautions and the necessary procedures and you have the necessary tools. Some vehicles are delivered from the factory without a vehicle jack and lug wrench. In such cases, have the wheel changed by an authorized Volkswagen dealer or authorized Volkswagen Service Facility. Volkswagen recommends contacting an authorized Volkswagen dealer or authorized Volkswagen Service Facility.
The vehicle jack supplied by the factory is only designed for changing one wheel that has a damaged tire and must be replaced. If both tires on one side of the vehicle, both tires on one axle, or all tires are damaged, contact an authorized Volkswagen dealer or authorized Volkswagen Service Facility for assistance. Volkswagen recommends contacting an authorized Volkswagen dealer or authorized Volkswagen Service Facility.
 WARNING
Changing a wheel can be dangerous, especially when done on the side of the road. To reduce the risk of serious injuries, observe the following:
-
Stop the vehicle as soon as it is safe to do so. Park the vehicle a safe distance away from moving traffic to change the wheel.
-
All passengers, especially children, must keep a safe distance and be outside of the work area when changing a wheel.
-
Switch on the emergency flashers to warn other road users.
-
Make sure the vehicle is on level and solid ground. If necessary, place a large, stable surface under the jack.
-
Only carry out the wheel change yourself if you are familiar with the necessary steps. Instead, seek assistance from an authorized Volkswagen dealer or authorized Volkswagen Service Facility. Volkswagen recommends contacting an authorized Volkswagen dealer or authorized Volkswagen Service Facility.
-
Only use suitable and undamaged tools for wheel changes.
-
Always switch off the engine and move the selector lever to the P position to reduce the risk of the vehicle moving unintentionally.
With a manual transmission, leave the vehicle in gear to reduce the risk of the vehicle moving unintentionally.
-
Set the electronic parking brake.
-
After changing a wheel, immediately check the tightening torque of the wheel bolts with an undamaged torque wrench that is functioning correctly.
-
If your vehicle is equipped with a Tire Pressure Monitoring System, you must recalibrate the system immediately after a wheel is changed ⇒ Tire Pressure Monitoring System.
Preparations for changing a wheel
Please read the introductory information and heed the Warnings and Notice ⇒  Introduction.
Checklist
Always perform the following steps in the specified order to prepare for a wheel change ⇒ :
-
If the vehicle has a flat tire, park the vehicle a safe distance away from moving traffic on level and solid ground as soon as possible.
-
Set the electronic parking brake.
-
Automatic transmission: move the selector lever into the P position.
-
Stop the engine and switch the ignition off.
-
Remove the vehicle key from the ignition lock.
-
Manual transmission: engage a gear.
-
Have all vehicle occupants exit the vehicle on the side facing away from traffic and move to a safe area.
-
Turn on the emergency flashers and set up the warning triangle ⇒ Securing yourself and the vehicle. Follow any applicable laws.
-
Block the tire that is diagonal from the one you will be changing with a stone, chocks, or another suitable object.
-
If the luggage compartment is full: remove the contents from the luggage compartment.
-
Where applicable, remove the subwoofer ⇒ Subwoofer.
-
Remove the collapsible spare wheel, full-size spare wheel or compact spare wheel and the vehicle tool kit from the luggage compartment.
-
Remove the wheel covers ⇒ Wheel covers.
WARNING
Failing to heed this checklist that is provided for your own safety can cause accidents and serious injuries.
-
Always follow the tasks in the checklist.
-
Observe the general safety precautions.
Wheel bolts
Please read the introductory information and heed the Warnings and Notice ⇒ Introduction.
Loosening wheel bolts

Fig. 176 Changing a tire: loosening the wheel bolts.
Use a suitable lug wrench to loosen the wheel bolts.
Only loosen the wheel bolts a few turns while the vehicle is not raised with the vehicle jack.
-
Slide the lug wrench all the way onto the wheel bolt fig. 176.
-
Hold the end of the lug wrench and turn the wheel bolt about one turn counterclockwise ⇒
.Or: if a wheel bolt cannot be loosened, carefully press on the end of the lug wrench using your foot. Hold onto the vehicle firmly while doing this and make sure you have secure footing.
Wheel bolt tightening specification
Tightening specification for wheel bolts in steel and aluminum alloy rims:
-
88 ft-lbs (120 Nm).
Wheel bolts that are corroded and difficult to turn must be replaced and the threads in the wheel hub must be cleaned before checking the tightening torque.
Never grease or oil the wheel bolts and the threads in the wheel hub.
Check the tightening torque using a functioning torque wrench immediately after changing a wheel.
WARNING
Wheel bolts that are tightened incorrectly can loosen while driving and cause accidents, serious injuries, and loss of vehicle control.
-
The wheel bolts and threads in the wheel hub must be clean, easy to move, and free of oil and grease.
-
Always use only the lug wrench to loosen and secure the wheel bolts that have been attached to the vehicle at the factory.
-
Only loosen the wheel bolts about one turn while the vehicle is not lifted with the jack.
-
Never grease or oil the wheel bolts and the threads in the wheel hub. Even when tightened to the specification, they could become loose while driving.
-
Never loosen the bolts on rims with a bolted rim ring.
-
Check the tightening torque regularly with a torque wrench. If the wheel bolts are not tightened enough to meet the specification, the wheel bolts and rims could come loose while driving. Exceeding the tightening specification could damage the wheel bolts and threads.
WARNING
Incorrect wheel bolts can loosen while driving and cause accidents, serious injuries, and loss of vehicle control.
-
Only use wheel bolts that are intended to be used with the rim.
-
Never use different wheel bolts.
Subwoofer

Fig. 177 In the luggage compartment: Removing the subwoofer.
The subwoofer must be removed before the spare wheel can be removed.
Removing the subwoofer
-
Remove the luggage compartment floor.
-
Unscrew the handwheel
 in the direction of the arrow.
 -
To release the connector
 , press the locking mechanism on the end of the connector.
 -
Detach the plug
in the direction of the arrows and put the electrical wire to one side. -
Lift the subwoofer out carefully.
Installing the subwoofer
-
Place the subwoofer carefully in the rim well. The point of the “FRONT” fig. 177 arrow symbol on the subwoofer must face forward
-
Connect the connector fig. 177 until the catch latches into place.
-
Turn the handwheel fig. 177 on the threaded pin in the opposite direction to the arrow until the subwoofer is securely fastened.
-
Place the luggage compartment floor on the floor covering.
Spare wheel or compact spare wheel

Fig. 178 In the luggage compartment: handle to secure the compact spare wheel.
Removing the spare wheel, collapsible spare wheel or compact spare wheel
-
Open the trunk lid.
-
Lift up the luggage compartment floor and remove it.
-
Remove the vehicle tool kit with the container.
-
If necessary, remove the subwoofer ⇒ Subwoofer.
-
Remove the locking wedge fig. 178
upward. -
Turn the handwheel in the center of the spare wheel fig. 178
all the way counterclockwise. -
Remove the spare wheel, collapsible spare wheel, or compact spare wheel.
Stowing the removed tire
-
Open the trunk lid.
-
Lift up the luggage compartment floor and remove it.
-
If the removed wheel fits in the spare wheel well: place the removed wheel with rim down into the spare wheel well so that the center hole on the rim is directly above the hole or the threaded pin.
If the removed wheel does not fit in the spare wheel well, the wheel must be securely stowed in the luggage compartment on the luggage compartment floor.
-
Turn the handwheel clockwise on the threaded pin until the removed wheel is securely fastened.
-
Position the locking wedge fig. 178
in the slot on the threaded pin so that the handwheel cannot turn. -
Place the vehicle tool kit back in the container and stow it in the luggage compartment.
-
If necessary, place the luggage compartment floor in the luggage compartment.
-
Close the trunk lid.
If the spare wheel is different from the regular tires
If the spare wheel is different from the regular wheels, then the spare wheel must only be used in the event of a vehicle breakdown and only for a short period of time → .
Note the driver information:
-
Do not drive faster than 50 mph (80 km/h).
-
Avoid hard acceleration, heavy braking, and fast cornering.
-
Do not use snow chains on the compact spare wheel ⇒ Snow chains.
-
After installing the spare wheel or compact spare wheel, check the tire pressure as soon as possible ⇒ Tire pressure.
The tire pressure of the spare wheel, compact temporary spare wheel or temporary spare wheel must be checked every time the tire pressure of the regular wheels is taken, or at least once a month. The tire pressure of the spare wheel, compact spare wheel or temporary spare wheel when the tires are cold must correspond to the details on the tire inflation pressure label ⇒ Tire pressure.
WARNING
Incorrect handling of the spare wheel or compact spare wheel can result in loss of vehicle control, collisions, or other accidents, and serious injuries.
-
Never use the spare wheel or compact spare wheel if it is damaged or if it is worn down to the wear indicator.
-
Some vehicles may be equipped with a compact spare wheel instead of a spare wheel. The compact spare wheel can be identified by a label stating “80 km/h” or “50 mph”. This label indicates the permitted maximum speed at which the tire may be driven. Cover the sticker while the wheel is in use.
-
Never drive faster than 50 mph (80 km/h).
-
Never drive more than 125 miles (200 km) with a temporary compact spare wheel fitted to the drive axle.
-
Avoid hard acceleration, hard braking, and driving fast around curves.
-
Replace the compact spare wheel as soon as possible with a regular wheel. The spare wheel is only intended for short-term use.
-
Always secure the compact spare wheel with the wheel bolts supplied by the factory.
-
Never drive with more than one spare wheel that differs from the regular tires.
-
After mounting the compact spare wheel,check the tire pressure as soon as possible ⇒ Tire pressure.
-
Do not use snow chains on the compact spare wheel.
Raising the vehicle with the vehicle jack
Please read the introductory information and heed the Warnings and Notice ⇒ Introduction.
Lift points

Fig. 179 Lift points for the vehicle jack (variant 1).
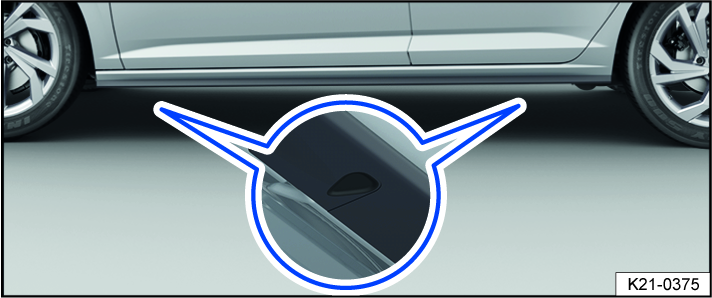
Fig. 180 Lift points for the vehicle jack (variant 2).
The vehicle jack must only be positioned at the reinforced areas on the underbody that are located behind the markings on the vehicle body fig. 179 or fig. 180. The lift point that is nearest the affected tire should be used ⇒ .
Positioning the jack (variant 1)

Fig. 181 Correct jack setup (variant 1).

Fig. 182 Jack positioned on the left side of the vehicle at the rear (variant 1).
Positioning the jack (variant 2)
Fig. 183 Correct jack setup (variant 2).

Fig. 184 Jack positioned on the left side of the vehicle at the rear (variant 2).
Checklist
For your own safety, follow the points below in the order they are given ⇒ :
-
Select an area where the ground is level and firm for raising the vehicle.
-
Adjust the steering wheel so that the wheels are not pointing straight forward.
-
Stop the engine.
-
Move the selector lever of the automatic transmission into the P position.
Or: engage a gear on the manual transmission.
-
Set the electronic parking brake.
-
Block the tire that is diagonal from the one you will be changing with chocks or other suitable objects.
-
Loosen the wheel bolts ⇒ Wheel bolts.
-
Position the hand crank in the mount on the jack.
-
Find the vehicle lift point fig. 179 or fig. 180 under the vehicle that is closest to the wheel you will be changing.
-
Crank the jack upward so that it is still positioned under the vehicle lift point.
-
Make sure the entire base of the jack is seated securely on the ground and that the base of the jack is located exactly directly below the lift point fig. 181 and fig. 182 or fig. 183 and fig. 184.
-
Straighten out the vehicle jack and continue raising the bracket on the top of the jack until the bracket is positioned on the vehicle lift point under the vehicle fig. 182 or fig. 184.
-
Continue raising the vehicle jack until the wheel is lifted off the ground.
WARNING
Using the vehicle jack incorrectly can result in the vehicle slipping from the jack and causing serious injuries. To reduce the risk of injuries, observe the following:
-
Never raise the vehicle if more than one tire is damaged.
-
Never raise the vehicle while the engine is running or while the vehicle is on ground that is tilted to the side or sloping.
-
Never allow the engine to be started if the vehicle is raised. Engine vibrations could cause the vehicle to fall off the jack.
-
Only place the vehicle jack at the lift points described. The bracket on the vehicle jack must firmly grip the sill fig. 179 or fig. 180.
-
Only use jacks that are approved by Volkswagen for the vehicle. Other vehicle jacks, including those approved for other Volkswagen models, could slip.
-
The ground must be level and firm. Sloped or soft ground can cause the vehicle to slip off the jack. If necessary, place a large, stable surface under the jack.
-
If you are on a slippery surface such as tile, place a non-slippery object such as a rubber mat on the ground to prevent the jack from slipping.
-
Never place any part of your body such as your arm or leg under the vehicle when it is supported only by the jack.
-
If you must work underneath the vehicle, additionally support the vehicle securely with suitable stands.
WARNING
Failing to heed this checklist that is provided for your own safety can cause accidents and serious injuries.
-
Always follow the activities in the checklist and follow the general safety precautions.
Changing a wheel
Please read the introductory information and heed the Warnings and Notice ⇒ Introduction.
Removing a wheel
Fig. 185 Wheel change: removing wheel bolts with the lug wrench.
-
Follow the checklist ⇒ Preparations for changing a wheel.
-
Loosen the wheel bolts ⇒ Wheel bolts.
-
Raise the vehicle ⇒ Raising the vehicle with the vehicle jack.
-
Remove loose wheel bolts completely using the lug wrench fig. 185 and place the bolts on a clean surface.
-
Remove the wheel.
Installing a spare wheel or compact spare wheel
-
Note the running direction of the tire ⇒ Tire labeling and tire classifications.
-
Position the wheel.
-
Install all other bolts clockwise and lightly tighten.
-
Lower the vehicle with the vehicle jack.
-
Tighten all wheel bolts securely clockwise using the lug wrench ⇒
. Do not go in order around the wheel while doing this, but rather always switch to a wheel bolt on the opposite side. -
Mount the caps, center wheel covers, or full wheel covers ⇒ Wheel covers.
After a wheel change
-
Clean the vehicle tool kit and place it back in the foam piece in the luggage compartment.
-
Stow the old wheel securely in the luggage compartment.
-
Always check the wheel bolt tightening torque ⇒ Wheel bolts.
-
Always have the damaged wheel replaced as soon as possible.
WARNING
An incorrect tightening torque or incorrectly treated wheel bolts can cause the driver to lose control of the vehicle and cause accidents and serious injuries.
-
Always keep all wheel bolts and threads in the wheel hubs clean and free of oil and grease. The wheel bolts must be easy to move and tightened to the tightening specification.
 The Tire Pressure Monitoring System (TPMS) indicator light may indicate a system malfunction after a wheel is changed ⇒ Troubleshooting the Tire Pressure Monitoring System.
Download Manual