Other interior features
position, flip it down.
To set the visor in the side posi- tion, flip down, unhook, and swing it to the side.
To use the side extender, place the visor in the side position, then slide it backward. (if equipped)
Slide the cover to open.
The vanity light turns on when the cover is opened.
If the vanity lights remain on for 20 minutes while the engine is off, the lights
will turn off automatically.
Adjusts the hours Adjusts the minutes
Rounds to the nearest hour*
*: e.g.1:00 to 1:29 1:00
1:30 to 1:59 2:00
6-4. Other interior features
393
(-40°C) to 122°F (50°C).
Type A Type B
Type C Type D
Vehicles without a smart key system The engine switch is in the“ON” position.
Vehicles with a smart key system
The engine switch is in IGNITION ON mode.
In the following situations, the correct outside temperature may not be dis- played, or the display may take longer than normal to change.
The system may be malfunctioning. Take your vehicle to your Toyota dealer.
394 6-4. Other interior features
Open the lid.
Vehicles without a smart key system
The engine switch is in the“ACC” or“ON” position.
Vehicles with a smart key system
The engine switch is in ACCESSORY or IGNITION ON mode.
6-4. Other interior features
395
ing can be used to support your body while sitting on the seat.
396 6-4. Other interior features
which can be programmed to operate 3 different devices. Refer to the programming methods on the following pages to determine the method which is appropriate for the device.
HomeLink® indicator light
Garage door operation indica- tors
Buttons
*: If equipped
6-4. Other interior features
397
though
must be performed within 60 seconds, other-
wise the indicator light will stop flashing and programming will not be able to be completed.
Press and release the HomeLink® button you want to program and check that the HomeLink® indicator light flashes orange.
Point the remote control transmitter for the device at the rear view mirror, 1 to 3 in. (25 to 75 mm) from the HomeLink® buttons.
Keep the HomeLink® indicator light in view while programming.
Programming a device other than an entry gate (for U.S.A. owners)
Press and hold the remote control transmitter button until the HomeLink® indicator light changes from slowly flashing orange to rapidly flashing green (rolling code) or continuously lit green (fixed code), then release the button.
Programming an entry gate (for U.S.A. owners)/Programming a device in the Canadian market
Press and release the remote control transmitter button at 2 sec- ond intervals, repeatedly, until the HomeLink® indicator light
changes from slowly flashing orange to rapidly flashing green (rolling code) or continuously lit green (fixed code).
398 6-4. Other interior features
Repeat the steps above to program another device for any of the remaining HomeLink® buttons.
2 or more people may be necessary to complete rolling code pro- gramming.
Locate the“Learn” or“Smart” button on the garage door opener motor in the garage.
This button can usually be found where the hanging antenna wire is attached to the unit. The name and color of the button may vary by manufacturer. Refer to the Owner’s manual supplied with the garage door opener motor for details.
Perform within 30 sec- onds after performing .
Press and hold the desired HomeLink® button (inside the vehicle) for 2 seconds and release it. Repeat this sequence (press/hold/ release) up to 3 times to complete programming.
If the garage door opener motor operates when the HomeLink® button is
pressed, the garage door opener motor recognizes the HomeLink® signal.
6-4. Other interior features
399
2-way communication is only available if the garage door opener motor used is a compatible device. (To check device compatibility, refer to www.HomeLink.com.)
Within 5 seconds after programming the garage door opener has been completed, if the garage door opener motor is trained to HomeLink®, both garage door operation indicators will flash rap- idly green and the light on the garage door opener motor will blink twice, indicating that 2-way communication is enabled.
If the indicators do not flash, perform and within the first 10 presses of the HomeLink® button after programming has been completed.
Press a programmed HomeLink® button to operate a garage door.
Within 1 minute of pressing the HomeLink® button, after the garage door operation has stopped, press the“Learn” or“Smart” button on the garage door opener motor. Within 5 seconds of the establishment of 2-way communication with the garage door opener, both garage door operation indicators in the vehicle will flash rapidly green and the light on the garage door opener motor will blink twice, indicating that 2-way communication is enabled.
400 6-4. Other interior features
With one hand, press and hold the desired HomeLink® button.
When the HomeLink® indicator starts flashing orange, continue to hold the HomeLink® button and perform“Programming Home- Link®” (it takes 20 seconds for the HomeLink® indicator to
start flashing).
Press the appropriate HomeLink® button. The HomeLink® indicator light should turn on.
The status of the opening and closing of a garage door is shown by the indicators.
Opening Closing
This function is only available if the garage door opener motor used is a compatible device. (To check device compatibility, refer to www.HomeLink.com.)
|
Color |
Status |
|
Orange (flashing) |
Currently opening/closing |
|
Green |
Opening/closing has completed |
|
Red (flashing) |
Feedback signals cannot be received |
buttons and or and simultane- ously. The last recorded status will be displayed for 3 seconds.
6-4. Other interior features
401
tons for 10 seconds until the HomeLink® indicator light changes from continuously lit orange to rapidly flashing green.
If you sell your vehicle, be sure to erase the programs stored in the HomeLink® memory.
For the U.S.A.
FCC ID: NZLAECHL5 NOTE:
This device complies with part 15 of the FCC Rules. Operation is subject to the following two conditions: (1) This device may not cause harmful interfer- ence, and (2) this device must accept any interference received, including interference that may cause undesired operation.
FCC WARNING:
Changes or modifications not expressly approved by the party responsible for compliance could void the user’s authority to operate the equipment.
For Canada NOTE:
This device complies with Industry Canada licence-exempt RSS standard(s).
Operation is subject to the following two conditions: (1) this device may not cause interference, and (2) this device must accept any interference, includ- ing interference that may cause undesired operation of the device.
REMARQUE:
Le present appareil est conforme aux CNR d’Industrie Canada applicables aux appareils radio exempts de licence. L’exploitation est autorisee aux deux conditions suivantes: (1) l’appareil ne doit pas produire de brouillage, et (2) l’utilisateur de l’appareil doit accepter tout brouillage radioelectrique subi, meme si le brouillage est susceptible d’en compromettre le fonctionnement.
402 6-4. Other interior features
Visit on the web at www.homelink.com/toyota or call 1-800-355-3515.
6-4. Other interior features
403
press the button for more than 3 seconds.
|
Display |
Direction |
|
N |
North |
|
NE |
Northeast |
|
E |
East |
|
SE |
Southeast |
|
S |
South |
|
SW |
Southwest |
|
W |
West |
|
NW |
Northwest |
*: If equipped
404 6-4. Other interior features
|
|
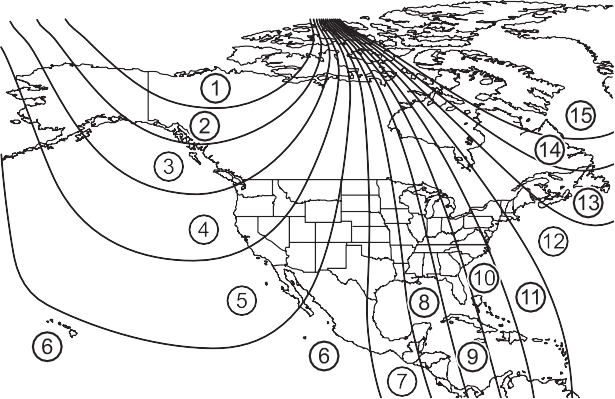

If you cross over a map boundary shown in illustration, the compass will deviate.
To obtain higher precision or perfect calibration, refer to the following.
Press and hold the button for 6 seconds.
A number (1 to 15) appears on the compass display.
If the direction is displayed several seconds after adjustment, the cali- bration is complete.
6-4. Other interior features
405
Press and hold the button for 9 seconds.
C appears on the compass dis- play.
(8 km/h) or less in a circle until a direction is displayed.
If there is not enough space to drive in a circle, drive around the block until the direction is dis- played.
406 6-4. Other interior features
The compass may not show the correct direction in the following conditions:
(There is a magnet or metal object near the inside rear view mirror.)
Download Manual