Vehicle Maintenance
BULB REPLACEMENT
REPLACEMENT BULBS, NAMES, AND PART NUMBERS
In the instance a bulb needs to be replaced, this section includes bulb description and replacement part numbers. All of the inside bulbs are brass or glass-wedge base. Aluminum base bulbs are not approved.
Note:
Please see an authorized dealer for LED replacement
|
Interior Bulbs |
|
|
Bulb Name |
Bulb Number |
|
Overhead Console Lamps |
TS 212–9 |
|
Dome Lamp |
7679 |
|
For lighted switches, see an authorized dealer for replacement instructions. |
|
|
Exterior Bulbs |
|
|
Bulb Name |
Bulb Number |
|
Low Beam (Halogen Reflector Headlamp) |
H11LL |
|
High Beam (Halogen Reflector Headlamp) |
9005LL |
|
Low & High Beam (Reflector Headlamp) |
LED |
|
Low & High Beam (Projector Headlamp) |
LED |
|
Turn Signal / Front Position (Halogen Reflector Headlamp) |
7444NA |
|
Turn Signal (Projector Headlamp) |
LED |
|
Front Position (Headlamps) |
LED |
|
Front Side Marker (Headlamps) |
LED |
|
Front Fog Lamps (Halogen Reflector Headlamp) |
H11LL |
|
Front Fog Lamps (Headlamps) |
LED |
|
Side Indicators (Front And Side View Mirror) |
LED |
|
Base Rear Tail/Turn and Stop Lamp |
3157K |
|
Premium Rear Tail/Turn and Stop Lamp |
LED |
|
Base Tail/Backup Lamp |
W21/5W |
|
Center High Mounted Stop Lamp (CHMSL) |
921 |
|
Cab Roof Marker Lamps |
LED |
|
Rear Lamp Bar ID Marker Lamp |
LED |
|
Side Marker Lamps (Dual Rear Wheels) |
LED |
|
Base Turn/Tail Lamp |
PWY24W |
|
Rear License Plate Lamp |
LED |
REPLACING EXTERIOR BULBS
BASE QUAD: LOW BEAM HEADLAMP, HIGH BEAM HEADLAMP, FRONT PARK AND TURN — IF EQUIPPED
Low Beam
See the following steps to replace:
-
Open the hood.
-
Disconnect and isolate the negative battery cable.
-
Reach into the front wheel house ahead of the front wheel, remove the fastener, and lift the cover over the access hole in the front of the wheel house splash shield. Access to the rear of the lamp can be gained through this access hole.
Splash Shield Access Cover
-
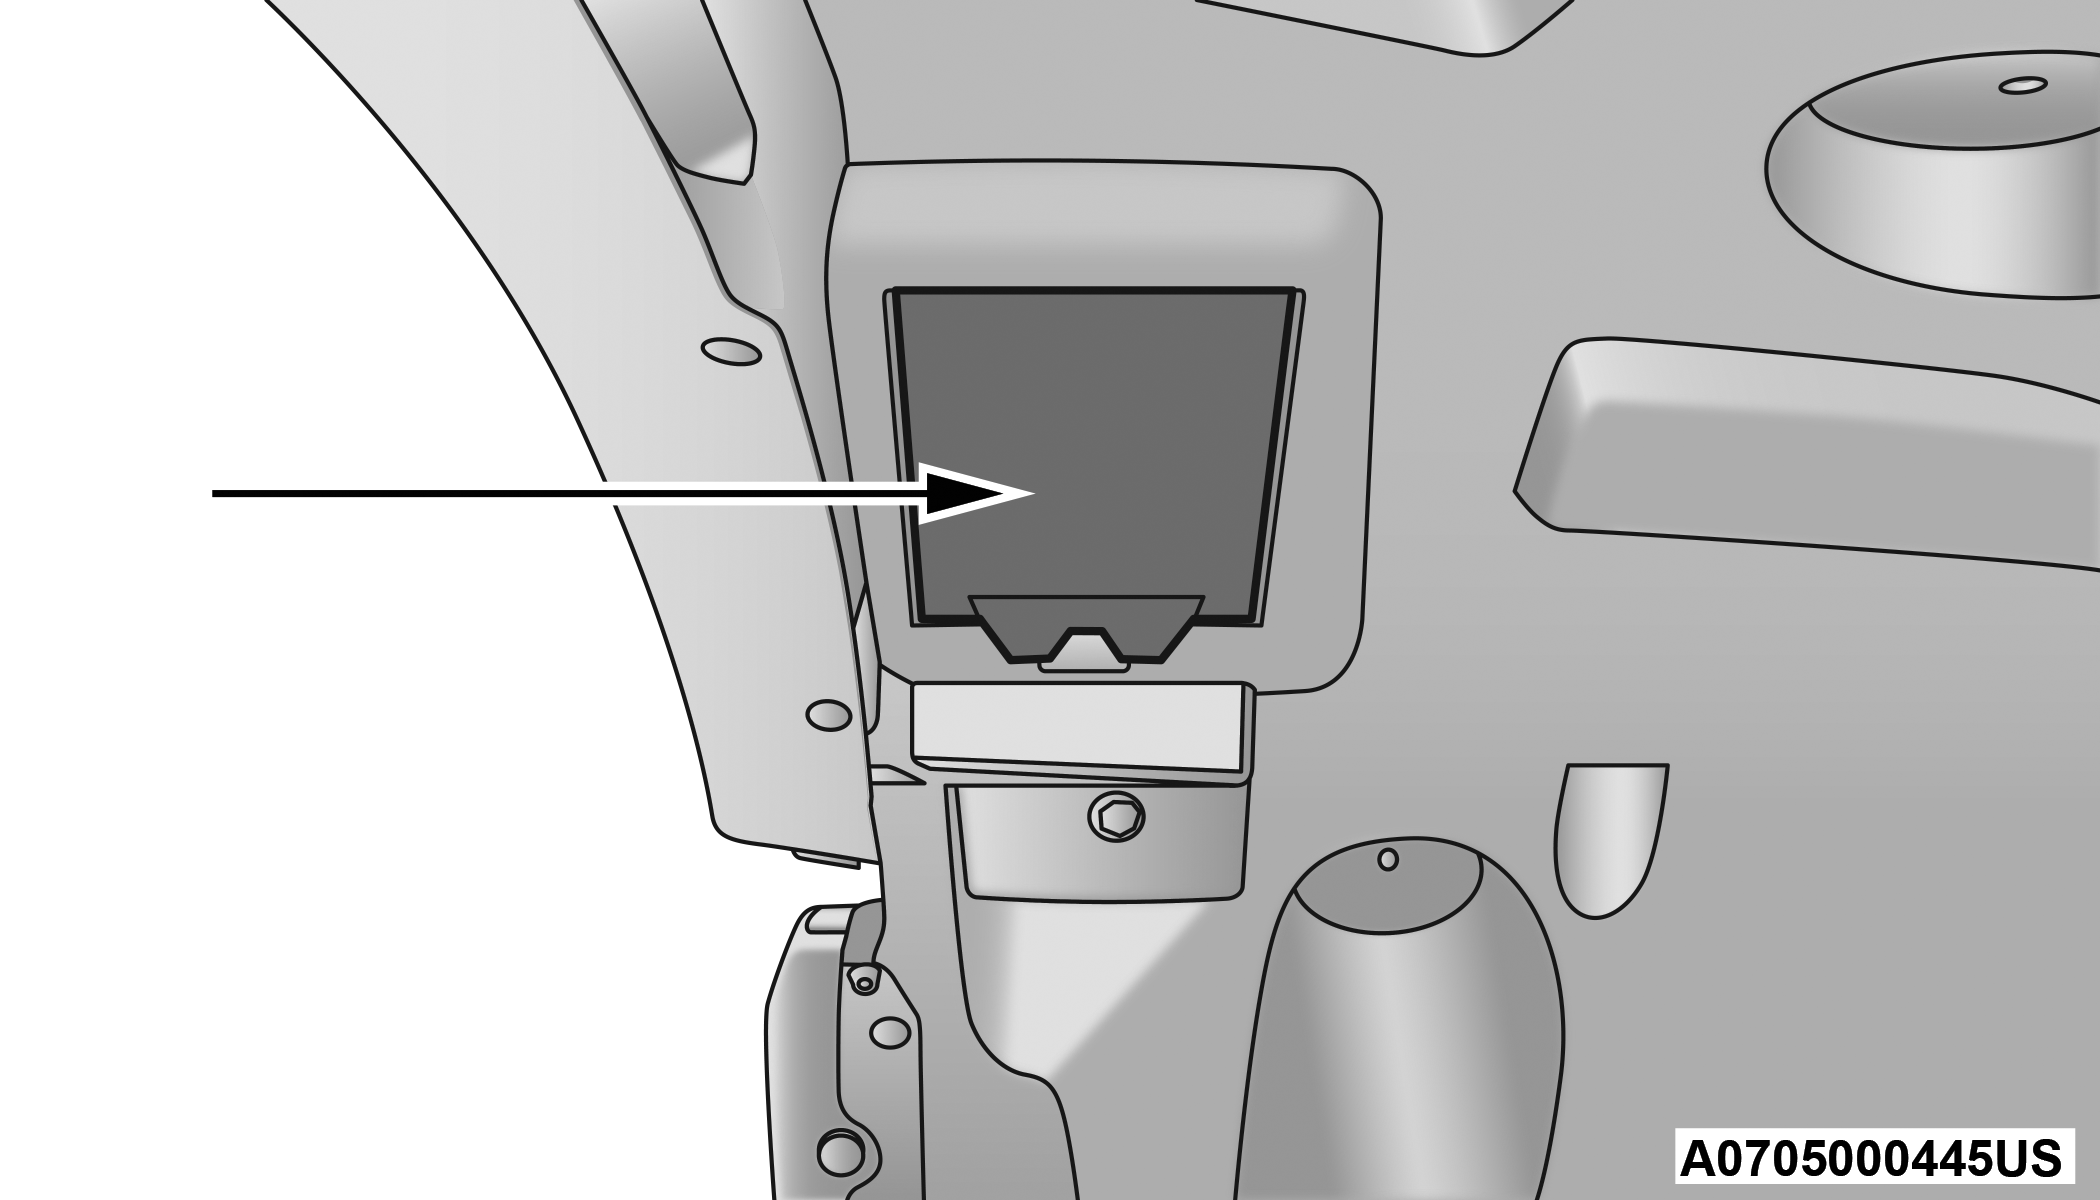
Reach through the access hole of the wheel house splash shield and disengage the bulb access cover by rotating counterclockwise.
Bulb Access Cover
-
Disconnect the internal lamp wiring harness connector from the low beam bulb.
CAUTION:
-
Do not contaminate the bulb glass by touching it with your fingers or by allowing it to contact other oily surfaces. Shortened bulb life will result.
-
Always use the correct bulb size and type for replacement. An incorrect bulb size or type may overheat and cause damage to the lamp, the bulb socket, or the lamp wiring.
-
-
Rotate the bulb counterclockwise a quarter turn to unlock the bulb from the lamp.
-
Pull the bulb straight out from the housing.
-
Reverse the procedure for installation of new bulb and covers.
High Beam
See the following steps to replace:
-
Open the hood.
-
Disconnect and isolate the negative battery cable.
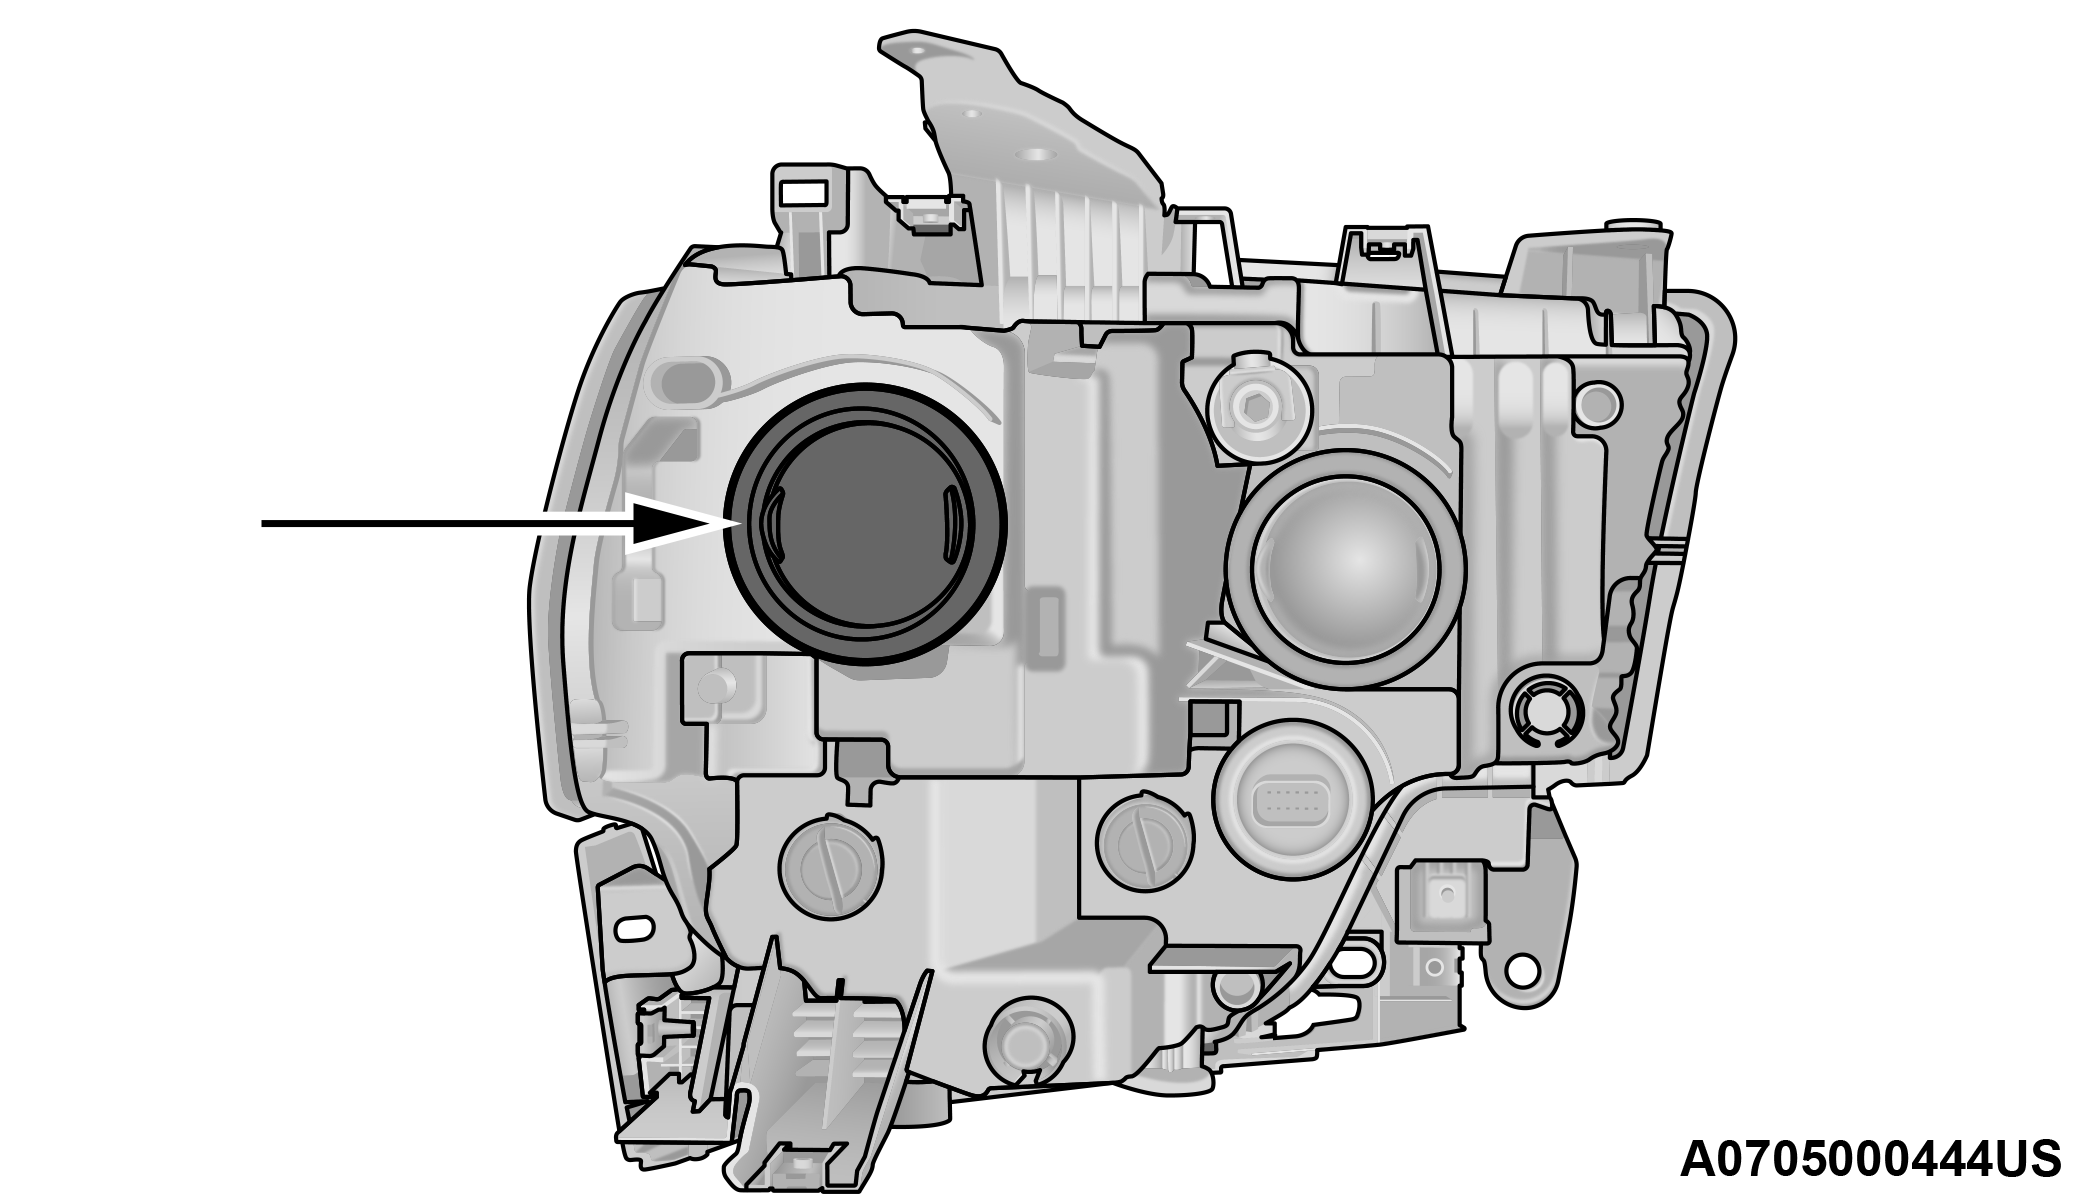
Bulb Access Cover
-
Look under the hood and behind the headlamp to find the high beam bulb access cover.
-
Reach behind the headlamp and disengage the access cover by rotating counterclockwise.
-
Disconnect the internal lamp wiring harness connector from the high beam bulb.
CAUTION:
-
Do not contaminate the bulb glass by touching it with your fingers or by allowing it to contact other oily surfaces. Shortened bulb life will result.
-
Always use the correct bulb size and type for replacement. An incorrect bulb size or type may overheat and cause damage to the lamp, the bulb socket, or the lamp wiring.
-
-
Rotate the bulb counterclockwise a quarter turn to unlock the bulb from the lamp.
-
Pull the bulb straight out from the housing.
-
Reverse the procedure for installation of new bulb and covers.
Outer Front Park And Turn
See the following steps to replace:
-
Open the hood.
-
Disconnect and isolate the negative battery cable.
-
Reach into the front wheel house ahead of the front wheel, remove the fastener, and lift the cover over the access hole in the front of the wheel house splash shield. Access to the rear of the lamp can be gained through this access hole.
Splash Shield Access Cover
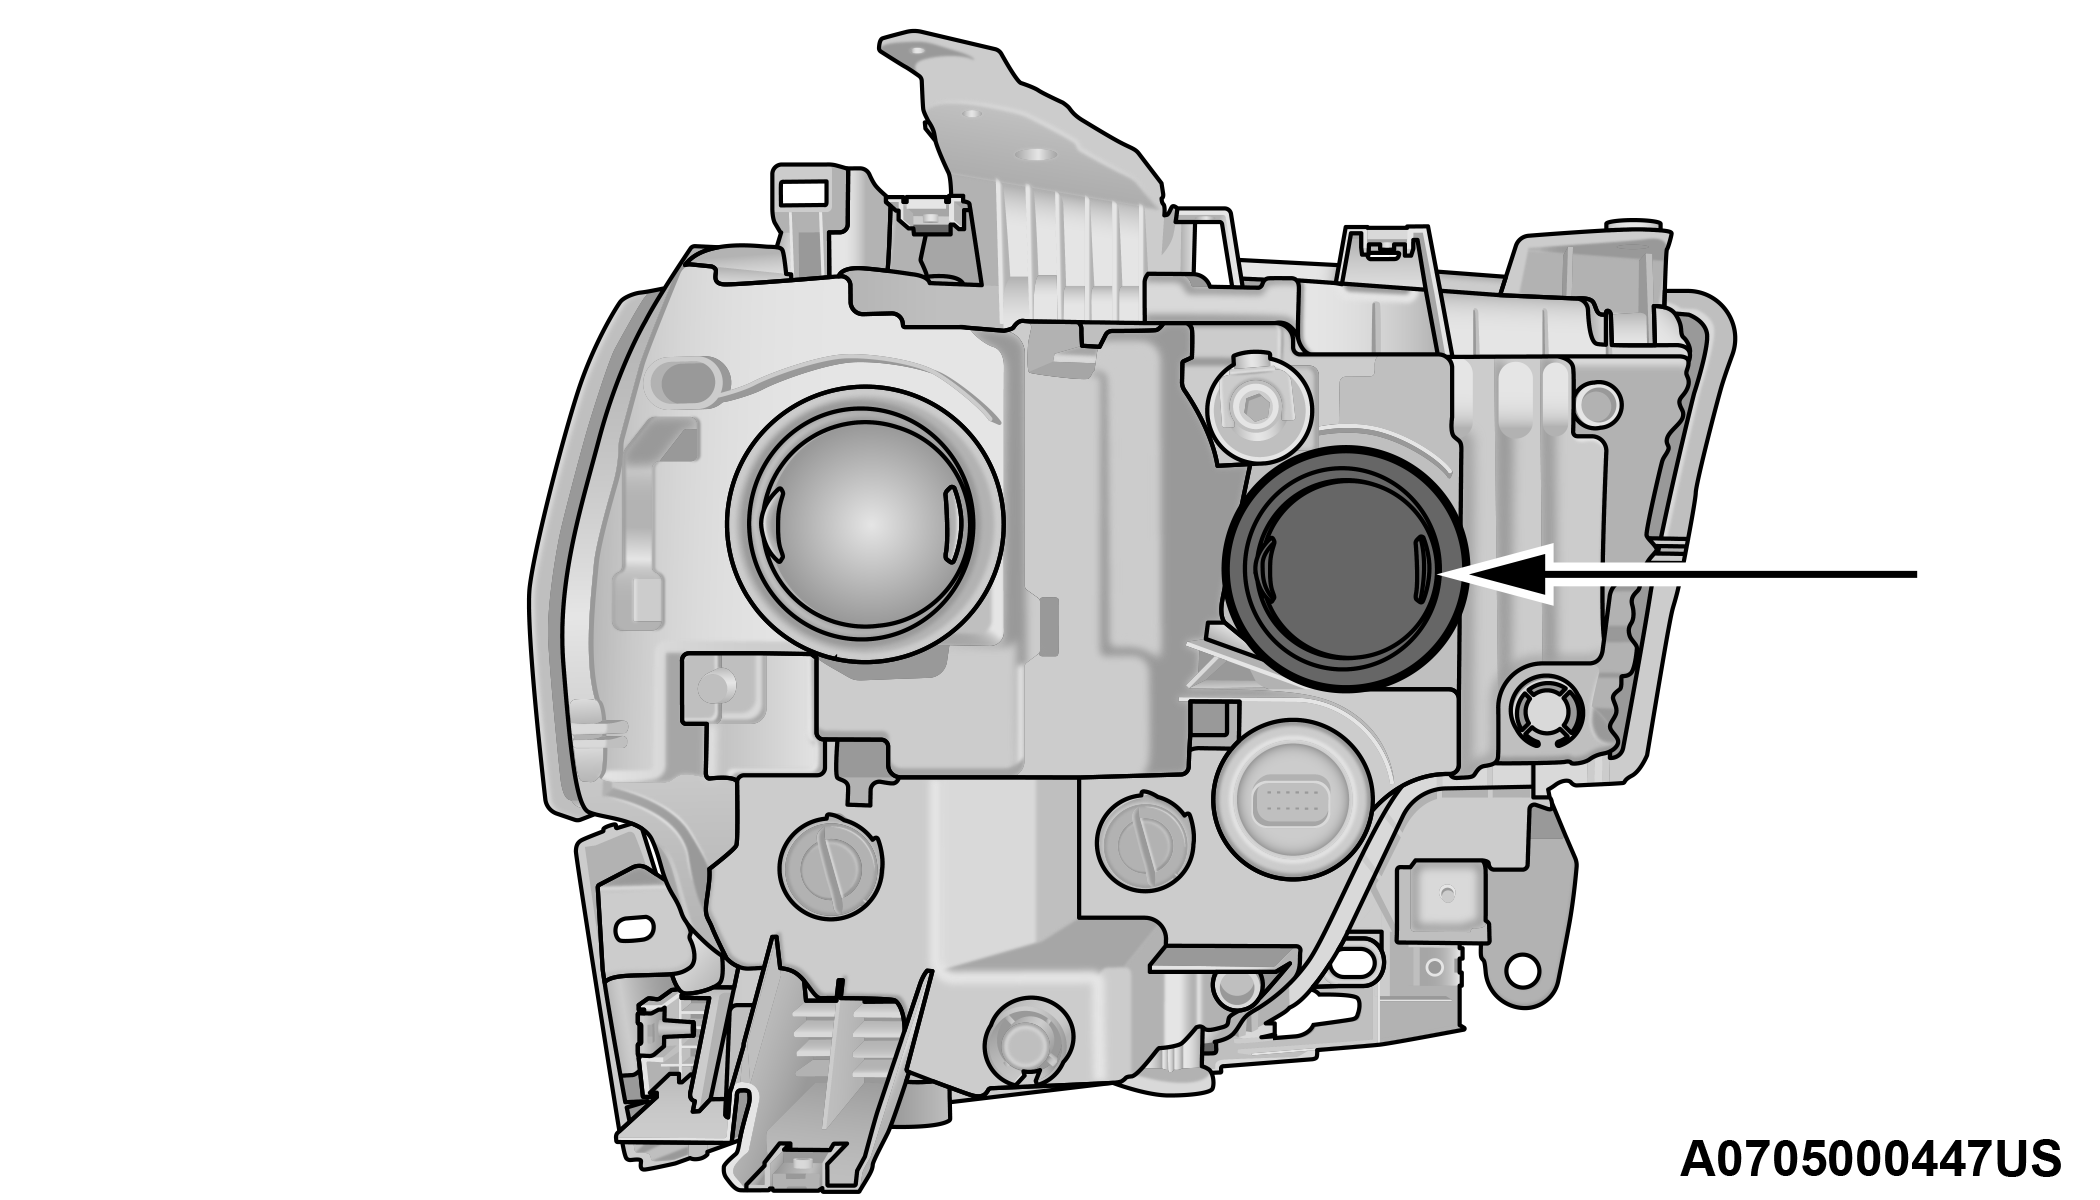
-
Reach through the access hole of the wheel house splash shield and disengage the side marker socket by rotating counterclockwise a quarter turn.
Park And Turn Sockets
-
Pull the socket and bulb straight out from the housing.
-
Separate the bulb from the socket without twisting.
-
Reverse the procedure for installation of new bulb and covers.
FOG LAMPS — IF EQUIPPED
Please see an authorized dealer for service on LED and Halogen front fog lamps.
Halogen
See the following steps to replace:
-
Reach under and behind the front fascia/bumper to access the back of the front fog lamp housing.
-
Disconnect the fog lamp wiring harness connector from the fog lamp bulb.
-
Rotate the bulb counterclockwise a quarter turn to unlock the bulb from the housing.
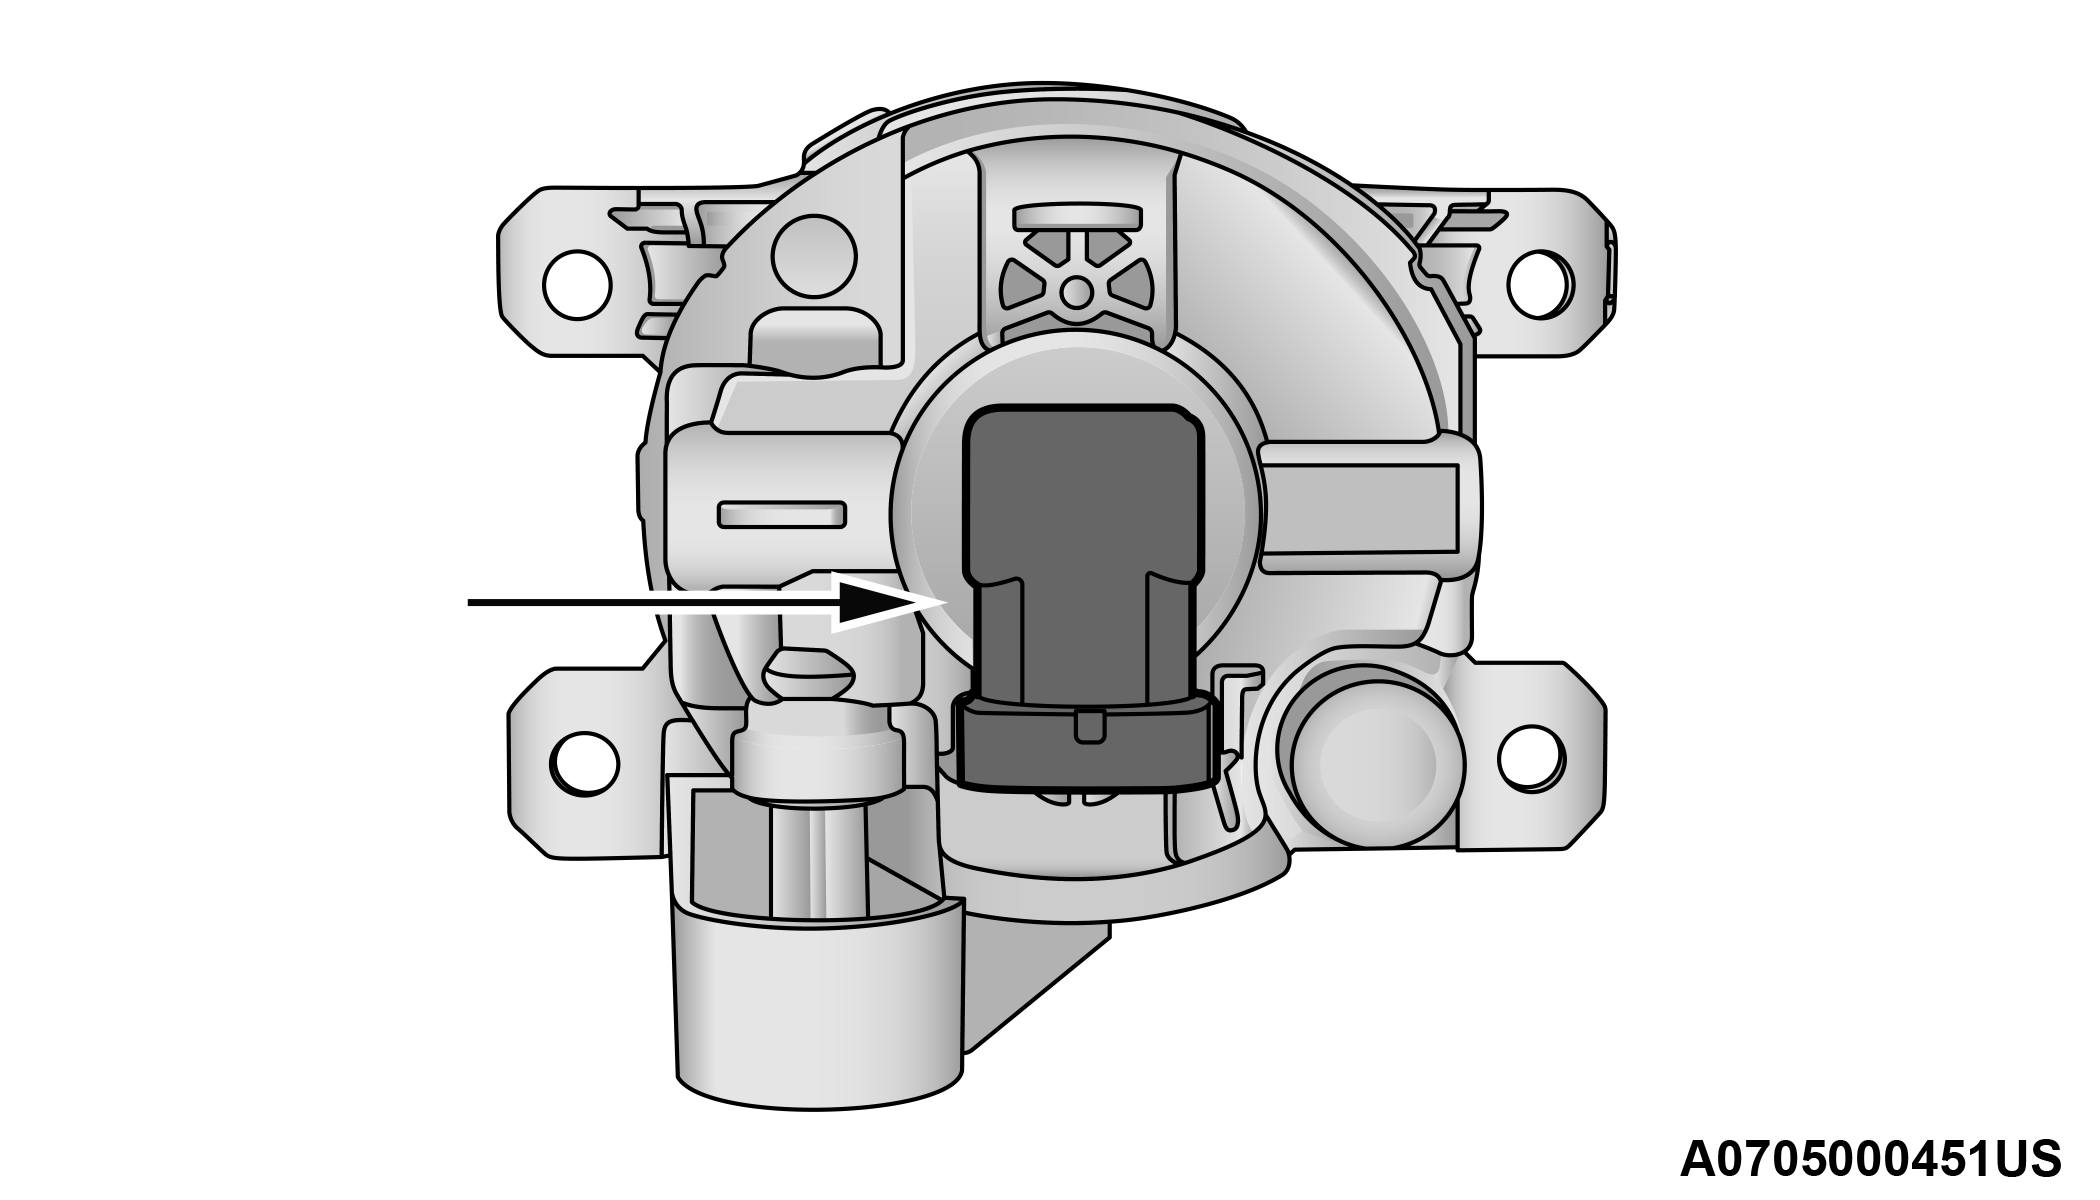
Fog Lamp Bulb
-
Pull the bulb straight out from the housing.
CAUTION:
Do not contaminate the bulb glass by touching it with your fingers or by allowing it to contact other oily surfaces. Shortened bulb life will result.
REAR TAIL/STOP, TURN SIGNAL AND BACKUP LAMPS
See the following steps to replace:
-
Remove the two screws and push pins that pass through the bed sheet metal.
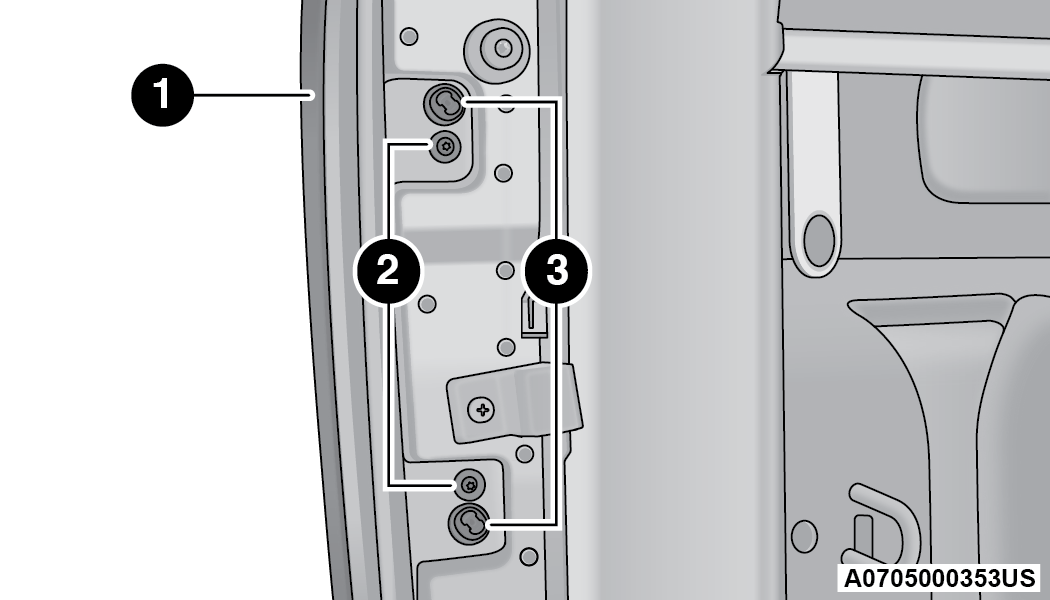
Tail Lamp Locations
1 — Tail Lamp 2 — Screws 3 — Fasteners -
Pull the outboard side of the lamp rearward far enough to unsnap the two receptacles on the outboard side of the lamp housing from the two plastic snap post retainers in the outer box side panel.
Tail Lamp Removed
-
Disconnect the wiring harness connectors from the bulb socket.
-
Rotate the bulb socket counterclockwise a quarter turn to unlock it from the housing.
-
Pull the bulb straight out of the socket.
CAUTION:
Do not contaminate the bulb glass by touching it with your fingers or by allowing it to contact other oily surfaces. Shortened bulb life will result.
-
Reverse the procedure to install the bulb and housing.
CENTER HIGH MOUNTED STOP LAMP (CHMSL) WITH CARGO LAMP
See the following steps to replace:
-
Remove the two screws holding the housing/lens to the body as shown.
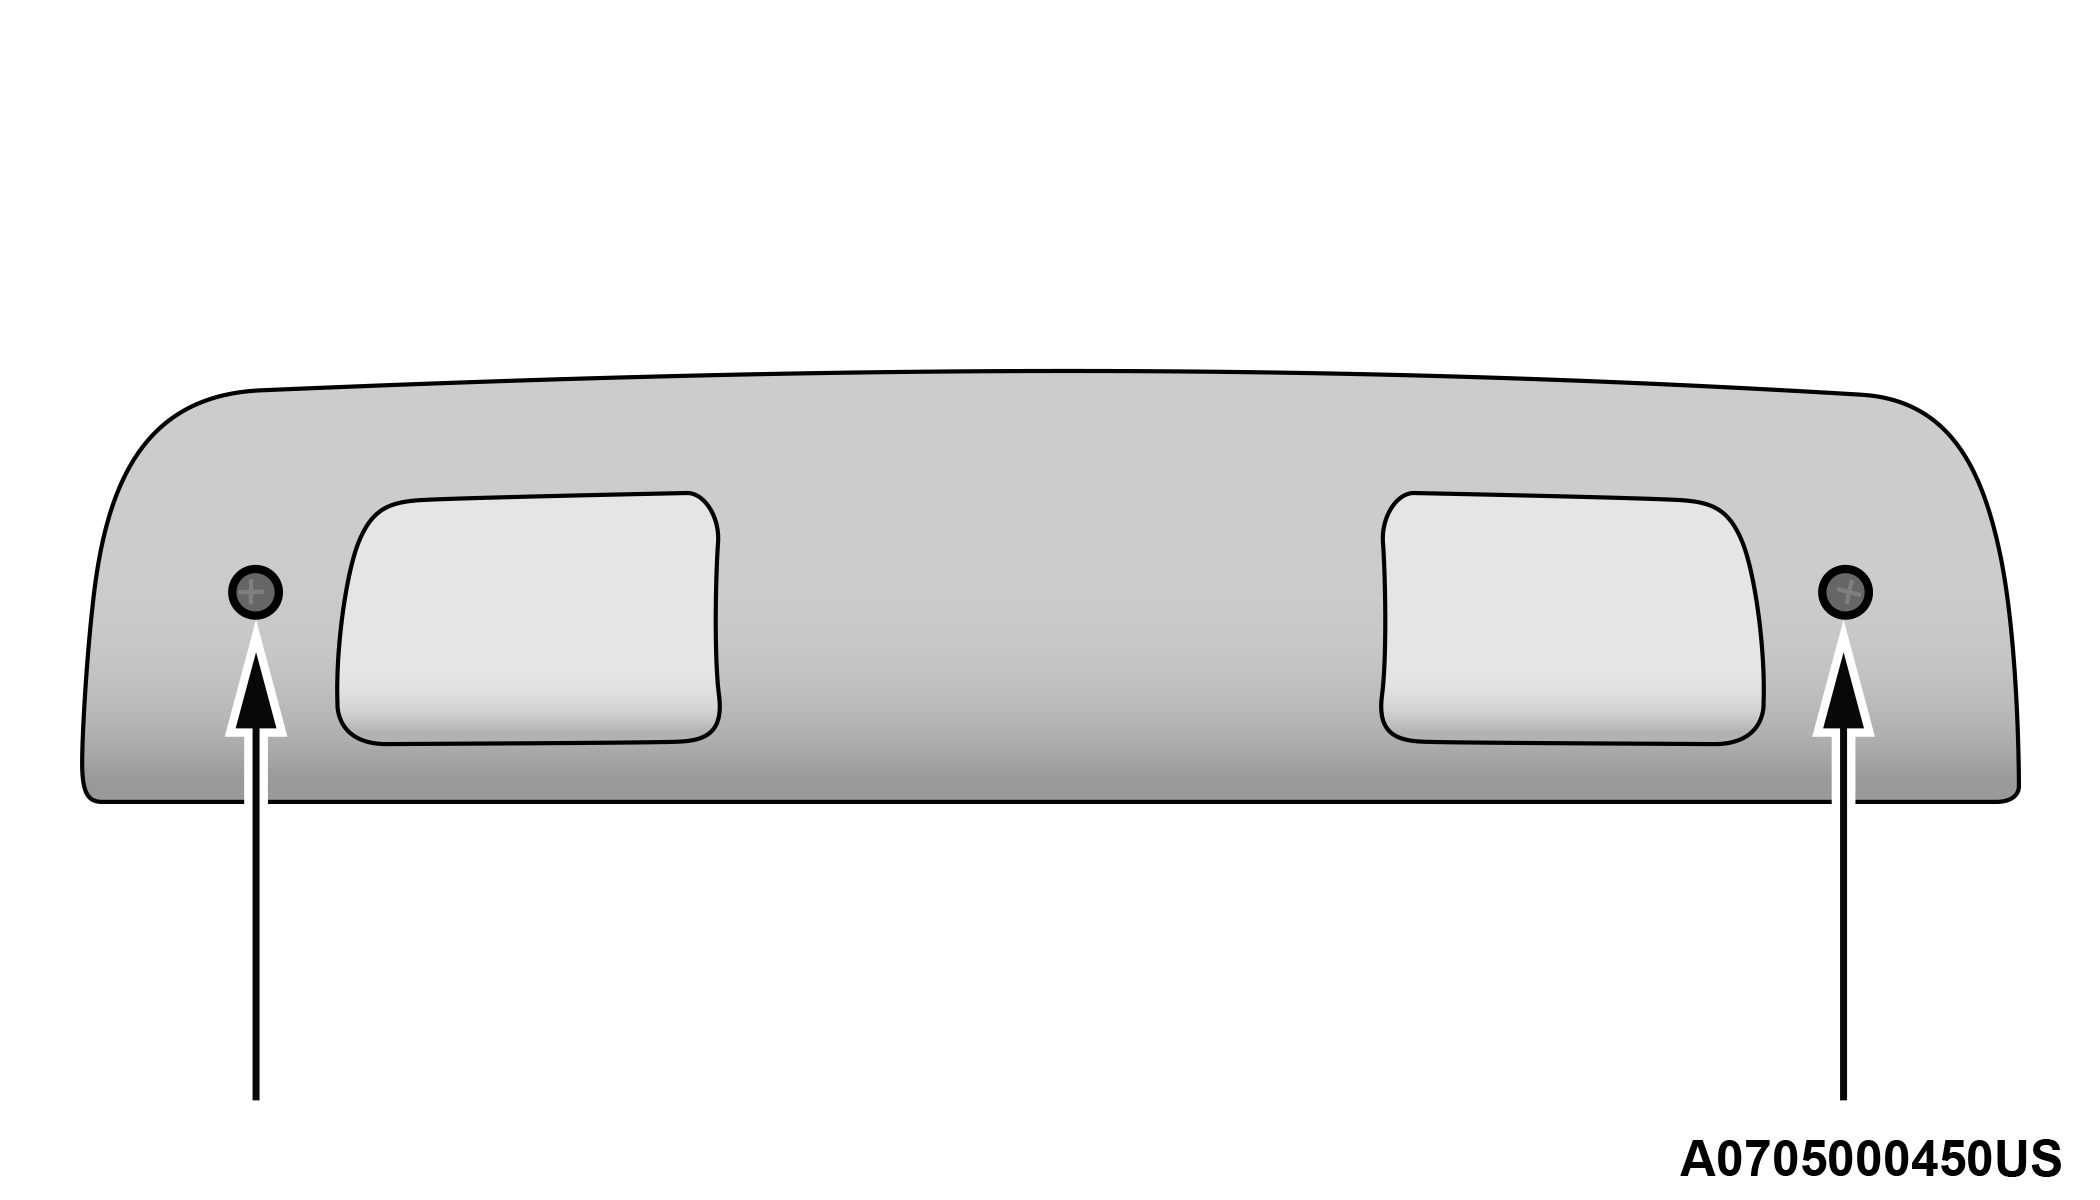
CHMSL Mounting Screw Locations
-
Separate the connector holding the housing and wiring harness to the body.
-
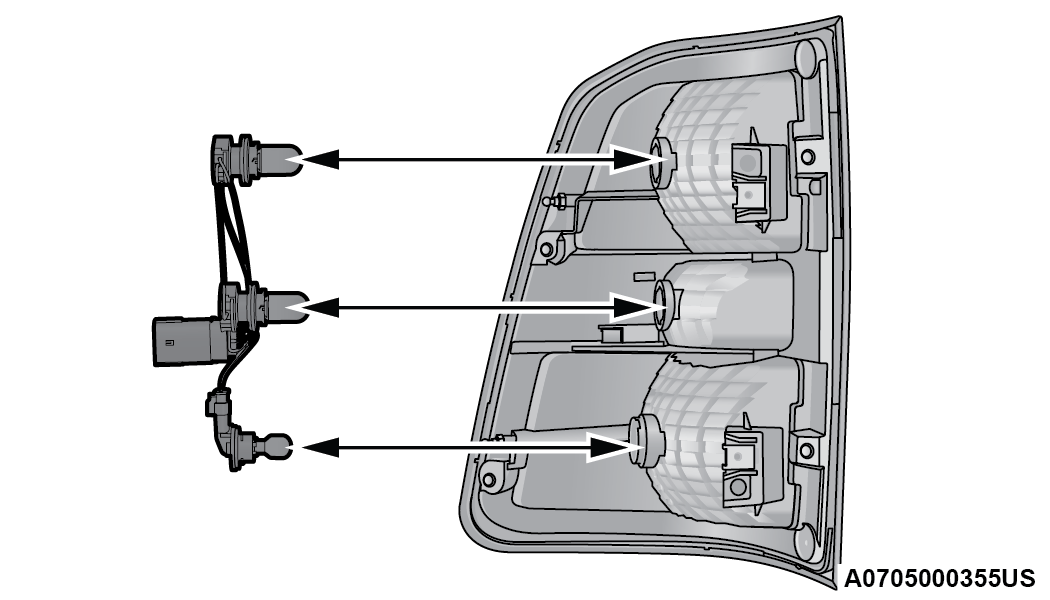
Turn the desired bulb socket a quarter turn and remove the socket and bulb from housing.
-
Pull the desired bulb straight from the socket.
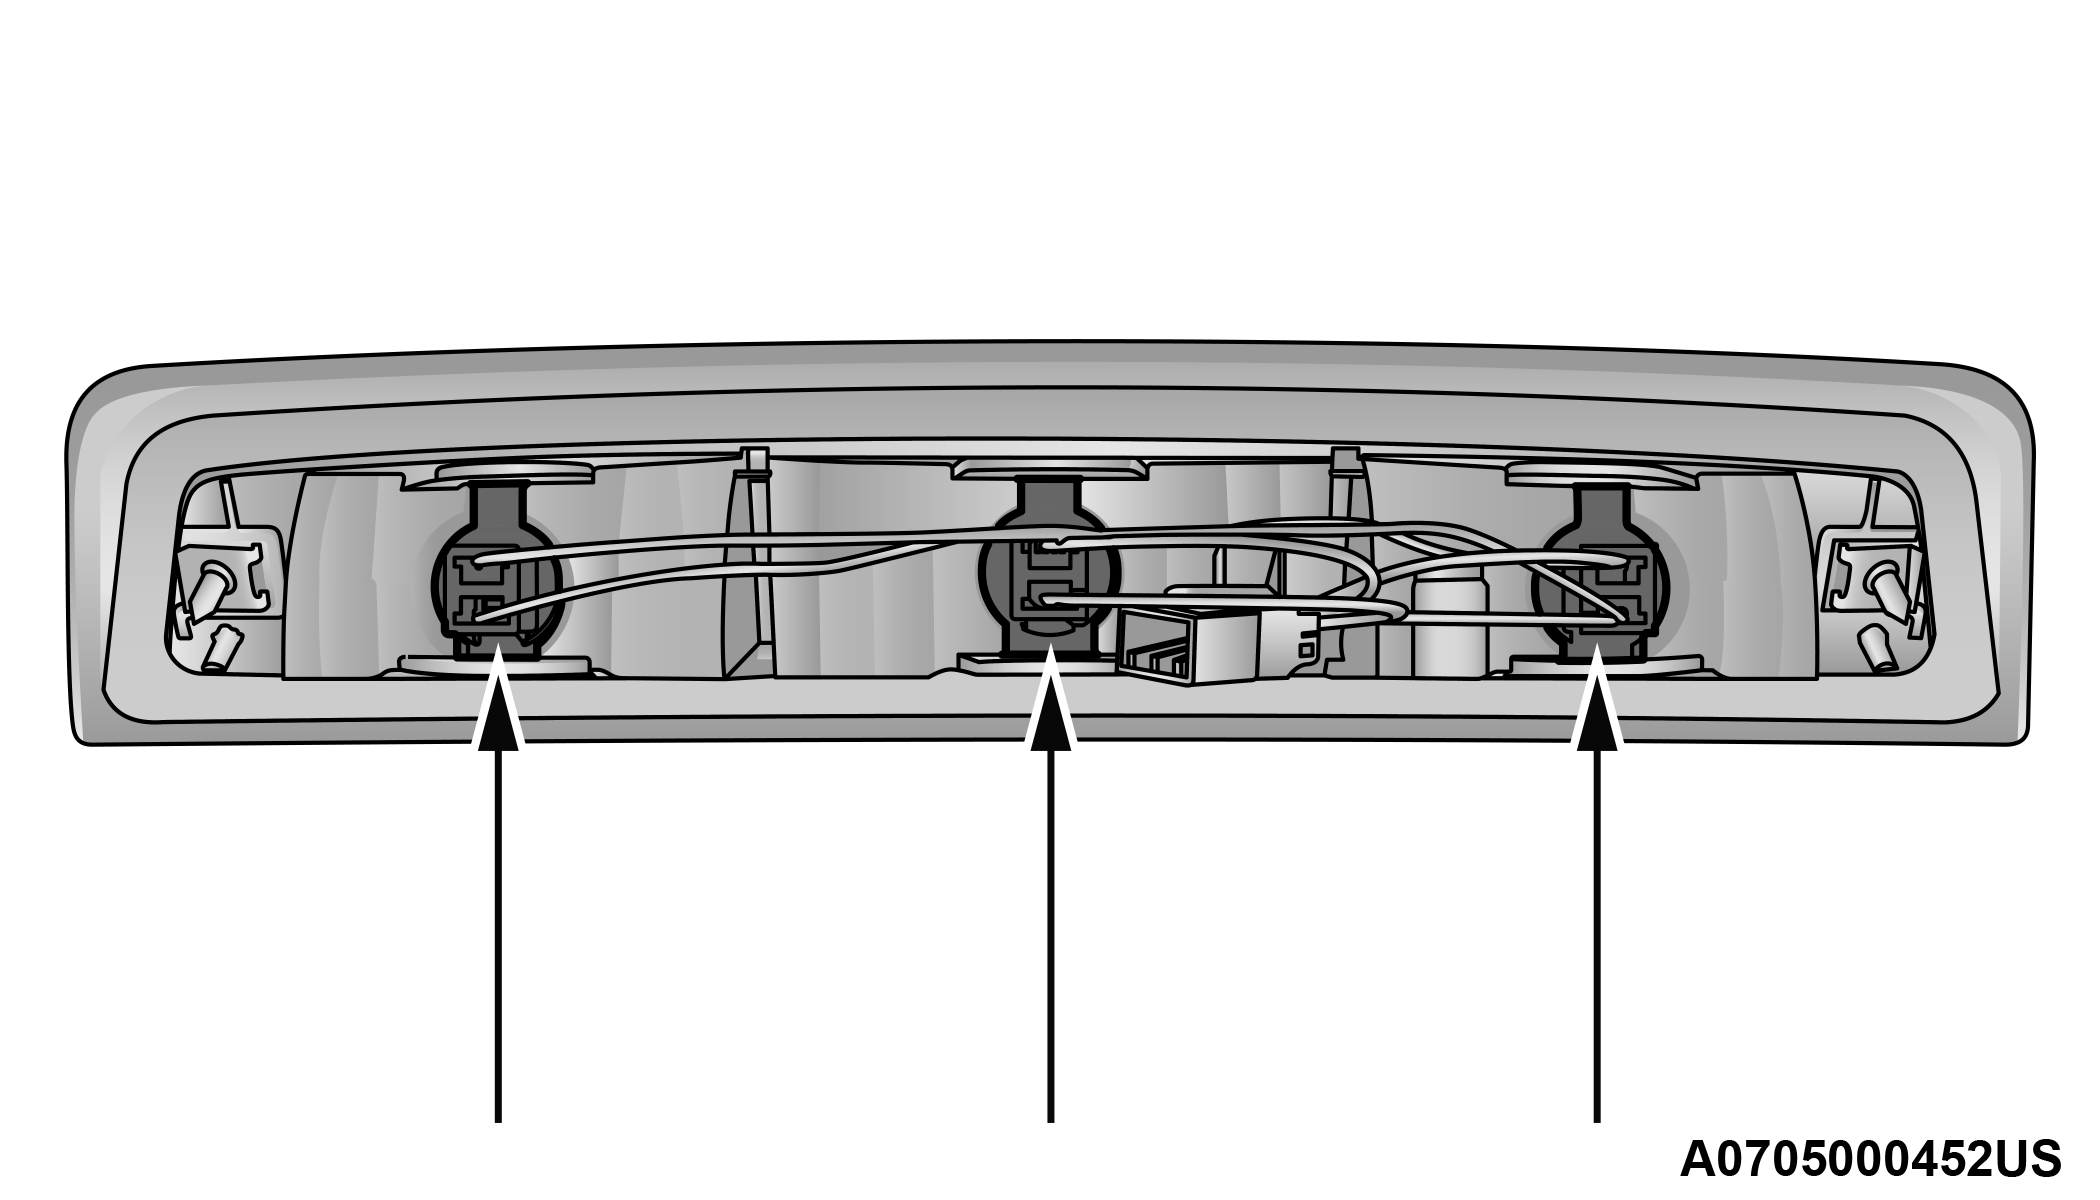
CHMSL Bulb And Socket
CAUTION:
Do not contaminate the bulb glass by touching it with your fingers or by allowing it to contact other oily surfaces. Shortened bulb life will result.
-
-
Outside Bulbs: Cargo Lamps
-
Inside Bulb: Center High Mounted Stop Lamp
-
-
Reverse the procedure for installation of bulbs and housing.
CAB TOP CLEARANCE LAMPS — IF EQUIPPED
See the following steps to replace:
-
Remove the screws from the top of the lamp.
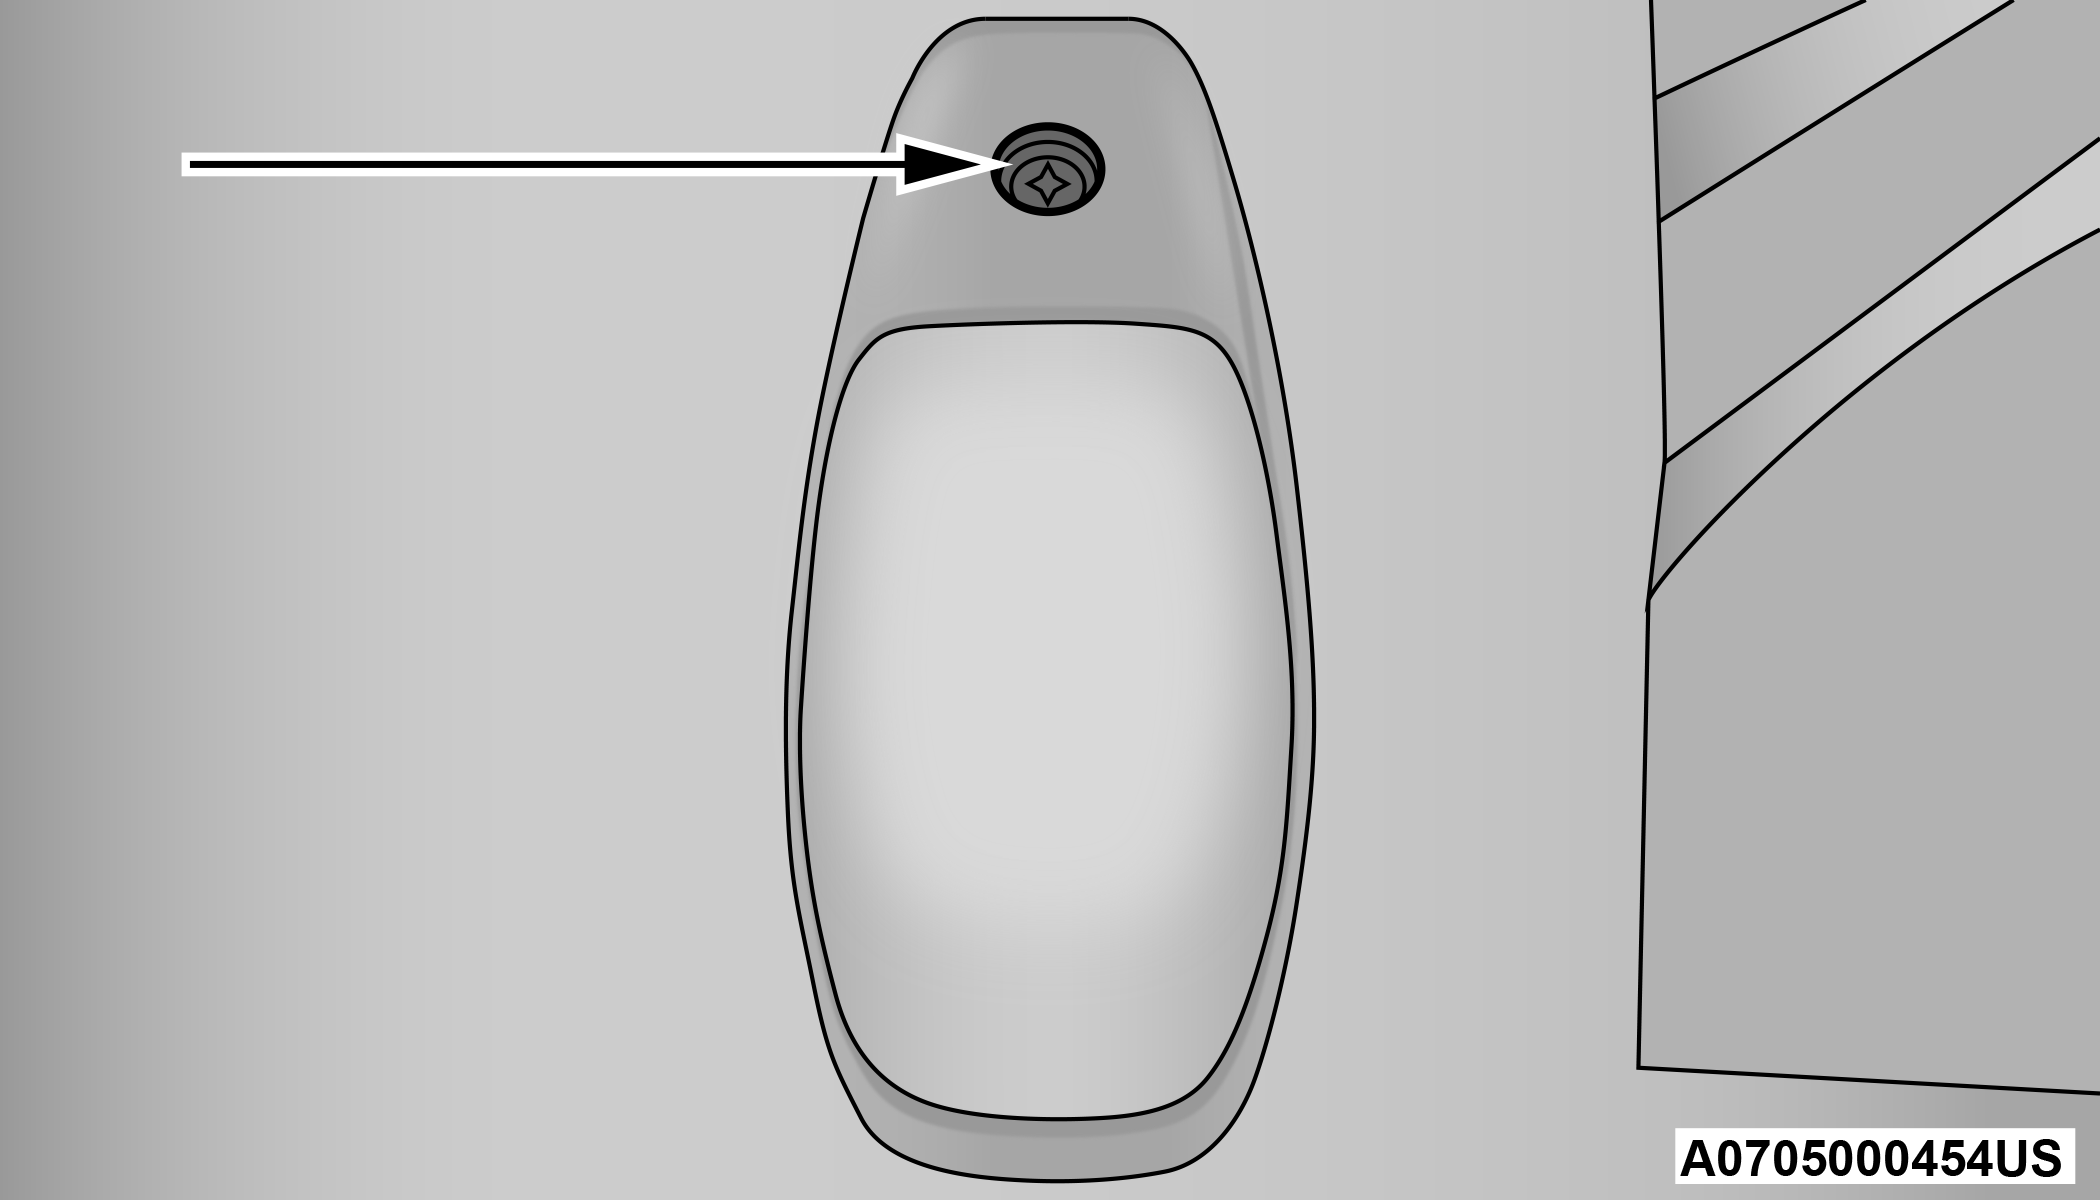
Screw Location From Clearance Lamp
-
Rotate the bulb socket a quarter turn and pull it from the lamp assembly.
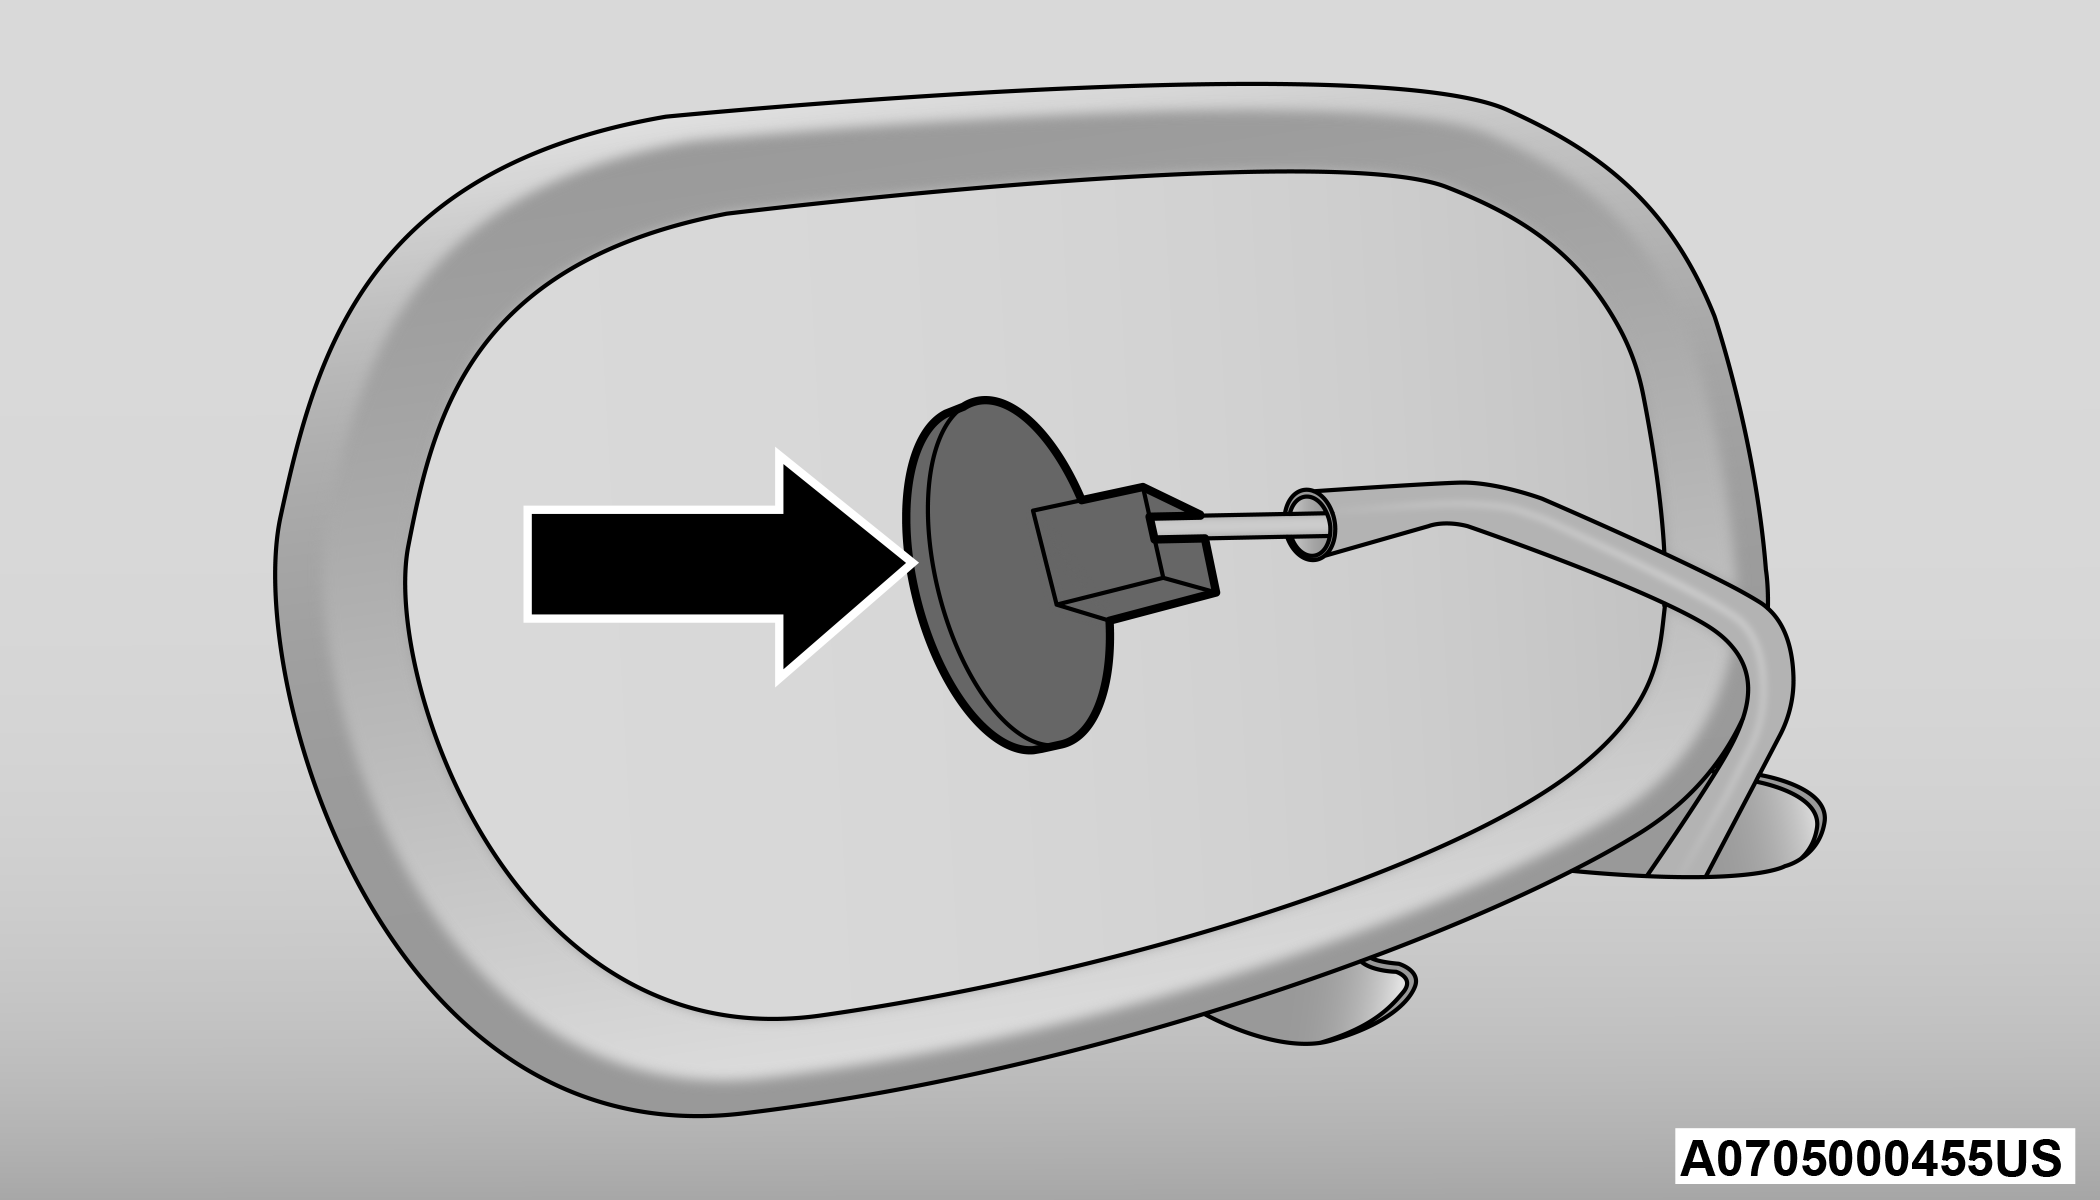
Removing Bulb Socket From Clearance Lamp
-
Pull the bulb straight from it's socket and replace.
REAR LAMP BAR ID MARKER (DUAL REAR WHEELS) — IF EQUIPPED
See the following steps to replace:
-
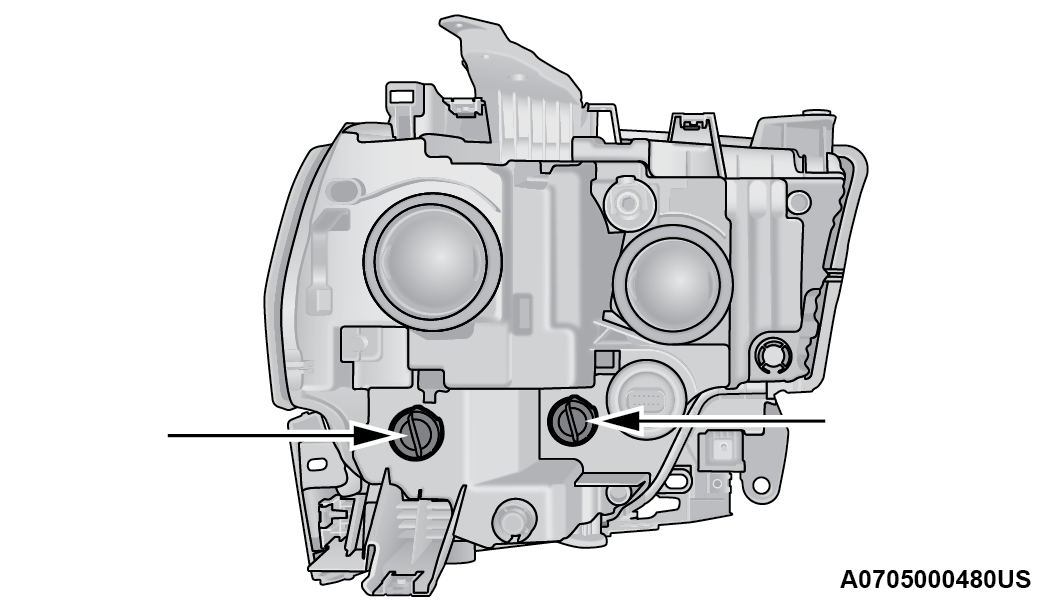
Loosen the two screws and the housing to gain access to the bulb sockets.
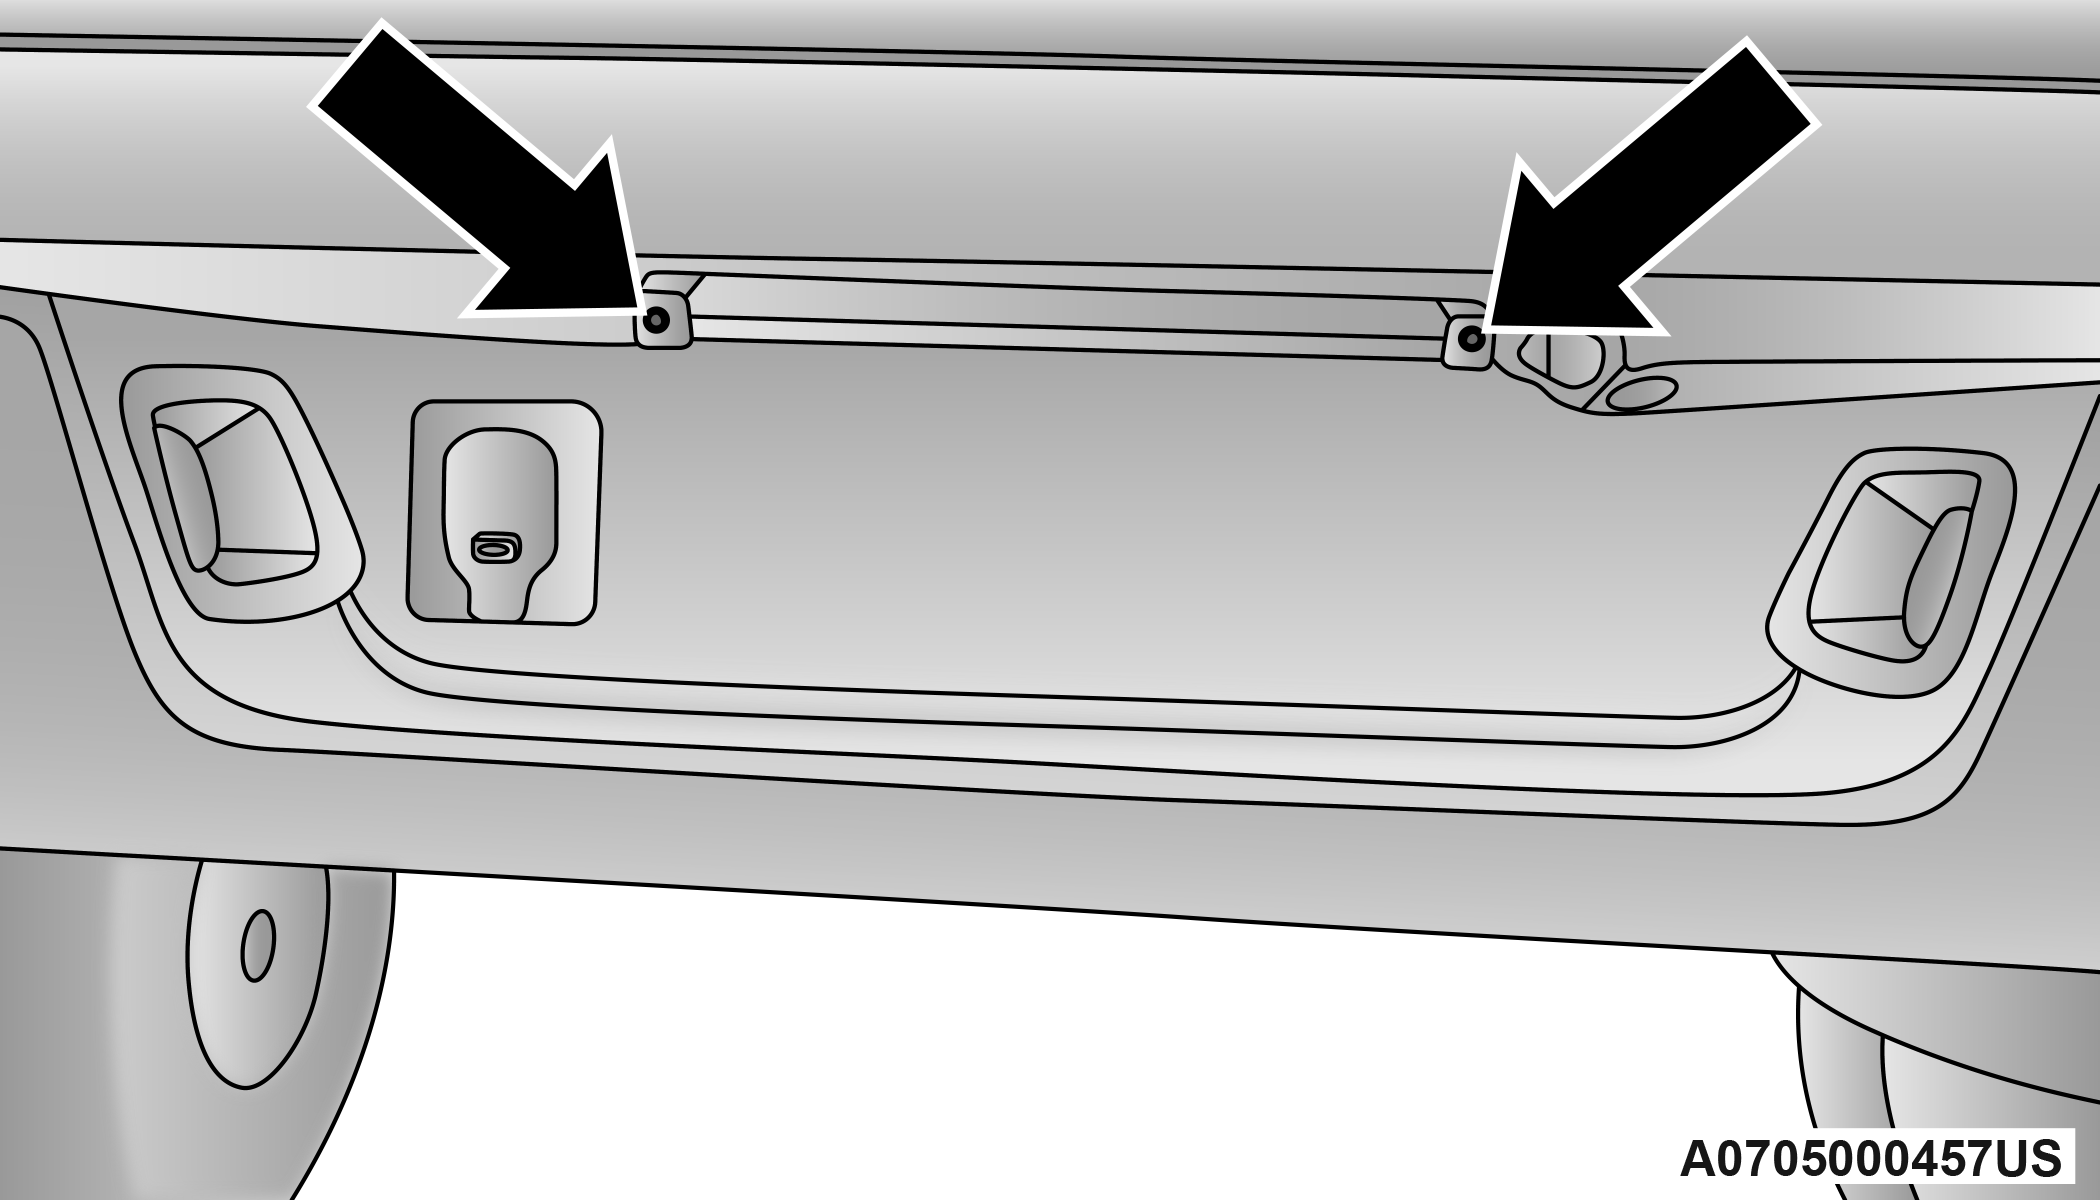
Screw Locations
-
Turn the socket a quarter turn counterclockwise to access the bulb.
-
Pull the bulb straight out from the socket.
-
Reverse the procedure for installation of the bulbs and housing.
SIDE MARKER LAMPS (DUAL REAR WHEELS) — IF EQUIPPED
See the following steps to replace:
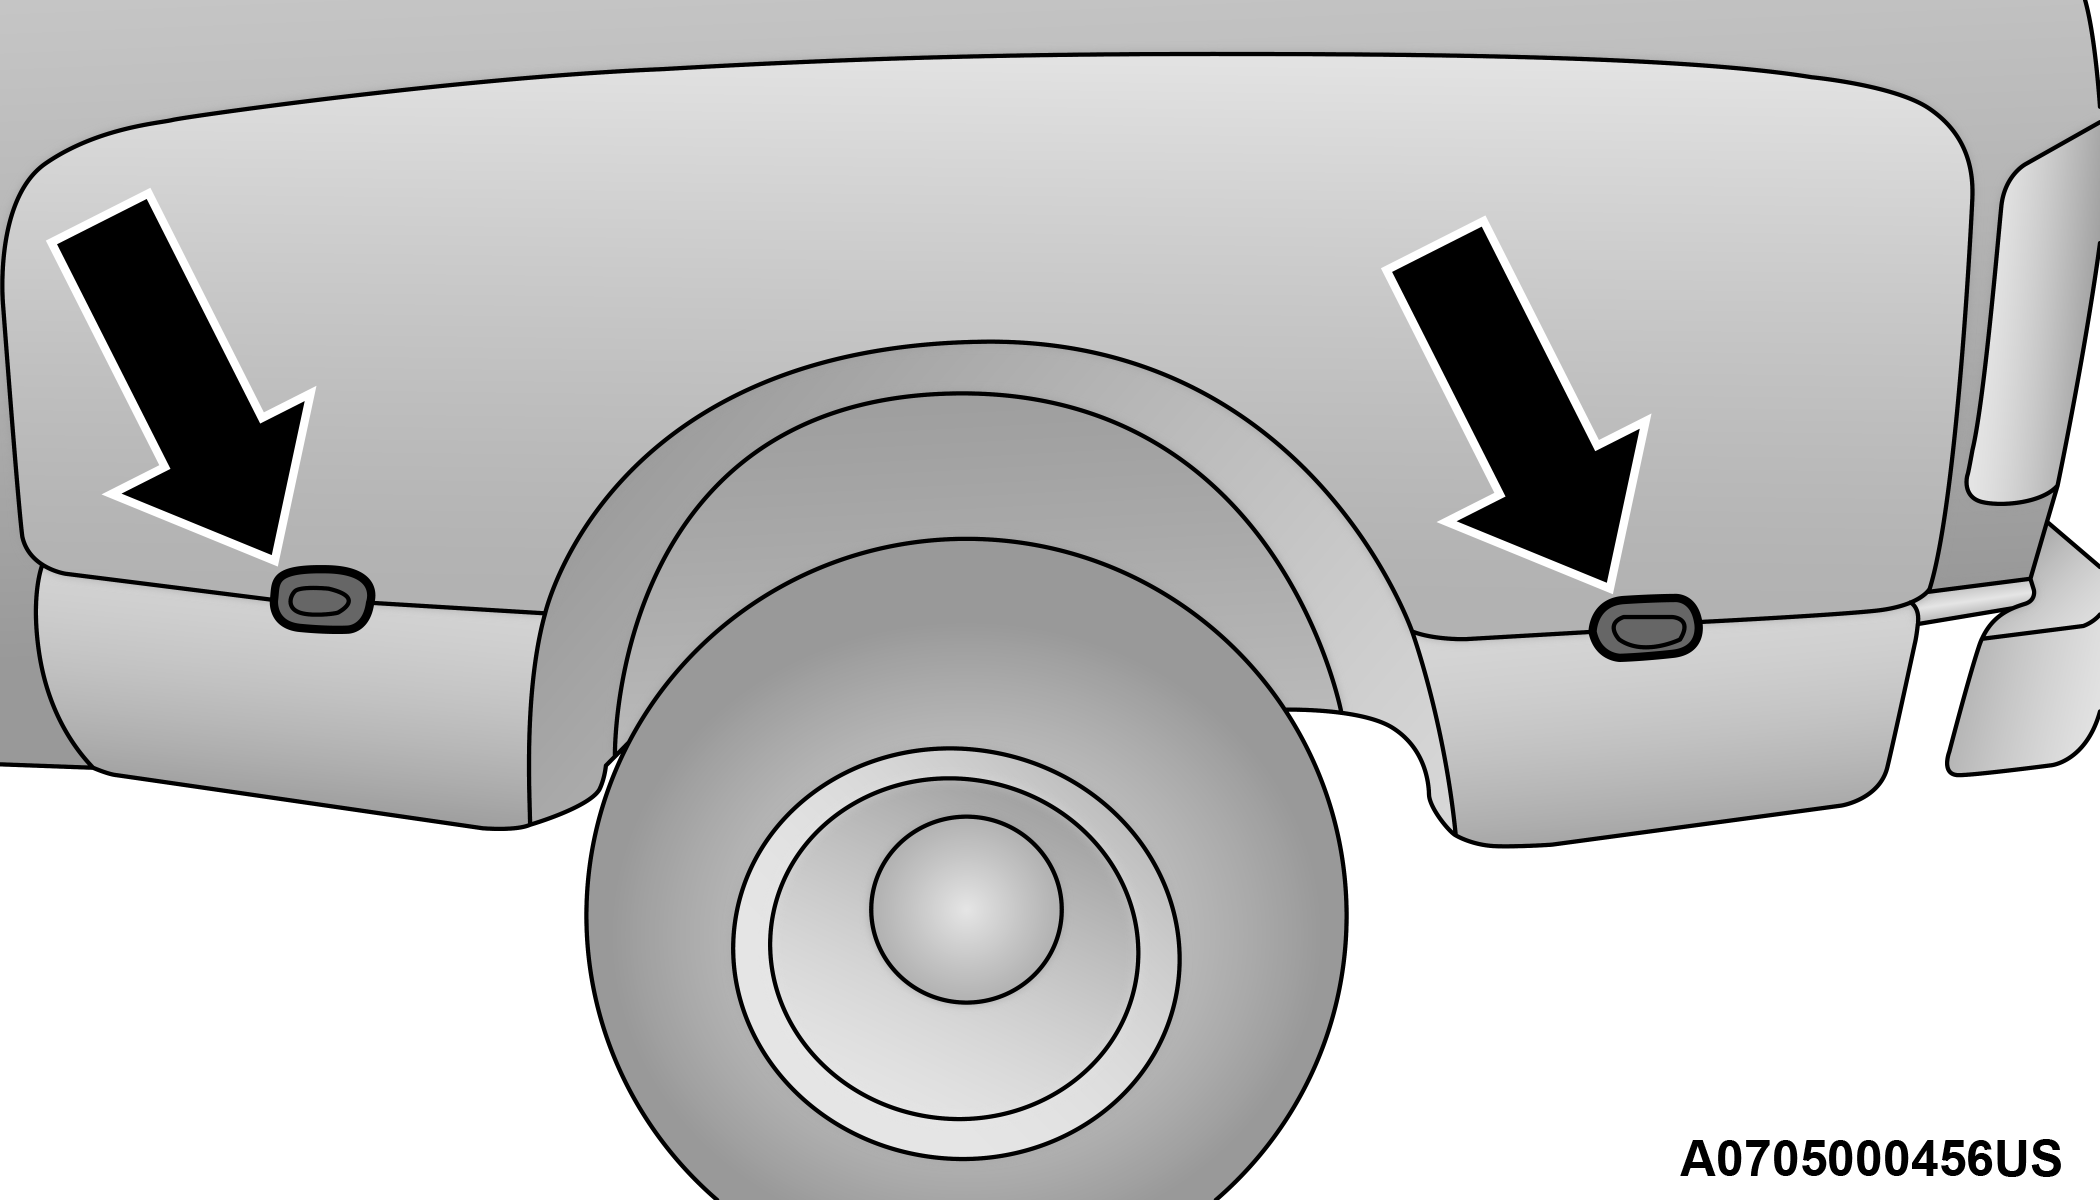
Side Marker Lamp Locations
-
Push rearward on the side marker lamp assembly.
-
Pull the entire assembly from the fender.
-
Turn the socket a quarter turn counterclockwise and remove from assembly to access the bulb.
-
Pull the bulb straight out from socket.
-
Reverse the procedure for installation of the bulbs and housing.