UCONNECT 3 WITH 5-INCH DISPLAY
Uconnect 3 With 5-Inch Display
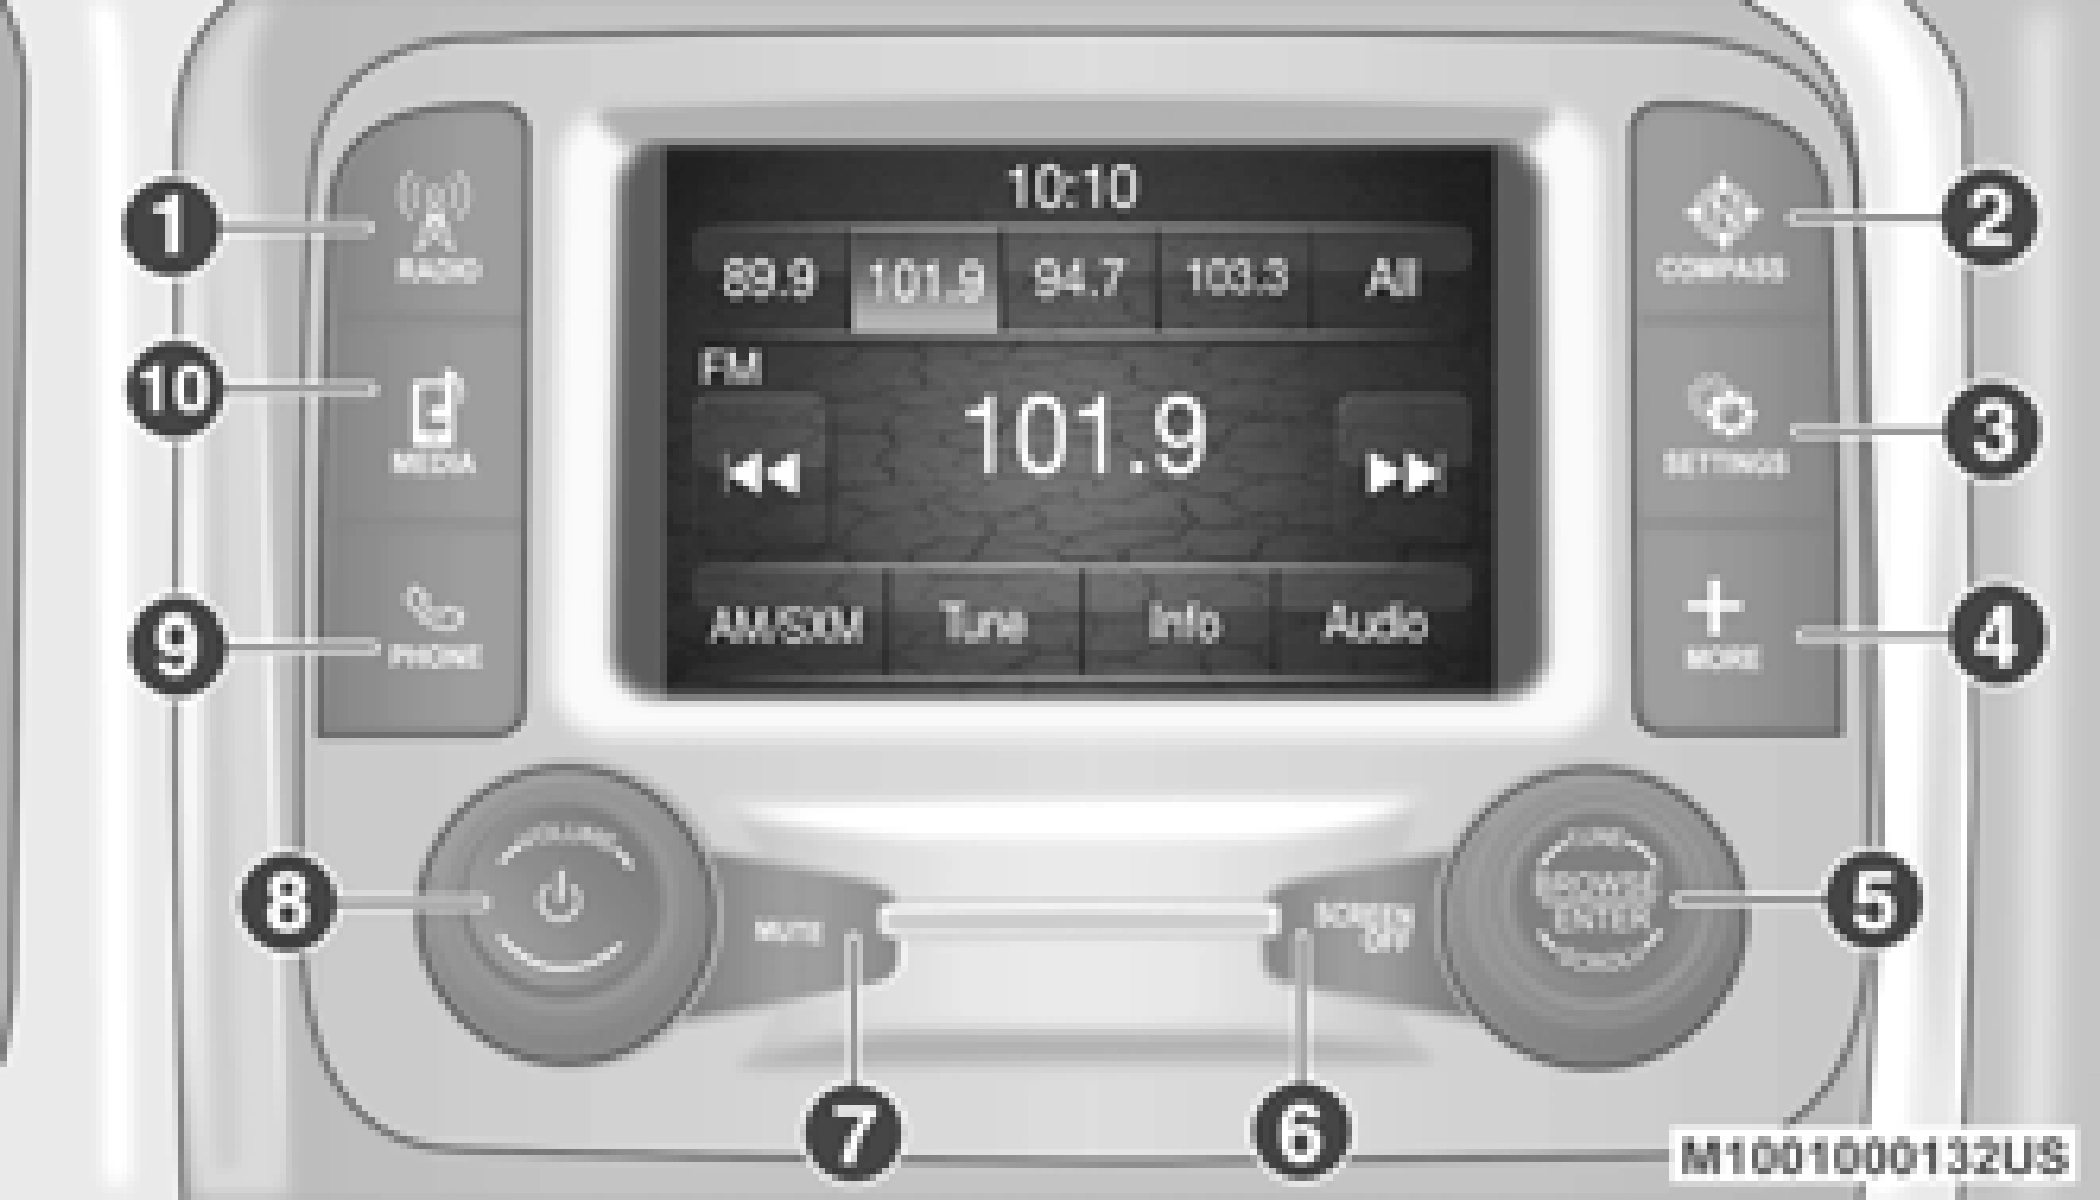
Push the RADIO button on the faceplate to enter Radio Mode. The different tuner modes; FM/ AM/SXM (if equipped), can be selected by pressing the corresponding buttons on the touchscreen in Radio Mode.
Push the COMPASS button on the faceplate to display the current direction of the vehicle.
Push the SETTINGS button on the faceplate to display the customer programmable features.
Push the MORE button on the faceplate to access additional options.
Push the ENTER/BROWSE button to accept a highlighted selection on the screen. Rotate the TUNE/SCROLL rotary knob to scroll through a list or tune to a radio station.
Push the SCREEN OFF button to turn the touch- screen off. To turn the touchscreen back on, press the screen.
Push the MUTE button to turn off the audio of the radio system. Press it again to turn the audio back on.
Rotate the rotary knob to adjust the Volume. Push the VOLUME/POWER button to turn the system ON or OFF.
Push the PHONE button on the faceplate to access the Uconnect Phone feature.
Pushing the MEDIA button on the faceplate will allow you to switch to Media mode: CD (if equipped), USB, AUX, and Bluetooth®.
Operating Radio Mode
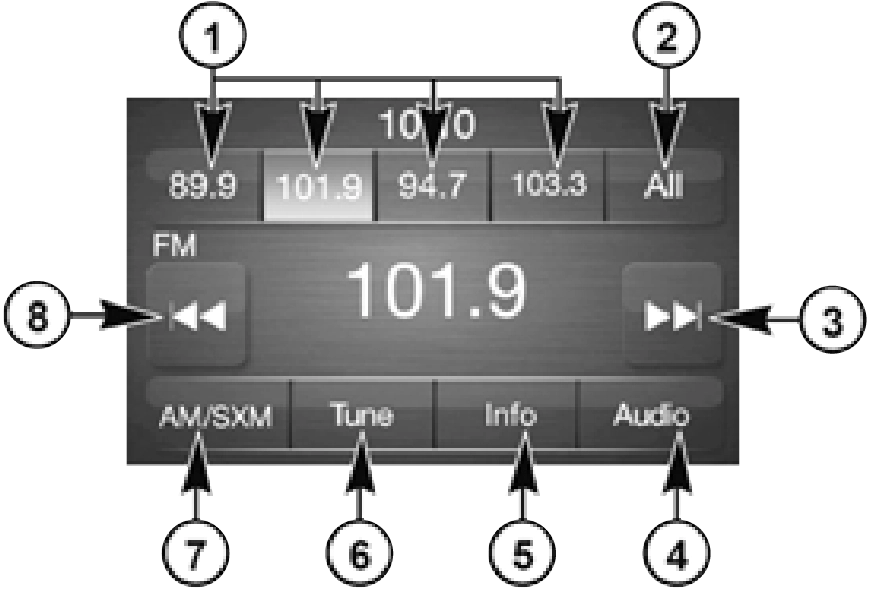
Radio Mode
1 — Station Presets 2 — All Presets
3 — Seek Up 4 — Audio
The radio is equipped with the following modes:
- FM
- AM
Push the RADIO button on the faceplate, to enter the Radio Mode. The different tuner modes – FM/AM/SXM (if equipped) – can then be selected by pressing the corresponding buttons on the touchscreen in the Radio mode.
Rotate the VOLUME/POWER rotary knob to adjust the Volume. When the audio system is turned on, the sound will be set at the same volume level as last played.
Push the VOLUME/POWER button to turn the system on or off.
Push the MUTE button to mute the system.
Push the MUTE button again to unmute the system.
Turn the rotary TUNE/SCROLL control knob clockwise to increase or counterclockwise to decrease the radio station frequency. Push the ENTER/BROWSE button to choose a selection.
Press and release the Seek Up button on the touchscreen to tune the radio to the next listen- able station or channel.
During a Seek Up function, if the radio reaches the starting station after passing through the entire band two times, the radio will stop at the station where it began.
Press and hold the Seek Up button on the touchscreen to advance the radio through the available stations or channels at a faster rate. The radio stops at the next available station or channel when the button on the touchscreen is released.
Press and release the Seek Down button on the touchscreen to tune the radio to the next listen- able station or channel.
During a Seek Down function, if the radio reaches the starting station after passing through the entire band two times, the radio will stop at the station where it began.
Press and hold the Seek Down button on the touchscreen to advance the radio through the available stations or channels at a faster rate. The radio stops at the next available station or channel when the button on the touchscreen is released.
Press the Tune button on the touchscreen to directly tune to a specific radio station. A keypad will appear. On the keypad, enter in your desired radio station, and the system will auto- matically tune to it.
SiriusXM® Satellite Radio uses direct satel- lite-to-receiver broadcasting technology to provide clear, coast to coast radio content. Siri- usXM® is a subscription based service.
Get over 160 channels on your satellite radio, and enjoy all you want, all in one place. Hear commercial-free music, sports, news, talk, and entertainment. Get all the premium program- ming, including Howard Stern, every NFL® game, every MLB®, every NHL® game, every NASCAR® race, Martha Stewart, Oprah Radio, and more. Get 20+ extra channels, including SiriusXM® Latino, offering 20 channels of commercial-free music, news, talk, comedy, sports, and more dedicated to Spanish language programming.
SiriusXM® services require subscriptions, sold separately after the trial included with the new vehicle purchase. If you decide to continue your service at the end of your trial subscription, the plan you choose will automatically renew and bill at then-current rates until you call Siri- usXM® at 1-866-635-2349 to cancel. See Siri- usXM® Customer Agreement for complete terms at www.siriusxm.com (US Residents) or www.siriusxm.ca (Canadian Residents). All fees and programming subject to change. Our satel- lite service is available only to those at least 18 and older in the 48 contiguous USA and D.C. Our Sirius satellite service is also available in Puerto Rico (with coverage limitations). Our Internet radio service is available throughout our satellite service area and in Alaska and Hawai. © 2019 SiriusXM® Radio Inc. SiriusXM® and all related marks and logos are trademarks of SiriusXM® Radio Inc.
This functionality is only available for radios equipped with a Satellite receiver. To receive satellite radio, the vehicle needs to be outside with a clear view to the sky.
If the screen displays Acquiring Signal, you may need to change the vehicle’s position to receive a signal. In most cases, the satellite radio does not receive a signal in underground parking garages or tunnels.
The Presets are available for all Radio Modes and are activated by pressing any of the four Preset buttons on the touchscreen, located at the top of the screen.
When you are receiving a station that you wish to commit into memory, press and hold the desired numbered button on the touchscreen for more than two seconds or until you hear a confirmation beep.
The Radio stores up to 12 presets in each of the Radio modes. Four presets are visible at the top of the radio screen.
Arrow button on the touchscreen when done.
Operating Media Mode
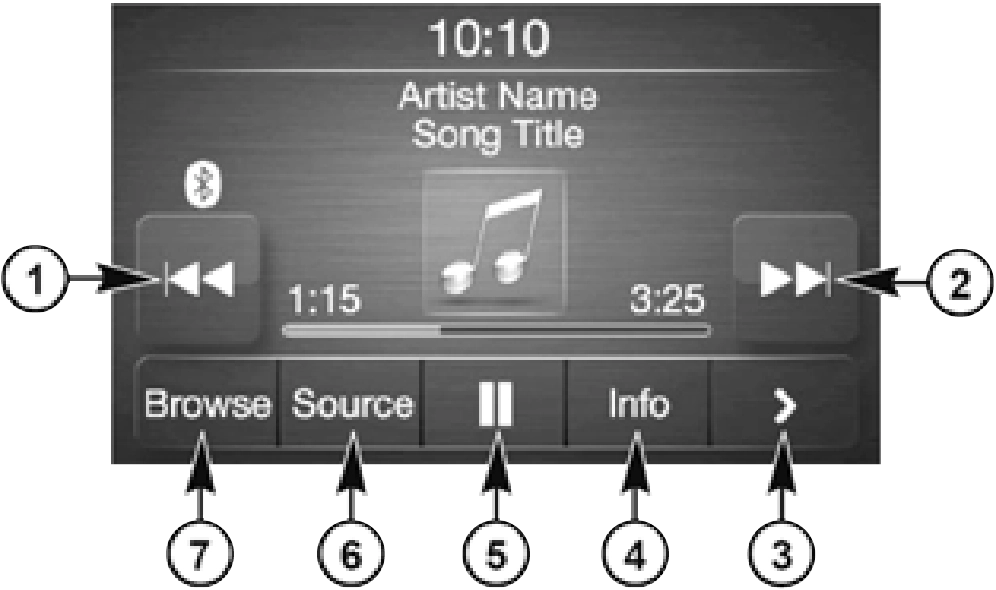
Media Mode
1 — Seek Down 2 — Seek Up
3 — Additional Functions 4 — Info
Media Mode is entered by pushing the MEDIA button located on the faceplate.
Once in Media Mode, press the Source button on the touchscreen and the desired mode button on the touchscreen. Disc (if equipped), USB, SD Card (if equipped), AUX and Blue- tooth® (if equipped), are the Media sources available. When available, you can select the Browse button on the touchscreen to be given these options:
- Now Playing
- Artists
- Albums
- Genres
- Songs
- Playlists
- Folders
You can press the Source, Pause/Play, or the Info button on the touchscreen for artist infor- mation on the current song playing.
Press and release the Seek Up button on the touchscreen for the next selection. Press and release the Seek Down button on the touch- screen to return to the beginning of the current selection, or return to the beginning of the previous selection if the track is within the first few seconds of the current selection.
Press and hold the Seek Up button on the touchscreen and the desired mode will begin to fast forward through the current track until the button on the touchscreen is released.
Press and hold the Seek Down button on the touchscreen and the desired mode will begin to rewind through the current track until the button on the touchscreen is released.
Rotate the Browse button on the touchscreen to scroll through and select a desired track on the iPod®, MP3 player, phone, or USB. Press the Exit button on the touchscreen if you wish to cancel the Browse function.
Press the Repeat button on the touchscreen to repeat the song selection. To cancel Repeat, press the Repeat button on the touchscreen a second time.
Press the Shuffle button on the touchscreen to play the selections on the USB/iPod® or Blue- tooth® device in random order to provide an interesting change of pace. Press the Shuffle button on the touchscreen a second time to turn this feature off.
Press the Info button on the touchscreen to display the current track information. Press the X button on the touchscreen to cancel this feature.
Refer to “Audio Settings” for the adjustable audio settings.
USB/iPod® Mode is entered by either inserting a USB Jump Drive or iPod® cable into the USB port, or by pushing the MEDIA button located on the faceplate. Once in Media Mode, press the Source button on the touchscreen, and select the USB/iPod® button.
Gently insert the USB/iPod® device into the USB Port. If you insert a USB/iPod® device with the ignition ON, the unit will switch to USB/ iPod® mode and begin to play when you insert the device. The display will show the track number and index time in minutes and seconds. Play will begin at the start of track 1.
Press the Browse button on the touchscreen to select Artist, Albums, Genres, Songs, Playlists or Folders from the USB/iPod® device. Once the desired selection is made you can chose from the available media by pressing the button on the touchscreen. Press the Exit button on the touchscreen if you wish to cancel the Browse function.
Bluetooth® Streaming Audio (BTSA) or Blue- tooth® Mode is entered by pairing a Bluetooth® device containing music to the Uconnect system.
Before proceeding, the Bluetooth® device must be paired with the Uconnect Phone to communi- cate with the Uconnect system.
Refer to Phone Mode chapter in this manual for pairing procedure.
Once the Bluetooth® device is paired to the Uconnect system, push the MEDIA button located on the faceplate. Once in Media Mode, press the Source button on the touchscreen and select the Bluetooth® button.
For mobile phone compatibility and pairing instructions, please visit UconnectPhone.com.
AUX Mode is entered by inserting a AUX device using a stereo cable with a 3.5 mm audio jack into the AUX port or by pushing the MEDIA
button located on the faceplate. Once in Media Mode, press the Source button on the touch- screen, and select the AUX button.
Gently insert the Auxiliary device cable into the AUX Port. If you insert an Auxiliary device with the ignition on, the unit will switch to AUX mode and begin to play when you insert the device cable.
The control of the Auxiliary device (e.g., selecting playlists, play, fast forward, etc.) cannot be provided by the radio; use the device controls instead. Adjust the volume with the VOLUME rotary knob or with the volume of the attached device.
The radio unit is acting as the amplifier for audio output from the Auxiliary device. Therefore, if the volume control on the Auxiliary device is set too low, there will be insufficient audio signal for the radio unit to play the music on the device.
Operating Phone Mode

Phone Mode
4 — Phone Battery Life 5 — Mute Microphone
6 — Transfer To/From Uconnect System 7 — Uconnect Phone Settings
8 — Text Messaging 9 — Direct Dial Pad 10 — Recent Call Log
11 — Browse Phone Book 12 — End Call
The Uconnect Phone is a voice-activated, hands-free, in-vehicle communications system with voice command capability. Refer to Voice Recognition (VR) within this publication for further information.
The Uconnect Phone allows you to dial a phone number with your mobile phone using simple voice commands.
The Uconnect Phone requires a mobile phone equipped with the Bluetooth® Hands-Free Profile. To check mobile phone compatibility, please visit UconnectPhone.com.
For Uconnect customer support:
Press the PHONE button on the front panel to activate the Phone mode. The buttons on the display can be used to:
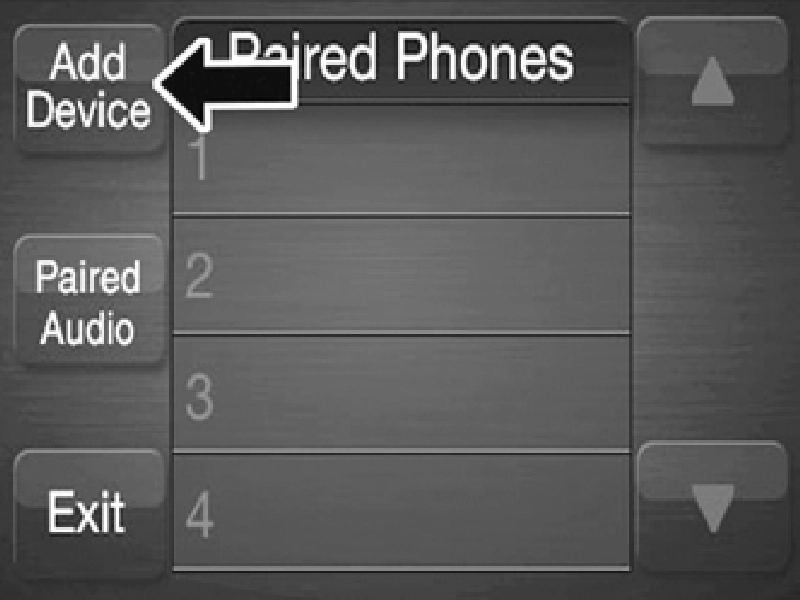
Pairing A Phone
If No is selected and you still would like to pair a mobile phone, press the Settings but- ton from the Uconnect Phone main screen. Select the Paired Phones button, and then press the Add Device button on the touchscreen. Search for available devices on your Bluetooth®-enabled mobile phone (see below). When prompted on the phone, select “Uconnect” and accept the connection request. Uconnect Phone will display an in progress screen while the system is connecting. When your mobile phone finds the Ucon- nect system, select “Uconnect.” When prompted on the mobile phone, accept the connection request from Ucon- nect Phone. Some mobile phones will require you to enter the PIN number. When the pairing process has successfully completed, the system will prompt you to choose whether or not this is your favorite phone. Selecting the Yes button will make this phone the highest priority. This phone will take precedence over other paired phones within range and will connect to the Uconnect system automatically when entering the vehicle. Only one mobile phone and/or one Bluetooth® audio device can be connected to the Uconnect system at a time. If the No button is selected, simply select “Uconnect” from the mobile phone/ audio device Bluetooth® screen, and the Uconnect system will reconnect to the Blue- tooth® device.
Software updates on your phone or the Ucon- nect system may interfere with the Bluetooth® connection. If this happens, simply repeat the pairing process. However, first, make sure to delete the device from the list of phones on your Uconnect system. Next, be sure to remove Uconnect from the list of devices in your phone’s Bluetooth® settings. Before pairing your mobile phone, you must make sure you have stored the names you want to contact in the phonebook on your mobile phone, so you can call them using the vehicle's hands-free system. If your phonebook does not contain any names, enter new names for the most frequently used numbers. For further details, consult your mobile phone owner's handbook. The names in the phonebook which do not contain phone numbers or where both fields (name and surname) are empty will not be displayed. The system connects automatically to the paired mobile phone with the highest priority.To choose a specific mobile phone or Blue- tooth® audio device, proceed as follows:
To disconnect a specific mobile phone or Blue- tooth® audio device, proceed as follows:
To delete a mobile phone or Bluetooth® audio device from a list, proceed as follows:
To set a mobile phone or Bluetooth® audio device as a favorite, proceed as follows:
If equipped and specifically supported by your phone, Uconnect Phone asks you if you want to download names (text names) and number entries from your mobile phone’s phonebook. Specific Bluetooth® enabled phones with Phonebook Access Profile may support this feature. See UconnectPhone.com for supported phones. If equipped and specifically supported by your phone, Uconnect Phone asks you if you want to download names (text names) and number entries from your mobile phone’s phonebook. Specific Bluetooth®-enabled phones with Phonebook Access Profile may support this feature. If supported, the download and update begins as soon as the Bluetooth® wireless phone connection is made to the Uconnect Phone. For example, after you start the vehicle. You may be asked for permission to initiate the phonebook download. A maximum of 2,000 contact names with six numbers per contact will be downloaded and updated every time a phone is connected to the Uconnect Phone.
Depending on the maximum number of entries downloaded, there may be a short delay before the latest downloaded names can be used. Until then, if available, the previ- ously downloaded phonebook is available for use.
Select "Delete Phone Data" on the display to delete the list of recent calls and the phonebook copy.
Enter the phone number using the graphic keypad displayed.
Proceed as follows:
The list of the last calls made for each of the following call types can be displayed:
To access these types of calls, press the Recent Calls button on the Phone menu main screen.
When a phone conversation is active, a second phone call can be made as follows:
To call the number/contact of last call made, press the Redial button.
The buttons on the display allow the following phone call functions to be managed:
When an incoming call rings or is announced on the Uconnect system, push the Answer button on the touchscreen, or push the PHONE button on the steering wheel.
When an incoming call rings or is announced on the Uconnect system, push the Answer button on the touchscreen, or push the PHONE button on the steering wheel to answer the call and put the ongoing call on hold.
Not all mobile phones may support the manage- ment of an incoming call when another phone conversation is active.
If two calls are in progress (one active and one on hold), it is possible to switch between them pressing the Call On Hold button or to merge the two calls in a conference pressing the Merge Calls button.
Check whether the mobile phone in use supports the management of a second call and the "Conference" mode.
The ongoing calls can be transferred from the mobile phone to the system and vice versa without ending the call.
To transfer the call, press the Transfer button. Call Continuation After the engine is switched off, it is still possible to continue a phone call.
The call continues until it is ended manually or for a maximum period of about 20 minutes.
When the system is switched off, the call is transferred to the mobile phone.
Press the End button on the touchscreen or the PHONE button on the steering wheel controls to end a call in progress.
Only the ongoing call is ended and any call on hold becomes the new active call.
Depending on the type of mobile phone, if the ongoing call is ended by the caller, the call on hold may not be activated automatically.
The system can read the messages received by the mobile phone.
To use this function, the mobile phone must support the SMS exchange function via Blue- tooth®.
If this function is not supported by the phone, the corresponding message button is deacti- vated (greyed out) or may only accept incoming messages.
When a text message is received, the display will show a screen where the options "Listen", "Call" or "Ignore" can be selected.
Press the Message button to access the list of SMS messages received by the mobile phone. The list displays a maximum of 60 messages received.
Using the steering wheel commands, you can view and manage the last 10 SMS messages received on the instrument panel. To use this function, the mobile phone must support the SMS exchange function through Bluetooth®.
Select the PHONE button on the instrument panel menu, and then select “SMS Reader” using the arrow keys on the steering wheel controls.
The “SMS Reader” submenu allows the last 10 SMS messages to be displayed.
Download Manual