SEATS
Seats are a part of the Occupant Restraint System of the vehicle.
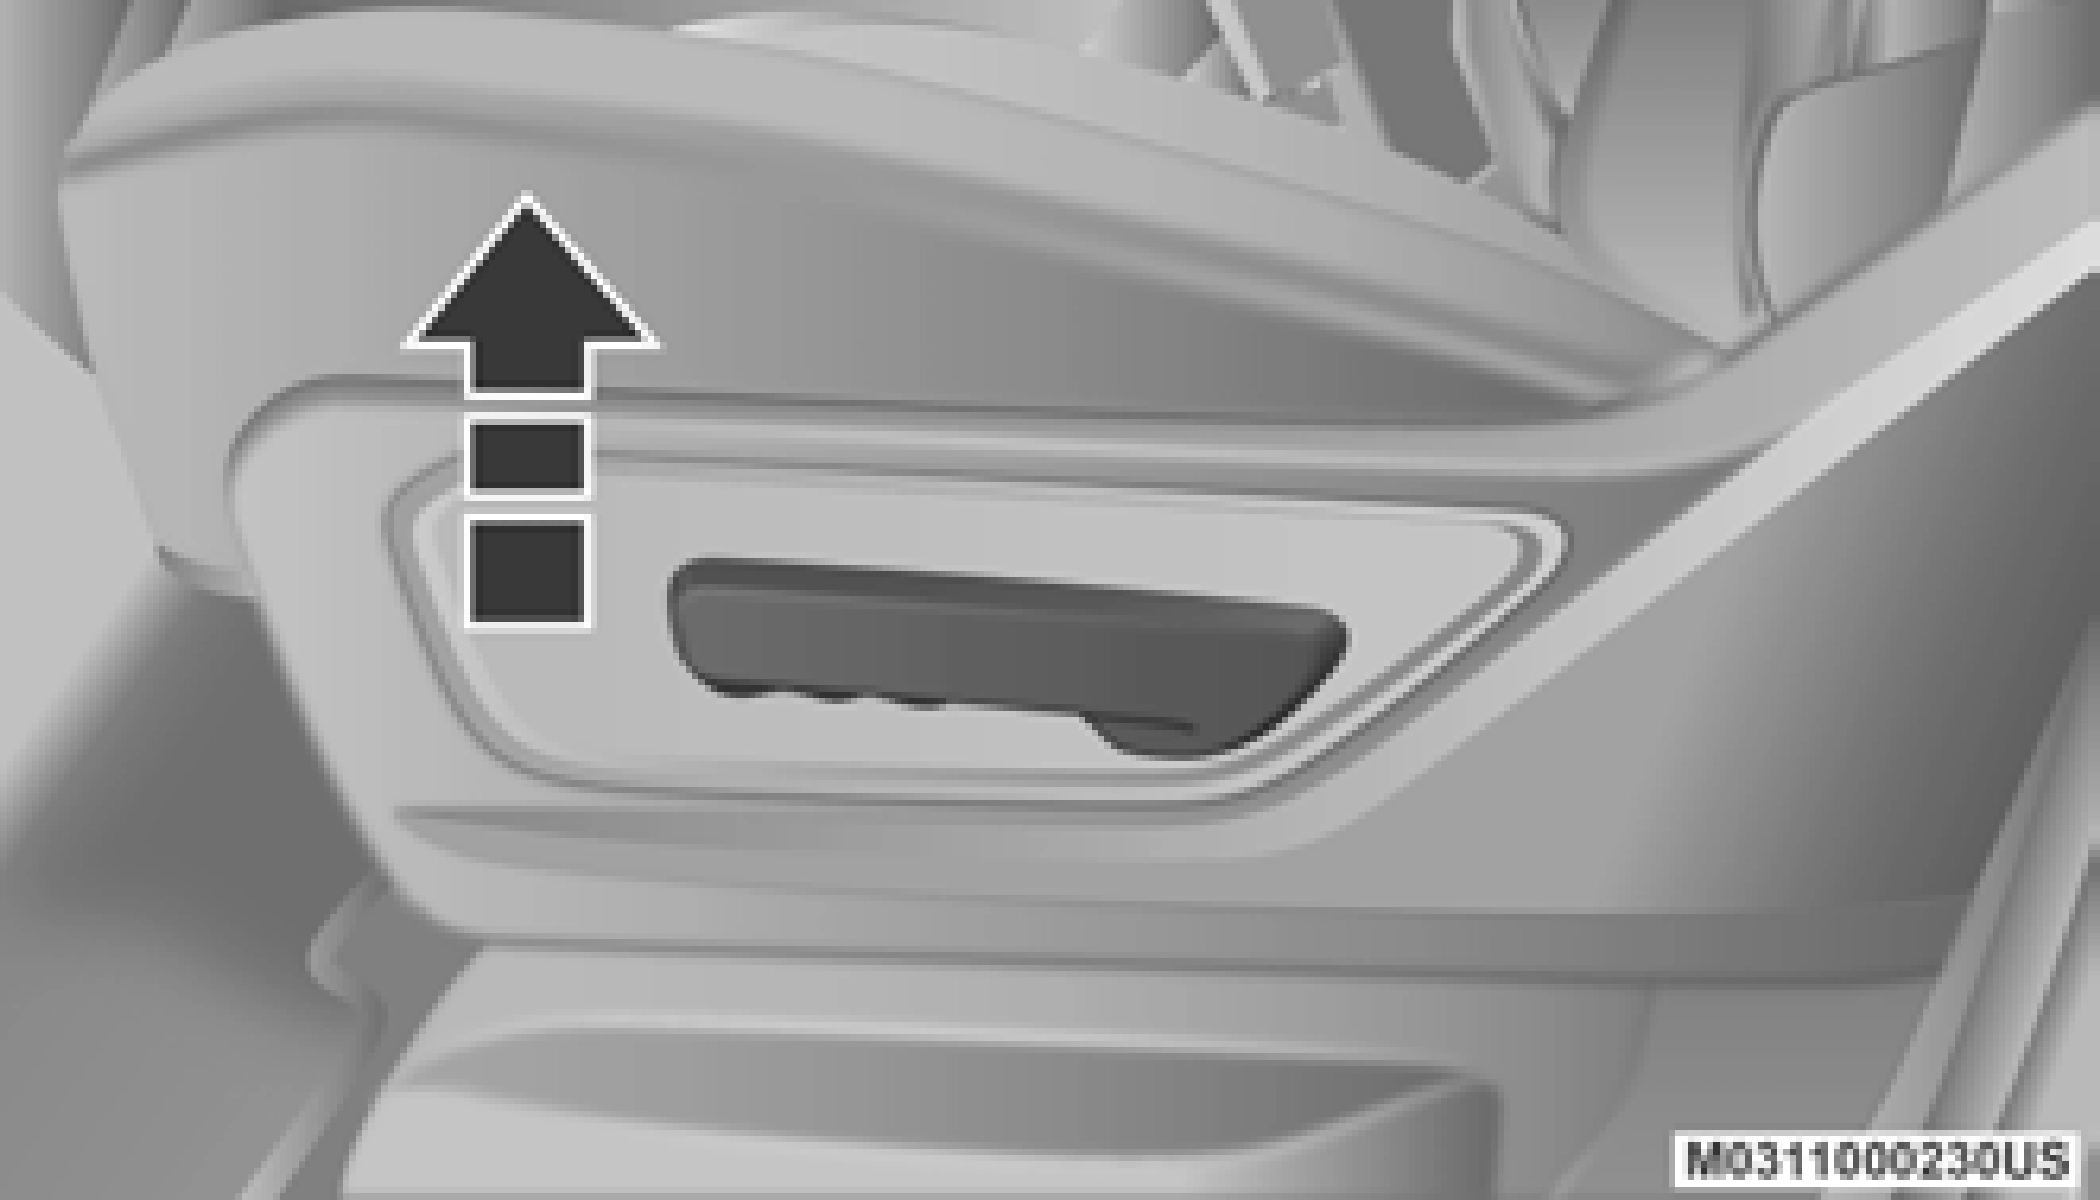
Manual Front Seat Forward/Rearward Adjustment
Both front seats are adjustable forward or rear- ward. The manual seat adjustment handle is located under the seat cushion at the front edge of each seat.

Manual Seat Adjustment Bar
While sitting in the seat, pull up on the handle and slide the seat forward or rearward. Release the bar once you have reached the desired posi- tion. Then, using body pressure, move forward and rearward on the seat to be sure that the seat adjusters have latched.
|
WARNING! |
|
Adjusting a seat while driving may be dangerous. Moving a seat while driving could result in loss of control which could cause a collision and serious injury or death.
Seats should be adjusted before fastening the seat belts and while the vehicle is parked. Serious injury or death could result from a poorly adjusted seat belt.
|
The recline lever is located on the outboard side of the seat. To recline the seat, lean forward slightly, lift the lever, lean back to the desired position and release the lever. To return the seatback to its normal upright position, lean forward and lift the lever. Release the lever once the seat back is in the upright position.
Manual Recline Lever
|
WARNING! |
|
Do not stand or lean in front of the seat while actuating the handle. The seatback may swing forward and hit you causing injury.
|
|
WARNING! |
|
To avoid injury, place your hand on the seat- back and actuate the handle, then position the seatback in the desired position.
|
40-20-40 Front Bench Seat — If Equipped The seat is divided into three segments. The outboard seat portions are each 40% of the total width of the seat. On some models, the back of the center portion (20%) easily folds down to provide an armrest/center storage compartment.
|
WARNING! |
|
Do not pile luggage or cargo higher than the top of the seatback. This could impair visibility or become a dangerous projectile in a sudden stop or collision. |
Reclining Rear Seats — If Equipped
The recliner handle is located on the outside of the seat cushion. To adjust the seatback, lift upward on the handle, lean back on the seat- back and when you reach the desired position, release the handle.
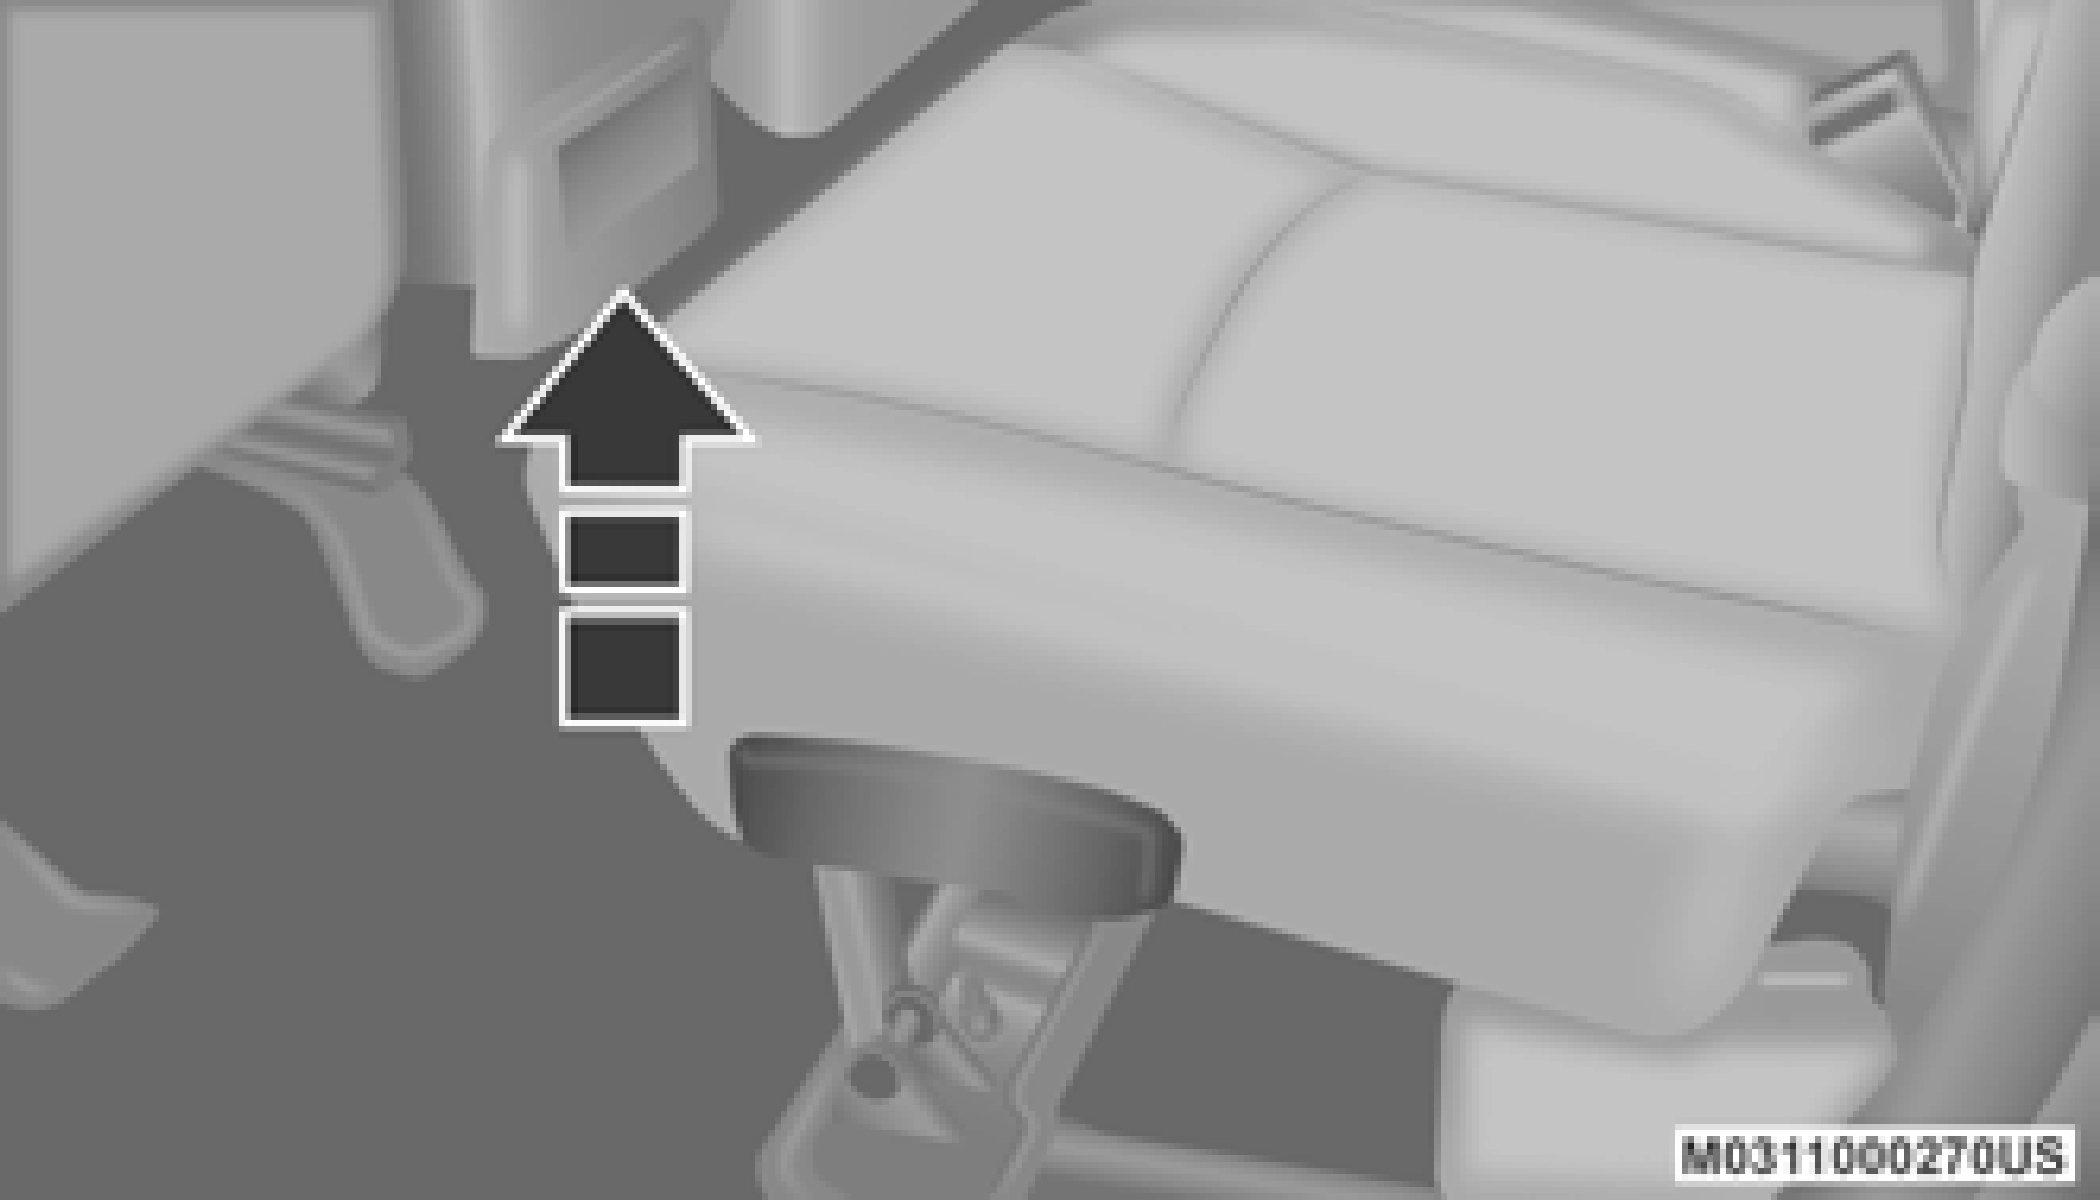
Rear Seat Recliner Handle
|
WARNING! |
|
Do not ride with the seatback reclined so that the shoulder belt is no longer resting against your chest. In a collision you could slide under the seat belt, which could result in serious injury or death. |
Some models may be equipped with an eight-way power driver's seat. The power seat switches are located on the outboard side of the driver's seat cushion. There are two power seat switches that are used to control the movement of the seat cushion and the seatback.
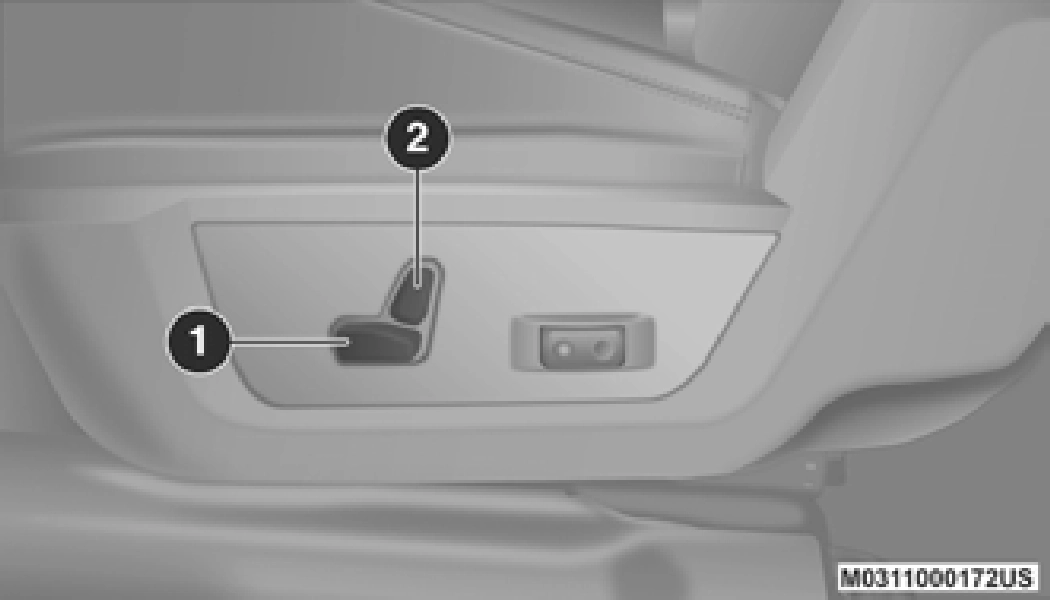
Power Seat Switches
The seat can be adjusted both forward and rear- ward. Push the seat switch forward or rearward. The seat will move in the direction of the switch. Release the switch when the desired position has been reached.
The height of the seats can be adjusted up or down. Pull upward or push downward on the rear of seat switch, the seat will move in the direction of the switch. Release the switch when the desired position has been reached.
The angle of the seat cushion can be adjusted in four directions. Pull upward or push down- ward on the front or rear of the seat switch, the front or rear of the seat cushion will move in the direction of the switch. Release the switch when the desired position is reached.
The angle of the seatback can be adjusted forward or rearward. Push the seatback switch forward or rearward, the seat will move in the direction of the switch. Release the switch when the desired position is reached.
Vehicles equipped with power driver or passenger seats may also be equipped with power lumbar. The power lumbar switch is located on the outboard side of the power seat. Push the switch forward to increase the lumbar support. Push the switch rearward to decrease the lumbar support.
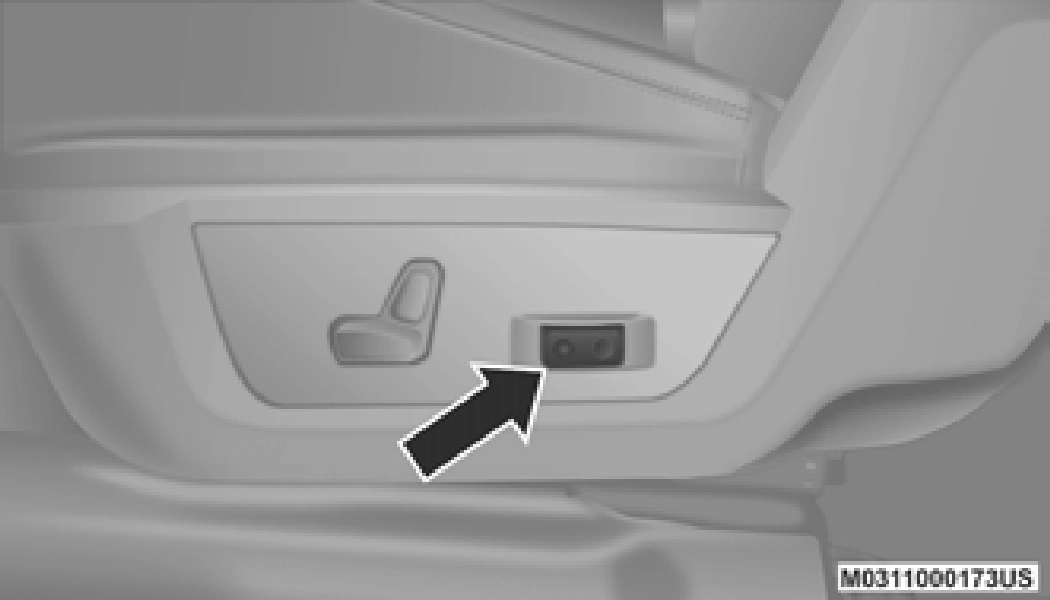
Lumbar Control Switch
This feature allows the driver to store up to two different memory profiles for easy recall through memory buttons. Each memory profile contains desired position settings for the driver’s seat, side mirrors, adjustable pedals (if equipped), and a set of desired radio station presets. pushed.
If equipped with power convex mirrors, these mirror positions will not set as part of a memory profile. Refer to “Mirrors” in this chapter for further information.
Your remote keyless entry key fob can also be programmed to recall the same positions when the unlock button is Your vehicle is equipped with two key fobs, one key fob can be linked to memory position 1 and the other key fob can be linked to memory posi- tion 2.
The driver memory seat buttons are located on the driver door, next to the door handle.
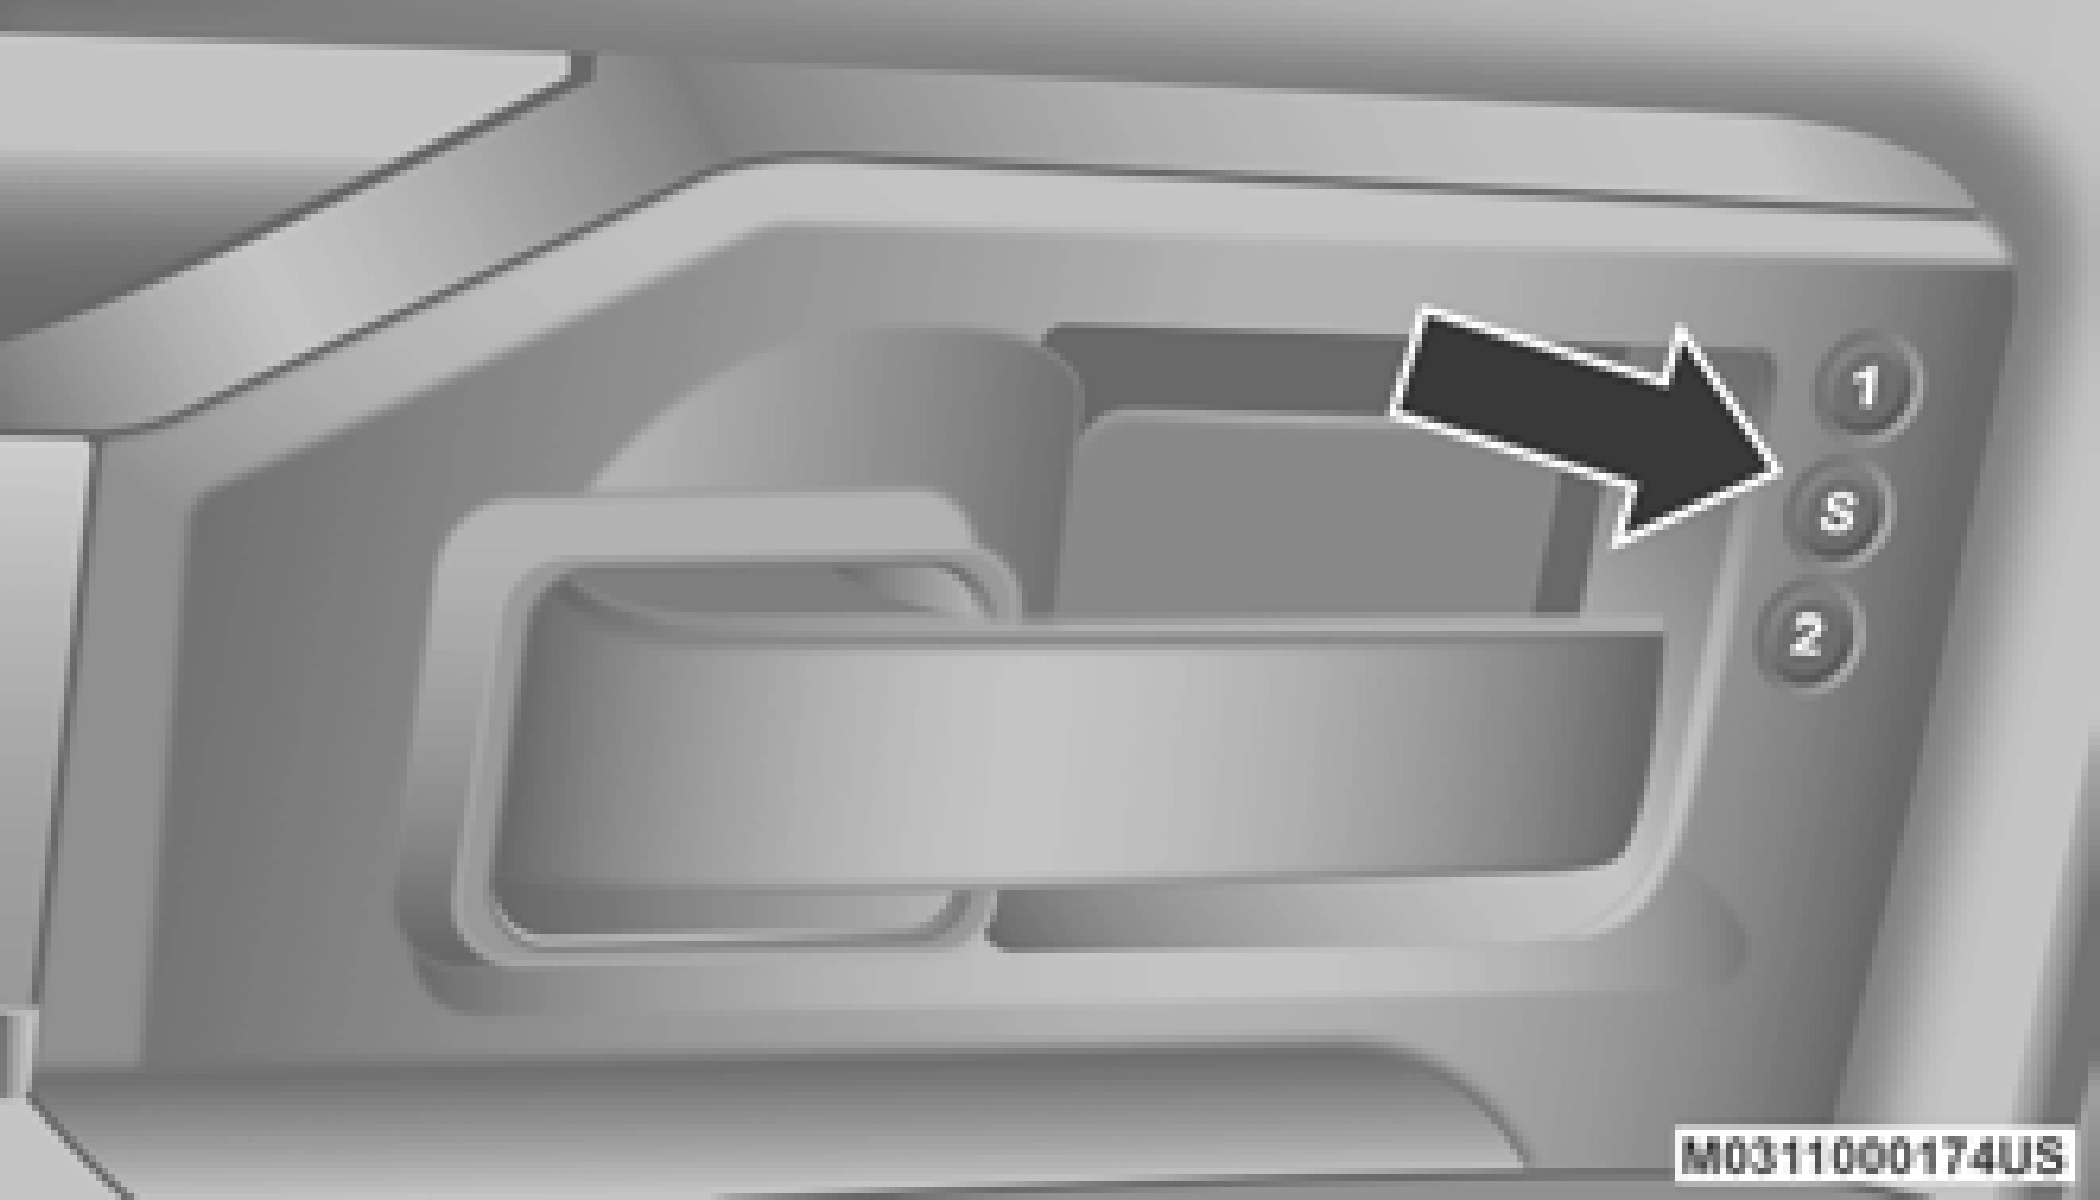
Driver Memory Seat Buttons
To create a new memory profile, perform the following:
Memory profiles can be set without the vehicle in PARK.
Your key fob can be programmed to recall one of two pre-programmed memory profiles by pushing the unlock button on the key fob.
Before programming your key fob you must select the “Personal Settings Linked to Key Fob” feature through the Uconnect Settings. Refer to “Uconnect Settings” in “Multimedia” for further information.
To program your key fob, perform the following:
If a memory profile has not already been set, refer to "Programming The Memory Feature" in this section for instructions on how to set a memory profile.
Your key fob can be unlinked to your memory settings by pushing the set (S) button, and within 10 seconds, followed by pushing the unlock button on the key fob.
The vehicle speed must be lower than 5 mph (8 km/h) to recall memory positions. If a recall is attempted when the vehicle speed is greater than 5 mph (8 km/h), a message will be displayed in the instrument cluster display.
Driver One Memory Position Recall
Driver Two Memory Position Recall
A recall can be cancelled by pushing any of the memory buttons during a recall (S, 1, or 2).
When a recall is canceled, the driver's seat and the adjustable pedals (if equipped) stop moving. A delay of one second will occur before another recall can be selected.
This feature provides automatic driver’s seat positioning to enhance driver mobility when entering and exiting the vehicle.
The distance the driver’s seat moves depends on where you have the driver’s seat positioned when you place the ignition in the OFF position.
Each stored memory setting will have an associ- ated Easy Entry and Easy Exit position.
The Easy Entry/Exit feature is not enabled when the vehicle is delivered from the factory. The Easy Entry/Exit feature is enabled (or later disabled) through the programmable features in the Uconnect system. Refer to “Uconnect Settings” in “Multimedia” for further informa- tion.
On some models, the front and rear seats may be equipped with heaters located in the seat cushions and seat backs.
The heated seats control buttons are located on the center instrument panel below the touch- screen, and are also located within the climate or controls screen of the touchscreen.
If the vehicle is equipped with a 12-inch radio, there will only be control buttons through the touchscreen.
 once to turn the HI setting on. a second time to turn the MED setting on. a third time to turn the LO setting on. a fourth time to turn the heating elements off.
On models that are equipped with remote start, the driver’s seat can be programmed to come on during a remote start.
This feature can be programmed through the Uconnect system. Refer to “Uconnect Settings” in “Multimedia” for further information.
On some models, the two outboard rear seats are equipped with heated seats. The heated seat switches for these seats are located on the rear of the center console.
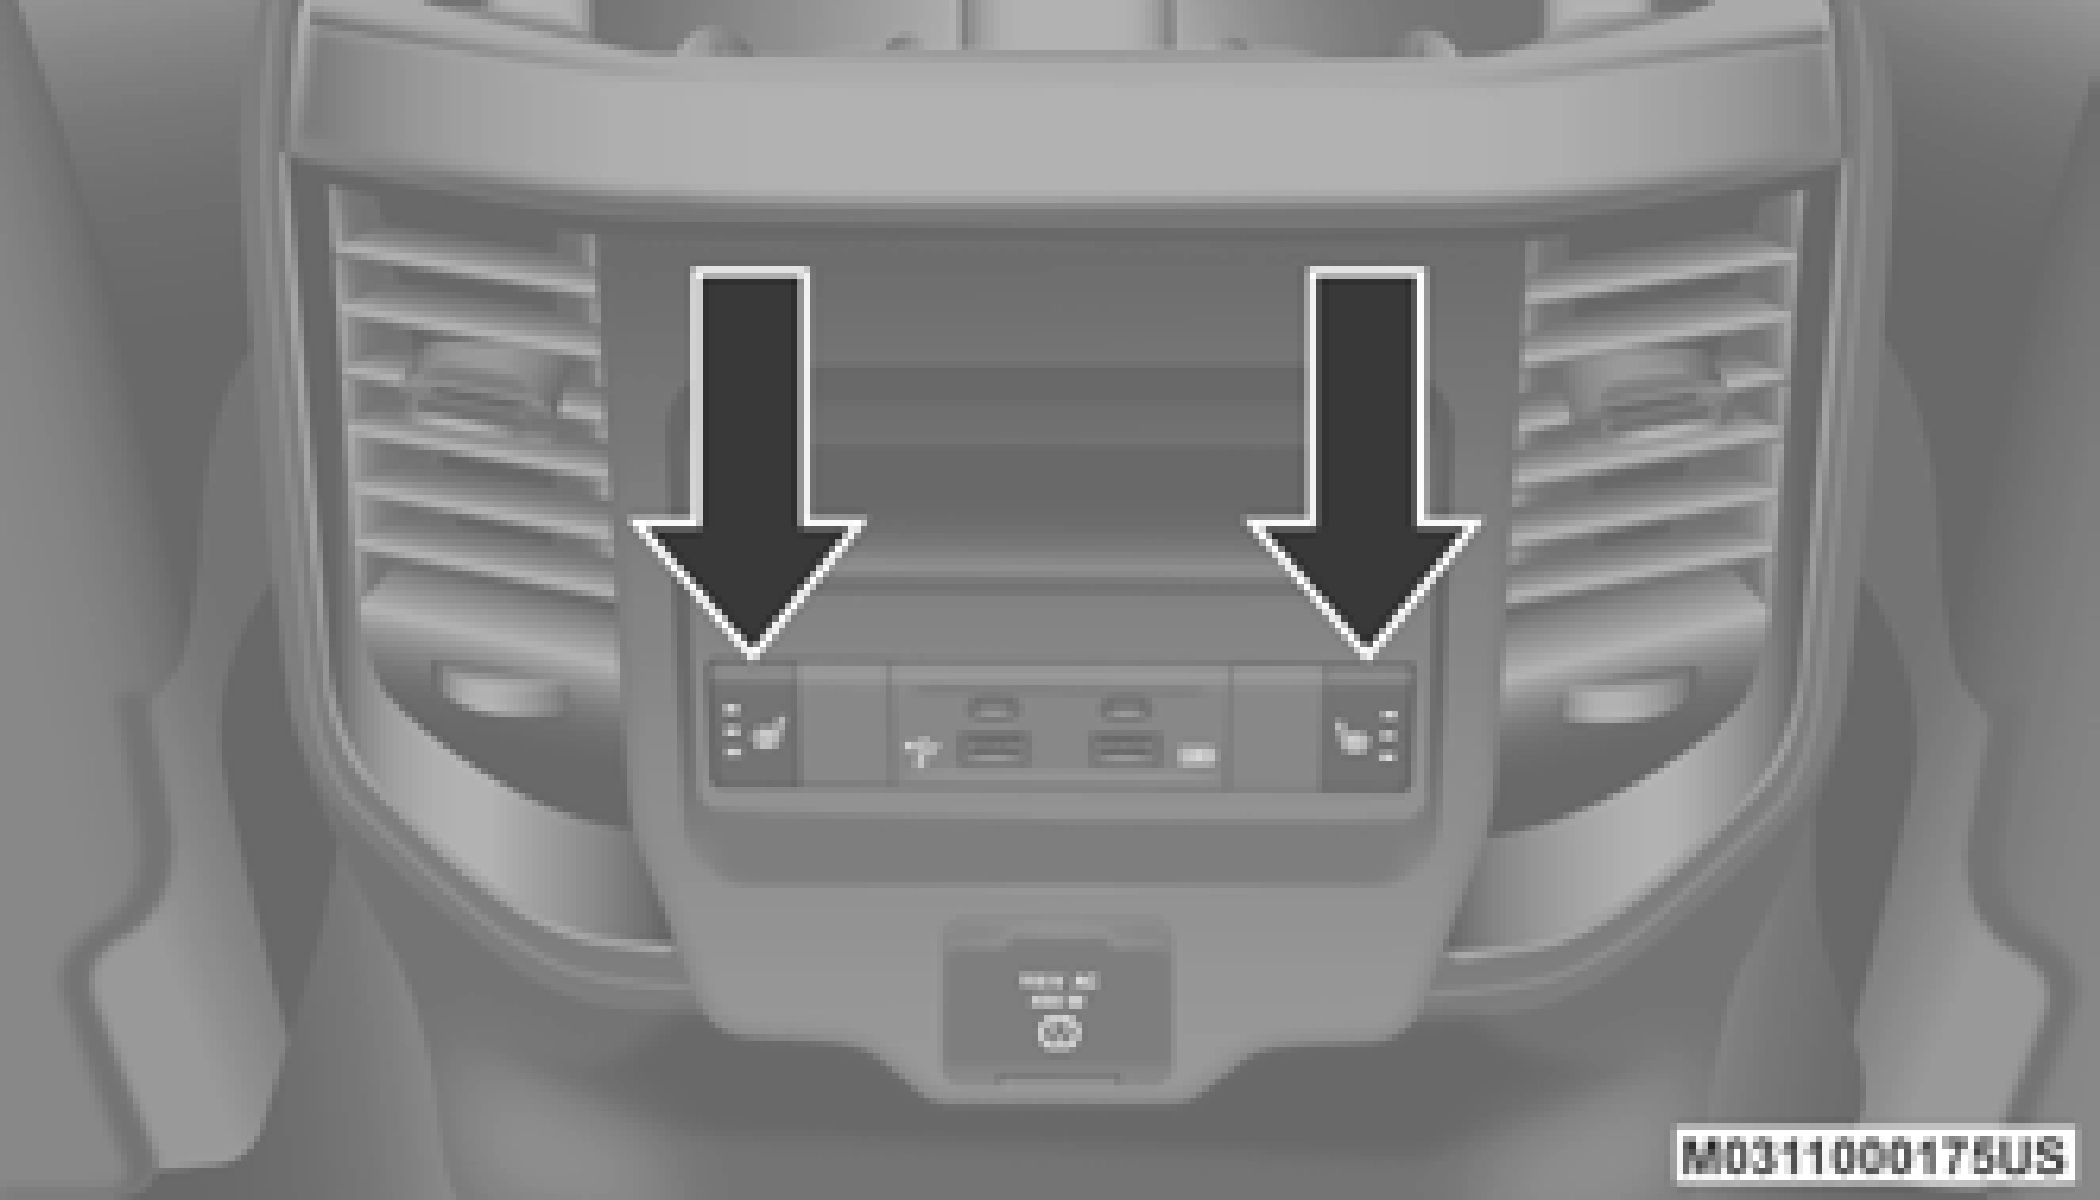
Rear Heated Seat Switches
There are two heated seat switches that allow the rear passengers to operate the seats inde- pendently. You can choose from HI, MED, LO, or OFF heat settings. Amber indicator lights in each switch indicate the level of heat in use.
once to turn the HI setting on. a second time to turn the MED setting on. a third time to turn the LO setting on. a fourth time to turn the heating elements off.Front Ventilated Seats
Located in the seat cushion are small fans that draw the air from the passenger compartment and move air through fine perforations in the seat cover to help keep the driver and front passenger cooler in higher ambient tempera- tures. The fans operate at three speeds, HI, MED and LO.
The front ventilated seats control buttons are located on the center instrument panel below the touchscreen, and are also located within the climate or controls screen of the touchscreen.
If the vehicle is equipped with a 12-inch radio, there will only be control buttons through the touchscreen.
 once to choose HI. a second time to choose MED.
a third time to choose LO. a fourth time to turn the ventilation off.The engine must be running for the ventilated seats to operate.
On models that are equipped with remote start, the driver’s seat can be programmed to come on during a remote start.
This feature can be programmed through the Uconnect system. Refer to “Uconnect Settings” in “Multimedia” for further information.
Download Manual