INSTRUMENT CLUSTER DISPLAY
Your vehicle will be equipped with an instru- ment cluster display, which offers useful infor- mation to the driver. With the ignition in the OFF mode, opening/closing of a door will activate the display for viewing, and display the total miles, or kilometers, in the odometer. Your instrument cluster display is designed to display important information about your vehicle’s systems and features. Using a driver interactive
display located on the instrument panel, your instrument cluster display can show you how systems are working and give you warnings when they are not. The steering wheel mounted controls allow you to scroll through the main menus and submenus. You can access the specific information you want and make selec- tions and adjustments.
The instrument cluster display features a driver interactive display that is located in the instru- ment cluster.
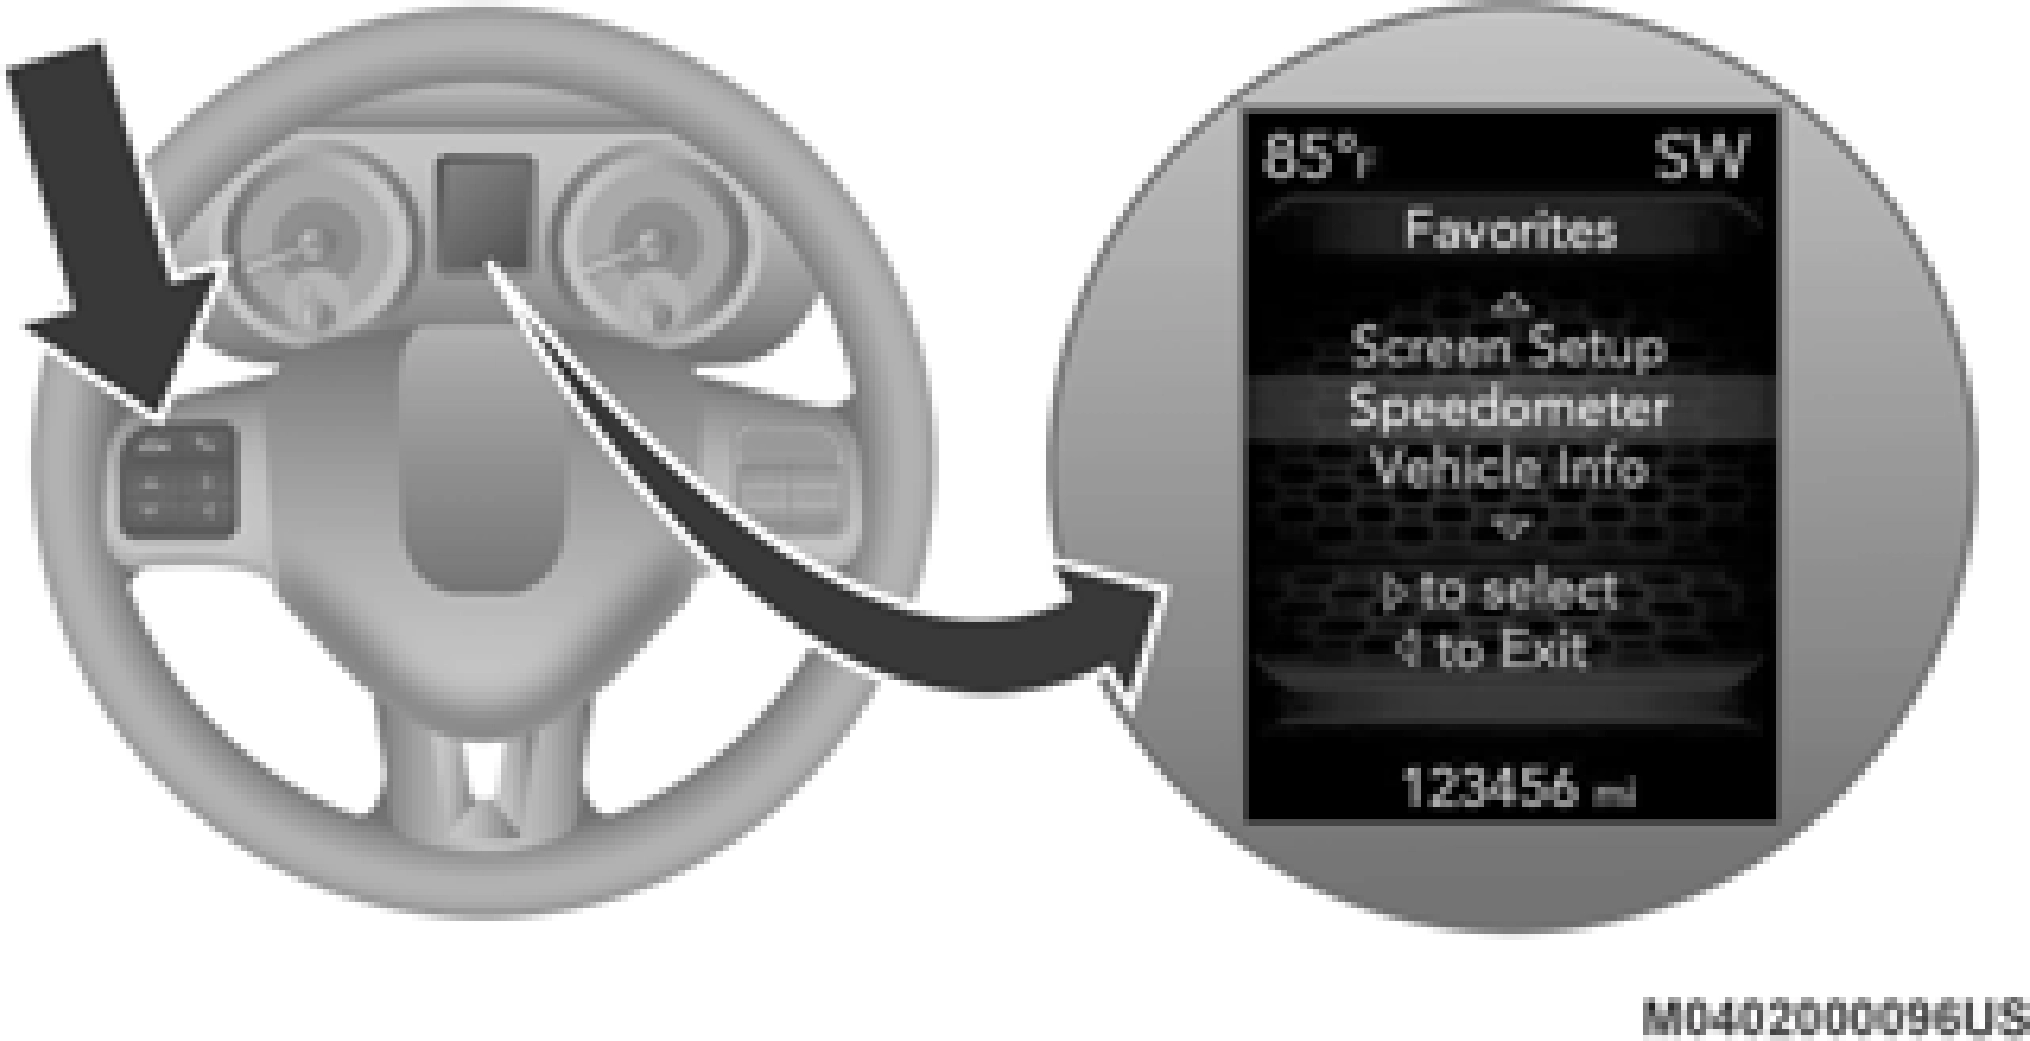
Base Instrument Cluster Display
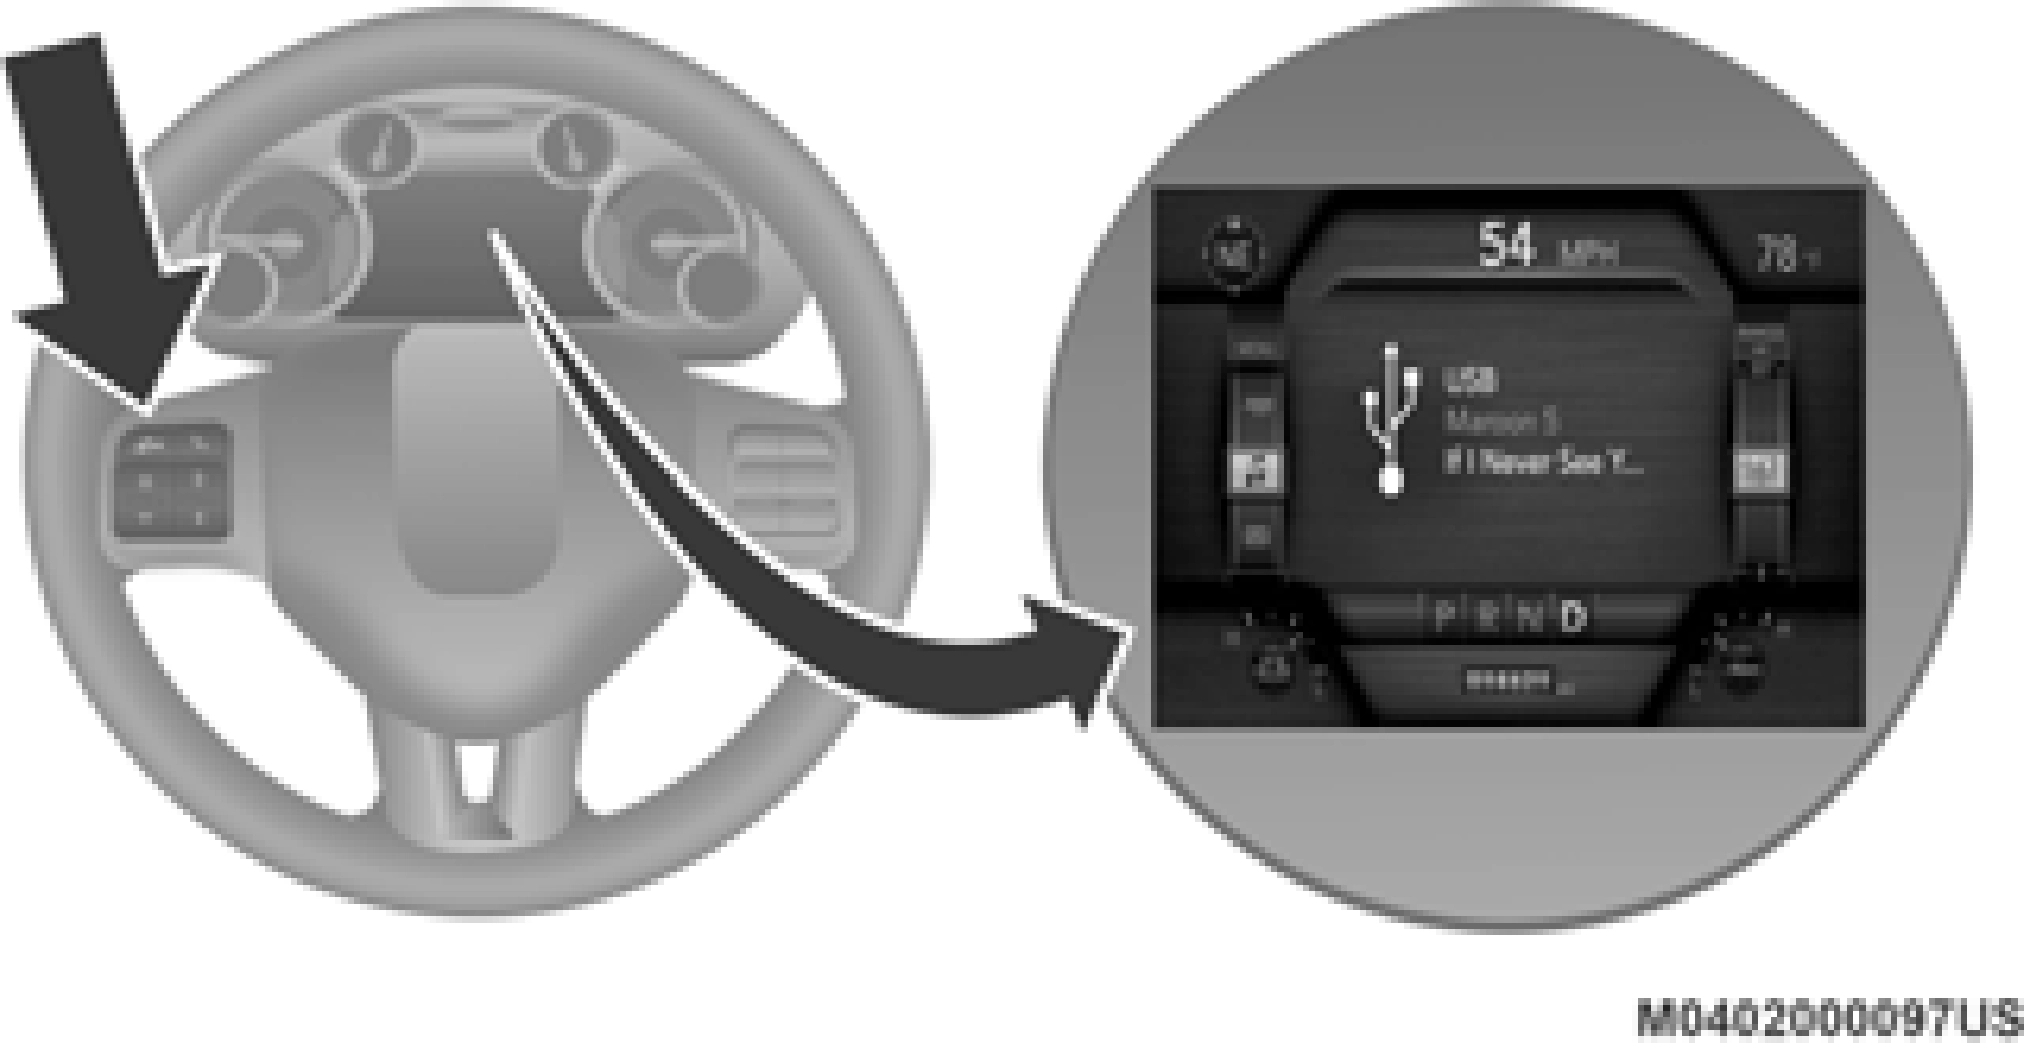
Premium Instrument Cluster Display
The instrument cluster display menu items may consist of the following:
- Speedometer
The system allows the driver to select informa- tion by pushing the following instrument cluster display control buttons located on the left side of the steering wheel:
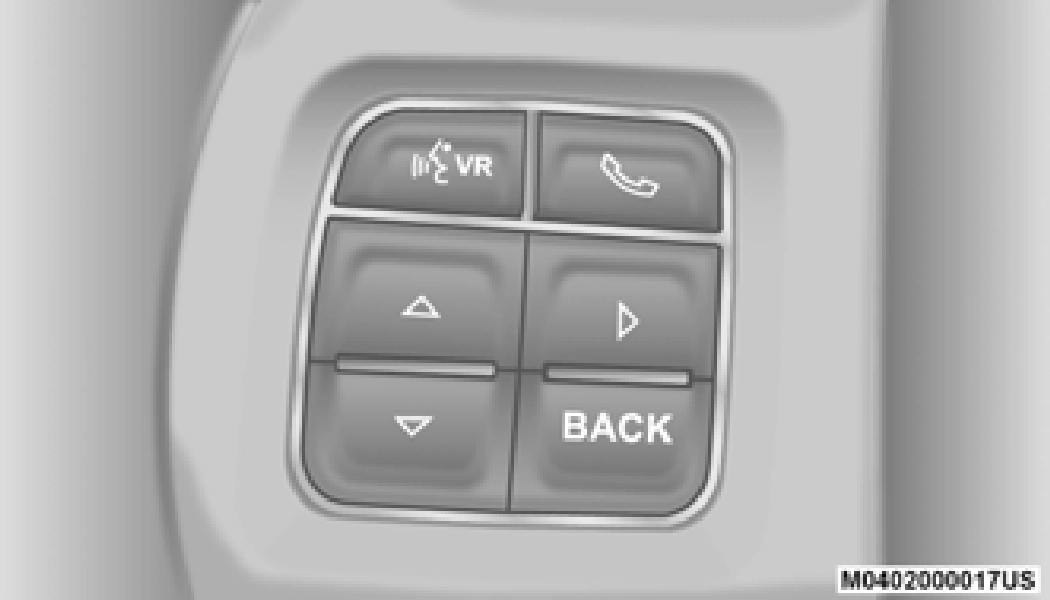
Instrument Cluster Display Control Buttons
Push and release the up arrow  button to scroll upward through the
main menu items, submenu screen, and vehicle settings.
Push and release the down arrow  button to scroll downward through
the main menu items, submenu screen, and vehicle settings.
Push and release the right arrow  button to access/select the infor-
mation screens or submenu
screens of a main menu item. Push and hold the right arrow button for two seconds to reset displayed/selected features that can be reset.
Push and release the left arrow  button to access/select the infor-
mation screens, submenu screens
of a main menu item, or to return to the main menu.
Your vehicle is equipped with an engine oil change indicator system. The “Oil Change Required” message will display in the instru- ment cluster display after a single chime has sounded, to indicate the next scheduled oil change interval. The engine oil change indicator system is duty cycle based, which means the engine oil change interval may fluctuate, depen- dent upon your personal driving style.
Use the steering wheel instrument cluster display controls for the following procedure.
If the indicator message illuminates when you start the vehicle, the oil change indicator system did not reset. If necessary, repeat this procedure.
Push and release the up or down arrow button until the desired selectable menu icon is high- lighted in the instrument cluster display.
Refer to “Instrument Cluster Display” in this chapter for further information.
Push and release the up or down arrow button until the speedometer menu item is highlighted in the instrument cluster display. Push and release the right arrow button to cycle the display between mph and km/h.
Push and release the up or down arrow button until the Vehicle Info menu item is highlighted in the instrument cluster display. Push and release the right arrow button to enter the submenus items of Vehicle Info. Follow the directional prompts to access or reset any of the following Vehicle Info submenu items:
The Driver Assist menu displays the status of the Adaptive Cruise Control (ACC) and Lane- Sense systems.
Push and release the up or down arrow button until the Driver Assist menu is displayed in the instrument cluster display.
The instrument cluster display displays the current ACC system settings. The information displayed depends on ACC system status.
Push the Adaptive Cruise Control (ACC) on/off button (located on the steering wheel) until one of the following displays in the instrument cluster display:
When ACC is deactivated, the display will read “Adaptive Cruise Control Off.”
When ACC is activated but the vehicle speed setting has not been selected, the display will read “Adaptive Cruise Control Ready.”
Push the SET + or the SET- button (located on the steering wheel) and the following will display in the instrument cluster display:
When ACC is set, the set speed will display in the instrument cluster.
The ACC screen may display once again if any ACC activity occurs, which may include any of the following:
For further information, refer to “Adaptive Cruise Control (ACC) — If Equipped” in “Starting And Operating.”
The instrument cluster display displays the current LaneSense system settings. The infor- mation displayed depends on LaneSense system status and the conditions that need to be met. For further information, refer to “Lane- Sense — If Equipped” in “Starting And Oper- ating.”
Push and release the up or down arrow button until the Fuel Economy menu item is highlighted in the instrument cluster display. Push and Hold the right arrow button to reset Average Fuel Economy.
Push and release the up or down arrow button until the Trip menu item is highlighted in the instrument cluster display. Push and release the right arrow button to enter the submenus of Trip A and Trip B. The Trip A or Trip B information will display the following:
Push and hold right arrow button to reset all information.
Push and release the up or down arrow button until the Trailer Tow menu item is highlighted in the instrument cluster display. Push and release the right arrow button and the next screen will display the following trailer trip infor- mation:
Push and release the up or down arrow button until the Audio Menu icon/title is highlighted in the instrument cluster display. This menu will display the audio source information, including
the Song name, Artist name, and audio source with an accompanying graphic.
When a call is incoming, a Phone Call Status pop-up will display on the screen. The pop-up will remain until the phone is answered or
ignored. 3
The call status will temporarily replace the previous media source information displayed on the screen. When the pop-up is no longer displayed, the display will return to the last used screen.
Push and release the up or down arrow button until the Messages Menu item is highlighted. This feature shows the number of stored warning messages. Push and release the right or left arrow buttons to cycle through stored messages.
Push and release the up or down arrow button until the Screen Setup menu item is highlighted in the instrument cluster display. Push and release the right arrow button to enter the Screen Setup submenu. The Screen Setup
feature allows you to change what information is displayed in the instrument cluster as well as the location that information is displayed.
Menus with (Show/Hide) can push the Right arrow button to choose whether to show or hide this menu in the instrument cluster display.
Commercial Settings — If Equipped Commercial Settings allows the driver to set and recall additional features when the trans-
mission is in PARK (P).
Push and release the up and down button until Commercial Settings displays in the instrument cluster display.
Follow the prompts to enter the required PIN and enter the Commercial Settings submenu.
Commercial Settings allows you to access the following features (if equipped):
If the vehicle’s PIN is forgotten or not known, see an authorized dealer to have the PIN reset.
Diesel Particulate Filter (DPF) Messages The Cummins diesel engine meets all diesel emissions standards, resulting in one of the
lowest emitting diesel engines ever produced.
To achieve these emissions standards, your vehicle is equipped with a state-of-the-art engine and exhaust system. These systems are seamlessly integrated into your vehicle and managed by the Powertrain Control Module (PCM). The PCM manages engine combustion to allow the exhaust system’s catalyst to trap and burn Particulate Matter (PM) pollutants, with no input or interaction on your part.
|
WARNING! |
|
A hot exhaust system can start a fire if you park over materials that can burn. Such materials might be grass or leaves coming into contact with your exhaust system. Do not park or operate your vehicle in areas where your exhaust system can contact anything that can burn. |
Your vehicle has the ability to alert you to addi- tional maintenance required on your vehicle or engine. The following messages may display in your instrument cluster display:
By simply driving your vehicle at highway speeds for as little as 45 minutes, you can remedy the condition in the particulate filter system and allow your Cummins diesel engine and exhaust after-treatment system to remove the trapped Particulate Matter (PM) and restore the system to normal oper- ating condition.
— This message indicates that the Diesel Particulate Filter (DPF) self-cleaning is completed. If this message is displayed, you will hear one chime to assist in alerting you of this condition.
— This message indicates regeneration has been disabled due to a system malfunction. At this point the engine Powertrain Control Module (PCM) will register a fault code, the instrument panel will display a MIL light.
|
CAUTION! |
|
See an authorized dealer, as damage to the exhaust system could occur soon with continued operation. |
Failing to follow the oil change indicator, changing your oil and resetting the oil change indicator by 0 miles remaining will prevent the diesel exhaust filter from performing it's cleaning routine. This will shortly result in a Malfunction Indicator Light (MIL) and reduced engine power. Only an authorized dealer will be able to correct this condition.
|
CAUTION! |
|
See an authorized dealer, as damage to the exhaust system could occur soon with continued operation. |
The vehicle will display messages when a derate (engine power reduction) is activated to protect the engine during start up in cold ambient temperatures.
-25°F (-32°C).
Your vehicle is equipped with an engine warm up protection feature that may limit engine performance after cold starting at low ambient temperatures. The length of time engine speed is limited is dependent upon engine coolant temperature. Engine speed may be briefly limited to 1000 RPM after starting with coolant temperature below
freezing conditions, and may be limited to 1000 RPM for up to approximately 2 minutes under more severe cold conditions.
There are four different messages which are displayed if the vehicle detects that the DEF system has been filled with a fluid other than DEF, has experienced component failures, or when tampering has been detected. The vehicle may be limited to a maximum speed of 5 MPH (8 km/H) if the DEF system is not serviced within less than 200 miles (322 km) of the fault being detected.
When the DEF system needs to be serviced the following warnings will display:
displayed. on pickup applications, and approximately 7 gallons (26 Liters) are required on chassis-cab applications.
— This message will continuously display if the “DEF Low Refill Soon” message is ignored, and the frequency of occurrence of the chime will increase unless up to 2 gallons (7.5 Liters) of DEF is added to the tank.
The vehicle will only be capable of a maximum speed of 5 MPH upon the first of the following conditions to occur:
Add a minimum of 2 gallons (7.5 Liters) of DEF to the tank in order to avoid vehicle operation at a maximum speed of 5 MPH (8 km/H).
A minimum of 2 gallons (7.5 Liters) may be required to restore normal vehicle operation. Although the vehicle will start normally and can be placed in gear after this message has been initially displayed, extreme caution should be utilized since the vehicle will only be capable of maneuvering at a maximum speed of 5 MPH (8 km/H).
There are five different messages which are displayed if the vehicle detects that the DEF system has been filled with a fluid other than DEF, has experienced component failures, or when tampering has been detected. The vehicle may be limited to a maximum speed of 5 MPH (8 km/H) if the DEF system is not serviced within less than 200 miles (322 km) of the fault being detected.
When the DEF system needs to be serviced the following warnings will display:
as soon as possible. 3
Under some circumstances this mileage counter may start with a value of less than 150 miles (241 km). For example, if recurring faults are detected in a time interval of less than 40 hours, the counter may restart at the
value where it stopped when a previous fault was temporarily remedied, or at a minimum of 50 miles (80 km).
The vehicle will only be capable of a maximum speed of 5 MPH upon the first of the following conditions to occur:
When this message is displayed, the engine can still be started. However, the vehicle will only operate at a maximum speed of 5 MPH.
Your vehicle is equipped with an advanced Ram Active Air system that provides enhanced performance, especially when towing under demanding hot or high altitude conditions. If the instrument cluster display displays the message “Active Airbox Service Required See Dealer”, vehicle performance may be reduced until service is performed by an authorized RAM dealer.
This vehicle is equipped with an Intelligent Battery Sensor (IBS) to perform additional moni- toring of the electrical system and status of the vehicle battery.
In cases when the IBS detects charging system failure, or the vehicle battery conditions are deteriorating, electrical load reduction actions will take place to extend the driving time and distance of the vehicle. This is done by reducing power to or turning off non-essential electrical loads.
Load reduction is only active when the engine is running. It will display a message if there is a risk of battery depletion to the point where the vehicle may stall due to lack of electrical supply, or will not restart after the current drive cycle.
When load reduction is activated, the message “Battery Saver On Some Systems May Have Reduced Power” will appear in the instrument cluster.
These messages indicate the vehicle battery has a low state of charge and continues to lose electrical charge at a rate that the charging system cannot sustain.
The electrical loads that may be switched off (if equipped), and vehicle functions which can be affected by load reduction:
Loss of the battery charge may indicate one or more of the following conditions:
+12 Volts, 115 Volts AC, USB ports) during certain driving conditions (city driving, towing, frequent stopping).
and similar devices. 3
During a trip:
After a trip:
Download Manual