UCONNECT SETTINGS
The Uconnect system uses a combination of buttons on the touchscreen and buttons on the faceplate located on the center of the instrument panel that allows you to access and change the customer programmable features. Many features can vary by vehicle.
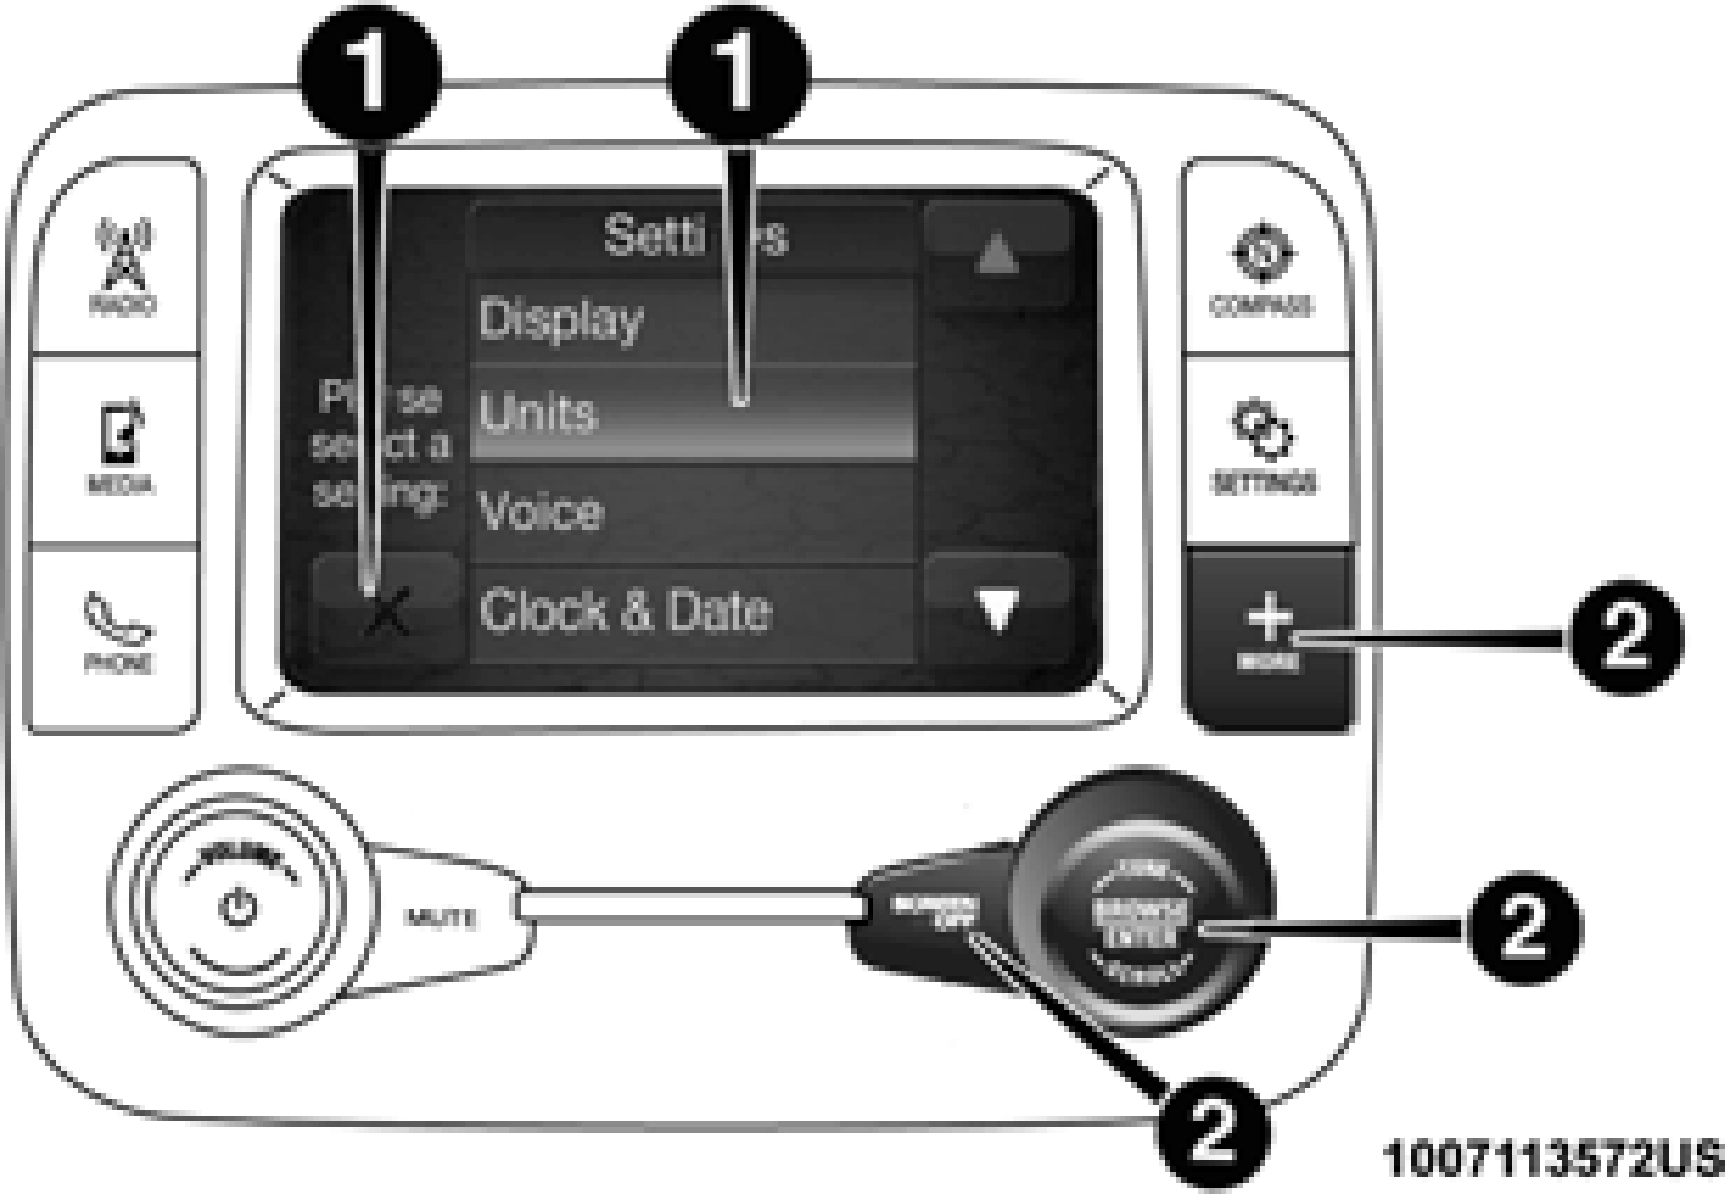
Uconnect 3 With 5–inch Display Buttons On The Touch- screen And Buttons On The Faceplate
1 — Uconnect Buttons On The Touchscreen 2 — Uconnect Buttons On The Faceplate
Push the MORE or SETTINGS button on the faceplate, then press the “Settings” button on the touchscreen (if equipped) to display the settings menu screen. In this mode the Ucon- nect system allows you to access programmable features that may be equipped such as Display, Units, Voice, Clock, Safety & Driving Assistance, Lights, Doors & Locks, Power Side Steps, Auto-On Comfort (if equipped), Engine Off Options, Suspension, Trailer Brake, Audio, Compass Settings, Phone/ Bluetooth, SiriusXM Setup (if equipped), Restore Settings, Clear Personal Data and System Information.
NOTE:
Only one category may be selected at a time.
When making a selection, press the button on the touch- screen to enter the desired mode. Once in the desired mode, press and release the preferred setting until the button is highlighted. Once the setting is complete, either press the back arrow or the “Done” button on the touchscreen or push the Back button on the faceplate to return to the previous menu. Pressing the Up or Down Arrow buttons on the touch- screen on the right side of the screen will allow you to toggle up or down through the list of available settings.
NOTE:
All settings should be changed with the ignition in the RUN position.
After pressing the “Display” button on the touchscreen, the following settings will be available.
|
Setting Name |
Selectable Options |
|
|
Display Mode |
Auto |
Manual |
|
Set Language |
English, Français, Español |
|
|
Touchscreen Beep |
On |
Off |
|
Fuel Saver Display |
On |
Off |
|
NOTE: The “Fuel Saver Display” feature will allow you to enable fuel saver mode and will be displayed in the instrument cluster display. |
After pressing “Units” on the touchscreen, the following will be available:
9
|
Setting Name |
Selectable Options |
||
|
Power — If Equipped |
HP (US) |
HP (UK) |
Kw |
|
Temperature |
°C |
°F |
|
|
Torque — If Equipped |
lb-ft |
Nm |
After pressing the “Voice” button on the touchscreen, the following settings will be available:
|
Setting Name |
Selectable Options |
||
|
Voice Response Length |
Brief |
Detailed |
|
|
Show Command List |
Always |
With Help |
Never |
After pressing the “Clock” button on the touchscreen, the following settings will be available:
|
Setting Name |
Selectable Options |
|
|
Set Time |
12 hour |
24 hour |
|
NOTE: Within the “Set Time” feature, press the corresponding arrow above and below the current time to adjust, then select “AM” or “PM.” |
After pressing the “Safety/Assistance” button on the touchscreen, the following settings will be available:
9
|
Setting Name |
Selectable Options |
|
|
Surround View Camera Delay — If Equipped |
On |
Off |
|
NOTE: The “Surround View Camera Delay” setting determines whether or not the screen will display the 360 degree view image with guidelines for up to ten seconds after the vehicle is shifted out of REVERSE. This delay will be canceled if the vehicle’s speed exceeds 8 mph (13 km/h), the transmission is shifted into PARK, or the ignition is switched to the OFF position. |
||
|
Surround View Camera Guidelines — If Equipped |
On |
Off |
|
NOTE: The “Surround View Rear Back Up Camera Active Guidelines” feature allows you to see active guidelines over the Surround View camera display whenever the gear selector is put into REVERSE or the Surround View button on the touchscreen is pressed. The image will be displayed on the radio touchscreen display. |
||
|
ParkView Backup Camera Active Guidelines |
On |
Off |
|
NOTE: Your vehicle may be equipped with the ParkView Rear Back Up Camera Active Guidelines that allows you to see active guidelines over the ParkView Back up camera display whenever the gear selector is put into REVERSE. The image will be displayed on the radio touchscreen display along with a caution note to “check entire surroundings” across the top of the screen. After five seconds, this note disappears. |
||
|
ParkView Backup Camera Delay |
On |
Off |
9
|
Setting Name |
Selectable Options |
|
|
Hill Start Assist — If Equipped |
On |
Off |
|
NOTE: When the “Hill Start Assist” feature is selected, the Hill Start Assist (HSA) system becomes active. |
||
|
Tire Fill Assist |
On |
Off |
After pressing the “Lights” button on the touchscreen, the following settings will be available:
|
Setting Name |
Selectable Options |
|||||
|
Headlight Off Delay |
0 sec |
30 sec |
||||
|
60 sec |
90 sec |
|||||
|
Headlight Illumination On Approach |
0 sec |
30 sec |
||||
|
60 sec |
90 sec |
|||||
|
NOTE: When the “Headlight Illumination On Approach” feature is selected, it allows the adjustment of the amount of time the head- lights remain on when the doors are unlocked with the key fob. |
||||||
|
Headlights Equipped |
With |
Wipers |
— |
If |
On |
Off |
|
Auto Dim High Beams — If Equipped |
On |
Off |
||||
|
Flash Lights With Lock |
On |
Off |
|
Setting Name |
Selectable Options |
|
|
NOTE: When the “Flash Lights With Lock” feature is selected, the exterior lights flash when the doors are locked or unlocked with the key fob. This feature may be selected with or without the sound horn on lock feature selected. |
||
|
Steering Directed Lights |
On |
Off |
|
NOTE: When the “Steering Directed Lights” feature is selected, the headlights turn with the direction of the steering wheel. |
||
|
Rear Cargo Guidance Lights — If Equipped |
On |
Off |
|
NOTE: When the “Rear Cargo Guidance Lights” feature is selected, the lights in the cargo and bed of the truck will come on either when the headlight switch is pressed, or the button on the back bed of the truck is pressed. |
After pressing the “Doors & Locks” button on the touchscreen, the following settings will be available:
9
|
Setting Name |
Selectable Options |
||
|
NOTE: When the “Auto Unlock On Exit” feature is selected, all doors unlock when the vehicle is stopped, the transmission is in the PARK or NEUTRAL position and the driver's door is opened. |
|||
|
Sound Horn With Lock |
Off |
1st Press |
2nd Press |
|
Remote Door Unlock |
All |
Driver |
|
|
NOTE: The “Remote Door Unlock” feature allows you to program your remote door locks to open “All doors” or only the “Driver door” with the first push of the key fob or grabbing the Passive Entry door handle. |
|||
|
Sound Horn With Remote Start |
On |
Off |
|
|
NOTE: When the “Sound Horn With Remote Start” feature is selected, the horn sounds when the remote start is activated. |
|||
|
Memory Linked To Fob — If Equipped |
On |
Off |
|
|
NOTE: The “Memory Linked To Fob” feature provides automatic driver seat positioning to enhance driver mobility when entering and exiting the vehicle.
The seat returns to the memorized seat location if “Memory Linked To Fob” is set to (On) when the key fob is used to unlock the door.
|
|||
|
Passive Entry — If Equipped |
On |
Off |
|
Setting Name |
Selectable Options |
|
|
NOTE: The “Passive Entry” feature allows you to lock and unlock the vehicle’s door(s) without having to push the key fob lock or unlock buttons. It automatically unlocks the doors when the outside door handle is grabbed. |
||
|
Flash Lights With Lock |
On |
Off |
|
NOTE: When the “Flash Lights With Lock” feature is selected, the exterior lights flash when the doors are locked or unlocked with the key fob. This feature may be selected with or without the “Sound Horn With Lock” feature selected. |
After pressing the “Power Side Steps” button on the touchscreen, the following settings will be available:
|
Setting Name |
Selectable Options |
|
|
Power Side Steps |
Automatic |
Stow |
9
After pressing the “Auto-On Comfort” button on the touchscreen, the following settings will be available:
|
Setting Name |
Selectable Options |
||
|
Auto-On Driver Heated/ Ventilated Seat & Steering Wheel With Vehicle Start — If Equipped |
Off |
Remote Start Only |
All Starts |
|
NOTE: When the “Auto-On Driver Heated/Ventilated Seat & Steering Wheel With Vehicle Start” feature is selected the driver's heated seat and heated steering wheel will automatically turn on when temperatures are below 40° F (4.4° C). When tempera- tures are above 80° F (26.7° C) the driver vented seat will turn on. |
After pressing the “Engine Off Options” button on the touchscreen, the following settings will be available:
|
Setting Name |
Selectable Options |
|
|
Easy Exit Seats — If Equipped |
On |
Off |
|
Headlight Off Delay |
0 sec |
30 sec |
|
60 sec |
90 sec |
|
|
Engine Off Power Delay |
0 sec |
45 sec |
|
5 min |
10 min |
|
Setting Name |
Selectable Options |
|
|
Auto Entry/Exit — If Equipped |
On |
Off |
After pressing the “Suspension” button on the touchscreen, the following settings will be available:
|
Setting Name |
Selectable Options |
|
|
Auto Entry/Exit Suspension |
On |
Off |
|
NOTE: When the “Auto Entry/Exit Suspension” feature is selected, the vehicle automatically lowers from ride height position when vehicle shifted to park for easy entry/exit. |
||
|
Display Suspension Messages |
All |
Warning Only |
|
Tire Jack Mode |
On |
Off |
|
NOTE: When this feature is selected the air suspension system is disabled to prevent auto leveling of the suspension, while the vehicle is on a jack changing a tire. |
||
|
Transport Mode |
On |
Off |
|
NOTE: When the “Transport Mode” feature is selected, the air suspension system is disabled to assist with flat bed towing. |
||
|
Wheel Alignment Mode |
On |
Off |
|
NOTE: The “Wheel Alignment Mode” feature prevents auto leveling of the air suspension while performing a wheel alignment service. Before performing a wheel alignment, this mode must be enabled. Refer to an authorized dealer for further information. |
After pressing the “Trailer Brake” button on the touchscreen, the following settings will be available:
|
Setting Name |
Selectable Options |
|||
|
Trailer Select |
Trailer 1 |
Trailer 2 |
Trailer 3 |
Trailer 4 |
|
Trailer Brake Type |
Light Electric |
Heavy Electric |
Light EOH |
Heavy EOH |
|
Trailer Name |
List of Trailer Names Available |
|||
|
NOTE: You can select and personalize your trailer name depending on the type of trailer you are hauling. Select the trailer name from the following list: trailer, boat, car, cargo, dump, equipment, flatbed, gooseneck, horse, livestock, motorcycle, snow mobile, travel, utility, and 5th wheel. |
After pressing the “Audio” button on the touchscreen, the following settings will be available:
|
Setting Name |
Selectable Options |
|||
|
Balance/Fade |
Front |
Back |
Left |
Right |
|
NOTE: The “Balance/Fade” feature allows you to adjust the Balance and Fade settings. Press and drag the speaker icon or use the arrows to adjust, tap the “C” icon to readjust to the center. |
||||
|
Equalizer |
+ |
– |
||
|
NOTE: When in the “Equalizer” display you may adjust the Bass, Mid and Treble settings. |
9
After pressing the “Compass Settings” button on the touchscreen, the following settings will be available:
|
Setting Name |
Selectable Options |
||||||||||||||
|
Variance |
1 |
2 |
3 |
4 |
5 |
6 |
7 |
8 |
9 |
10 |
11 |
12 |
13 |
14 |
15 |
|
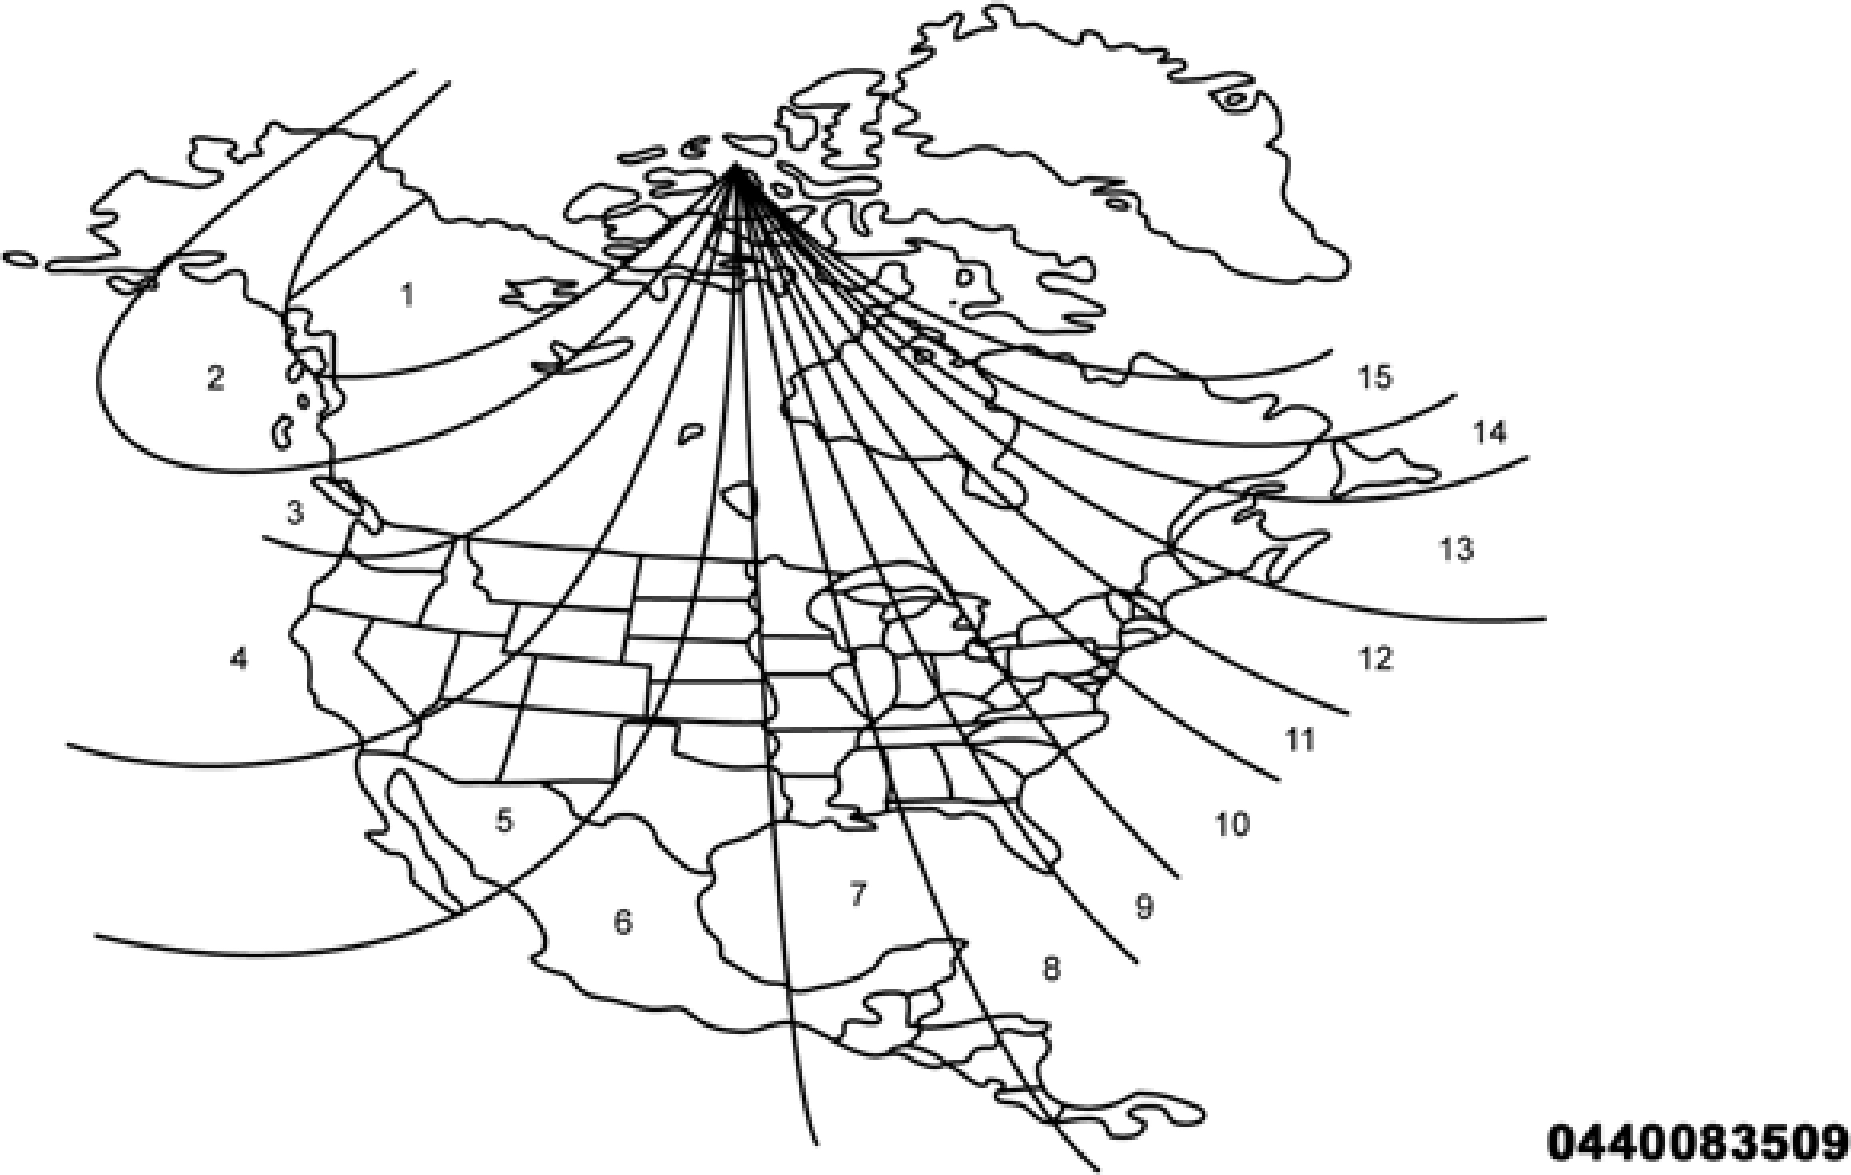
NOTE: Compass Variance is the difference between Magnetic North and Geographic North. To compensate for the differences the variance should be set for the zone where the vehicle is driven, per the zone map. Once properly set, the compass will auto- matically compensate for the differences, and provide the most accurate compass heading.
Keep magnetic materials away from the top of the instrument panel, such as iPod's, Mobile Phones, Laptops and Radar Detectors. This is where the compass module is located, and it can cause interference with the compass sensor, and it may give false readings.
|
|||||||||||||||
|
Perform Compass Calibration |
On |
Off |
|||||||||||||
|
NOTE: Press the “Calibration” button on the touchscreen to change this setting. This compass is self-calibrating, which eliminates the need to manually reset the compass. When the vehicle is new, the compass may appear erratic until it is calibrated. You may also calibrate the compass by pressing the “ON” button on the touchscreen and completing one or more 360-degree turns (in an area free from large metal or metallic objects). The compass will now function normally. |
 9
9
Compass Variance Zone Map
After pressing the “Phone/Bluetooth” button on the touchscreen, the following settings will be available:
|
Setting Name |
Selectable Options |
|
Paired Phones |
List of Paired Phones |
|
NOTE: The “Paired Phones” feature shows which phones are paired to the Phone/Bluetooth system. For further information, refer to the Uconnect Owner’s Manual Supplement. |
After pressing the “SiriusXM Setup” button on the touchscreen, the following settings will be available:
|
Setting Name |
Selectable Options |
|
|
Tune Start |
On |
Off |
|
Channel Skip |
List of Channels |
|
|
NOTE: SiriusXM can be programmed to exclude undesirable channels while scanning. To make your selection, press the “Channel Skip” button on the touchscreen, select the channels you would like to skip. |
||
|
Subscription Info |
Sirius ID |
|
Setting Name |
Selectable Options |
|
NOTE: New vehicle purchasers or lessees will receive a free limited time subscription to SiriusXM Satellite Radio with your radio. Following the expiration of the free services, it will be necessary to access the information on the Subscription Information screen to re-subscribe. Press the “Subscription Info” button on the touchscreen to access the Subscription Information screen.
Write down the SIRIUS ID numbers for your receiver. To reactivate your service, either call the number listed on the screen or visit the provider online.
|
After pressing the “Restore Default Settings” button on the touchscreen, the following settings will be available:
9
After pressing the “Clear Personal Data Settings” button on the touchscreen, the following settings will be available:
|
Setting Name |
Selectable Options |
|
|
Clear Personal Data |
Yes |
Cancel |
|
NOTE: When this feature is selected it will remove all personal data including Bluetooth devices and presets. If “Yes” is selected a pop-up will appear asking "Are you sure you want to clear all personal data?” select “Yes” to Clear, or “Cancel” to exit. |
After pressing the “System Information” button on the touchscreen, the following settings will be available:
|
Setting Name |
Selectable Options |
|
System Information |
System Software Information Screen |
|
NOTE: When the “System Information” feature is selected, a “System Software Information” screen will appear, displaying the system software version. You can also update your maps with a USB device. Please see an authorized dealer for further infor- mation. |
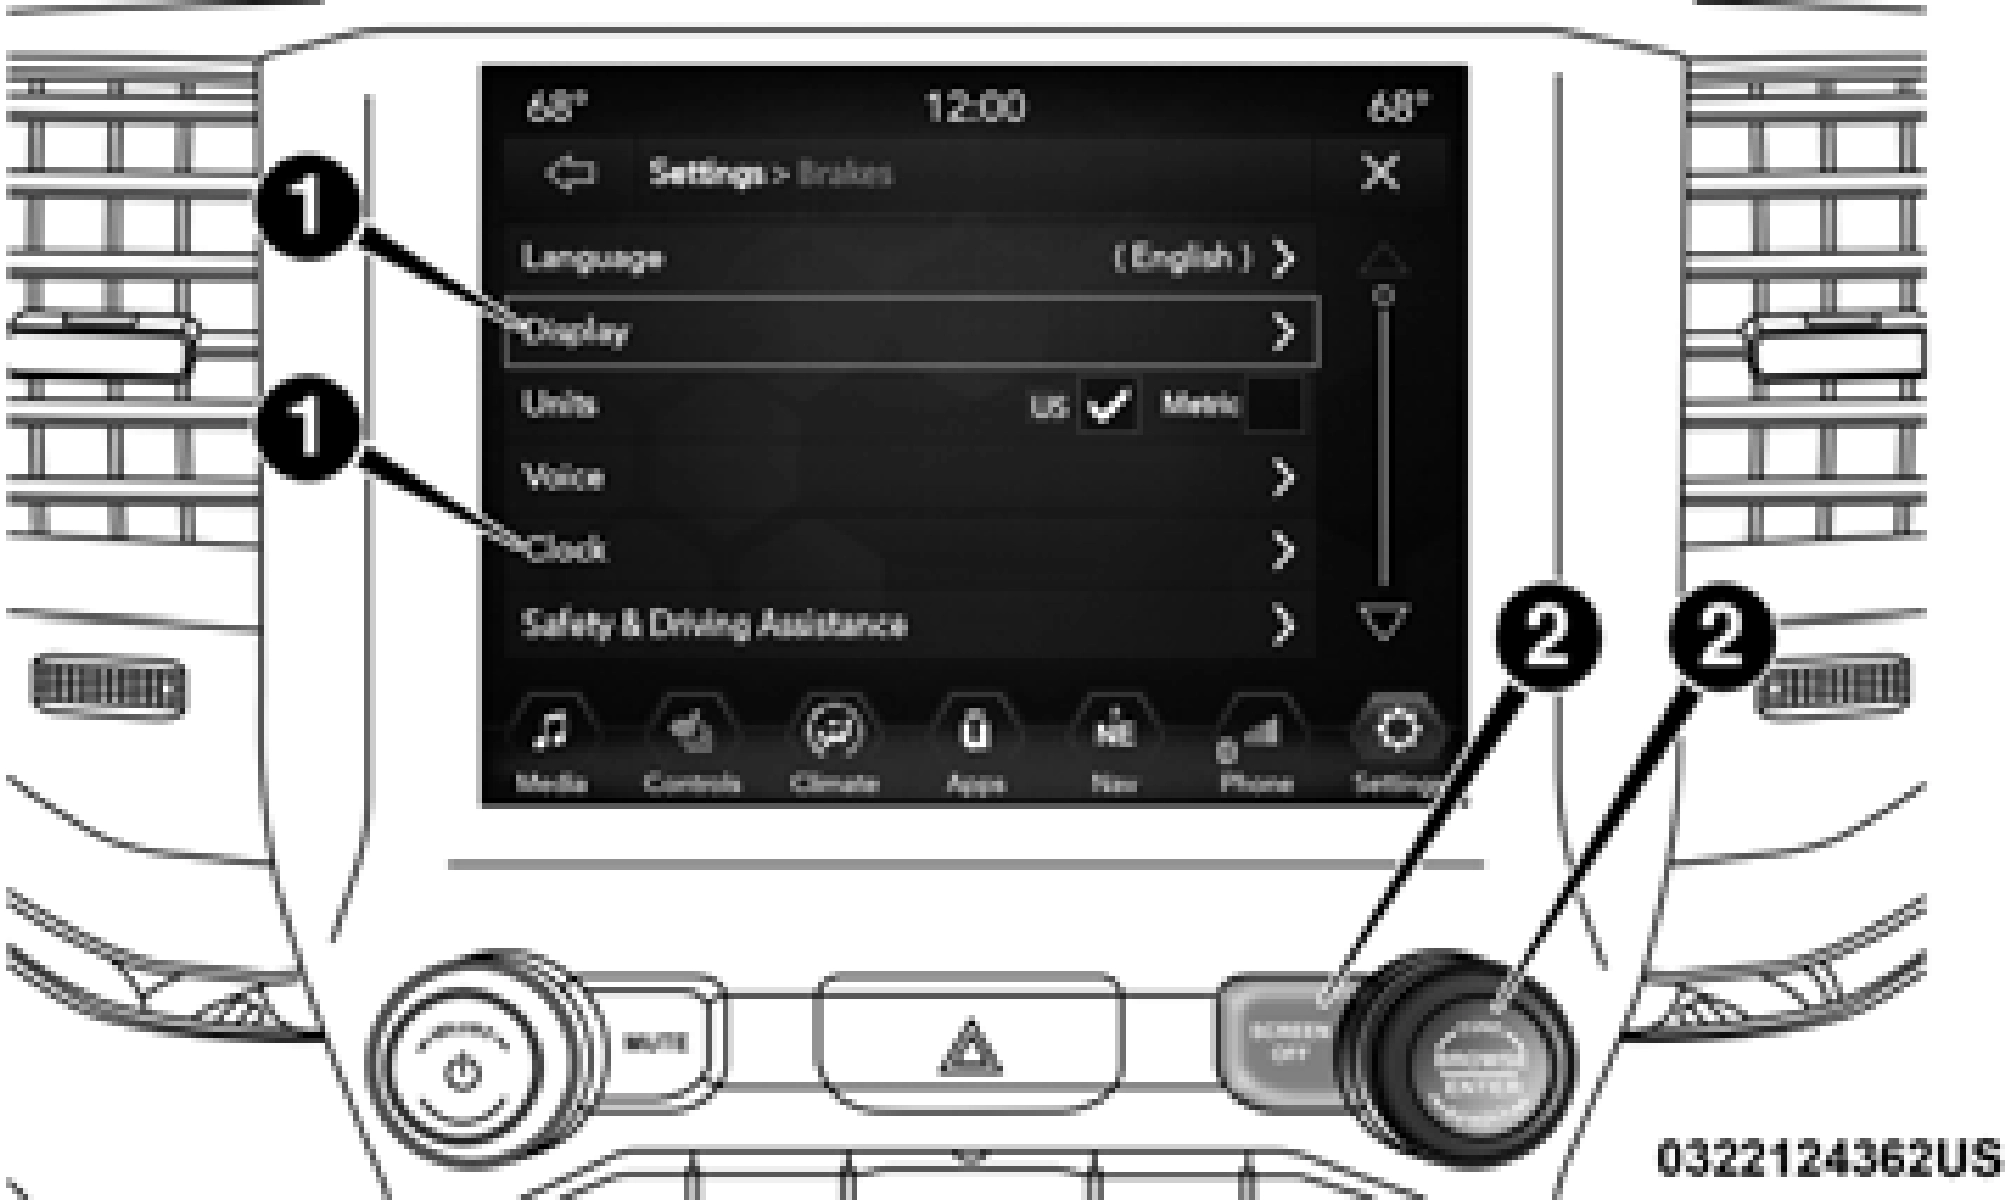
Uconnect 4/4C/4C NAV With 8.4–inch Display Buttons On The Touchscreen And Buttons On The Faceplate
1 — Uconnect Buttons On The Touchscreen 2 — Uconnect Buttons On The Faceplate
Engine Off Options, Suspension, Trailer, Audio, Phone/ Bluetooth, SiriusXM Setup (if equipped), Restore Settings and System Information.
NOTE:
Only one category may be selected at a time.
When making a selection, press the button on the touch- screen to enter the desired mode. Once in the desired mode, press and release the preferred setting until a check-mark appears next to the setting, showing that setting has been selected. Once the setting is complete, press the back arrow button on the touchscreen to return to the previous menu or press the “X” button on the touchscreen to close out of the settings screen. Pressing the Up or Down Arrow buttons on the touchscreen on the right side of the screen will allow you to toggle up or down through the list of available settings.
NOTE:
All settings should be changed with the ignition in the RUN
Press the “Apps” button on the touchscreen then press the
position. 9
“Settings” button on the touchscreen to display the settings menu screen. In this mode the Uconnect system allows you to access programmable features that may be equipped such as Language, Display, Units, Voice, Clock, Safety & Driving Assistance, Mirrors & Wipers, Lights, Doors & Locks, Power Side Steps (if equipped), Auto-On Comfort (if equipped),
After pressing the “Language” button on the touchscreen, the following settings will be available:
|
Setting Name |
Selectable Options |
||
|
Set Language |
English |
Français |
Español |
|
NOTE: When the “Set Language” feature is selected, you may select one of multiple languages (English / Français / Español) for all display nomenclature, including the trip functions and the navigation system (if equipped). Press the “Set Language” button on the touchscreen, then press the desired language button on the touchscreen until a check-mark appears next to the language, showing that setting has been selected. |
After pressing the “Display” button on the touchscreen, the following settings will be available:
|
Setting Name |
Selectable Options |
|
|
Display Mode |
Auto |
Manual |
|
NOTE: When Day or Night is selected for the Display Mode, the usage of the Parade Mode feature will cause the radio to activate the Display Brightness Day control even though the headlights are on. |
||
|
Display Brightness With Headlights ON |
– |
+ |
|
NOTE: To make changes to the "Display Brightness with Headlights ON" setting, the headlights must be on and the interior dimmer switch must not be in the "party" or "parade" positions. |
9
After pressing the “Units” button on the touchscreen, you may select each unit of measure independently displayed in the instrument cluster display, and navigation system (if equipped). The following selectable units of measure are listed below:
|
Setting Name |
Selectable Options |
|||
|
Units |
US |
Metric |
Custom |
|
|
NOTE: When the “Custom” setting is selected, units will appear according to your personally configured settings. To configure these settings, press the “Custom” bar. The following settings will appear: |
||||
|
Speed |
MPH |
km/h |
||
|
Distance |
mi |
km |
||
|
Fuel Consumption |
MPG (US) |
MPG (UK) |
L/100 km |
km/L |
|
Pressure |
psi |
kPa |
bar |
|
|
Power — If Equipped |
HP (US) |
HP (UK) |
Kw |
|
|
Temperature |
°F |
°C |
||
|
Torque — If Equipped |
lb-ft |
Nm |
After pressing the “Voice” button on the touchscreen, the following settings will be available:
|
Setting Name |
Selectable Options |
||
|
Voice Response Length |
Brief |
Detailed |
|
|
Show Command List |
Never |
w/Help |
Always |
After pressing the “Clock & Date” button on the touchscreen, the following settings will be available:
9
After pressing the “Camera” button on the touchscreen, the following settings will be available:
|
Setting Name |
Selectable Options |
|
|
Surround View Camera — If Equipped |
On |
Off |
|
NOTE: The “Surround View Camera” feature displays a complete 360 degree view of the vehicle's exterior environment while backing up. |
||
|
Surround View Camera Delay — If Equipped |
On |
Off |
|
NOTE: The “Surround View Camera Delay” setting determines whether or not the screen will display the 360 degree view image with guidelines for up to ten seconds after the vehicle is shifted out of REVERSE. This delay will be canceled if the vehicle’s speed exceeds 8 mph (13 km/h), the transmission is shifted into PARK, or the ignition is switched to the OFF position. |
||
|
Surround View Camera Guidelines — If Equipped |
On |
Off |
|
NOTE: The “Surround View Rear Back Up Camera Active Guidelines” feature allows you to see active guidelines over the Surround View camera display whenever the gear selector is put into REVERSE or the Surround View button on the touchscreen is pressed. The image will be displayed on the radio touchscreen display. |
||
|
ParkView Backup Camera Delay |
On |
Off |
|
Setting Name |
Selectable Options |
|
|
NOTE: The “ParkView Backup Camera Delay” setting determines whether or not the screen will display the rear view image with dynamic grid lines for up to ten seconds after the vehicle is shifted out of REVERSE. This delay will be canceled if the vehicle’s speed exceeds 8 mph (13 km/h), the transmission is shifted into PARK, or the ignition is switched to the OFF position. |
||
|
Active Parkview Backup Camera Guidelines |
On |
Off |
|
NOTE: The “ParkView Backup Camera Active Guide Lines” feature overlays the Rear Backup Camera image with active, or dynamic, grid lines to help illustrate the width of the vehicle and its project back up path, based on the steering wheel posi- tion when the option is checked. A dashed center line overlay indicates the center of the vehicle to assist with parking or aligning to a hitch/receiver. |
||
|
Fixed Parkview Backup Camera Guidelines |
On |
Off |
|
Forward Facing Camera Guidelines — If Equipped |
On |
Off |
9
|
Setting Name |
Selectable Options |
|
|
NOTE: The “Forward Facing Camera Guidelines” feature is an off-road type of feature that shows the path of the tires based on the steering wheel input. |
||
|
CHMSL (Center High Mounted Stop Lamp) Camera Dynamic Centerline — If Equipped |
On |
Off |
|
NOTE: When the “CHMSL Camera Dynamic Centerline” feature is selected, it will assist in backing up for trailer alignment and hook up. |
After pressing the “Safety & Driving Assistance” button on the touchscreen, the following settings will be available:
|
Setting Name |
Selectable Options |
|
|
Surround View Camera — If Equipped |
On |
Off |
|
NOTE: The “Surround View Camera” feature displays a complete 360 degree view of the vehicle's exterior environment while backing up. |
||
|
Surround View Camera Delay — If Equipped |
On |
Off |
9
|
Setting Name |
Selectable Options |
||
|
NOTE: The “ParkView Backup Camera Active Guide Lines” feature overlays the Rear Backup Camera image with active, or dynamic, grid lines to help illustrate the width of the vehicle and its project back up path, based on the steering wheel posi- tion when the option is checked. A dashed center line overlay indicates the center of the vehicle to assist with parking or aligning to a hitch/receiver. |
|||
|
Fixed Parkview Backup Camera Guidelines |
On |
Off |
|
|
Forward Facing Camera Guidelines — If Equipped |
On |
Off |
|
|
NOTE: The “Forward Facing Camera Guidelines” feature is an off-road type of feature that shows the path of the tires based on the steering wheel input. |
|||
|
CHMSL (Center High Mounted Stop Lamp) Camera Dynamic Centerline — If Equipped |
On |
Off |
|
|
NOTE: When the “CHMSL Camera Dynamic Centerline” feature is selected, it will assist in backing up for trailer alignment and hook up. |
|||
|
Forward Collision Warning — If Equipped |
Off |
Warning Only |
Warning & Braking |
9
After pressing the “Mirrors & Wipers” button on the touchscreen, the following settings will be available:
|
Setting Name |
Selectable Options |
|
|
Tilt Side Mirrors In Reverse — If Equipped |
On |
Off |
|
NOTE: When the “Tilt Side Mirrors In Reverse” feature is selected, the outside side-view mirrors will tilt downward when the igni- tion is in the RUN position and the transmission gear selector is in the REVERSE position. The mirrors will move back to their previous position when the transmission is shifted out of REVERSE. |
||
|
Rain Sensing Auto Wipers — If Equipped |
On |
Off |
|
NOTE: Automatically adjusts the wiper speed based on the amount of precipitation. |
||
|
Headlights with Wipers |
On |
Off |
After pressing the “Lights” button on the touchscreen, the following settings will be available:
9
|
Setting Name |
Selectable Options |
|
|
Daytime Running Lights — If Equipped |
On |
Off |
|
Flash Lights With Lock |
On |
Off |
|
NOTE: When the “Flash Lights With Lock” feature is selected, the exterior lamps flash when the doors are locked or unlocked with the key fob. This feature may be selected with or without the sound horn on lock feature selected. |
||
|
Rear Cargo Guidance Lights — If Equipped |
On |
Off |
|
NOTE: When the “Rear Cargo Guidance Lights” feature is selected, the lights in the cargo and bed of the truck will come on either when the headlight switch is pressed, or the button on the back bed of the truck is pressed. |
After pressing the “Doors & Locks” button on the touchscreen, the following settings will be available:
|
Setting Name |
Selectable Options |
|
|
Auto Door Locks — If Equipped |
On |
Off |
|
NOTE: When the “Auto Door Locks” feature is selected, all doors lock automatically when the vehicle reaches a speed of 15 mph (24 km/h). |
||
|
Auto Unlock On Exit |
On |
Off |
|
Setting Name |
Selectable Options |
||
|
NOTE: When the “Auto Unlock On Exit” feature is selected, all doors unlock when the vehicle is stopped and the transmission is in the PARK or NEUTRAL position and the driver's door is opened. |
|||
|
Flash Lights With Lock |
On |
Off |
|
|
NOTE: When the “Flash Lights With Lock” feature is selected, the front and rear turn signals flash when the doors are locked or unlocked with the key fob. This feature may be selected with or without the “Sound Horn With Lock” feature selected. |
|||
|
Sound Horn With Lock |
Off |
1st Press |
2nd Press |
|
Sound Horn With Remote Start |
On |
Off |
|
|
1st Press Of Key Fob Unlocks |
Driver Door |
All Doors |
9
|
Setting Name |
Selectable Options |
|
|
NOTE: When “1st Press Of Key Fob Unlocks: Driver Door” is selected, only the driver's door unlocks on the first press of the key fob unlock button. You must push the key fob unlock button twice to unlock the passenger's doors.
When “All Doors” is selected, all of the doors unlock on the first push of the key fob unlock button.
If the vehicle is programmed “1st Press Of Key Fob Unlocks: All Doors”, all doors will unlock no matter which Passive Entry equipped door handle is grasped. If “1st Press Of Key Fob Unlocks: Driver Door” is programmed, only the driver’s door will unlock when the driver’s door is grasped.
With Passive Entry, if “1st Press Of Key Fob Unlocks: Driver Door” is programmed pushing the handle more than once only results in the driver’s door opening. If “Driver Door” is selected, once the driver’s door is opened, the interior door lock/unlock switch can be used to unlock all doors (or use key fob).
|
||
|
Passive Entry — If Equipped |
On |
Off |
|
NOTE: The “Passive Entry” feature allows you to lock and unlock the vehicle’s door(s) without having to push the key fob lock or unlock buttons. |
||
|
Personal Settings Linked To Key Fob — If Equipped |
On |
Off |
|
NOTE: The “Personal Settings Linked To Key Fob” feature provides automatic driver seat positioning to enhance driver mobility when entering and exiting the vehicle.
The seats return to the memorized seat location (if “Personal Settings Linked To Key Fob” is set to on) when the key fob is used to unlock the door.
|
After pressing the “Power Side Steps” button on the touchscreen, the following settings will be available:
|
Setting Name |
Selectable Options |
|
|
Power Side Steps |
Automatic |
Stow |
After pressing the “Auto-On Comfort” button on the touchscreen, the following settings will be available:
9
After pressing the “Engine Off Options” button on the touchscreen, the following settings will be available:
|
Setting Name |
Selectable Options |
|
|
Engine Off Power Delay |
– |
+ |
|
NOTE: When the “Engine Off Power Delay” feature is selected, the power window switches, radio, Uconnect phone system (if equipped), power sunroof (if equipped), and power outlets will remain active for up to ten minutes after the ignition is cycled to OFF. Opening either front door will cancel this feature. |
||
|
Headlight Off Delay |
– |
+ |
|
NOTE: When the “Headlight Off Delay” feature is selected, the driver can choose to have the headlights remain on for 0, 30, 60, or 90 seconds when exiting the vehicle. |
||
|
Auto Entry/Exit — If Equipped |
On |
Off |
|
Easy Exit Seat — If Equipped |
On |
Off |
|
NOTE: When the “Easy Exit Seat” feature is selected, the Driver’s seat will automatically move rearward once the engine is shut off. |
After pressing the “Suspension” button on the touchscreen, the following settings will be available:
9
After pressing the “Trailer Brake” button on the touchscreen, the following settings will be available:
|
Setting Name |
Selectable Options |
|||
|
Trailer Select |
Trailer 1 |
Trailer 2 |
Trailer 3 |
Trailer 4 |
|
Trailer Brake Type |
Light Electric |
Heavy Electric |
Light EOH |
Heavy EOH |
|
Trailer Name |
List of Trailer Names Available |
|||
|
NOTE: You can select and personalize your trailer name depending on the type of trailer you are hauling. Select the trailer name from the following list: trailer, boat, car, cargo, dump, equipment, flatbed, gooseneck, horse, livestock, motorcycle, snow mobile, travel, utility, and 5th wheel. |
After pressing the “Audio” button on the touchscreen, the following settings will be available:
|
Setting Name |
Selectable Options |
|||
|
Balance/Fade |
Front |
Rear |
Left |
Right |
|
NOTE: The “Balance/Fade” feature allows you to adjust the Balance and Fade settings. Press and drag the speaker icon or use the arrows to adjust, tap the “C” icon to readjust to the center. |
||||
|
Equalizer |
+ |
– |
||
|
NOTE: When in the “Equalizer” display you may adjust the Bass, Mid and Treble settings. |
|
Setting Name |
Selectable Options |
|||
|
Speed Adjusted Volume |
Off |
1 |
2 |
3 |
|
NOTE: The “Speed Adjusted Volume” feature increases or decreases volume relative to vehicle speed. |
||||
|
Surround Sound — If Equipped |
On |
Off |
||
|
NOTE: The “Surround Sound” feature provides simulated surround sound mode. |
||||
|
AUX Volume Offset — If Equipped |
On |
Off |
||
|
NOTE: The “AUX Volume Offset” feature provides the ability to tune the audio level for portable devices connected through the AUX input. |
||||
|
Auto Play |
On |
Off |
9
After pressing the “Phone/Bluetooth Settings” button on the touchscreen, the following settings will be available:
|
Setting Name |
Selectable Options |
|
|
Phone Pop-ups Displayed in Cluster — If Equipped |
On |
Off |
|
Do Not Disturb |
List of Settings |
|
|
NOTE: Press “Do Not Disturb” to access the available settings. The following settings are: Auto Reply (both, text, call), Auto Reply Message (custom, default) and Custom Auto Reply Message (create message). |
||
|
Paired Phones and Audio Devices |
List Of Paired Phones and Audio Sources |
|
|
NOTE: The “Paired Phones and Audio Devices” feature shows which phones and audio sources are paired to the Phone and Audio Sources Settings system. For further information, refer to the Uconnect Owner’s Manual Supplement. |
||
|
Smartphone Projection Manager |
On |
Off |
After pressing the “SiriusXM Setup” button on the touchscreen, the following settings will be available:
|
Setting Name |
Selectable Options |
|
|
Tune Start |
On |
Off |
9
After pressing the “Restore Default Settings” button on the touchscreen, the following settings will be available:
|
Setting Name |
Selectable Options |
|
|
Restore Default Settings |
Yes |
Cancel |
|
NOTE: When the “Restore Settings” feature is selected it resets clock, audio and other features to their default settings. |
After pressing the “System Information” button on the touchscreen, the following settings will be available:
|
Setting Name |
Selectable Options |
|
Software License |
System Software Information Screen |
|
NOTE: When the “Software License” feature is selected, a “System Software Information” screen will appear, displaying the system software version. |
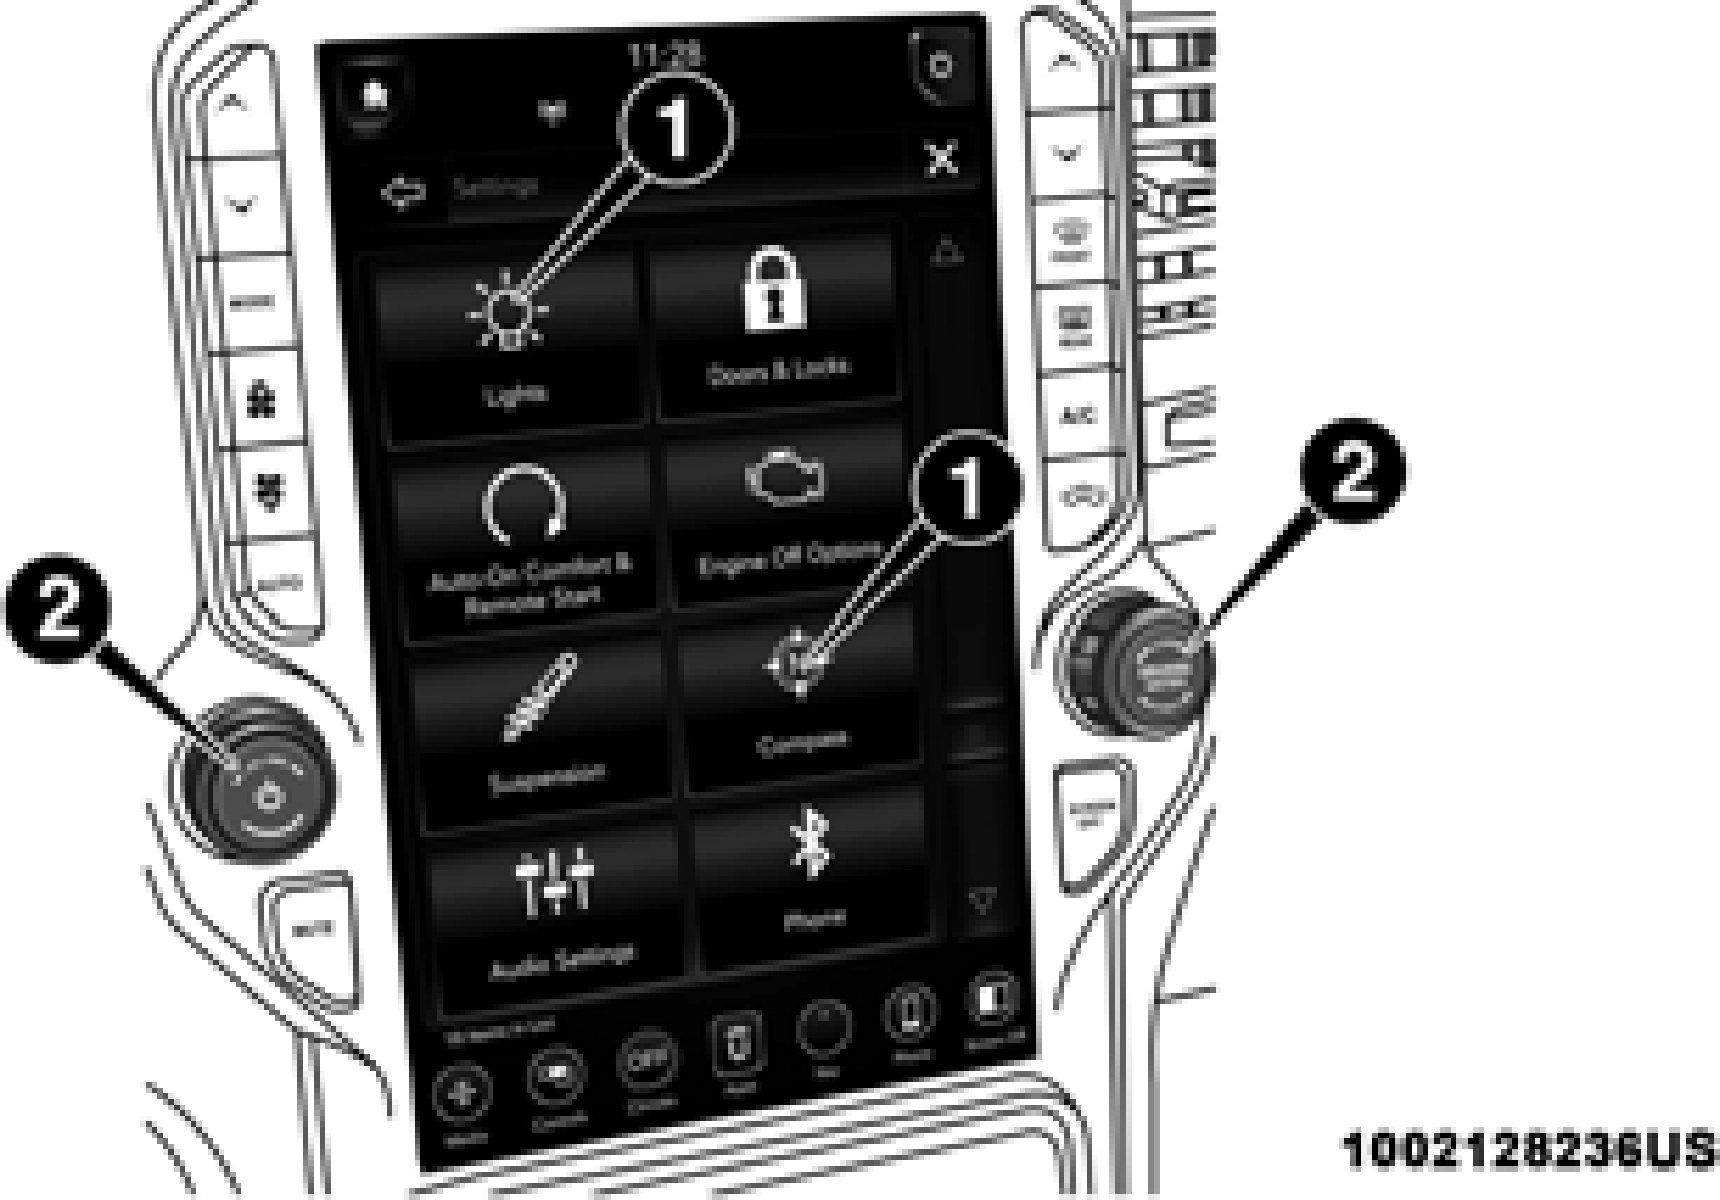
Uconnect 4C NAV With 12–inch Display Buttons On The Touchscreen And Buttons On The Faceplate
1 — Uconnect Buttons On The Touchscreen 2 — Uconnect Buttons On The Faceplate
Settings, Bluetooth, SiriusXM Setup (if equipped), Reset and System Information.
NOTE:
Only one category may be selected at a time.
When making a selection, press the button on the touch- screen to enter the desired mode. Once in the desired mode, press and release the preferred setting until a check-mark appears next to the setting, showing that setting has been selected. Once the setting is complete, press the back arrow button on the touchscreen to return to the previous menu or press the “X” button on the touchscreen to close out of the settings screen. Pressing the Up or Down Arrow buttons on the touchscreen on the right side of the screen will allow you to toggle up or down through the list of available settings.
NOTE:
All settings should be changed with the ignition in the RUN position.
Press the “Settings” button on the touchscreen to display the 9
settings menu screen. In this mode the Uconnect system allows you to access programmable features that may be equipped such as Language, Display, Units, Voice, Clock & Date, Camera, Safety & Driving Assistance, Mirrors and Wipers, Lights, Doors & Locks, Auto-On Comfort (if equipped), Engine Off Options, Suspension, Trailer, Audio
After pressing the “Language” button on the touchscreen, the following settings will be available:
|
Setting Name |
Selectable Options |
||
|
Language |
English |
Espanol |
Français |
|
NOTE: When the “Set Language” feature is selected, you may select one of multiple languages (English / Français / Español) for all display nomenclature, including the trip functions and the navigation system (if equipped). Press the “Set Language” button on the touchscreen, then press the desired language button on the touchscreen until a check-mark appears next to the language, showing that setting has been selected. |
After pressing the “Display” button on the touchscreen, the following settings will be available:
|
Setting Name |
Selectable Options |
|
|
Display Brightness Mode |
Auto |
Manual |
|
NOTE: Select Auto or Manual display mode and this allows adjustment of overall screen brightness. |
||
|
Display Brightness Headlight ON |
- |
+ |
|
NOTE: To make changes to the "Display Brightness with Headlights ON" setting, the headlights must be on and the interior dimmer switch must not be in the "party" or "parade" positions. |
||
|
Display Brightness Headlight OFF |
- |
+ |
|
Setting Name |
Selectable Options |
|
|
NOTE: To make changes to the "Display Brightness with Headlights OFF" setting, the headlights must be off and the interior dimmer switch must not be in the "party" or "parade" positions. |
||
|
Set Theme |
Pre-configured Themes |
|
|
Touchscreen Beep |
On |
Off |
|
Controls Screen Time-Out — If Equipped |
On |
Off |
|
Fuel Saver Display — If Equipped |
On |
Off |
|
NOTE: When selected, the system displays fuel saver mode in the instrument cluster. |
||
|
Navigation Turn-By-Turn Displayed in Cluster — If Equipped |
On |
Off |
|
Phone Pop-Ups Displays In Cluster |
On |
Off |
|
Ready To Drive Pop-Ups — If Equipped |
On |
Off |
9
After pressing “Units” on the touchscreen, the following will be available:
|
Setting Name |
Selectable Options |
|||
|
Units |
US |
Metric |
Custom |
|
|
NOTE:When the “Custom” setting is selected, units will appear according to your personally configured settings. To configure these settings, press the “Custom” bar. The following settings will appear: |
||||
|
Speed |
MPH |
km/h |
||
|
Distance |
mi |
km |
||
|
Fuel Consumption |
MPG (US) |
MPG (UK) |
L/100 km |
km/L |
|
Pressure |
psi |
kPa |
bar |
|
|
Power — If Equipped |
HP (US) |
HP (UK) |
Kw |
|
|
Temperature |
°F |
°C |
||
|
Torque — If Equipped |
lb-ft |
Nm |
After pressing the “Voice” button on the touchscreen, the following settings will be available:
|
Setting Name |
Selectable Options |
||
|
Voice Response Length |
Brief |
Detailed |
|
|
Show Command List |
Always |
w/Help |
Never |
After pressing the “Clock” button on the touchscreen, the following settings will be available:
|
Setting Name |
Selectable Options |
|
|
Sync Time With GPS — If Equipped |
On |
Off |
|
Set Time Hours |
+ |
– |
|
Set Time Minutes |
+ |
– |
|
Time Format |
AM |
PM |
|
12hrs |
24hrs |
|
|
Show Time in Status Bar — If Equipped |
On |
Off |
After pressing the “Camera” button on the touchscreen, the following settings will be available:
9
|
Setting Name |
Selectable Options |
|
|
NOTE: The “Surround View Camera Delay” setting determines whether or not the screen will display the 360 degree view image with guidelines for up to ten seconds after the vehicle is shifted out of REVERSE. This delay will be canceled if the vehicle’s speed exceeds 8 mph (13 km/h), the transmission is shifted into PARK, or the ignition is switched to the OFF position. |
||
|
Surround View Camera Guidelines — If Equipped |
On |
Off |
|
NOTE: The “Surround View Rear Back Up Camera Active Guidelines” feature allows you to see active guidelines over the Surround View camera display whenever the gear selector is put into REVERSE or the Surround View button on the touchscreen is pressed. The image will be displayed on the radio touchscreen display. |
||
|
Parkview Backup Camera Delay |
On |
Off |
|
NOTE: The “ParkView Backup Camera Delay” setting determines whether or not the screen will display the rear view image with dynamic grid lines for up to ten seconds after the vehicle is shifted out of REVERSE. This delay will be canceled if the vehicle’s speed exceeds 8 mph (13 km/h), the transmission is shifted into PARK, or the ignition is switched to the OFF position. |
||
|
Parkview Camera Delay |
On |
Off |
|
NOTE: The “Parkview Camera Delay” setting determines whether or not the screen will display the rear view image with dynamic grid lines for up to ten seconds after the vehicle is shifted out of REVERSE. This delay will be canceled if the vehicle’s speed exceeds 8 mph (13 km/h), the transmission is shifted into PARK, or the ignition is switched to the OFF position. |
||
|
Active Backup Camera Guidelines |
On |
Off |
9
After pressing the “Safety & Driving Assistance” button on the touchscreen, the following settings will be available:
|
Setting Name |
Selectable Options |
||
|
Forward Collision Warning — If Equipped |
Off |
Warning Only |
Warning & Active Braking |
|
NOTE: Applies brakes to slow the vehicle in case of potential forward collision, or applies brakes and a warning. |
|||
|
Forward Collision Warning Sensitivity — If Equipped |
Near |
Med |
Far |
|
NOTE: Sets the distance in which a Forward Collision Warning occurs. |
|||
|
Front ParkSense Volume |
Low |
Med |
High |
|
Rear ParkSense Volume |
Low |
Med |
High |
|
Blind Spot Alert |
Off |
Lights |
Lights & Chime |
|
Power Side Step — If Equipped |
Auto |
Store |
|
|
Hill Start Assist — If Equipped |
On |
Off |
|
|
Tire Fill Assist — If Equipped |
On |
Off |
After pressing the “Mirror and Wipers” button on the touchscreen, the following settings will be available:
|
Setting Name |
Selectable Options |
|
|
Tilt Side Mirrors In Reverse — If Equipped |
On |
Off |
|
NOTE: When the “Tilt Side Mirrors In Reverse” feature is selected, the outside side-view mirrors will tilt downward when the igni- tion is in the RUN position and the transmission gear selector is in the REVERSE position. The mirrors will move back to their previous position when the transmission is shifted out of REVERSE. |
||
|
Rain Sensing Auto Wipers |
On |
Off |
|
NOTE: Automatically adjusts the wiper speed based on the amount of precipitation. |
||
|
Headlights with Wipers |
On |
Off |
9
After pressing the “Lights” button on the touchscreen, the following settings will be available:
|
Setting Name |
Selectable Options |
|
|
Headlight Illumination On Approach |
– |
+ |
|
NOTE: When the “Headlight Illumination On Approach” feature is selected, the headlights will activate and remain on for 0, 30, 60, or 90 seconds when the doors are unlocked with the key fob. |
||
|
Headlight Off Delay |
- |
+ |
|
NOTE: When the “Headlight Off Delay” feature is selected, the driver can choose to have the headlights remain on for 0, 30, 60, or 90 seconds when exiting the vehicle. |
||
|
Headlights With Wipers — If Equipped |
On |
Off |
|
NOTE: When the “Headlights With Wipers” feature is selected, and the headlight switch is in the AUTO position, the headlights turn on approximately ten seconds after the wipers are turned on. The headlights also turn off when the wipers are turned off if they were turned on by this feature. |
||
|
Auto Dim High Beams — If Equipped |
On |
Off |
|
NOTE: When the “Auto Dim High Beams” feature is selected, the high beam headlights deactivate automatically under certain conditions. |
||
|
Daytime Running Lights |
On |
Off |
|
Setting Name |
Selectable Options |
|
|
Flash Lights with Lock |
On |
Off |
|
NOTE: When the “Flash Lights With Lock” feature is selected, the exterior lamps flash when the doors are locked or unlocked with the key fob. This feature may be selected with or without the sound horn on lock feature selected. |
||
|
Steering Directed Lights |
On |
Off |
|
NOTE: When the “Steering Directed Lights” feature is selected, the headlights turn with the direction of the steering wheel. |
||
|
Rear Cargo Guidance Lights — If Equipped |
On |
Off |
|
NOTE: When the “Rear Cargo Guidance Lights” feature is selected, the lights in the cargo and bed of the truck will come on either when the headlight switch is pressed, or the button on the back bed of the truck is pressed. |
After pressing the “Doors & Locks” button on the touchscreen, the following settings will be available:
9
|
Setting Name |
Selectable Options |
|
|
Flash Lights With Lock |
On |
Off |
|
NOTE: When the “Flash Lights With Lock” feature is selected, the front and rear turn signals flash when the doors are locked or unlocked with the key fob. This feature may be selected with or without the “Sound Horn With Lock” feature selected. |
||
|
Sound Horn With Remote Start |
On |
Off |
|
1st Press Of Key Fob Unlocks |
Driver Door |
All Doors |
|
NOTE: When “1st Press Of Key Fob Unlocks: Driver Door” is selected, only the driver's door unlocks on the first press of the key fob unlock button. You must push the key fob unlock button twice to unlock the passenger's doors.
When “All Doors” is selected, all of the doors unlock on the first push of the key fob unlock button.
If the vehicle is programmed “1st Press Of Key Fob Unlocks: All Doors”, all doors unlock no matter which Passive Entry equipped door handle is grasped. If “1st Press Of Key Fob Unlocks: Driver Door” is programmed, only the driver’s door unlocks when the driver’s door is grasped.
With Passive Entry, if “1st Press Of Key Fob Unlocks: Driver Door” is programmed pushing the handle more than once only resultsin the driver’s door opening. If “Driver Door” is selected, once the driver’s door is opened, the interior door lock/unlock switch can be used to unlock all doors (or use key fob).
|
||
|
Passive Entry — If Equipped |
On |
Off |
|
Setting Name |
Selectable Options |
|
|
NOTE: The “Passive Entry” feature allows you to lock and unlock the vehicle’s door(s) without having to push the key fob lock or unlock buttons. |
||
|
Personal Settings Linked To Key Fob — If Equipped |
On |
Off |
|
NOTE: The “Personal Settings Linked To Key Fob” feature provides automatic driver seat positioning to enhance driver mobility when entering and exiting the vehicle.
The seats return to the memorized seat location (if “Personal Settings Linked To Key Fob” is set to on) when the key fob is used to unlock the door.
|
After pressing the “Auto-On Comfort & Remote Start” button on the touchscreen, the following settings will be available:
9
After pressing the “Engine Off Options” button on the touchscreen, the following settings will be available:
|
Setting Name |
Selectable Options |
|
|
Engine Off Power Delay |
+ |
– |
|
NOTE: When the “Engine Off Power Delay” feature is selected, the power window switches, radio, Uconnect phone system (if equipped), power sunroof (if equipped), and power outlets will remain active for up to ten minutes after the ignition is cycled to OFF. Opening either front door will cancel this feature. |
||
|
Headlight Off Delay |
+ |
– |
|
NOTE: When the “Headlight Off Delay” feature is selected, the driver can choose to have the headlights remain on for 0, 30, 60, or 90 seconds when exiting the vehicle. |
||
|
Auto Entry/Exit — If Equipped |
On |
Off |
|
Easy Exit Seat — If Equipped |
On |
Off |
|
NOTE: When the “Easy Exit Seat” feature is selected, the Driver’s seat will automatically move rearward once the engine is shut off. |
After pressing the “Suspension” button on the touchscreen, the following settings will be available:
9
After pressing the “Trailer Brake” button on the touchscreen, the following settings will be available:
|
Setting Name |
Selectable Options |
|||
|
Trailer Select |
Trailer 1 |
Trailer 2 |
Trailer 3 |
Trailer 4 |
|
NOTE: Once a Trailer is selected, press the “Use This Trailer” on the touchscreen to set this trailer as the one in current use. In each Trailer setting, the following settings appear: |
||||
|
Braking |
Light Electric |
Heavy Electric |
Light Electric over Hydraulic |
Heavy Electric over Hydraulic |
|
Trailer Name |
List of Trailer Names Available |
|||
|
NOTE: You can select and personalize your trailer name depending on the type of trailer you are hauling. Select the trailer name from the following list: trailer, boat, car, cargo, dump, equipment, flatbed, gooseneck, horse, livestock, motorcycle, snowmo- bile, travel, utility, and fifth wheel. |
After pressing the “Audio” button on the touchscreen, the following settings will be available:
9
|
Setting Name |
Selectable Options |
|
|
AUX Volume Offset — If Equipped |
On |
Off |
|
NOTE: The “AUX Volume Offset” feature provides the ability to tune the audio level for portable devices connected through the AUX input. |
||
|
Auto Play |
On |
Off |
After pressing the “Bluetooth” button on the touchscreen, the following settings will be available:
|
Setting Name |
Selectable Options |
|
|
Phone Pop-Ups Displayed in Cluster |
On |
Off |
|
Do Not Disturb |
List of Settings |
|
|
NOTE: Press “Do Not Disturb” to access the available settings. The following settings are: Auto Reply (both, text, call), Auto Reply Message (custom, default) and Custom Auto Reply Message (create message). |
||
|
Paired Phones and Audio Devices |
List Of Paired Phones and Audio Sources |
|
|
NOTE: The “Paired Phones and Audio Sources” feature shows which phones and audio sources are paired to the Phone and Audio Sources Settings system. For further information, refer to the Uconnect Owner’s Manual Supplement. |
|
Setting Name |
Selectable Options |
|
|
Smartphone Device Mirroring |
On |
Off |
|
Enable CarPlay Projections |
On |
Off |
|
Automatically Display Pop-Ups in Cluster |
On |
Off |
|
Set as Default Device |
On |
Off |
|
Projection Manager |
Smartphone Device Mirroring On |
Smartphone Device Mirroring Off |
After pressing the “SiriusXM Setup” button on the touchscreen, the following settings will be available:
|
Setting Name |
Selectable Options |
|
|
Sirius All Access |
Choose a Subscription Package |
|
|
Add Listener |
Add up to five profiles |
|
|
NOTE: The “Add Listener” feature allows you to add up to five different profiles for customizing personal music or satellite radio choices. |
||
|
Listener Items |
Listening History |
List Of Options |
|
Tune Start |
On |
Off |
|
Setting Name |
Selectable Options |
|
NOTE: The “Tune Start” feature begins playing the current song from the beginning when you tune to a music channel using one of the twelve presets, so you can enjoy the complete song. This feature occurs the first time the preset is selected during that current song. Tune Start works in the background, so you will not even realize it's on, except that you will miss the experience of joining your favorite song with only a few seconds left to play. |
|
|
Channel Skip |
List of Channels |
|
NOTE: SiriusXM can be programmed to designate a group of channels that are the most desirable to listen to or to exclude undesir- able channels while scanning. This feature allows you to select the channels you would like to skip. |
|
|
Subscription Info |
Sirius ID |
|
NOTE: New vehicle purchasers or lessees will receive a free limited time subscription to SiriusXM Satellite Radio with your radio. Following the expiration of the free services, it will be necessary to access the information on the Subscription Information screen to re-subscribe. Press the “Subscription Info” button on the touchscreen to access the Subscription Information screen.
Write down the Sirius ID numbers for your receiver. To reactivate your service, either call the number listed on the screen or visit the provider online.
SiriusXM Travel Link is a separate subscription. |
After pressing the “Reset” button on the touchscreen, the following settings will be available:
|
Setting Name |
Selectable Options |
|
|
Reset App Drawer |
Yes |
Cancel |
|
Restore Settings |
Yes |
Cancel |
|
NOTE: When the “Restore Settings” feature is selected it resets all settings to their default settings. |
||
|
Clear Personal Data |
Yes |
Cancel |
|
NOTE: When the “Clear Personal Data” feature is selected it removes all personal data including Bluetooth devices and presets. |
||
|
Clear Sirius XM Data |
Yes |
Cancel |
After pressing the “System Information” button on the touchscreen, the following settings will be available:
9
Download Manual