Trailer Towing
General Towing Information
Only use towing equipment that has been designed for the vehicle. Contact your dealer or trailering dealer for assistance with preparing the vehicle to tow a trailer. Read the entire section before towing a trailer.
To tow a disabled vehicle, see Towing the Vehicle 0 392. To tow the vehicle behind another vehicle such as a motor home, see Recreational Vehicle Towing 0 392.
Trailering is different than just driving the vehicle by itself. Trailering means changes in handling, acceleration, braking, durability, and fuel economy. Successful, safe trailering takes correct equipment, and it has to be used properly.
The following information has many time-tested, important trailering tips and
safety rules. Many of these are important for your safety and that of your passengers. Read this section carefully before pulling a trailer.
When towing a trailer:
If equipped, the following driver assistance features should be turned off when towing a trailer:
If equipped, the following driver assistance features should be turned to alert or off when towing a trailer:
If equipped with Lane Change Alert (LCA), the LCA detection zones that extend back from the side of the vehicle do not move further back when a trailer is towed. Use caution while changing lanes when towing a trailer.
If equipped with Rear Cross Traffic Alert (RCTA), use caution while backing up when towing a trailer, as the RCTA detection zones that extend out from the back of the vehicle do not move further back when a trailer is towed.
Towing a trailer requires experience. The combination of the vehicle and trailer is longer and not as responsive as the vehicle itself. Get used to the handling and braking of the combination by driving on a level road surface before driving on public roads.
The trailer structure, the tires, and the brakes must all be rated to carry the intended cargo. Inadequate trailer equipment can cause the combination to operate in an unexpected or unsafe manner. Before driving, inspect all trailer hitch parts and attachments, safety chains, electrical connectors, lamps, tires, and mirrors. See Towing Equipment 0 295. If the trailer has electric brakes, start the combination
moving and then manually apply the trailer brake controller to check that the trailer brakes work. During the trip, occasionally check that the cargo and trailer are secure and that the lamps and any trailer brakes are working.
When towing, the stability control system might be heard. The system reacts to vehicle movement caused by the trailer, which mainly occurs during cornering. This is normal when towing heavier trailers.
Stay at least twice as far behind the vehicle ahead as you would when driving without a trailer. This can help to avoid heavy braking and sudden turns.
More passing distance is needed when towing a trailer. The combination of the vehicle and trailer will not accelerate as quickly and is much longer than the vehicle alone. It is necessary to go much farther beyond the passed vehicle before returning to the lane. Pass on level roadways. Avoid passing on hills if possible.
Hold the bottom of the steering wheel with one hand. To move the trailer to the left, move that hand to the left. To move the trailer to the right, move that hand to the right. Always back up slowly and, if possible, have someone guide you.
Make wider turns than normal when towing, so the trailer will not go over soft shoulders, over curbs, or strike road signs, trees,
or other objects. Always signal turns well in advance. Do not steer or brake suddenly.
Reduce speed and shift to a lower gear before starting down a long or steep downhill grade. If the transmission is not shifted down, the brakes may overheat and result in reduced braking efficiency.
The vehicle can tow in D (Drive). Shift the transmission to a lower gear if the transmission shifts too often under heavy loads and/or hilly conditions.
When towing at higher altitudes, engine coolant will boil at a lower temperature than at lower altitudes. If the engine is turned off immediately after towing at high altitude on steep uphill grades, the vehicle could show signs similar to engine overheating. To avoid this, let the engine run, preferably on level ground, with the transmission in P (Park) for a few minutes before turning the engine off. If the overheat warning comes on, see Engine Overheating 0 336.
If equipped, the viewing systems on the vehicle can improve visibility while hitching, backing, and driving with a trailer. See Driver Assistance Systems 0 263.
When parking your vehicle and your trailer on a hill:
Backing the Trailer into the Water
Disconnect the wiring to the trailer before backing the trailer into the water to prevent damage to the electrical circuits on the trailer. Reconnect the wiring to the trailer after removing the trailer from the water.
If the trailer has electric brakes that can function when the trailer is submerged, it might help to leave the electrical trailer connector attached to maintain trailer brake functionality while on the boat ramp.
To back the trailer into the water:
Pulling the Trailer from the Water
To pull the trailer out of the water:
The vehicle needs service more often when used to tow trailers. See Maintenance Schedule 0 406. It is especially important to check the engine oil, axle lubricant, belts, cooling system, and brake system before and during each trip.
Check periodically to see that all nuts and bolts on the trailer hitch are tight.
The cooling system may temporarily overheat during severe operating conditions. See Engine Overheating 0 336.
If equipped with a diesel engine, see the Duramax diesel supplement.
Trailering is different than just driving the vehicle by itself. Trailering means changes in handling, acceleration, braking, durability, and fuel economy. Successful, safe trailering takes correct equipment, and it has to be used properly.
The following information has many time-tested, important trailering tips and
safety rules. Many of these are important for your safety and that of your passengers. Read this section carefully before pulling a trailer.
Safe trailering requires monitoring the weight, speed, altitude, road grades, outside temperature, and how frequently the vehicle is used to tow a trailer.
When towing a trailer, the combined weight of the vehicle, vehicle contents, trailer, and trailer contents must be below all of the maximum weight ratings for the vehicle, including:
See "Weight-Distributing Hitch and Adjustment" under Towing Equipment 0 295 to determine if equalizer bars are required to obtain the maximum trailer weight rating.
See "Trailer Brakes" under Towing Equipment 0 295 to determine if brakes are required based on your trailer's weight.
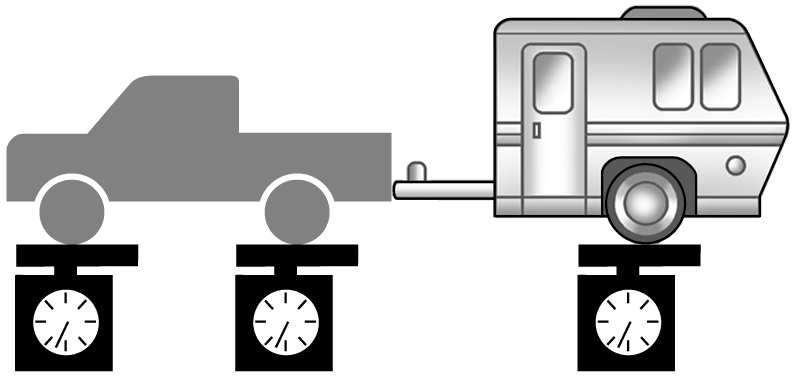
The only way to be sure the weight is not exceeding any of these ratings is to weigh the tow vehicle and trailer combination, fully loaded for the trip, getting individual weights for each of these items.
A trailering information label on the B-pillar shows tow rating information for the vehicle.
GCWR is the total allowable weight of the completely loaded vehicle and trailer including any fuel, passengers, cargo, equipment, and accessories. Do not exceed the GCWR for your vehicle. The GCWR for the vehicle is on the Trailering Information Label.
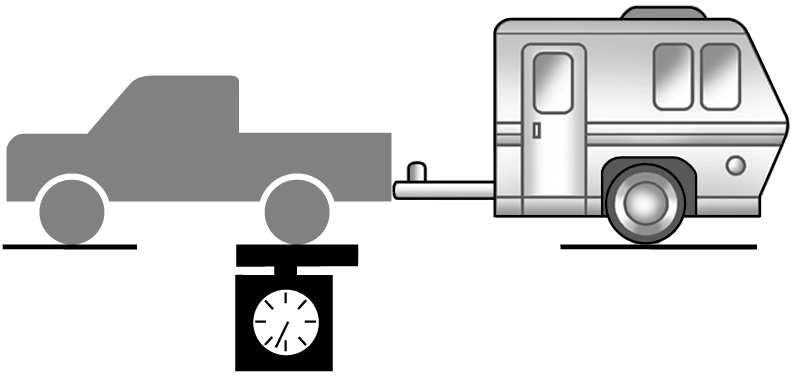
To check that the weight of the vehicle and trailer are within the GCWR for the vehicle, follow these steps:
The resulting weight cannot exceed the GCWR value on the Trailering Information Label.
The gross combined weight can also be confirmed by weighing the truck and trailer on a public scale. The truck and trailer should be loaded for the trip with passengers and cargo.
For information about the vehicle's maximum load capacity, see Vehicle Load Limits 0 221. When calculating the GVWR with a trailer attached, the trailer tongue weight must be included as part of the weight the vehicle is carrying.
The maximum trailer weight rating is calculated assuming the tow vehicle has a driver, a front seat passenger, and all required trailering equipment. This value represents the heaviest trailer the vehicle can tow, but it may be necessary to reduce the trailer weight to stay within the GCWR, GVWR, maximum trailer tongue load,
or GAWR-RR for the vehicle.
Use the Tow Rating Guide (my.gmc.com/ learn) to determine how much the trailer can weigh, based on the vehicle model and options.
Weights listed apply for conventional trailers and gooseneck/fifth-wheel trailers unless otherwise noted.
A step bumper trailer hitch can only support a total trailer weight up to 2 271 kg (5,000 lb). If a trailer hitch ball is added to the step bumper, check the hitch ball rating to be sure it is higher than the total trailer weight.
The Maximum Trailer Tongue Weight Rating is the allowable trailer tongue weight that the vehicle can support using a conventional trailer hitch. It may be necessary to reduce the overall trailer weight to stay within the maximum trailer tongue weight rating while still maintaining the correct trailer load balance. A fifth-wheel or gooseneck hitch may support a higher tongue weight.
The Maximum Trailer Tongue Weight Rating for a conventional trailer hitch or a fifth wheel/gooseneck hitch is shown on the Trailering Information Label.
Do not exceed a maximum trailer tongue weight of 567 kg (1,250 lb) for a conventional trailer hitch.
The trailer tongue weight contributes to the Gross Vehicle Weight (GVW). GVW includes the curb weight of your vehicle, any passengers, cargo, equipment and the trailer tongue weight. Vehicle options, passengers, cargo, and equipment reduce the maximum allowable tongue weight the vehicle can carry, which also reduces the maximum allowable trailer weight.
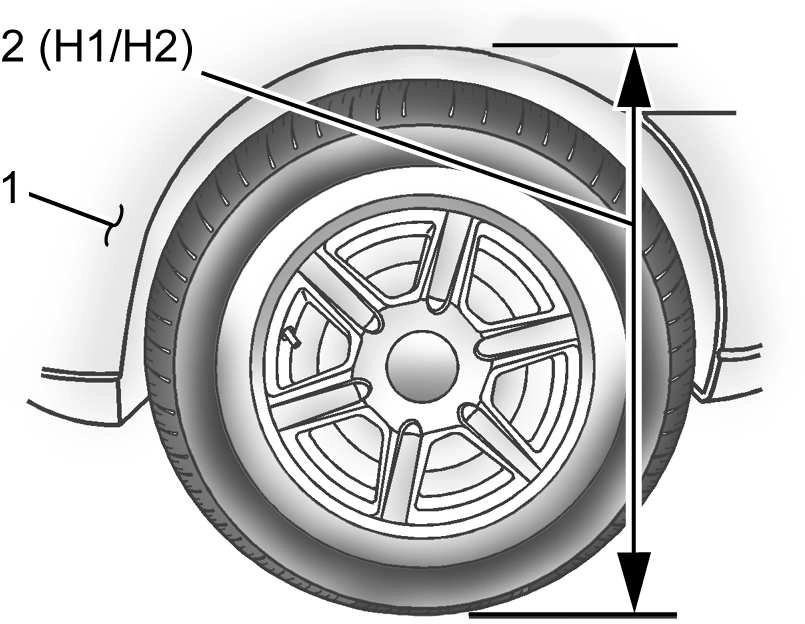
The correct trailer load balance must be maintained to ensure trailer stability. Incorrect load balance is a leading cause of trailer sway.
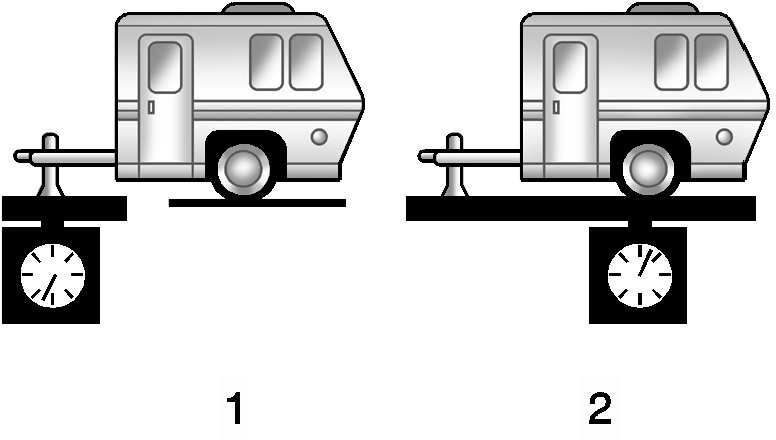
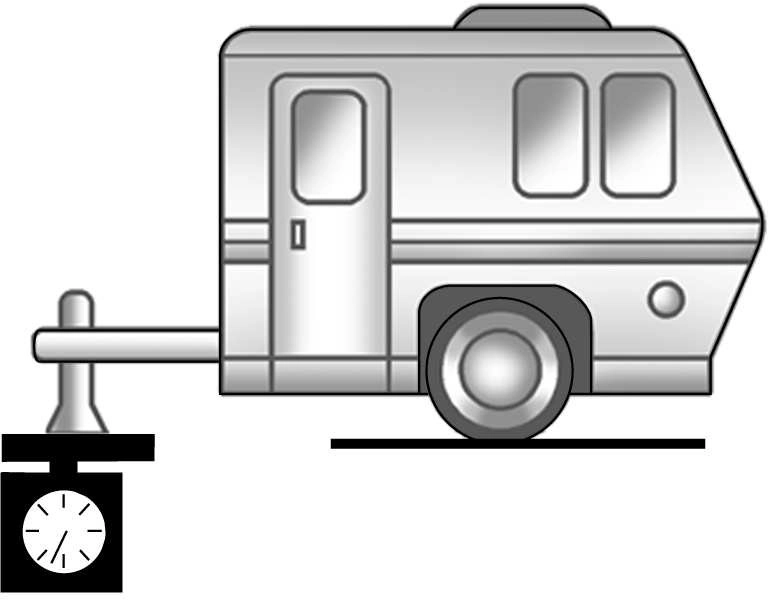
The trailer tongue weight (1) should be 10– 15% and fifth-wheel or gooseneck tongue weight should be 15–25% of the total loaded trailer weight (2). Some specific trailer types, such as boat trailers, fall outside of this range. Always refer to the trailer owner’s manual for the recommended trailer tongue weight for each trailer. Never exceed the maximum loads for the vehicle, hitch, and trailer.
The trailer load balance percentage is calculated as: weight (1) divided by weight (2) times 100.
After loading the trailer, separately weigh the trailer and then the trailer tongue and calculate the trailer load balance percentage to see if the weights and distribution are appropriate for your vehicle. If the trailer weight is too high, it may be possible to transfer some of the cargo into your vehicle. If the trailer tongue weight is too high or too low, it may be possible to rearrange some of the cargo inside of the trailer.
Do not exceed the maximum allowable tongue weight for your vehicle. Use the shortest hitch extension available to position the hitch ball closer to your vehicle. This will help reduce the effect of the trailer tongue weight on the trailer hitch and the rear axle.
If a cargo carrier is used in the trailer hitch receiver, choose a carrier that positions the load as close to the vehicle as possible.
Make sure the total weight, including the carrier, is no more than half of the maximum allowable tongue weight for the vehicle or 227 kg (500 lb), whichever is less.
The GAWR-RR is the total weight that can be supported by the rear axle of the vehicle. Do not exceed the GAWR-RR for the vehicle, with the tow vehicle and trailer fully loaded for the trip including the weight of the trailer tongue. If using a weight-distributing hitch, do not exceed the GAWR-RR before applying the weight distribution spring bars.
The GAWR-RR for the vehicle is on the Trailering Information Label.
Ask your dealer for trailering information or assistance.
Conventional Hitch
A conventional hitch is bolted to the frame or cross member of the tow vehicle, and is generally rated Class 2, 3, or 4.
Gooseneck Hitch
A gooseneck hitch is designed to be coupled to a special hitch leveraging a hitch ball, and is mounted over the rear axle in the
truck bed.
Fifth-Wheel Hitch
A fifth-wheel hitch is mounted over the rear axle in the truck bed, and leverages a hinged plate — the same type of hitch leveraged by semi trucks. Generally,
fifth-wheel hitches accommodate large trailers with as many as one, two, or three axles.
Always use the correct hitch equipment for your vehicle. Crosswinds, large trucks going by, and rough roads can affect the trailer and the hitch.
Proper hitch equipment for your vehicle helps maintain control of the vehicle-trailer combination. Many trailers can be towed using a weight-carrying hitch which has a coupler latched to the hitch ball, or a tow eye latched to a pintle hook. Other trailers may require a weight-distributing hitch that uses spring bars to distribute the trailer tongue weight between your vehicle and trailer axles. Fifth-wheel and gooseneck hitches may also be used. See "Maximum
Trailer Tongue Weight" under Trailer Towing
0 291 for weight limits with various hitch
types.
Avoid sharp turns when using a step-bumper hitch to prevent damage. Make wider turns to prevent contact between your trailer and your bumper.
Consider using mechanical sway controls with any trailer. Ask a trailering professional about sway controls or refer to the trailer manufacturer's recommendations and instructions.
A weight-distributing hitch may be useful with some trailers. Use the following guidelines to determine if a weight-distributing hitch should be used.
|
Vehicle Series |
Trailer Weight |
Weight-Distributing Hitch Usage |
Hitch Distribution |
|
1500 |
Up to 3 175 kg (7,000 lb) |
Not Required |
50% |
|
1500 |
Over 3 175 kg (7,000 lb) |
Required |
50% |
Towing with Model 1500 Series Trucks
this time.
between the two measured ride heights).
weight-distributing hitch to ensure that the manufacturers’ recommendations have been met.
|
Measurement |
Height Example 1500 (mm) |
|
H1 |
1 000 |
|
H2 |
1 050 |
|
H2−H1 |
50 |
|
(H2−H1)/2 |
25 |
|
H2−[(H2−H1)/2] |
1 025 |
0 358 for instructions on proper tire inflation.
Fifth-wheel and gooseneck trailers can be used with many pickup models. These trailers place a larger percentage of the weight (kingpin weight) on the tow vehicle than conventional trailers. Make sure this weight does not cause the vehicle to exceed GAWR or GVWR. Fifth-wheel or gooseneck kingpin weight should be 15–25% of the
trailer weight up to the maximum amount
specified in the trailering chart for the vehicle. See "Trailer Weight" under Trailer Towing 0 291.
The hitch should be in the pickup bed so that its centerline is over or slightly in front of the rear axle. Take care that it is not so far forward that it will contact the back of the cab in sharp turns. This is especially important for short box pickups. Trailer pin box extensions and sliding fifth-wheel hitch assemblies may be used. There should be at least 15 cm (6 in) of clearance between the top of the pickup box and the bottom of the trailer shelf that extends over the box.
Make sure the hitch is attached to the tow vehicle frame rails. Do not use the pickup box for support.
Always attach safety chains between the vehicle and the trailer. Instructions about safety chains may be provided by the hitch manufacturer or by the trailer manufacturer.
If the trailer being towed weighs up to
2 271 kg (5,000 lb) with a factory-installed step bumper, safety chains may be attached to the attaching points on the bumper; otherwise, safety chains should be attached to holes on the trailer hitch.
Cross the safety chains under the tongue of the trailer to help prevent the tongue from contacting the road if it becomes separated from the hitch. Always leave enough slack in the safety chains to allow the combination to turn. Never allow safety chains to drag on the ground.
Loaded trailers over 900 kg (2,000 lb) must be equipped with brake systems and with brakes for each axle. Trailer braking equipment conforming to Canadian Standards Association (CSA) requirement CAN3-D313, or its equivalent, is recommended.
State or local regulations may require trailers to have their own braking system if the loaded weight of the trailer exceeds certain minimums that can vary from state to state. Read and follow the instructions for the trailer brakes so they are installed, adjusted, and maintained properly. Never attempt to tap into your vehicle's hydraulic brake system. If you do, both the vehicle antilock brakes and the trailer brakes may not function, which could result in a crash.
If equipped, the vehicle's auxiliary battery can be used to supply electrical power to additional equipment that may be added, such as a slide-in camper.
Locate the auxiliary battery connector under the hood on the driver side of the vehicle, next to the engine compartment fuse block.
Follow the proper installation instructions included with any electrical equipment that is installed.
Basic Trailer Wiring
If the vehicle is not equipped with a trailer connector on the rear bumper, a 7-wire trailering harness is tied to the vehicles frame. The harness requires the installation of a trailer connector, which is available through your dealer.
Use only a round, seven-wire connector with flat blade terminals meeting SAE J2863 specifications for proper electrical connectivity.
The seven-wire harness contains the following trailer circuits:
|
Stop/Turn Signal Right |
Green/Violet |
|
Tail/Parking Lamps |
Gray/Brown |
|
Reverse Lamps |
White/Green |
|
Battery Feed |
Red/Green |
|
Ground |
White |
|
Electric Trailer Brake |
Blue |
If equipped, the trailer wiring harness, with a 7-pin connector and a 4-pin connector, is mounted on the vehicle's rear bumper.
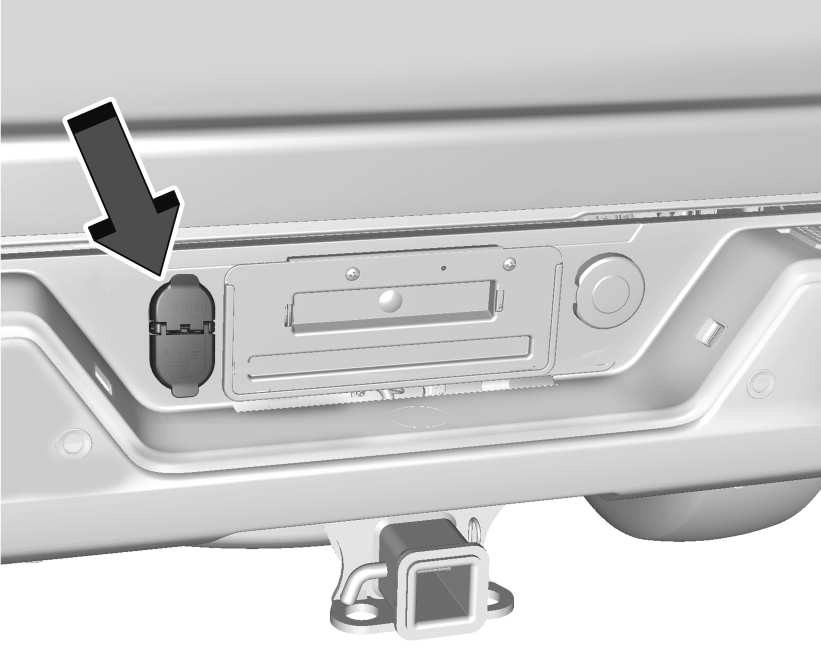
The trailer connectors contain the following circuits.
 Ground
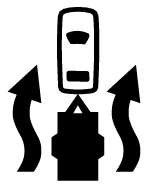
If equipped, trailering camera connectors are available in the bumper trailer receptacle in place of the four pin connector. The inside trailer auxiliary camera should be installed on the top left hand side (A) and the rear trailer auxiliary camera (B) should be installed on the top right hand side.
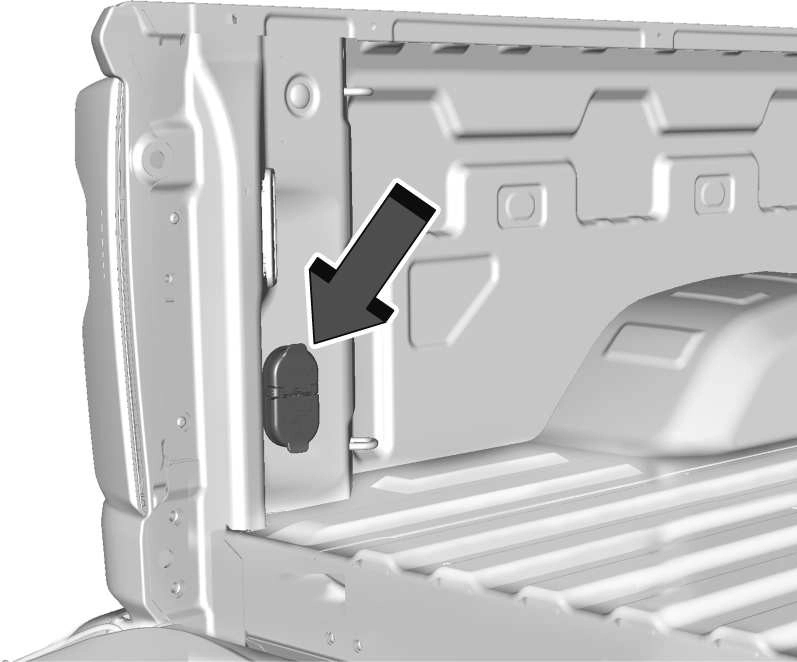
If equipped with the fifth wheel/ gooseneck trailer package, the harness connector is mounted on the inside of the pickup bed behind the rear wheel.
Camper/Fifth-Wheel Trailer Wiring Package
For vehicles without the fifth wheel/ gooseneck trailer package, the seven-wire camper harness is under the rear bumper, attached to the frame near the rear crossmember. A connector must be added to the wiring harness that connects to the camper.
The harness contains the following camper/ trailer circuits:
|
Stop/Turn Signal Left |
Yellow/Blue |
|
Stop/Turn Signal Right |
Green/Violet |
|
Tail/Parking Lamps |
Gray/Brown |
|
Reverse Lamps |
White/Green |
|
Battery Feed |
Red/Green |
|
Ground |
White |
|
Electric Trailer Brake |
Blue |
If equipped with the heavy-duty trailering option, see "Heavy-Duty Trailer Wiring Harness Package" earlier in this section. When the camper-wiring harness is ordered without the heavy-duty trailering package, a
seven-wire harness with a seven-pin connector is at the rear of the vehicle and is tied to the vehicle's frame.
Always check that all trailer lamps are working at the beginning of each trip, and periodically on longer trips.
If equipped, the Trailering App will monitor the RH turn/brake lamp circuit, LH turn/ brake lamp circuit, running lamp circuit, and reverse lamp circuits on the trailer. DIC messages and Trailering App alerts may be displayed if lighting circuit issues are detected on the trailer.
Pressing START LIGHT TEST in the Trailering App automatically activates the trailer lamps. The Trailering App is not a substitute for manually inspecting your trailer lamps. See Trailering App 0 305.
When properly connected, the trailer turn signals will illuminate to indicate the vehicle is turning, changing lanes, or stopping.
When towing a trailer, the arrows on the instrument cluster will illuminate even if the trailer is not properly connected or the bulbs are burned out.
For instructions on how to enter Tow/Haul Mode, see Driver Mode Control 0 249.
Tow/Haul assists when pulling a heavy trailer or a large or heavy load. See Tow/ Haul Mode 0 240.
Tow/Haul Mode is designed to be most effective when the vehicle and trailer combined weight is at least 75% of the vehicle's Gross Combined Weight Rating (GCWR). See "Trailer Weight" under Trailer
Towing 0 291.
Tow/Haul Mode is most useful when towing a heavy trailer or carrying a large or
heavy load:
Operating the vehicle in Tow/Haul Mode when lightly loaded or not towing will not cause damage; however, it is not recommended and may result in unpleasant engine and transmission driving characteristics, heavy or light steering efforts, and reduced fuel economy.
The vehicle may have an Integrated Trailer Brake Control (ITBC) system for use with electric trailer brakes or most electric over hydraulic trailer brake systems. These instructions apply to both types of electric trailer brakes.

This symbol is on the Trailer Brake Control Panel on vehicles with an ITBC system. The power output to the trailer brakes is proportional to the amount of vehicle braking. This available power output to the trailer brakes can be adjusted to a wide range of trailering situations.
The ITBC system is integrated with the vehicle’s brake, antilock brake, and StabiliTrak/Electronic Stability Control (ESC) systems. In trailering conditions that cause the vehicle’s antilock brake or StabiliTrak/ ESC systems to activate, power sent to the trailer's brakes will be automatically
adjusted to minimize trailer wheel lock-up. This does not imply that the trailer has StabiliTrak/ESC.
If the vehicle’s brake, antilock brake, or StabiliTrak/ESC systems are not
functioning properly, the ITBC system may not function fully or at all. Make sure all of these systems are fully operational to allow the ITBC system to function properly.
The ITBC system is powered through the vehicle's electrical system. Turning the ignition off will also turn off the ITBC system. The ITBC system is fully functional only when the ignition is in on.
The trailer symbol on the control panel will light amber when a trailer with electric brakes is connected.
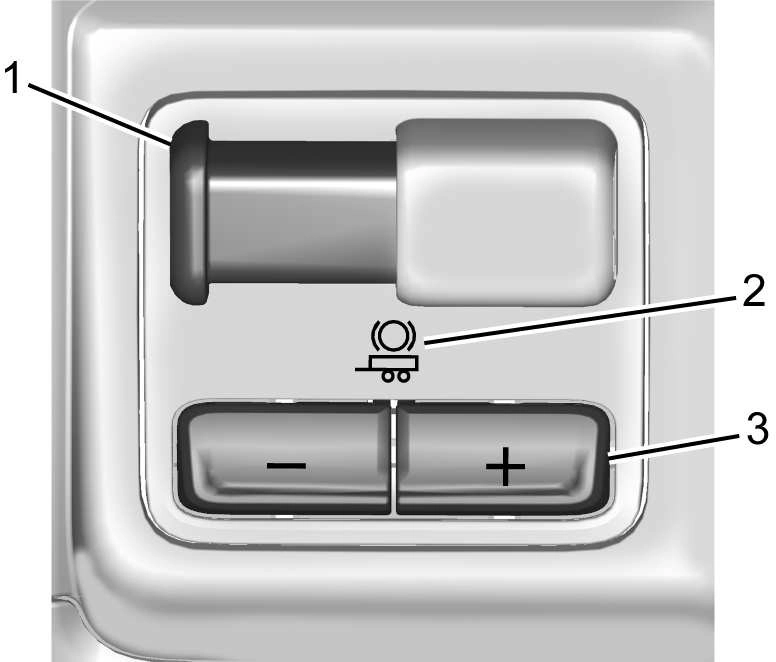
The ITBC control panel is on the center stack. See Instrument Panel Overview 0 4. The control panel allows adjustment to the amount of output, referred to as Trailer Gain, available to the trailer brakes and allows manual application of the trailer brakes. Use the ITBC control panel and the DIC trailer brake display page to adjust and display power output to the trailer brakes.
The ITBC display page indicates:
TRAILER GAIN: Press a Trailer Gain button to recall the current Trailer Gain setting. Each press and release of the gain buttons will then change the Trailer Gain setting. Press the Trailer Gain (+) or (-) to adjust. Press and hold to continuously adjust the Trailer Gain. To turn the output to the trailer off, adjust the Trailer Gain setting to 0.0. This setting can be adjusted from 0.0 to 10.0 with a trailer connected or disconnected.
TRAILER OUTPUT: This displays anytime a trailer with electric brakes is connected. Output to the trailer brakes is based on the amount of vehicle braking present and
relative to the Trailer Gain setting. Output is displayed from 0 to 100% for each gain setting.
The Trailer Output will indicate " " on
the Trailer Brake Display Page whenever the
following occur:
message displays in the DIC.
Slide this lever right to apply the trailer’s electric brakes independent of the vehicle’s brakes. Use this lever to adjust the Trailer Gain to achieve proper power output to the trailer brakes. Under certain circumstances,
this lever can also be used to apply additional trailer braking. The trailer and
vehicle brake lamps will come on when either the vehicle brakes or trailer brakes are applied and properly connected.
Trailer Gain should be set for a specific trailering condition and it must be readjusted anytime vehicle loading, trailer loading, or road surface conditions change.
To adjust Trailer Gain for each towing condition:
(20–25 mph) and fully apply the Manual
Trailer Brake Apply Lever.
Adjusting Trailer Gain at speeds lower than 32–40 km/h (20–25 mph) may result in an incorrect gain setting.
Trailer wheel lock-up may not occur if towing a heavily loaded trailer. Adjust the Trailer Gain to the highest allowable setting for the towing condition.
TRAILER CONNECTED: This message will briefly display when a trailer with electric brakes is first connected to the vehicle. This message will automatically turn off in about 10 seconds. This message can be acknowledged before it automatically
turns off.
CHECK TRAILER WIRING: This message will display if:
. The ITBC system first determines connection to a trailer with electric brakes and then the trailer harness becomes disconnected from the vehicle.
If the disconnect occurs while the vehicle is stationary, this message will automatically turn off in about
30 seconds. This message will also turn off if it is acknowledged or if the trailer harness is reconnected.
If the disconnect occurs while the vehicle is moving, this message will continue until the ignition is turned off. This message will also turn off if it is acknowledged or if the trailer harness is reconnected.
. There is an electrical fault in the wiring to the trailer brakes. This message will continue as long as there is an electrical fault in the trailer wiring. This message will also turn off if it is acknowledged.
To determine whether the electrical fault is on the vehicle side or trailer side of the trailer wiring harness connection:
If the CHECK TRAILER WIRING message only reappears when connecting the trailer wiring harness to the vehicle, the electrical fault is on the trailer side.
SERVICE TRAILER BRAKE SYSTEM: This
message will display when there is a problem with the ITBC system. If this message continues over multiple ignition cycles, have the vehicle serviced.
If either the CHECK TRAILER WIRING or SERVICE TRAILER BRAKE SYSTEM message
displays while driving, the ITBC system may not be fully functional or may not function at all. When traffic conditions allow, carefully pull the vehicle over to the side of the road and turn the ignition off. Check the wiring connection to the trailer and turn the ignition back on. If either of these messages continues, either the vehicle or trailer needs service.
A GM dealer may be able to diagnose and repair problems with the trailer. However, any diagnosis and repair of the trailer is not covered under the vehicle warranty. Contact your trailer dealer for assistance with trailer repairs and trailer warranty information.
Vehicles with StabiliTrak/Electronic Stability Control (ESC) have a Trailer Sway Control (TSC) feature. Trailer sway is unintended side-to-side motion of a trailer while towing. If the vehicle is towing a trailer and the TSC detects that sway is increasing, the vehicle brakes are selectively applied at each wheel, to help reduce excessive trailer sway.
If equipped with the Integrated Trailer Brake Control (ITBC) system, and the trailer has an electric brake system, StabiliTrak/ESC may also apply the trailer brakes.

If TSC is enabled, the Traction Control System (TCS)/StabiliTrak/ESC warning light will flash on the instrument cluster. Reduce
vehicle speed by gradually removing your foot from the accelerator. If trailer sway continues, StabiliTrak/ESC can reduce engine torque to help slow the vehicle. TSC will not function if StabiliTrak/ESC is turned off. See Traction Control/Electronic Stability Control 0 247.
Some trailers may come equipped with an electronic device designed to reduce or control trailer sway. Aftermarket equipment manufacturers also offer similar devices that connect to the wiring between the trailer and the vehicle. These devices may interfere with the vehicle’s trailer brake or other
systems, including integrated anti-sway
systems, if equipped. Messages related to trailer connections or trailer brakes could appear on the DIC. The effects of these aftermarket devices may have on vehicle handling or trailer brake performance is not known.
Special Trailer (ST) tires differ from vehicle tires. Trailer tires are designed with stiff sidewalls to help prevent sway and to
support heavy loads. These features can make it difficult to determine if the trailer tire pressures are low only based on a visual inspection.
Always check all trailer tire pressures before each trip when the tires are cool. Low trailer tire pressure is a leading cause of trailer tire blow-outs.
If the vehicle is equipped with a trailer tire pressure monitoring system, see the trailer tire pressure monitoring system description and the trailering app.
Trailer tires deteriorate over time. The trailer tire sidewall will show the week and year the tire was manufactured. Many trailer tire manufacturers recommend replacing tires more than six years old.
Overloading is another leading cause of trailer tire blow-outs. Never load your trailer with more weight than the tires are designed to support. The load rating is located on the trailer tire sidewall.
Always know the maximum speed rating for the trailer tires before driving. This may be significantly lower than the vehicle tire speed rating. The speed rating may be on
the trailer tire sidewall. If the speed rating is not shown, the default trailer tire speed rating is 105 km/h (65 mph).
If equipped, the Trailer Lights App is on the Home Page of the infotainment display.
Touch Start to cycle the trailer lamps on and off to determine if they are working. The test follows this sequence:
one minute and 45 seconds, or until the
test deactivates.
Touch Stop to stop the test. The test will automatically end after one minute and 45 seconds.
The sequence also deactivates when any of the following occur:
If equipped, the Trailering App is on the Home Page of the infotainment display.
If equipped this feature allows profiles for connected trailers to be created to view status, to store and track trailer usage information, and to set up towing assistance features.
The Trailering App Preview will appear when the Trailering App is opened for the first time from the Home Page. Touch GET STARTED in the Trailering App to go into the app.
When a trailer is electrically connected and a trailer profile has not been created, there will be an option to create a profile, use a guest profile, or select Accessory/No trailer. After the pop-up is displayed three times, Don’t Remind Me will display and touching
that will turn off the trailer detection
pop-up. To turn the Trailer Detection Alert on, select ON in the Settings tab.
When a trailer is electrically connected and after a Trailer Profile has been created, the trailer detection pop-up will appear with a list of all of the custom Trailer Profiles made on the vehicle. To load an existing Trailer Profile, select one of the Trailer Profiles listed, or load the Guest Trailer Profile by selecting GUEST TRAILER. Touching Accessory/No trailer will select Accessory/No trailer as the active Trailer Profile and will dismiss the pop- up. Shifting the vehicle from P (Park) will select Guest Trailer as the active Trailer Profile and will dismiss the pop-up.
Create a Trailer Profile
A pop-up will indicate the setup is complete. Touch DONE to complete the process or touch TRAILER FEATURE SETUP to set up the Tow/Haul Mode reminder, Trailer Tire
Pressure Monitoring System, if equipped, maintenance reminders, or towing assistance, if equipped.
Import a Trailer Profile
A trailer profile saved to an OnStar account can be imported to the vehicle.
A pop-up will indicate the import was successful. Touch OK to return to the trailer list and select the trailer profile. The Tow/ Haul Mode reminder, Brake Gain Setting and Trailer Tire Pressure sensor learning,
if equipped, do not import. Trailer Feature Setup Tow/Haul Mode Reminder
To turn the Tow/Haul Mode Reminder setting on, touch Yes. To turn it off, touch No.
Trailer Tire Pressure Setup
If the Trailer Tire Pressure Monitoring System (TTPMS) is detected, touch the Tire Pressure Monitoring icon to set up tire pressure monitoring. Touch Yes to set up the sensors or touch No to return to the previous screen.
The trailer tire pressure sensors can transmit up to 7 m (23 feet) from the hitch receiver of the vehicle.
A trailer must be electrically connected to the vehicle before starting the
sensor-to-vehicle learn process.
After selecting Start from the Learn Sensors screen, use the Tool Method or the Manual Method (described below) to learn each tire sensor, during which the current tire number will be highlighted.
Each sensor has a minimum of two minutes to learn, shown by a timer. After a sensor is learned, a checkmark appears next to the tire, the vehicle horn will sound, the vehicle’s brake lamps will flash, and all
working trailer lamps will flash. It then
moves to the next sensor.
To cancel the process touch Stop.
The recommended tire pressure must be entered for the trailer tires. This allows the vehicle to alert when the tire pressure is high or low.
TTPMS must learn the location of the installed tire sensors to show correct air pressure and temperature for each tire. To set up, use one of the following options or see a tire or trailer dealer for service. The learning process must be repeated when the trailer tires are rotated or replaced. See "Editing a Trailer Profile" later in this section
for tire pressure sensor relearn information.
Tool Method: A TTPMS activation tool can be purchased separately to learn the sensor locations.
Manual Method: Without the tool, the air pressure can be increased or decreased in each tire for 10 seconds. Do not exceed the maximum inflation pressure found on the tire sidewalls. Make sure to re-adjust tire pressure to the recommended level when the process is complete.
Sensor Learning Steps
To complete the sensor-to-vehicle learn process:
The process stops without saving the sensor locations if this step takes more than two minutes.
To set up maintenance reminders, touch the Trailer Maintenance icon. Select Yes to set up the maintenance reminders for the
Trailer Profile. Follow the on-screen prompts. The maximum number of reminders is 50. Select No to return to the previous screen.
To set up towing assistance features, if equipped, touch the Towing Assistance icon.
Touch Yes to begin set up or touch No to return to the previous screen.
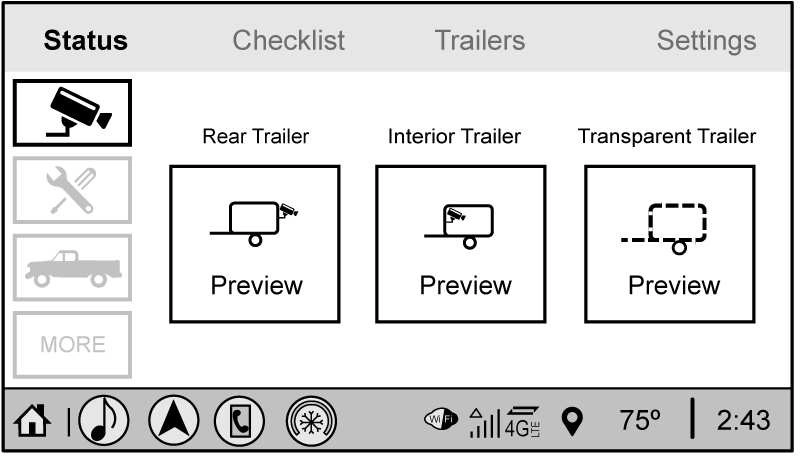
To complete setup for transparent trailer:
100 cm (39.3 in). Measure from ground to
top of coupler.
A rear trailer camera must be mounted on the trailer and electrically connected to the vehicle before transparent trailer feature can be used. See Assistance Systems for Parking or Backing 0 265.
Trailer dimensions must be in range to enable this feature.
. Trailer Length: 300 cm (118.1 in) – 970 cm (381.8 in). Measure from center of coupler to furthest rear point on the trailer.
Follow instructions to drive forward to complete calibration.
Follow instructions to drive forward to complete calibration.
Trailer dimensions must be in range to enable this feature.
. Trailer Length: 300 cm (118.1 in) –
1200 cm (472.4 in). Measure from center
of coupler to furthest rear point on the trailer.
If trailer dimensions are out of range, this feature will be unavailable.
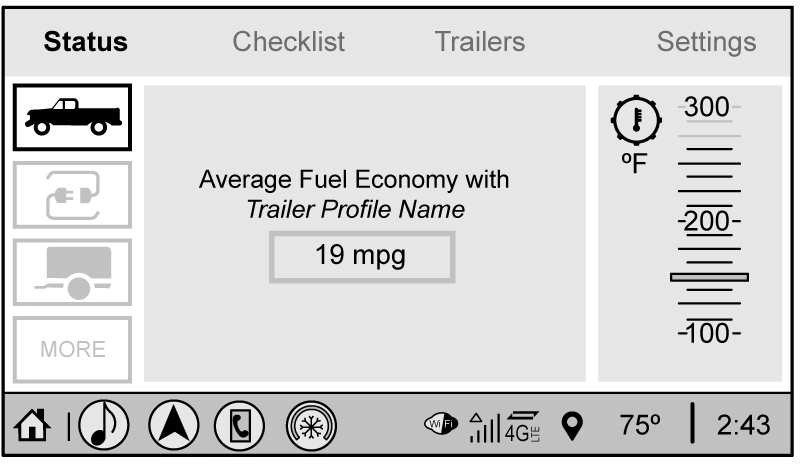
The Status view shows:
Upon entry, the most recent items will be shown. Select MORE to view all options.
Transmission Temperature
View the temperature of the transmission fluid by looking at the graphic. The graphic will indicate a dangerous level if the temperature is at 130 °C–150 °C (270 °F– 300 °F).
Average Fuel Economy
Touch to view the average fuel economy of the vehicle while the Trailer Profile is active.
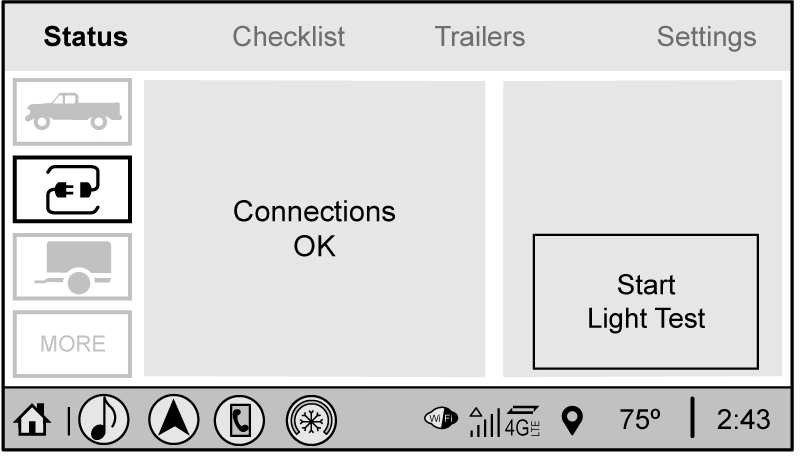
Connections: OK
If a trailer connection is detected, the view will display OK.
Trailer Connections Status
When a trailer is connected, the Trailering App System detects the trailer connection using the Park and Stop/Turn Signal lighting circuits and alerts the driver by requesting a trailer profile setup through the Trailering App System on the infotainment screen. The Trailer Detection Alert setting must be enabled for the alert to display when a trailer is connected. When a trailer is connected and the ignition is off, the Trailering App System will periodically pulse the lighting circuits of the trailer to verify it is still connected. The trailer lights may periodically flash as a result of this trailer connection detection. These flashes may be more visible in dark ambient light environments. The flashing or flickering lights are a normal condition and the Trailering App System has built-in protections to prevent the battery from draining. When Theft Alert is also enabled the frequency and pattern of this flashing will change.
Connection Problem
If any of the trailer connections are lost, a message about the connection issue will appear on the Driver Information Center (DIC). The infotainment display will also show the connection issue in the Connection Status view.
If a trailer connection is not detected, the Trailering App will not display the Connection Status screen.
Connection Trailer Lighting Faults Detected
The Trailering App System monitors for electrical faults on the trailer lights.
A message about the lighting issue will appear on the DIC. The infotainment display will also show the lighting issue in the Connection Status view. Repair your trailer lights if needed. A trailer lighting issue is not covered by your GM warranty.
Diagnose View
Touch Diagnose to see more information about the connection problem.
This view will display the names of the trailer connector pins, a graphic of the trailer connector, and a graphic of the back of the trailer.
Any connector pin that failed will be amber color, and the location of the corresponding connection will be highlighted on the graphic of the back of the trailer.
The Running Lights connection may not detect partial outages. Activate the light test to check all trailer lamps. See "Light Test" following.
Light Test
Touch Start Light Test to cycle the trailer lights on and off to determine if they are working. The test follows this sequence:
one minute and 45 seconds, or until the
test deactivates.
Touch Stop to stop the test. The test will automatically end after one minute and 45 seconds.
The sequence also deactivates when any of the following occur:
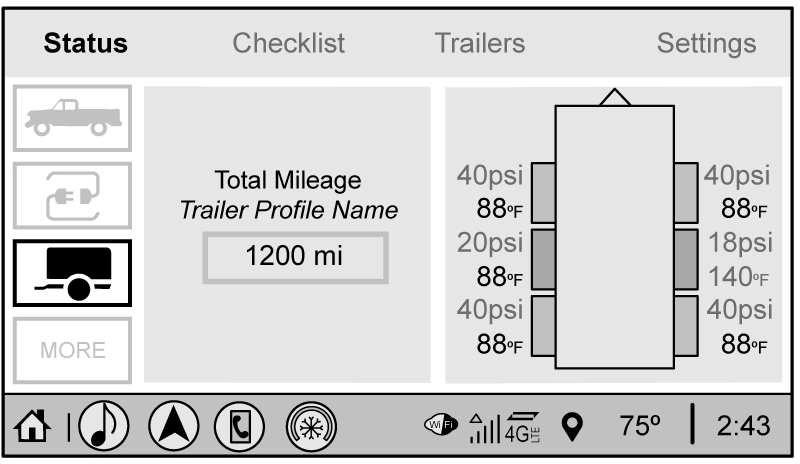
Tire Pressure and Temperature
If the TTPMS sensor-to-vehicle learn process was completed, the status view will display the current tire pressure and temperature of the trailer tires related to the active Trailer Profile. If a tire’s pressure is low or high, the
color of the pressure value will be amber.
If a sensor malfunctions, the values are dashed lines. If the screen displays "Service Tire Pressure Monitoring System", the vehicle needs to be taken to a dealer for service.
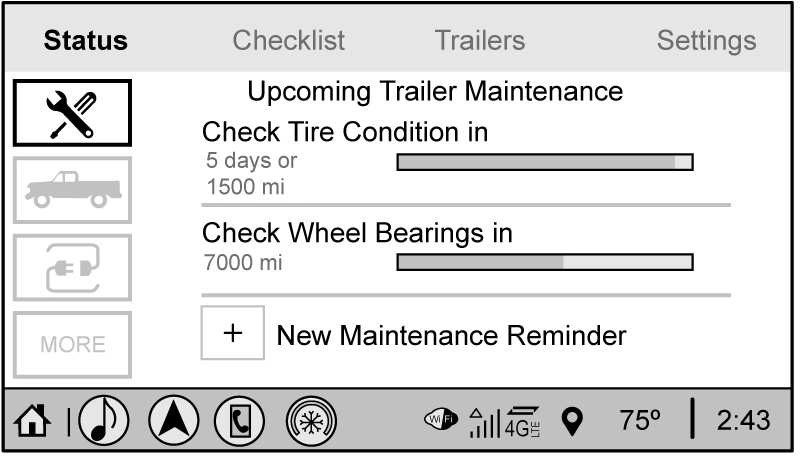
The Maintenance Status view displays reminders. Touch a reminder to edit.
Touch + New Maintenance Reminder to go to the Select New Reminder view.
The progress bar turns yellow when the maintenance item reaches 90% complete.
The progress bar turns red when the maintenance item reaches 100% complete.
Maintenance Notifications
Always follow all of the maintenance instructions that came with your trailer.
Guest Trailer Status View
Touch the Guest Trailer Profile for the status views.
The Guest Trailer Profile Status view shows:
The Trailer Status view displays mileage information. Touch to edit, and follow the on-screen prompts. Mileage and fuel economy will reset after the trailer disconnects.
If the Accessory/No Trailer profile is active, trailer status information is not available.
This view shows the recommended steps to take before towing a trailer.
Touch the box next to each item if that step has been completed.
Touch p to access a detailed view of each step. Within each detailed view, touch Next and Previous to navigate between steps.
Touch Clear All to clear the completed statuses from all items in the current checklist.
For each of the Trailer Profile checklists, there is an option to create custom items to view in the checklist. The custom item will appear at the bottom of the checklist.
If Guest Trailer Profile is active or if no trailer is connected, the checklist will show all of the checklists associated with Custom Trailer Profiles in addition to default checklists.
Touch the Trailers tab to view, activate, create, edit, or delete Trailer Profiles.
If a trailer is connected, touch the Trailer Profile name to activate a Trailer Profile.
There can be up to five Custom Trailer Profiles on the vehicle.
The Custom Trailer Profiles and Guest Trailer are in order of the most frequently used.
The Accessory/No Trailer profile is shown below the Custom Trailer Profiles and Guest Trailer Profile.
All personalization features are based on the settings for each driver in vehicle personalization. The list of Trailer Profiles is based on vehicle personalization settings.
Guest Trailer
If the Guest Trailer Profile is the active Trailer Profile, trailer detection, connections status, theft, and the Tow/Haul reminder
alerts can be sent. The system will not track total mileage or fuel economy, but the system will track trip mileage and fuel economy if the Guest Trailer Profile is active. The Trailer Tire Pressure Monitoring System or maintenance reminders cannot be set up for a Guest Trailer Profile. The Guest Trailer Profile cannot be edited.
Touch p to learn more about the Guest Trailer option.
Accessory/No Trailer
If the Accessory/No Trailer Profile is active, alerts will not be sent and the system will not track mileage or fuel economy. The Trailer Tire Pressure Monitoring System or maintenance reminders cannot be set up for the Accessory/No Trailer Profile. The Accessory/No Trailer profile cannot be edited.
No Trailer Connected
When there is no trailer connected, Trailer Profiles cannot be activated but most options can be edited.
Trailer Brake Gain Memory
The system can memorize the brake gain setting of a Trailer Profile or a Guest Trailer Profile. When a Trailer Profile or Guest
Trailer Profile is selected, and a brake gain setting is set for that Trailer Profile, a quick notice will appear to indicate that the system has recalled that profile’s brake gain setting.
If a Trailer Profile is already active and the brake gain setting had been set for that Trailer Profile, the quick notice will trigger whenever the ignition is turned on.
If there was an error in setting the brake gain for a Trailer Profile, there will be a notification. This pop-up will not appear if the Guest Trailer Profile is active or if there is no trailer connected.
Trailer brake gain should be set for a specific trailering condition and must be adjusted anytime vehicle loading, trailer loading,
or road surface conditions change.
Trailer Profile View
Touch to edit any of the following options in the Trailer Profile view:
Touch Save to save the new value to the Trailer Profile. Touching Back will still save the previously entered information.
Trailer Name
Touch to edit the Trailer Profile’s name. Use at least one character and no spaces.
Touch Save.
Towing Assistance Setup
A trailer should be connected to complete this portion of profile setup.
Touch to set up towing assistance features for the Trailer Profile. See "Towing Assistance" for details on the setup.
Tire Pressure Setup
Touch to set up the Trailer Tire Pressure Monitoring System (TTPMS) for the Trailer Profile. See "Trailer Tire Pressure Setup" previously in this section for details on the setup. Also, touch Tire Pressure Setup if the
trailer tires were rotated or if the tire pressure sensors in the tires were replaced for this Trailer Profile. The vehicle will need to relearn the tire sensors and their locations.
If TTPMS had been set up previously, the Select Number of Sensors screen will appear after touching Tire Pressure Setup. If the number of sensors has changed, select the number and touch Next.
If a new number of sensors is selected, the Relearn Sensors pop-up will appear. Touch Cancel to go back or touch Relearn to overwrite the current sensors and begin the relearning process. See "Trailer Tire Pressure
Setup" previously in this section.
If number of sensors has not changed, touch Next and the Learn sensors screen will appear.
On the Learn Sensors screen. Touch Relearn to overwrite the current sensors and begin the relearning process. See "Trailer Tire Pressure Setup" previously in this section.
On the Learn Sensors screen, touch Next to go to the Edit Recommended Tire Pressure screen.
On the Edit Recommended Tire Pressure screen, touch a number on the keypad to change the
Recommended Tire Pressure for the trailer’s tires. This will change the number at which the vehicle displays alerts related to trailer
tire pressure. Touch Done to return to the Trailer Profile view.
Touch to view a list of maintenance reminders for the Trailer Profile.
Touch a reminder to view, reset, delete, or edit it.
Reset Reminder
Touch Maintenance Complete in the reminder view to reset the reminder. On the pop-up, touch Reset to reset the time and mileage values for the reminder. Touch Cancel to return to the previous view and nothing will change.
Edit Reminder
Touch to edit the mileage or time settings for the reminder. Touch Save to save the new settings to the Trailer Profile.
Delete Reminder
Touch to delete the maintenance reminder. On the pop-up, touch Delete to delete the reminder or touch Cancel to return to the previous view and nothing will change.
New Maintenance Reminder
Touch + New Maintenance Reminder to set up a new reminder. Suggested reminders that were previously set will have checkmarks next to them. Suggested reminders that have not been set will have empty boxes next to them. The maximum number of reminders is 50.
Edit Mileage
Touch to edit the Trailer Profile’s mileage. Touch Reset to reset trailer mileage to zero, or enter a new value and touch Save.
Touching back will return to the Trailer Profile view.
Effect on Maintenance Reminders
If the mileage is reset or changed, and mileage has already accumulated, any maintenance reminders that have been set up will be adjusted accordingly.
Reset Average Fuel Economy
Touch to reset the average fuel economy for the Trailer Profile. Touch Reset to change,
or touch Cancel to go back to the previous view.
Delete/Remove Trailer
Touch to remove the Trailer Profile and all of its settings.
On the pop-up, touch Remove to remove the Trailer Profile from the vehicle. Touch Cancel to dismiss the pop-up and return to the previous view.
Remove will be displayed if there is a connected OnStar plan active with the vehicle. Removing a trailer profile will remove the profile from the vehicle but the profile will still be associated with the user account. However, if there is not a connected OnStar plan then the remove button will read DELETE and the profile will be deleted permanently.
Within the Trailering App, touch the Settings tab to modify the following settings:
The Trailer Detection Alert setting will be on by default. Turn it off to disable the Trailer Detection pop-up from displaying when a trailer is connected. The Guest Trailer Profile will become the active Trailer Profile, unless another Trailer Profile is selected manually through the Trailering App. If this setting is disabled while a Custom Trailer Profile is active, that Trailer Profile will remain the active profile until the trailer is disconnected.
Touch Maintenance Alerts to view the Maintenance Alerts settings page. These alerts are based on the Trailer Profile, so the settings for each Trailer Profile must be turned on or off. Touch a profile to view more information or adjust the setting for that profile.
The setting will be on by default for each profile. All Maintenance Alerts for that active Trailer Profile will be received.
Turn a setting off to not receive any of the Maintenance Alerts when that Trailer Profile is active.
A theft alert can be set if a trailer is connected and the alert is enabled. When the trailer is disconnected and the vehicle is off, an alarm will sound.
Touch Theft Alert in Settings to view the Theft Alert settings page. These alerts are based on the Trailer Profile, so the settings for each Trailer Profile must be turned on or off. Touch a profile to view more information or adjust the setting for that profile.
This setting will be off by default for each Trailer Profile, including the Guest Trailer Profile.
A smartphone will receive a notification that the trailer related to the selected Trailer Profile is disconnected from the vehicle,
if the setting is on for the active Trailer Profile, the vehicle has an OnStar or connected service plan and the smartphone number has been added to the account for this notification.
If the setting is turned off for a given Trailer Profile, the smartphone will not receive this security notification even if the Trailer Profile is active.
This is a reminder to turn on the Tow/Haul Mode when towing a trailer. See Tow/Haul Mode 0 240.
Touch Tow/Haul Mode Reminder in Settings to view the Tow/Haul Mode Reminder settings page. These alerts are based on the Trailer Profile, so the settings for each Trailer Profile must be turned on or off.
Touch a profile to view more information or to adjust the setting for that profile.
This setting will default to OFF for each Trailer Profile, including the Guest Trailer Profile.
If Tow/Haul Mode is off and this setting is on for a Trailer Profile, each time the ignition is turned on a reminder will appear to turn on Tow/Haul Mode when the Trailer Profile is active.
If Tow/Haul Mode is on and this setting is on for a Trailer Profile, the reminder will not appear when the Trailer Profile is active.
Touch Trailer Length Indicator to view the Trailer Length Indicator settings page. If this setting is ON a guideline is displayed in the
side mirror camera view to indicate the rear of the attached trailer. If this setting is OFF the guideline will not be displayed.
This setting will default to OFF if the trailer length indicator feature is not set up. See "Towing Assistance" for details on the setup.
Download Manual