Child Safety
See the following sections for directions on how to properly use safety restraints for children.
|
Child |
Child Size, Height, Weight, or Age |
Recommended Restraint Type |
|
Infants or toddlers |
Children weighing 40 lb (18 kg) or less (generally age four or younger). |
Use a child restraint (sometimes called an infant carrier, convertible seat, or toddler seat). |
|
Small children |
Children who have outgrown or no longer properly fit in a child restraint (generally children who are less than 57 in (1.45 m) tall, are greater than age four and less than age 12, and between 40 lb (18 kg) and 80 lb (36 kg) and upward to 100 lb (45 kg) if recommended by your child restraint manufacturer). |
Use a belt-positioning booster seat. |
|
Larger children |
Children who have outgrown or no longer properly fit in a belt-positioning booster seat (generally children who are at least 57 in (1.45 m) tall or greater than 80 lb (36 kg) or 100 lb (45 kg) if recommended by child restraint manufacturer). |
Use a vehicle seatbelt having the lap belt snug and low across the hips, shoulder belt centered across the shoulder and chest, and seat backrest upright. |
E142594
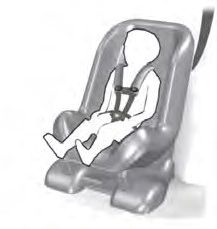
Use a child restraint (sometimes called an infant carrier, convertible seat, or toddler seat) for infants, toddlers, or children weighing 40 lb (18 kg) or less (generally age four or younger).
|
|
 WARNING: Depending on where you secure a child restraint, and depending on the child restraint design, you may block access to certain seatbelt buckle assemblies and LATCH lower anchors, rendering those features potentially unusable. To avoid risk of injury, make sure occupants only use seating positions where they are able to be properly restrained.
When installing a child restraint with combination lap and shoulder belts:
Perform the following steps when installing the child restraint with combination lap and shoulder belts:
Note: Although the child restraint illustrated is a forward facing child restraint, the steps are the same for installing a rear facing child restraint.
E142528
1. Position the child restraint in a seat with a combination lap and shoulder belt.
E142531
Note: The automatic locking mode is available on the front passenger and rear seats. This vehicle does not require the use of a locking clip.
To check this, grab the seat at the belt path and attempt to move it side to side and forward and back. There should be no more than 1 in (2.5 cm) of movement for proper installation.
We recommend checking with a NHTSA Certified Child Passenger Safety Technician to make certain the child restraint is properly installed. In Canada, check with Transport Canada for referral to a Child Car Seat Clinic.
|
|
 WARNING: Depending on where you secure a child restraint, and depending on the child restraint design, you may block access to certain seatbelt buckle assemblies and LATCH lower anchors, rendering those features potentially unusable. To avoid risk of injury, make sure occupants only use seating positions where they are able to be properly restrained.
The LATCH system is composed of three vehicle anchor points: two lower anchors where the vehicle seat backrest and seat cushion meet (called the seat bight) and one top tether anchor behind that seating position.
LATCH compatible child restraints have two rigid or webbing mounted attachments that connect to the two lower anchors at the LATCH equipped seating positions in your vehicle. This type of attachment method eliminates the need to use seatbelts to attach the child restraint. However, you can still use the seatbelt to attach the child restraint if the lower anchors are not used.
For forward-facing child restraints, you must also attach the top tether strap to the proper top tether anchor if a top tether strap has been provided with your child restraint.
Your vehicle has LATCH lower anchors for child restraint installation at the following seating positions.
For SuperCrew vehicles, the lower LATCH anchors are at the rear section of the rear seat between the cushion and the seat backrest.
For SuperCab vehicles, the lower LATCH anchors are at the back panel behind the rear seats.
Follow the child restraint manufacturer's instructions to properly install a child restraint with LATCH attachments.
Follow the instructions later in this chapter on attaching child restraints with tether straps.
Attach LATCH lower attachments of the child restraint only to the anchors shown.
|
|
 WARNING: The standardized spacing for LATCH lower anchors is 11 in (280 mm) center to center. Do not use LATCH lower anchors for the center seating position unless the child restraint manufacturer's instructions permit and specify using anchors spaced at least as far apart as those in this vehicle.
The lower anchors at the center of the second row rear seat are spaced 25.7 in (652 mm) apart. The standardized spacing for LATCH lower anchors is 11.0 in
(280 mm) center to center. You cannot install a child restraint with rigid LATCH attachments at the center seating position. LATCH compatible child restraints (with attachments on belt webbing) can only be
used at this seating position provided that the child restraint manufacturer's instructions permit use with the anchor spacing stated. Do not attach a child restraint to any lower anchor if an adjacent child restraint is attached to that anchor.
Each time you use the child restraint, check that the seat is properly attached to the lower anchors and tether anchor, if applicable. Tug the child restraint from side to side and forward and back where it is secured to the vehicle. The seat should move less than 1 in (2.5 cm) when you do this for a proper installation.
If the child restraint is not anchored properly, the risk of a child being injured in a crash greatly increases.
When used in combination, either the seatbelt or the LATCH lower anchors may be attached first, provided a proper installation is achieved. Attach the tether strap afterward, if included with the child restraint.
Many forward-facing child restraints include a tether strap which extends from the back of the child restraint and hooks to an anchoring point called the top tether anchor. Tether straps are available as an accessory for many older child restraints. Contact the manufacturer of your child restraint for information about ordering a tether strap, or to obtain a longer tether strap if the tether strap on your child restraint does not reach the appropriate top tether anchor in the vehicle.
The passenger seats of your vehicle may have built-in tether strap anchors behind the seats.
For SuperCrew vehicles, the tether anchors are anchor brackets behind the seat on the rear edge of the seat cushion.
For SuperCab vehicles, the tether anchors in your vehicle are loops of webbing above the seat backrest.
The rear seat in the SuperCab has two straps along the top of the seat backrest that function as both routing loops for the tether straps and anchor loops.
The tether strap anchors in your vehicle are in the following positions (shown from top view):
For SuperCab vehicles without rear seats, use either of the two passenger side rear rigid anchors on the back panel as a top tether for the front passenger seat.
Attach the tether strap only to the appropriate tether anchor as shown. The tether strap may not work properly if attached somewhere other than the correct tether anchor.
If you install a child restraint with rigid LATCH attachments, do not tighten the tether strap enough to lift the child restraint off the vehicle seat cushion when the child is seated in it. Keep the tether strap just snug without lifting the front of the child restraint. Keeping the child restraint just touching the vehicle seat gives the best protection in a severe crash.
Once you have installed the child restraint using either the seatbelt, the lower anchors of the LATCH system, or both, you can attach the top tether strap.
If the tether strap is clipped incorrectly, the child restraint may not be retained properly in the event of a crash.
If the child restraint is not anchored properly, the risk of a child being injured in a crash greatly increases.
If your child restraint system has a tether strap, and the child restraint manufacturer recommends its use, we also recommend its use.
Note: For vehicles with adjustable head restraints, route the tether strap under the head restraint and between the head restraint posts, otherwise route the tether strap over the top of the seat backrest.
If the tether strap is clipped incorrectly, the child restraint may not be retained properly in the event of a crash.
If the child restraint is not anchored properly, the risk of a child being injured in a crash greatly increases.
If your child restraint system has a tether strap, and the child restraint manufacturer recommends its use, we also recommend its use.

E280119
There are two loops of webbing just above the back of the rear seat (along the bottom edge of the rear window). Use these loops as both routing loops and anchor loops for up to two child restraint tether straps.
For example, you can use the driver side loop as a routing loop for a child restraint in the driver side rear seat and as an anchoring loop for child restraints installed in the passenger side rear seat.
Many tether straps cannot be tightened if the tether strap is hooked to the loop directly behind the child restraint.
To provide a tight tether strap:

E162715
If the child restraint is not anchored properly, the risk of a child being injured in a crash greatly increases.
If your child restraint system has a tether strap, and the child restraint manufacturer recommends its use, we also recommend its use.
|
|
 WARNING: Do not put the shoulder section of the seatbelt or allow the child to put the shoulder section of the seatbelt under their arm or behind their back. Failure to follow this instruction could reduce the effectiveness of the seatbelt and increase the risk of injury or death in a crash.
Use a belt-positioning booster seat for children who have outgrown or no longer properly fit in a child safety restraint (generally children who are less than 57 in (1.45 m) tall, are greater than age 4 and less than age 12, and between 40 lb (18 kg) and 80 lb (36 kg) and upward to 100 lb (45 kg) if recommended by your child restraint manufacturer). Many state and provincial laws require that children use approved booster seats until they reach age eight, a height of 57 in (1.45 m) tall, or 80 lb (36 kg).
Booster seats should be used until you can answer YES to ALL of these questions when seated without a booster seat:
Always use booster seats in conjunction with your vehicle lap and shoulder belt.
If your backless booster seat has a removable shield, remove the shield. If a vehicle seating position has a low seat backrest or no head restraint, a backless booster seat may place your child's head (as measured at the tops of the ears) above the top of the seat. In this case, move the backless booster to another seating position with a higher seat backrest or head restraint and lap and shoulder belts, or consider using a high back booster seat.
If, with a backless booster seat, you cannot find a seating position that adequately supports your child's head, a high back booster seat would be a better choice.
Children and booster seats vary in size and shape. Choose a booster that keeps the lap belt low and snug across the hips, never up across the stomach, and lets you adjust the shoulder belt to cross the chest and rest snugly near the center of the shoulder. The following drawings compare the ideal fit (center) to a shoulder belt uncomfortably close to the neck and a shoulder belt that could slip off the shoulder. The drawings also show how the lap belt should be low and snug across the child's hips.
 If the booster seat slides on the vehicle seat upon which it is being used, placing a rubberized mesh sold as shelf or carpet liner under the booster seat may improve this condition. Do not introduce any item thicker than this under the booster seat. Check with the booster seat manufacturer's instructions.
|
Restraint Type |
Combined Weight of Child and Child Restraint |
Use Any Attachment Method as Indicated Below by X |
||||
|
LATCH (Lower Anchors and Top Tether Anchor) |
LATCH (Lower Anchors Only) |
Seatbelt and Top Tether Anchor |
Seatbelt and LATCH (Lower Anchors and Top Tether Anchor) |
Seatbelt Only |
||
|
Rear facing child restraint |
Up to 65 lb (29.5 kg) |
X |
X |
|||
|
Rear facing child restraint |
Over 65 lb (29.5 kg) |
X |
||||
|
Forward facing child restraint |
Up to 65 lb (29.5 kg) |
X |
X |
X |
||
|
Forward facing child restraint |
Over 65 lb (29.5 kg) |
X |
X |
Note: The child restraint must rest tightly against the vehicle seat upon which it is installed. It may be necessary to lift or remove the head restraint. See Seats (page 124).
CHILD SAFETY LOCKS (IF EQUIPPED)
When these locks are set, the rear doors cannot be opened from the inside.
The childproof locks are located on the rear edge of each rear door and must be set separately for each door.
Left-Hand Side
Turn counterclockwise to lock and clockwise to unlock.
Turn clockwise to lock and counterclockwise to unlock.
Download Manual