TIRES
Tire safety information will cover aspects of the following information: Tire Markings, Tire Identification Numbers, Tire Terminology and Definitions, Tire Pressures, and Tire Loading.
Tire Markings
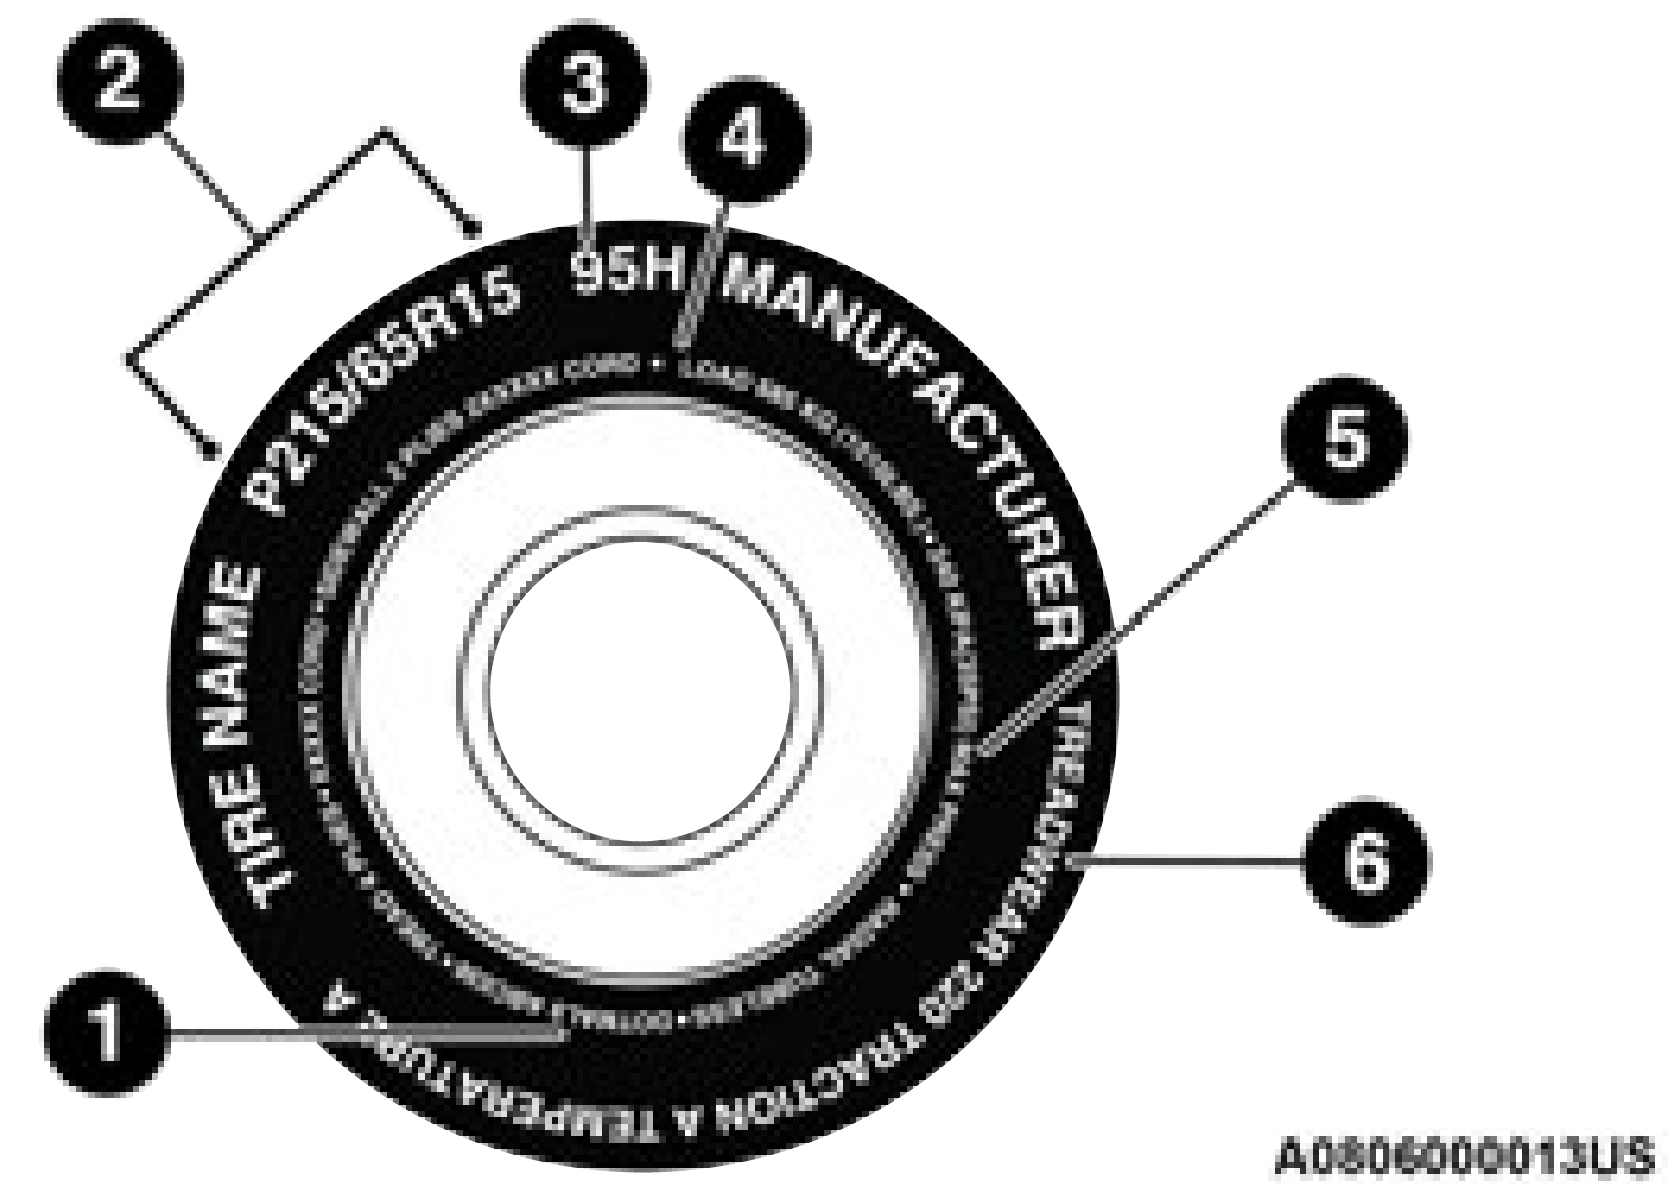
Tire Markings
Tire Sizing Chart
into the sidewall beginning with the section width. The letter "P" is absent from this tire size designation. Example: 215/65R15 96H.
7
|
EXAMPLE: |
|
R = Construction code "R" means radial construction, or
"D" means diagonal or bias construction
|
|
15, 16, 18 = Rim diameter in inches (in) |
|
Service Description: |
|
95 = Load Index A numerical code associated with the maximum load a tire can carry
|
|
H = Speed Symbol A symbol indicating the range of speeds at which a tire can carry a load corresponding to its load index under certain operating conditions
The maximum speed corresponding to the speed symbol should only be achieved under specified operating conditions (i.e., tire pressure, vehicle loading, road conditions, and posted speed limits)
|
|
Load Identification: Absence of the following load identification symbols on the sidewall of the tire indicates a Standard Load (SL) tire: XL = Extra load (or reinforced) tire, or
LL = Light load tire or
C, D, E, F, G = Load range associated with the maximum load a tire can carry at a specified pressure
|
|
Maximum Load – Maximum load indicates the maximum load this tire is designed to carry |
|
Maximum Pressure – Maximum pressure indicates the maximum permissible cold tire inflation pressure for this tire |
The TIN may be found on one or both sides of the tire; however, the date code may only be on one side. Tires with white sidewalls will have the full TIN, including the date code, located on the white sidewall side of the tire. Look for the TIN on the outboard side of black sidewall tires as mounted on the vehicle. If the TIN is not found on the outboard side, then you will find it on the inboard side of the tire.
7
|
Term |
Definition |
|
B-pillar |
The vehicle B-pillar is the structural member of the body located behind the front door. |
|
Cold Tire Inflation Pressure |
Cold tire inflation pressure is defined as the tire pressure after the vehicle has not been driven for at least three hours, or driven less than 1 mile (1.6 km) after sitting for a minimum of three hours. Inflation pressure is measured in units of PSI (pounds per square inch) or kPa (kilopascals). |
|
Maximum Inflation Pressure |
The maximum inflation pressure is the maximum permissible cold tire inflation pressure for this tire. The maximum inflation pressure is molded into the sidewall. |
|
Recommended Cold Tire Inflation Pressure |
Vehicle manufacturer's recommended cold tire inflation pressure as shown on the tire placard. |
|
Tire Placard |
A label permanently attached to the vehicle describing the vehicle’s loading capacity, the original equipment tire sizes and the recommended cold tire inflation pressures. |
 Tire Loading And Tire Pressure
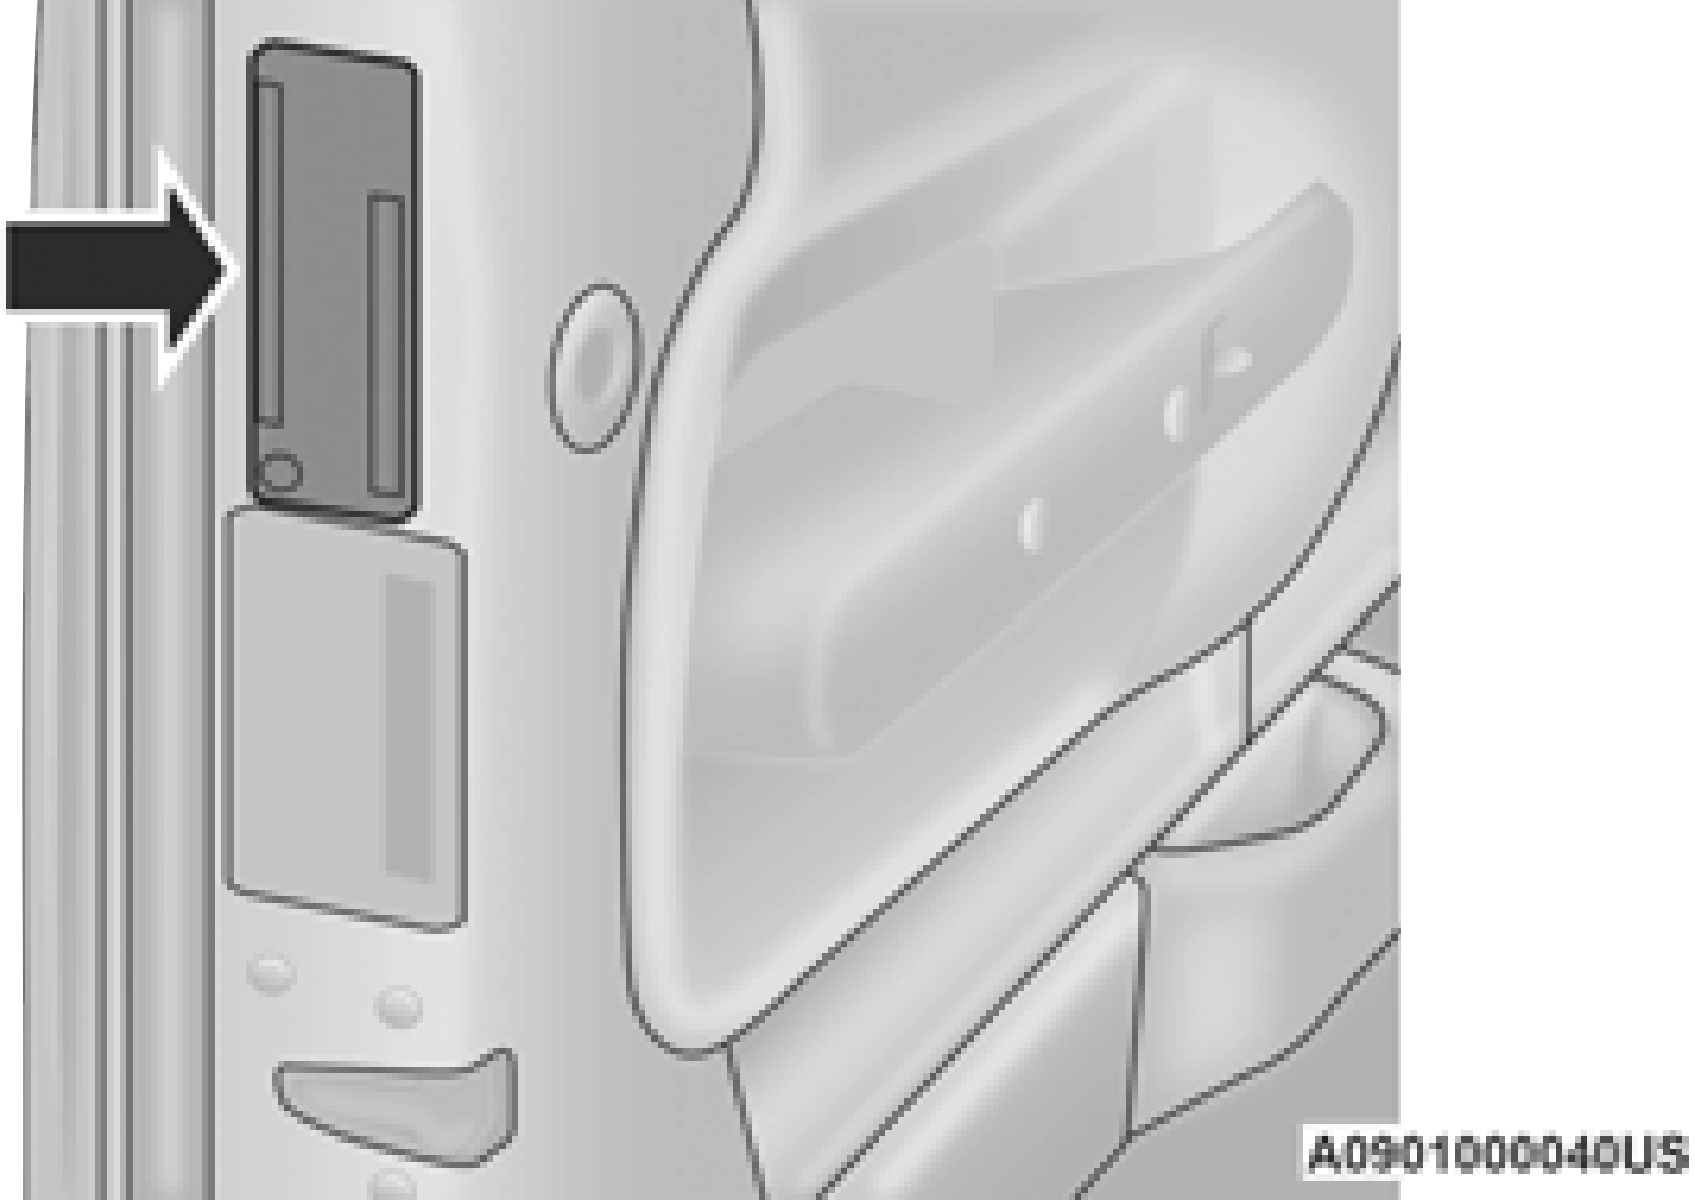
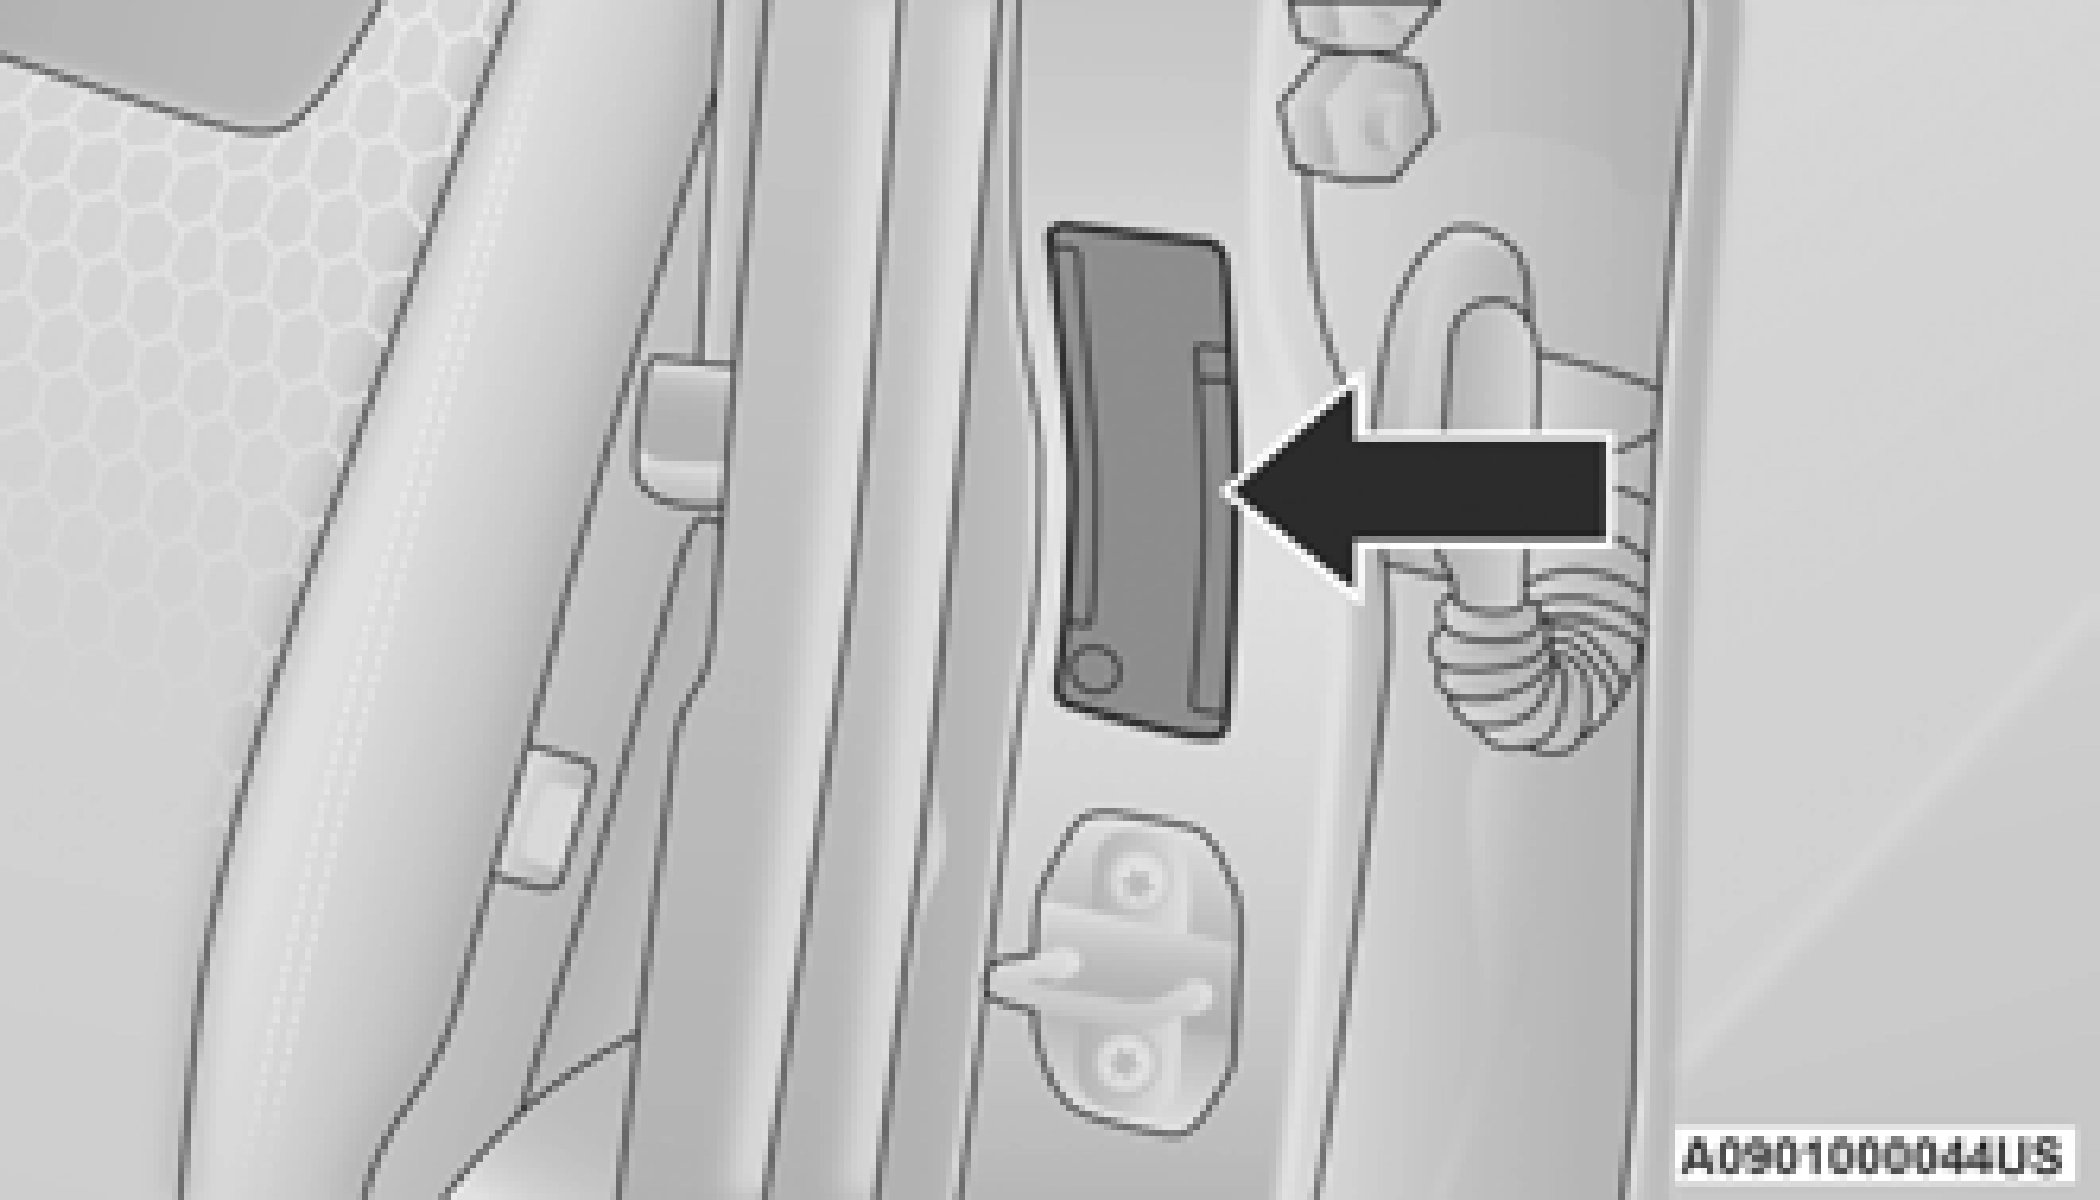
The proper cold tire inflation pressure is listed on the driver’s side B-pillar or the rear edge of the driver's side door.
Check the inflation pressure of each tire, including the spare tire (if equipped), at least monthly and inflate to the recommended
pressure for your vehicle. Example Tire Placard Location (Door) Example Tire Placard Location (B-pillar)
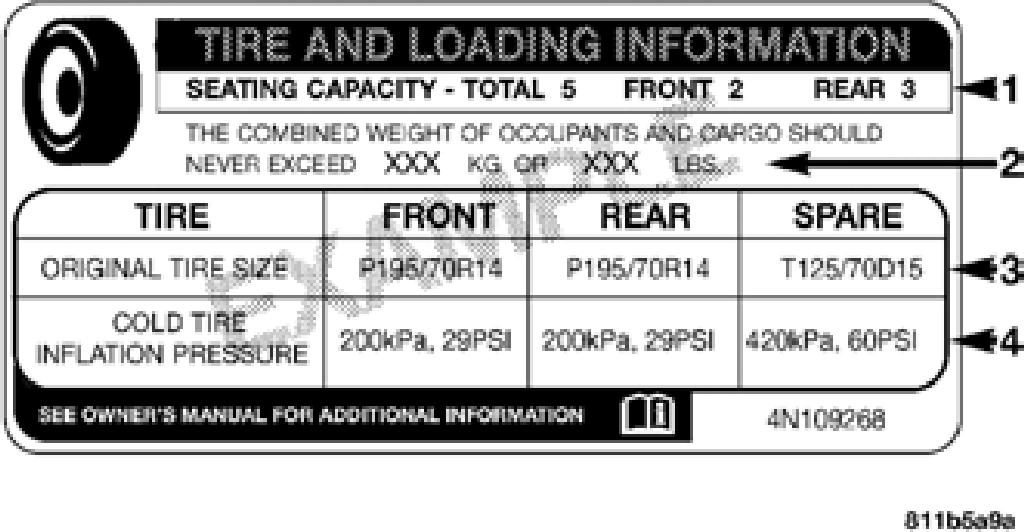
Tire And Loading Information Placard
This placard tells you important information about the:
The vehicle maximum load on the tire must not exceed the load carrying capacity of the tire on your vehicle. You will not exceed the tire's load carrying capacity if you adhere to the loading conditions, tire size, and cold tire inflation pressures specified on the Tire and Loading Information placard in“Vehicle Loading” in the“Starting And Operating” section of this manual.
Under a maximum loaded vehicle condition, gross axle weight ratings (GAWRs) for the front and rear axles must not be exceeded.
For further information on GAWRs, vehicle loading, and trailer towing, refer to“Vehicle Loading” in the“Starting And Operating” section of this manual.
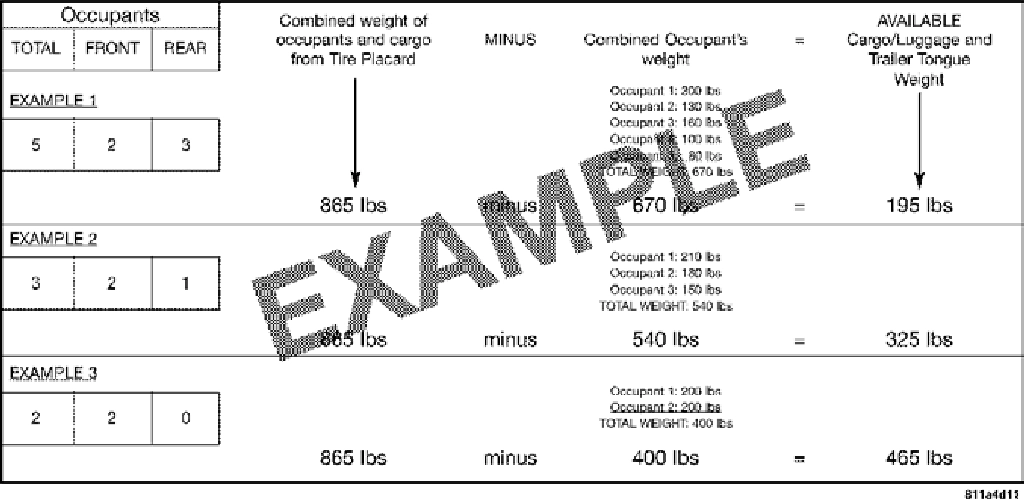
To determine the maximum loading conditions of your vehicle, locate the statement“The combined weight of occupants and cargo should never exceed XXX kg or XXX lbs” on the Tire and Loading Information placard. The combined weight of occupants, cargo/luggage and trailer tongue weight (if applicable) should never exceed the weight referenced here.
Steps For Determining Correct Load Limit—
the driver and passengers that will be
riding in your vehicle.
For example, if“XXX” amount equals 635 kg and there will be five 68 kg passengers in your vehicle, the amount of available cargo and luggage load capacity is 295 kg (635-340 (5x68) = 295 kg) as shown in step 4.
Tire Pressure
Proper tire inflation pressure is essential to the safe and satisfactory operation of your vehicle. Four primary areas are affected by improper tire pressure:
(Continued)
Both underinflation and overinflation affect the stability of the vehicle and can produce a feeling of sluggish response or over responsiveness in the steering.
Underinflated tires will increase tire rolling resistance resulting in higher fuel consumption.
Improper cold tire inflation pressures can cause abnormal wear patterns and reduced tread life, resulting in the need for earlier tire replacement.
Ride Comfort And Vehicle Stability Proper tire inflation contributes to a
comfortable ride. Overinflation produces a jarring and uncomfortable ride.
Tire Inflation Pressures
The proper cold tire inflation pressure is listed on the driver's side B-pillar or rear edge of the driver's side door.
At least once a month:
Inflation pressures specified on the placard are always“cold tire inflation pressure”. Cold tire inflation pressure is defined as the tire pressure after the vehicle has not been driven for at least 3 hours, or driven less than 1 mile (1.6 km) after sitting for a minimum of 3 hours. The cold tire inflation pressure must not exceed the maximum inflation pressure molded into the tire sidewall.
Check tire pressures more often if subject to a wide range of outdoor temperatures, as tire pressures vary with temperature changes.
Tire pressures change by approximately 1 psi (7 kPa) per 12°F (7°C) of air temperature change. Keep this in mind when checking tire pressure inside a garage, especially in the Winter.
Example: If garage temperature = 68°F (20°C) and the outside temperature = 32°F (0°C) then the cold tire inflation pressure should be increased by 3 psi (21 kPa), which equals 1 psi (7 kPa) for every 12°F (7°C) for this outside temperature condition.
Tire pressure may increase from 2 to 6 psi (13 to 40 kPa) during operation. DO NOT reduce this normal pressure build up or your tire pressure will be too low.
Tire Pressures For High Speed Operation The manufacturer advocates driving at safe speeds and within posted speed limits. Where
speed limits or conditions are such that the
vehicle can be driven at high speeds, maintaining correct tire inflation pressure is very important. Increased tire pressure and reduced vehicle loading may be required for
high-speed vehicle operation. Refer to an authorized tire dealer or original equipment vehicle dealer for recommended safe operating speeds, loading and cold tire inflation pressures.
If your tire becomes damaged, it may be repaired if it meets the following criteria:
Consult an authorized tire dealer for tire repairs and additional information.
Damaged Run Flat tires, or Run Flat tires that have experienced a loss of pressure should be replaced immediately with another Run Flat tire of identical size and service description (Load
Index and Speed Symbol). Replace the tire pressure sensor as well as it is not designed to be reused.
Run Flat tires allow you the capability to drive 50 miles (80 km) at 50 mph (80 km/h) after a rapid loss of inflation pressure. This rapid loss of inflation is referred to as the Run Flat mode. A Run Flat mode occurs when the tire inflation pressure is of/or below 14 psi (96 kPa). Once a Run Flat tire reaches the run flat mode it has
limited driving capabilities and needs to be replaced immediately. A Run Flat tire is not repairable. When a run flat tire is changed after driving with underinflated tire condition, please replace the TPM sensor as it is not designed to be reused when driven under run flat mode 14 psi (96 kPa) condition.
TPM Sensor must be replaced after driving the vehicle on a flat tire condition.
It is not recommended driving a vehicle loaded at full capacity or to tow a trailer while a tire is in the run flat mode.
See the tire pressure monitoring section for more information.
When stuck in mud, sand, snow, or ice conditions, do not spin your vehicle's wheels above 30 mph (48 km/h) or for longer than 30 seconds continuously without stopping.
Refer to“Freeing A Stuck Vehicle” in“In Case Of Emergency” for further information.
Tread wear indicators are in the original equipment tires to help you in determining when your tires should be replaced.
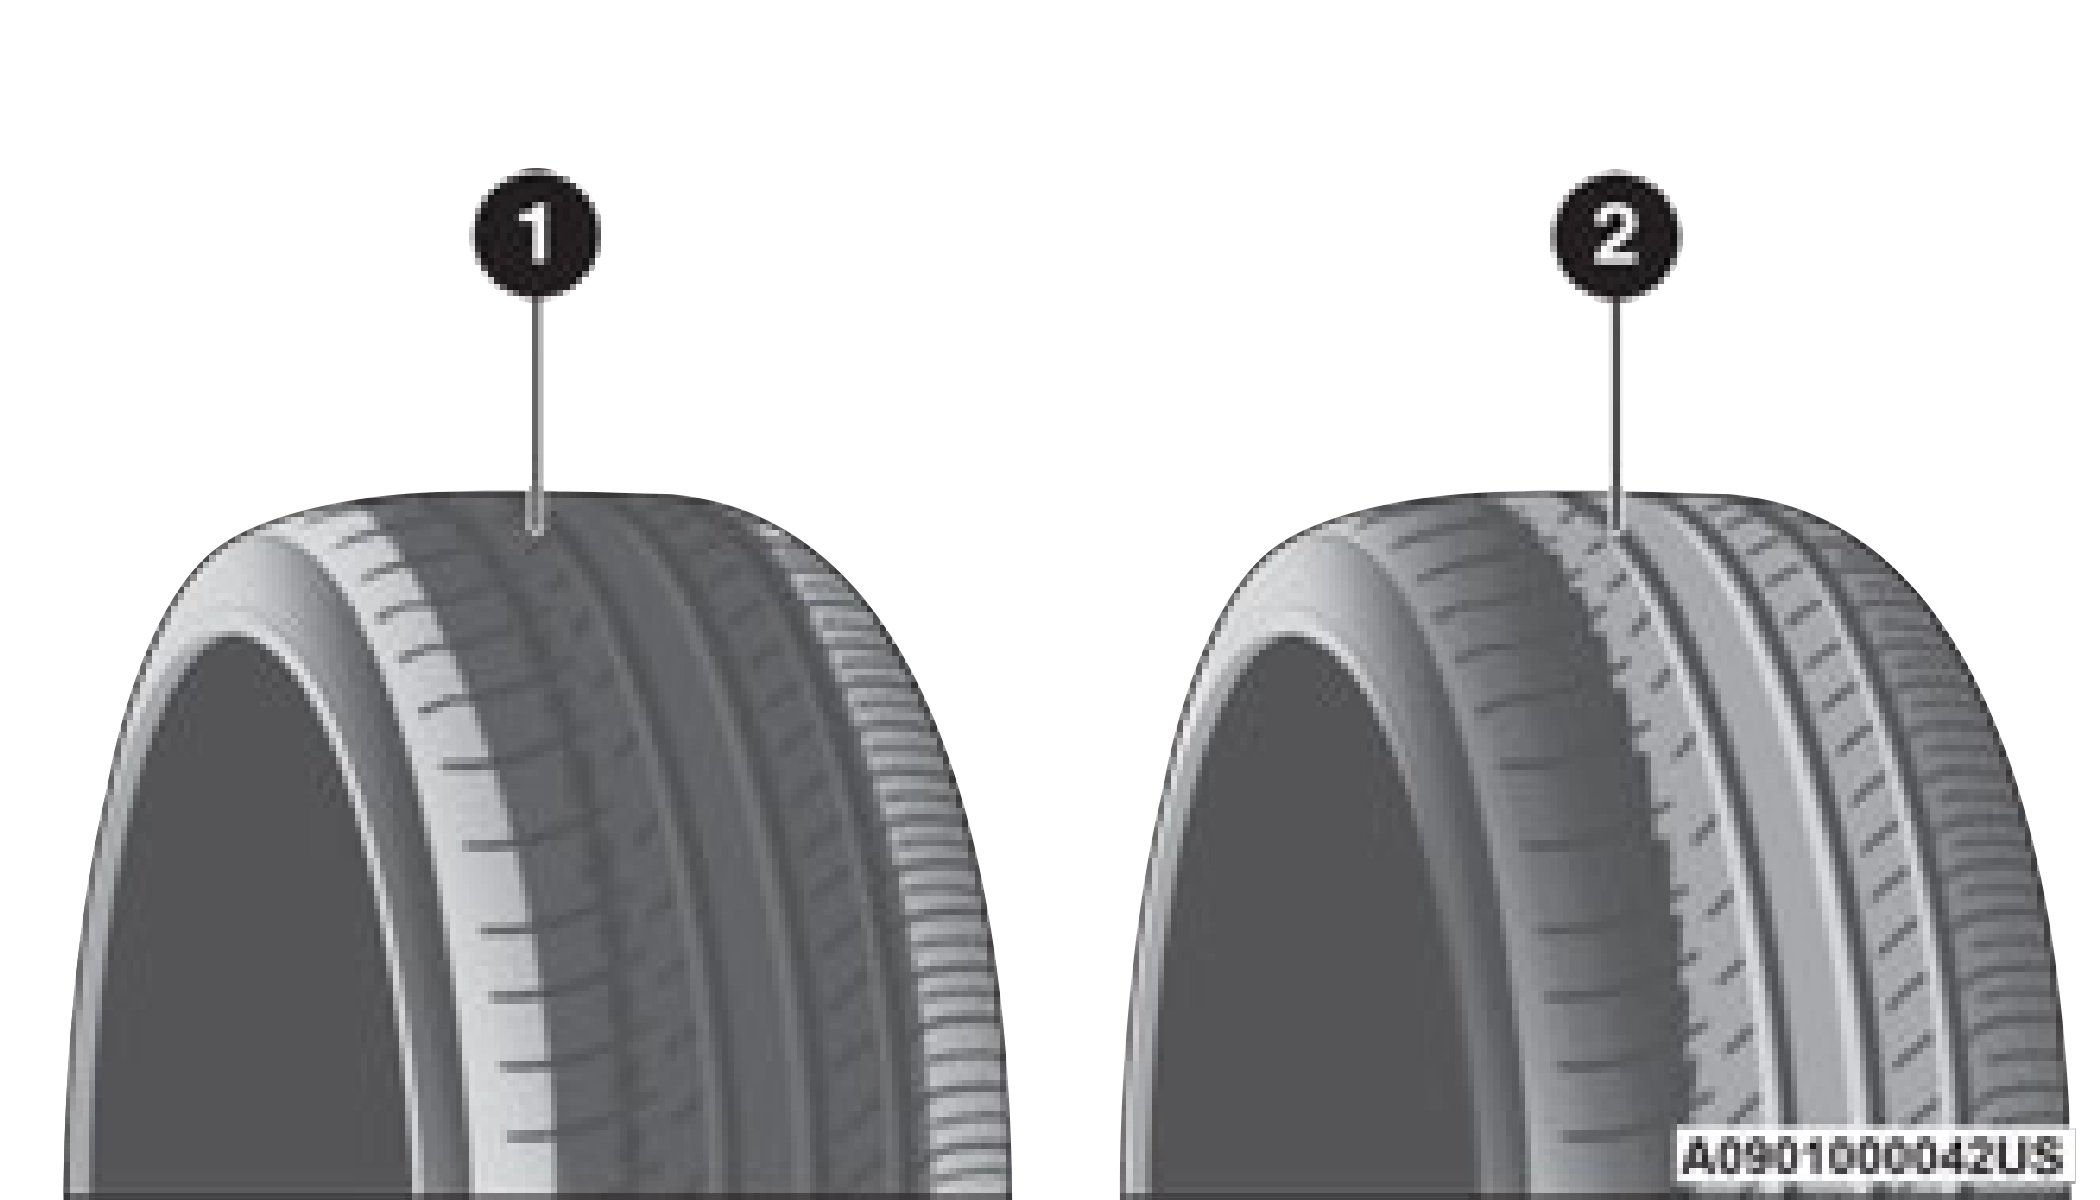
Tire Tread
These indicators are molded into the bottom of the tread grooves. They will appear as bands when the tread depth becomes a 1/16 of an inch (1.6 mm). When the tread is worn to the tread wear indicators, the tire should be replaced.
Refer to“Replacement Tires” in this section for further information.
The service life of a tire is dependent upon varying factors including, but not limited to:
1 — Worn Tire 2 — New Tire
Wheel valve stem must be replaced as well when installing new tires due to wear and tear in existing tires.
Keep dismounted tires in a cool, dry place with as little exposure to light as possible. Protect tires from contact with oil, grease, and gasoline.
The tires on your new vehicle provide a balance of many characteristics. They should be inspected regularly for wear and correct cold tire inflation pressures. The manufacturer strongly recommends that you use tires equivalent to the originals in size, quality and performance when replacement is needed.
Refer to the paragraph on“Tread Wear Indicators” in this section. Refer to the Tire and Loading Information placard or the Vehicle Certification Label for the size designation of your tire. The Load Index and Speed Symbol for your tire will be found on the original equipment tire sidewall.
See the Tire Sizing Chart example found in the“Tire Safety Information” section of this manual for more information relating to the Load Index and Speed Symbol of a tire.
It is recommended to replace the two front tires or two rear tires as a pair. Replacing just one tire can seriously affect your vehicle’s handling. If you ever replace a wheel, make sure that the wheel’s specifications match those of the original wheels.
It is recommended you contact an authorized tire dealer or original equipment dealer with any questions you may have on tire specifications or capability. Failure to use equivalent replacement tires may adversely affect the safety, handling, and ride of your vehicle.
All Season Tires — If Equipped
All Season tires provide traction for all seasons (Spring, Summer, Autumn, and Winter). Traction levels may vary between different all season tires. All season tires can be identified by the M+S, M&S, M/S or MS designation on the tire sidewall. Use all season tires only in sets of four; failure to do so may adversely affect the safety and handling of your vehicle.
Summer tires provide traction in both wet and dry conditions, and are not intended to be driven in snow or on ice. If your vehicle is equipped with Summer tires, be aware these tires are not designed for Winter or cold driving conditions. Install Winter tires on your vehicle when ambient temperatures are less than 40°F (5°C) or if roads are covered with ice or snow.
For more information, contact an authorized dealer.
Summer tires do not contain the all season designation or mountain/snowflake symbol on the tire sidewall. Use Summer tires only in sets of four; failure to do so may adversely affect the safety and handling of your vehicle.
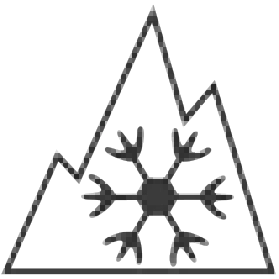
Some areas of the country require the use of snow tires during the Winter. Snow tires can be identified by a“mountain/snowflake” symbol on the tire sidewall.
 If you need snow tires, select tires equivalent in size and type to the original equipment tires. Use snow tires only in sets of four; failure to do
so may adversely affect the safety and handling of your vehicle.
Snow tires generally have lower speed ratings than what was originally equipped with your vehicle and should not be operated at sustained speeds over 75 mph (120 km/h). For speeds above 75 mph (120 km/h) refer to original equipment or an authorized tire dealer for recommended safe operating speeds, loading and cold tire inflation pressures.
While studded tires improve performance on ice, skid and traction capability on wet or dry surfaces may be poorer than that of
non-studded tires. Some states prohibit studded tires; therefore, local laws should be checked before using these tire types.
SPARE TIRES — IF EQUIPPED
For vehicles equipped with Tire Service Kit instead of a spare tire, please refer to“Tire Service Kit” in“In Case Of Emergency” for further information.
Refer to the“Towing Requirements - Tires” in“Starting And Operating” for restrictions when towing with a spare tire designated for temporary emergency use.
Your vehicle may be equipped with a spare tire and wheel equivalent in look and function to the original equipment tire and wheel found on the front or rear axle of your vehicle. This spare tire may be used in the tire rotation for your vehicle. If your vehicle has this option, refer to an authorized tire dealer for the recommended tire rotation pattern.
The compact spare is for temporary emergency use only. You can identify if your vehicle is equipped with a compact spare by looking at the spare tire description on the Tire and Loading Information Placard located on the driver’s side door opening or on the sidewall of the tire. Compact spare tire descriptions begin with the letter“T” or“S” preceding the size designation. Example: T145/80D18 103M.
T, S = Temporary Spare Tire
Since this tire has limited tread life, the original equipment tire should be repaired (or replaced) and reinstalled on your vehicle at the first opportunity.
Do not install a wheel cover or attempt to mount a conventional tire on the compact spare wheel, since the wheel is designed specifically for the compact spare tire. Do not install more than one compact spare tire and wheel on the vehicle at any given time.
The collapsible spare is for temporary emergency use only. You can identify if your vehicle is equipped with a collapsible spare by looking at the spare tire description on the Tire and Loading Information Placard located on the driver’s side door opening or on the sidewall of the tire.
Collapsible spare tire description example: 165/80-17 101P.
Since this tire has limited tread life, the original equipment tire should be repaired (or replaced) and reinstalled on your vehicle at the first opportunity.
Inflate collapsible tire only after the wheel is properly installed to the vehicle. Inflate the
collapsible tire using the electric air pump 7
before lowering the vehicle.
Do not install a wheel cover or attempt to mount a conventional tire on the collapsible spare wheel, since the wheel is designed specifically for the collapsible spare tire.
The full size spare is for temporary emergency use only. This tire may look like the originally equipped tire on the front or rear axle of your vehicle, but it is not. This spare tire may have limited tread life. When the tread is worn to the tread wear indicators, the temporary use full size spare tire needs to be replaced. Since it is not the same as your original equipment tire, replace (or repair) the original equipment tire and reinstall on the vehicle at the first opportunity.
The limited use spare tire is for temporary emergency use only. This tire is identified by a label located on the limited use spare wheel. This label contains the driving limitations for this spare. This tire may look like the original equipped tire on the front or rear axle of your vehicle, but it is not. Installation of this limited use spare tire affects vehicle handling. Since it is not the same as your original equipment tire, replace (or repair) the original equipment tire and reinstall on the vehicle at the first opportunity.
WHEEL AND WHEEL TRIM CARE
All wheels and wheel trim, especially aluminum and chrome plated wheels, should be cleaned regularly using mild (neutral Ph) soap and water to maintain their luster and to prevent corrosion. Wash wheels with the same soap solution recommended for the body of the vehicle and remember to always wash when the surfaces are not hot to the touch.
Your wheels are susceptible to deterioration caused by salt, sodium chloride, magnesium chloride, calcium chloride, etc., and other road chemicals used to melt ice or control dust on dirt roads. Use a soft cloth or sponge and mild soap to wipe away promptly. Do not use harsh chemicals or a stiff brush. They can damage the wheel’s protective coating that helps keep them from corroding and tarnishing.
When cleaning extremely dirty wheels including excessive brake dust, care must be taken in the selection of tire and wheel cleaning chemicals and equipment to prevent damage to the wheels. Mopar Wheel Treatment or Mopar Chrome Cleaner or their equivalent is recommended or select a non-abrasive, non-acidic cleaner for aluminum or chrome wheels.
If you intend parking or storing your vehicle for an extended period after cleaning the wheels with wheel cleaner, drive your vehicle and apply the brakes to remove the water droplets from the brake components. This activity will remove the red rust on the brake rotors and prevent vehicle vibration when braking.
TIRE CHAINS AND TRACTION DEVICES — NON-SRT
Use of traction devices require sufficient
tire-to-body clearance. Due to limited clearance, the following traction devices are recommended. Follow these recommendations to guard against damage.
For a P215/65R17 tire, use a Peerless Chain Super Z6 low profile traction device or equivalent is recommended.
For a P235/55R19 tire, use of an S Class traction device or equivalent is recommended.
7
(Continued)
TIRE CHAINS AND TRACTION DEVICES — SRT
Due to limited clearance, tire chains or traction devices are not recommended.
TIRE ROTATION RECOMMENDATIONS — NON-SRT
Tires on the front and rear axles of vehicles operate at different loads and perform different steering, driving, and braking functions. For these reasons, they wear at unequal rates.
These effects can be reduced by timely rotation of tires. The benefits of rotation are especially worthwhile with aggressive tread designs such as those on all season type tires. Rotation will
increase tread life, help to maintain mud, snow and wet traction levels, and contribute to a smooth, quiet ride.
Refer to“Scheduled Servicing” in“Servicing And Maintenance” for the proper maintenance intervals. The reasons for any rapid or unusual wear should be corrected prior to rotation being performed.
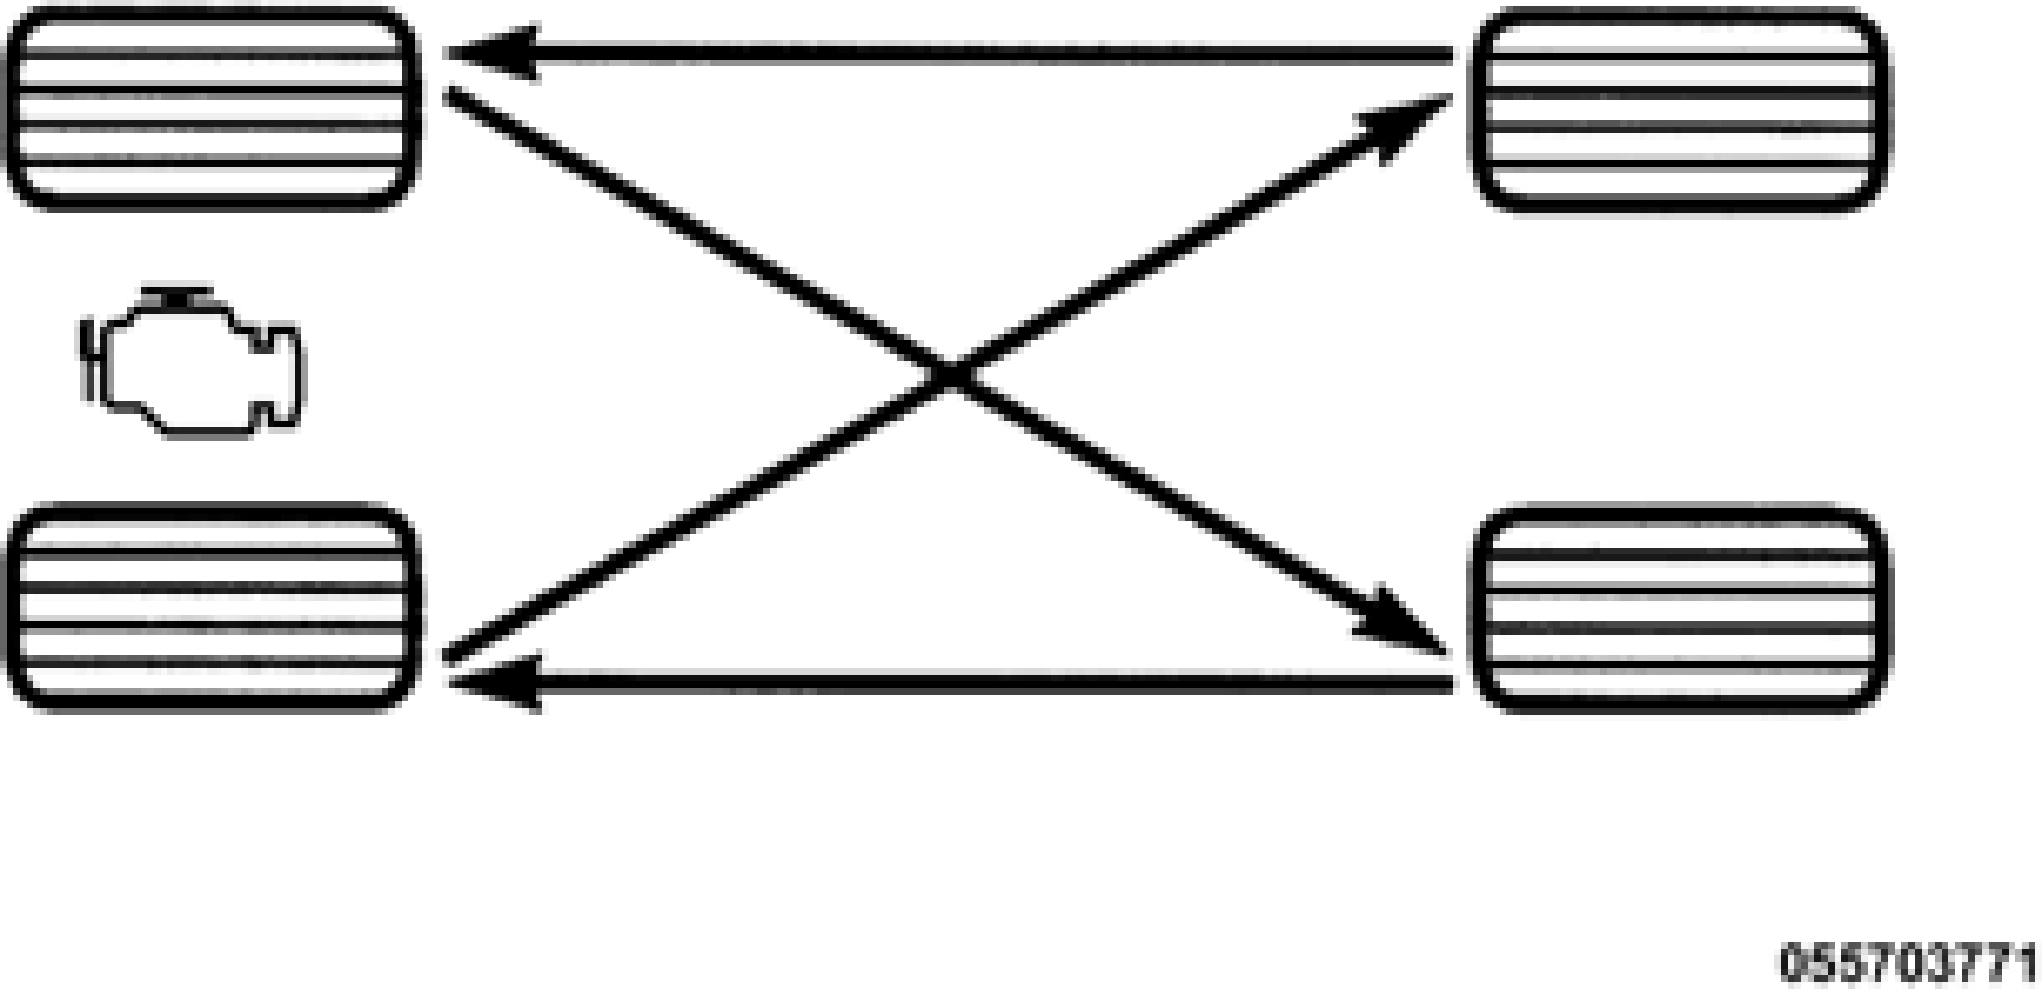
The suggested rotation method is the“rearward cross” shown in the following diagram. This rotation pattern does not apply to some directional tires that must not be reversed.

Tire Rotation (Rearward Cross)
TIRE ROTATION RECOMMENDATIONS — SRT
Tires on the front and rear axles of vehicles operate at different loads and perform different steering, driving, and braking functions. For these reasons, they wear at unequal rates.
These effects can be reduced by timely rotation of tires. The benefits of rotation are especially worthwhile with aggressive tread designs such as those on all season type tires. Rotation will increase tread life, help to maintain mud, snow and wet traction levels, and contribute to a smooth, quiet ride.
Refer to“Scheduled Servicing” in“Servicing And Maintenance” for the proper maintenance intervals. The reasons for any rapid or unusual wear should be corrected prior to rotation being performed.
The suggested rotation method for vehicles equipped with non directional three season and all season tires is the“forward cross” as shown in the following diagram.
Tire Rotation (Forward Cross)
Download Manual