INSTRUMENT CLUSTER DISPLAY
Your vehicle will be equipped with an instrument cluster display, which offers useful information to the driver. With the ignition in the STOP/OFF mode, opening/closing of a door will activate the display for viewing, and display the total miles, or kilometers, in the odometer. Your instrument cluster display is designed to display important informa- tion about your vehicle’s systems and features. Using a driver interactive display located on the instrument panel, your instrument cluster display can show you how sys- tems are working and give you warnings when they are not. The steering wheel mounted controls allow you to scroll through the main menus and submenus. You can access the specific information you want and make selec- tions and adjustments.
Location And Controls
The instrument cluster display features an interactive display which is located in the instrument cluster.
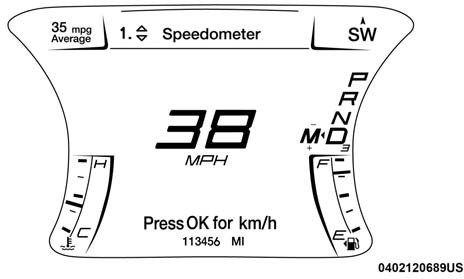
Instrument Cluster Display
This system conveniently allows the driver to select a variety of useful information by pushing the arrow buttons located on the left side of the steering wheel. The instru- ment cluster display menu items consist of the following:
- Speedometer
- Vehicle Info
- Driver Assist — If Equipped
- Fuel Economy
- Trip
- Audio
- Messages
- Screen Setup
The system allows the driver to select information by pushing the following buttons mounted on the steering wheel:
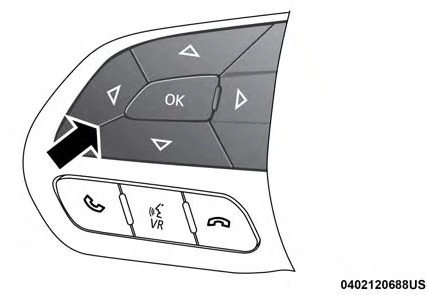
Instrument Cluster Display Controls
Up And Down Arrow Buttons:
Using the up or down arrows allows you to cycle through the Main Menu Items.
Changes the Main Screen area and Menu Title area.
Left And Right Arrow Buttons:
Using the left or right arrow button allows you to cycle through the submenu items of the Main menu item.
NOTE:
- Holding the up/down or left/right arrow button will loop the user through the currently selected menu or options presented on the screen.
- Main menu and submenus wrap for continuous scroll- ing.
- Upon returning to a main menu, the last submenu screen viewed within that main menu will be displayed.
OK Button:
For Digital Speedometer:
- Pushing the OK button changes units (mph or km/h).
For Screen Setup:
- OK button allows user to enter menu and submenus.
- Within each submenu layer, the up and down arrows will allow the user to select the item of interest.
- Pushing the OK button makes the selection and a confirmation screen will appear (returning the user to the first page of the submenu).
- Pushing the left arrow button will exit each submenu layer and return to the main menu.
Engine Oil Life Reset
Oil Change Required
Your vehicle is equipped with an engine oil change indi- cator system. The “Oil Change Required” message will display in the instrument cluster display for five seconds after a single chime has sounded, to indicate the next scheduled oil change interval. The engine oil change indi- cator system is duty cycle based, which means the engine oil change interval may fluctuate, dependent upon your personal driving style.
Unless reset, this message will continue to display each time you place the ignition in the ON/RUN position. To turn off the message temporarily, push and release the OK or arrow buttons. To reset the oil change indicator system (after performing the scheduled maintenance), refer to the following procedure.
Vehicles Equipped With Keyless Enter-N-Go — Ignition
Use the steering wheel instrument cluster display controls for the following procedure(s):
- Without pressing the brake pedal, push the ENGINE START/STOP button and place the ignition in the ON/RUN position (do not start the engine).
- Push and release the down arrow button to scroll downward through the main menu to “Vehicle Info.”
- Push and release the right arrow button to access the ”Oil Life” screen.
- Push and hold the OK button to reset oil life. If conditions are met, the gauge and numeric display will update to show 100%. If conditions are not met a popup message of "To reset oil life engine must be off with ignition in run" will be displayed (for five seconds), and the user will remain at the Oil Life screen.
- Push and release the up or down arrow button to exit the submenu screen.
NOTE: If the indicator message illuminates when you start the vehicle, the oil change indicator system did not reset. If necessary, repeat this procedure.
Secondary Method Of Resetting Engine Oil Life
- Without pressing the brake pedal, push the ENGINE START/STOP button and place the ignition to the ON/RUN position (do not start the engine).
- Fully press the accelerator pedal, slowly, three times within ten seconds.
- Without pushing the brake pedal, push the ENGINE START/STOP button once to return the ignition to the OFF/LOCK position.
NOTE: If the indicator message illuminates when you start the vehicle, the oil change indicator system did not reset. If necessary, repeat this procedure.
The Performance Shift Indicator (PSI) is enabled on ve- hicles with manual transmission, or when a vehicle with automatic transmission is in manual shift mode. The PSI provides the driver with a visual indication within the instrument cluster display when the driver configured gear shift point has been reached and the driver is still acceler- ating. This indication notifies the driver to change gear corresponding to the configured RPMs in the head unit.
Push and release the up or down arrow button until the desired Selectable Menu item is displayed in the instru- ment cluster display.
Follow the Menu or submenu prompts as desired.
Speedometer
Push and release the up or down arrow button until the speedometer menu is displayed in the instrument cluster display. Push and release the OK button to toggle units (km/h or MPH) of the speedometer.
Vehicle Info
Push and release the up or down arrow button until the “Vehicle Info” menu is displayed in the instrument cluster display. Push and release the right or left arrow button to scroll through the submenus items of “Vehicle Info.” Fol- low the directional prompts to access or reset any of the following “Vehicle Info” submenu items:
- Tire Pressure Monitor
- Coolant Temp
- Trans Temp
- Oil Temp
- Oil Pressure
- Oil Life
- Battery Voltage
- AWD Status — If Equipped
Driver Assist — If Equipped
The Driver Assist menu displays the status of the ACC and LaneSense systems.
Push and release the up or down arrow button until the Driver Assist menu is displayed in the instrument cluster display.
Adaptive Cruise Control (ACC) Feature
The instrument cluster displays the current ACC system settings. The information displayed depends on ACC system status.
Push the Adaptive Cruise Control (ACC) on/off button (located on the steering wheel) until one of the following displays in the instrument cluster display:
Adaptive Cruise Control Off
When ACC is deactivated, the display will read “Adaptive Cruise Control Off.”
Adaptive Cruise Control Ready
When ACC is activated but the vehicle speed setting has not been selected, the display will read “Adaptive Cruise Control Ready.”
Push the SET + or the SET- button (located on the steering wheel) and the following will display in the instrument cluster display:
ACC SET
When ACC is set, the set speed will display in the instrument cluster.
The ACC screen may display once again if any ACC activity occurs, which may include any of the following:
- Distance Setting Change
- System Cancel
- Driver Override
- System Off
- ACC Proximity Warning
- ACC Unavailable Warning
LaneSense — If Equipped
The instrument cluster displays the current LaneSense system settings. The information displayed depends on LaneSense system status and the conditions that need to be met. For further information, refer to “LaneSense — If Equipped” in “Starting And Operating.”
Fuel Economy
Two submenu pages; one with Current Value (instanta- neous calculation of the fuel economy) displayed and one without the Current Value displayed (toggle the left or right arrow button to select one):
- Current Fuel Economy (MPG, L/100 km, or km/L).
- Range To Empty (miles or km).
- Average Fuel Economy (MPG, L/100 km, or km/L).
- The Max and Min values will correspond to the particular engine requirements.
- Lower end of gauge will be displayed in an amber color and turn green as Fuel Economy improves.
- Hold the OK button to reset average fuel economy information.
Trip Info
Push and release the up or down arrow button until the Trip Menu item is displayed in the instrument cluster display. Toggle the left or right arrow button to select Trip A or Trip B. The Trip information will display the following:
Hold the OK button to reset feature information.
Audio
This menu displays the Audio information of the currently playing audio source (e.g. FM radio).
Messages
This feature shows the number of stored warning mes- sages, if any. Pushing the right or left arrow button will allow you to scroll through the stored messages.
Screen Setup
Push and release the up or down arrow button until the Screen Setup Menu displays in the instrument cluster display. Push and release the OK button to enter the submenus. The Screen Setup feature allows you to change what information is displayed in the instrument cluster as well as the location that information is displayed.
Upper Left
- Compass (default)
- Outside Temp.
- Time (default)
- Range to Empty (default)
- Average (MPG, L/100 km, or km/L)
- Current (MPG, L/100 km, or km/L)
- Trip A Distance
- Trip B Distance
- None
Upper Right
- Compass
- Outside Temp (default)
- Time
- Range to Empty
- Average (MPG, L/100 km, or km/L)
- Current (MPG, L/100 km, or km/L)
- Trip A Distance
- Trip B Distance
- None
Center
- Menu Title (default)
- Compass
- Outside Temp.
- Time
- Range to Empty
- Average (MPG, L/100 km, or km/L)
- Current (MPG, L/100 km, or km/L)
- Trip A Distance
- Trip B Distance
- Audio Information
- Digital Speed
- None
Current Gear
- On
- Off (default)
Odometer
- Show (default) 4
- Hide
Gear Display
- Full (default)
- Single
- Ok
- Cancel
Diagnostics
This feature allows the driver to view engine and emission vehicle faults.
- Push OK to have the most recent fault code sent.
- There is a delay when the next diagnostic code is re- quested during which the following message is displayed:
- “Checking System for Diagnostic Codes.”
- Driver must push the OK button again to see the next Pcode otherwise current message remains displayed.
- Driver exits when they cycle to another submenu (up or down).
- Faults are displayed from newest to the oldest.
- If the menu is exited before the end of codes is reached - when the driver re-enters the list will be restarted from the beginning.
- When no codes are present or the last code is reached = (P0000) and this message is displayed:
- “No or End of Diagnostic Codes.”
Battery Saver On/Battery Saver Mode Message — Electrical Load Reduction Actions — If Equipped
This vehicle is equipped with an Intelligent Battery Sensor (IBS) to perform additional monitoring of the electrical system and status of the vehicle battery.
In cases when the IBS detects charging system failure, or the vehicle battery conditions are deteriorating, electrical load reduction actions will take place to extend the driving time and distance of the vehicle. This is done by reducing power to or turning off non-essential electrical loads.
Load reduction is only active when the engine is running. It will display a message if there is a risk of battery depletion to the point where the vehicle may stall due to lack of electrical supply, or will not restart after the current drive cycle.
When load reduction is activated, the message “Battery Saver On” or “Battery Saver Mode” will appear in the instrument cluster.
These messages indicate the vehicle battery has a low state of charge and continues to lose electrical charge at a rate that the charging system cannot sustain.
NOTE:
The charging system is independent from load reduc- tion. The charging system performs a diagnostic on the charging system continuously.
If the Battery Charge Warning Light is on it may indicate a problem with the charging system. Refer to “Battery Charge Warning Light” in “Getting To Know Your Instrument Panel” for further information.
The electrical loads that may be switched off (if equipped), and vehicle functions which can be affected by load reduction:
- Heated Seat/Vented Seats/Heated Wheel
- Heated/Cooled Cup Holders — If Equipped
- Rear Defroster And Heated Mirrors
- HVAC System
- 115V AC Power Inverter System
- Audio and Telematics System
Download Manual