Liftgate
The liftgate may be released in several ways:
-
Key fob
-
Liftgate Release Handle
-
Button on overhead console
Push the liftgate button on the key fob twice within five seconds to release the liftgate.
The key fob and the overhead console button will release the liftgate when the liftgate is locked. The outside handle requires the liftgate to be unlocked. If the vehicle is equipped with Passive Entry, pulling the electronic liftgate release handle will unlock and release the liftgate, with a valid Passive Entry key fob within 5 ft (1.5 m) of the liftgate.
Electronic Liftgate Release Handle
Note:
When you pull the electronic liftgate release handle, either only the liftgate will unlock, or all the doors and the liftgate will unlock, depending on the selected setting in the Uconnect system "⇨UCONNECT SETTINGS".
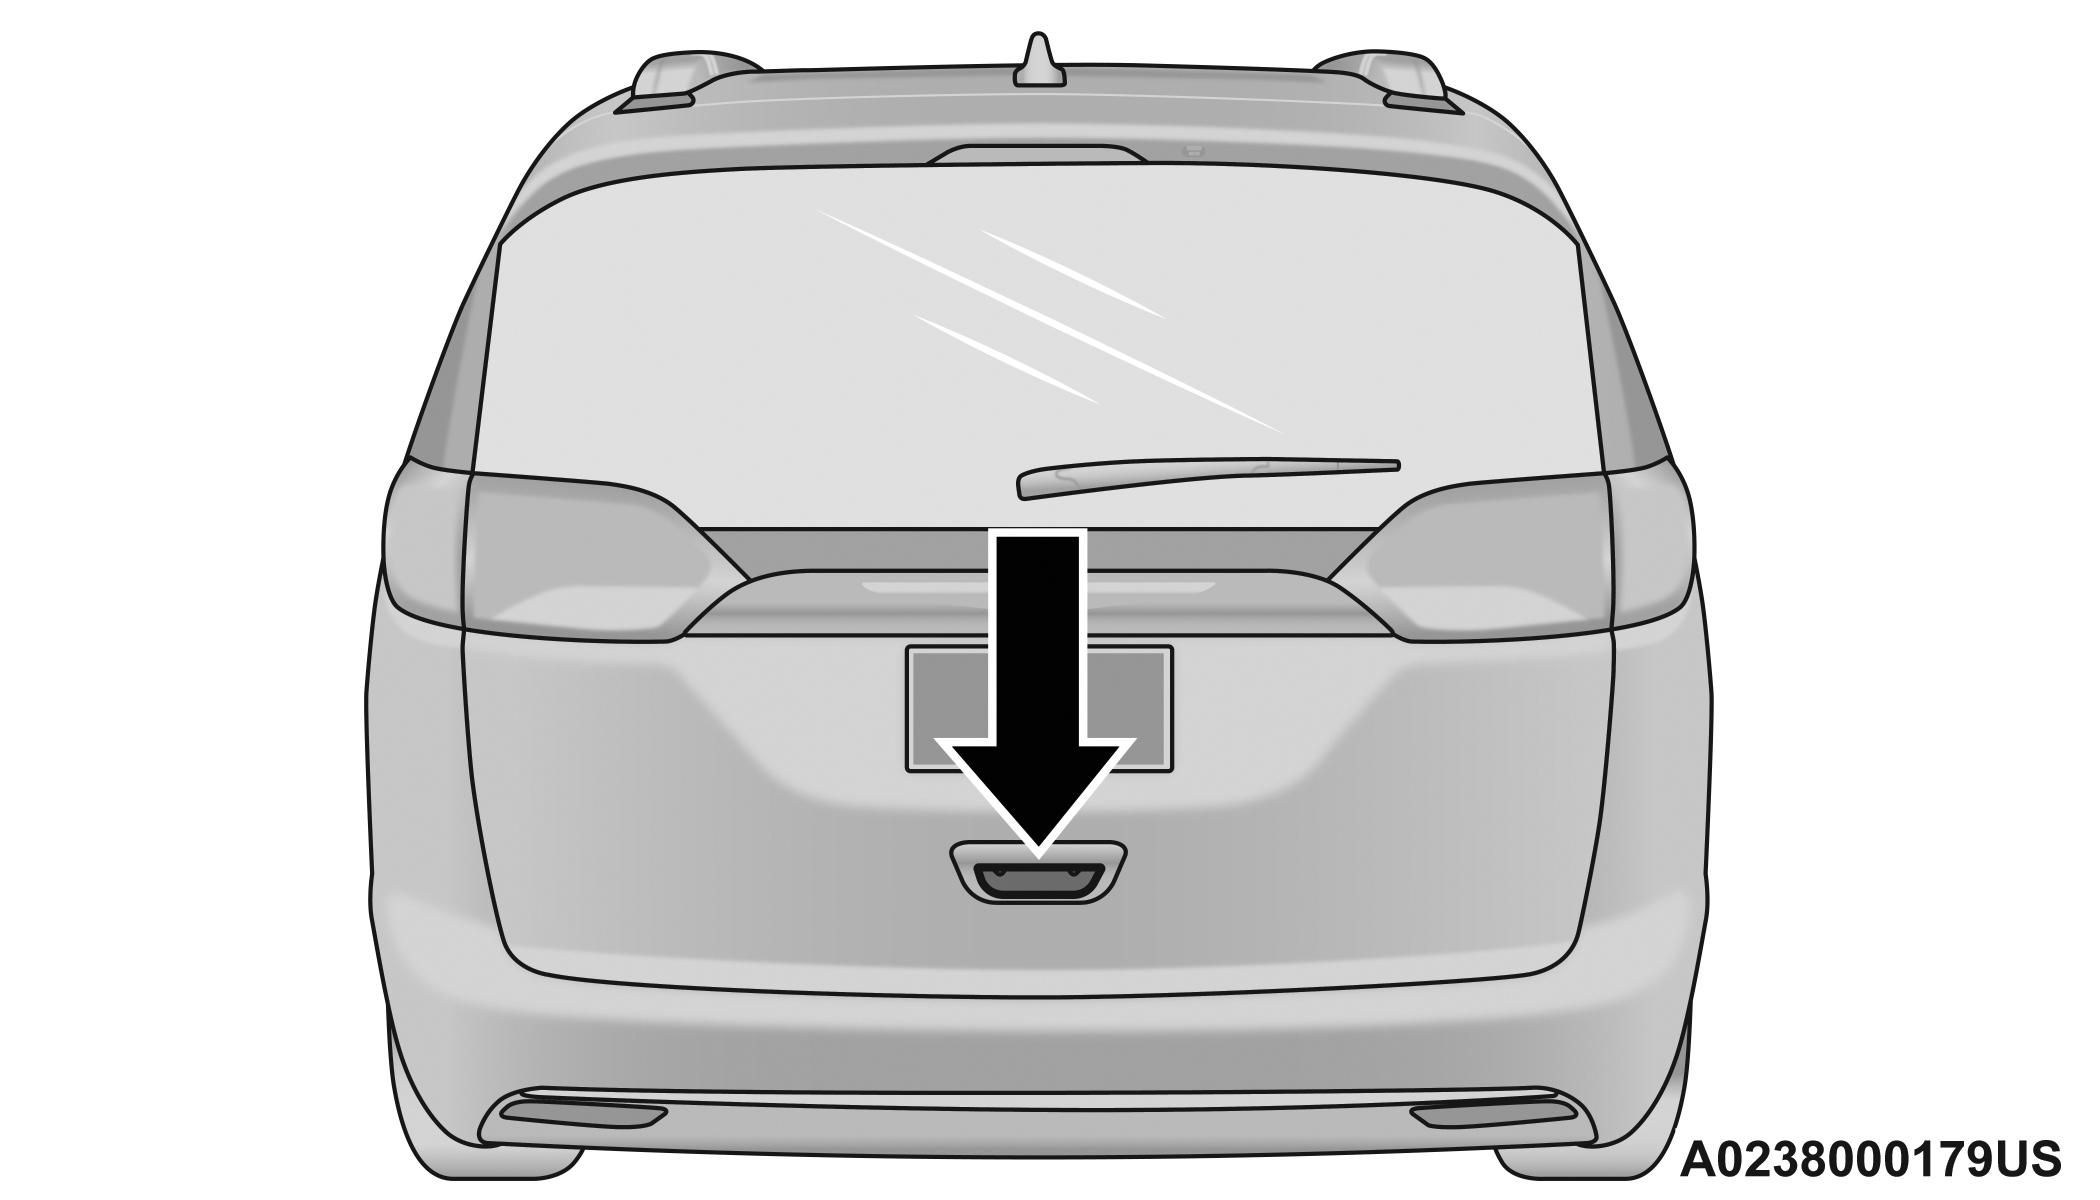
TO LOCK/CLOSE THE LIFTGATE
To manually close the liftgate, grab the liftgate closing handle and pull in a downward motion.
WARNING:
-
Driving with the liftgate open can allow poisonous exhaust gases into your vehicle. You and your passengers could be injured by these fumes. Keep the liftgate closed when you are operating the vehicle.
-
If you are required to drive with the liftgate open, make sure that all windows are closed, and the climate control blower switch is set at high speed. Do not use the recirculation mode.
POWER LIFTGATE — IF EQUIPPED
The power liftgate may be opened or closed in several ways:
-
Overhead console liftgate button
-
Key fob
-
Outside handle (open or reset liftgate latch)
-
Rear Interior Power Liftgate button (when liftgate is open)
-
Hands-Free Liftgate (if equipped) — opens liftgate only
Using the above ways to open or close the liftgate:
-
When the liftgate is fully closed, the liftgate will open
-
When the liftgate is fully open, the liftgate will close
-
When the liftgate is moving, the liftgate will reverse
Push the Power Liftgate button on the overhead console to open or close the liftgate.
Push the liftgate button on the key fob twice within five seconds to open or close the liftgate.
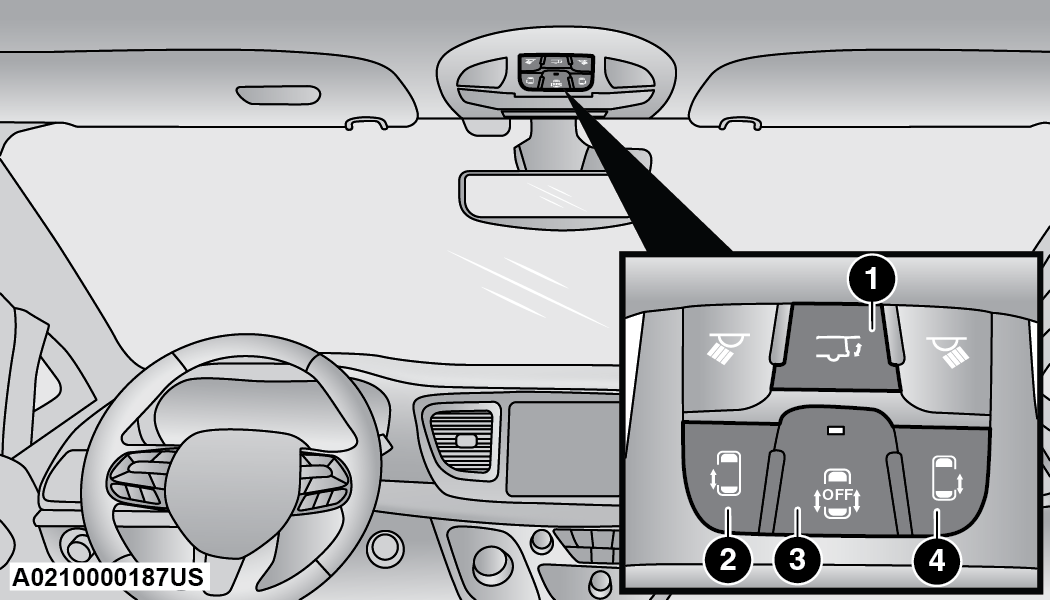
Overhead Console Power Switches
|
1 — Liftgate |
|
2 — Left Sliding Door |
|
3 — Sliding Door Power Off |
|
4 — Right Sliding Door |
The key fob and the overhead console button will operate the liftgate when the liftgate is locked. The outside handle requires the liftgate to be unlocked. If the vehicle is equipped with Passive Entry, pressing the touch pad on the outside handle or Hands-Free Liftgate foot activation (if equipped) will unlock and open the liftgate, with a valid Passive Entry key fob within 5 ft (1.5 m) of the liftgate handle.
Note:
-
To open the liftgate, the Hands-Free Liftgate foot activation (if equipped) requires a valid Passive Entry key fob within 5 ft (1.5 m) of the door handle.
-
When you pull the electronic liftgate release handle, either only the liftgate will unlock, or all the doors and the liftgate will unlock, depending on the selected setting in the Uconnect system.
-
Tones are sounded and the turn signals are flashed with liftgate movements. These alerts can be turned on or off in Uconnect Settings "⇨UCONNECT SETTINGS".
To Close The Liftgate
The liftgate can also be closed using the Rear Interior Power Liftgate button (if equipped), located in the upper left trim in the liftgate opening.
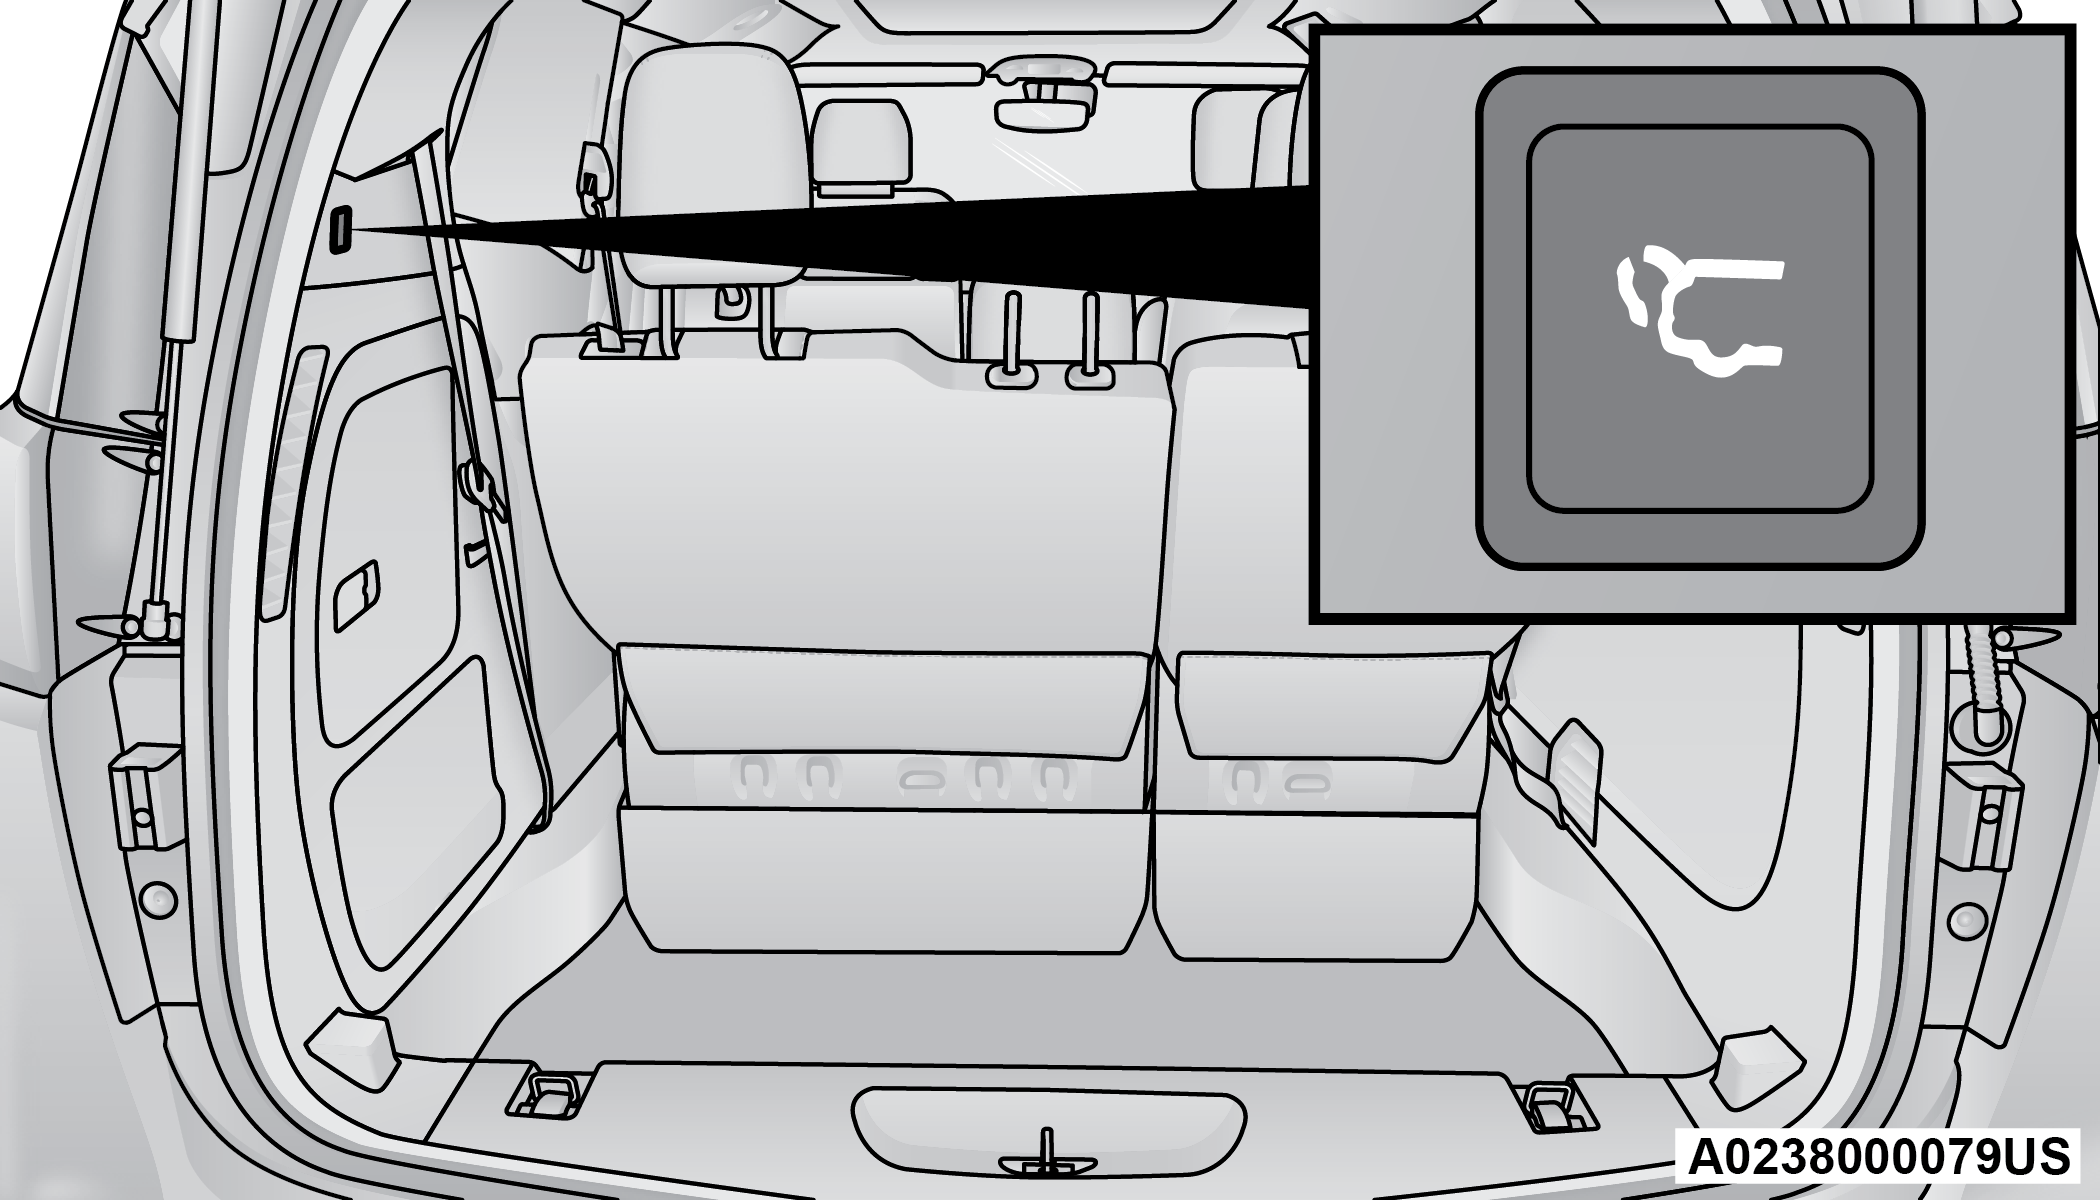
Rear Interior Power Liftgate Button
Note:
If the power liftgate will not fully open or latch close, check the latch for damage or obstacles that may be preventing the closing operation. If the problem persists, proceed as follows:
-
Press the electronic liftgate release handle on the outside of the liftgate to home/reset the latch mechanism.
-
Manually close the liftgate by pulling downward using the closing handle.
-
Resume normal power liftgate open or closing operation.
If the home/reset procedure is unsuccessful, see an authorized dealer for service.
HANDS-FREE LIFTGATE — IF EQUIPPED
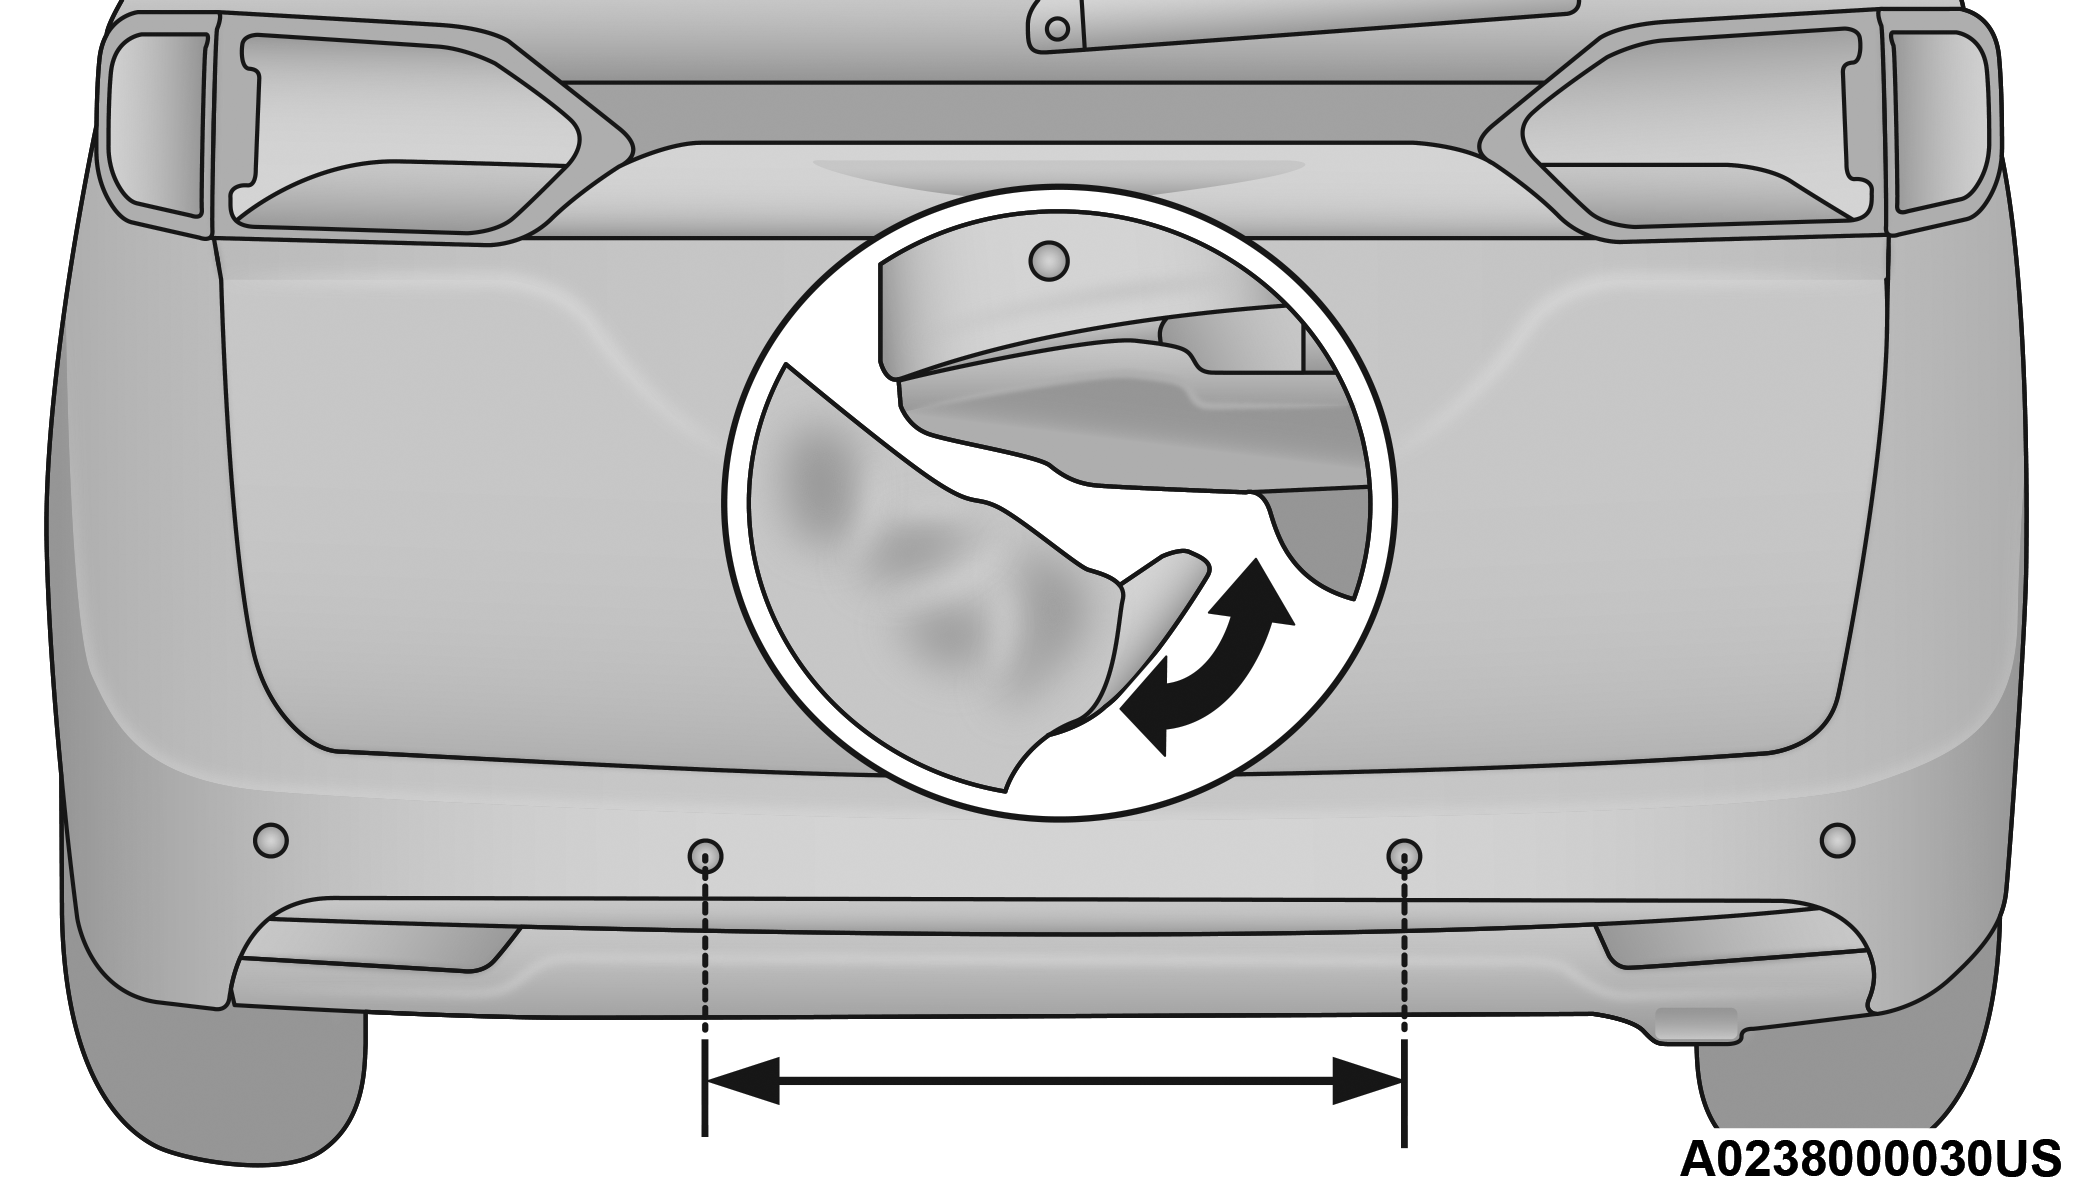
Hands-Free Liftgate Activation Zone
To open the liftgate using hands-free activation, use a straight in and out kicking motion under the vehicle activation zone in the general location below the liftgate door handle. You may also move your foot sideways or in a sweeping motion.
Vehicles Equipped With A Trailer Tow Package
Note:
If your vehicle is equipped with the Trailer Tow Package, the hands-free activation zone(s) for the Power Liftgate will be located on the left and right side of the receiver. Use a straight kicking motion under either activation zone to open the Hands-Free Liftgate.
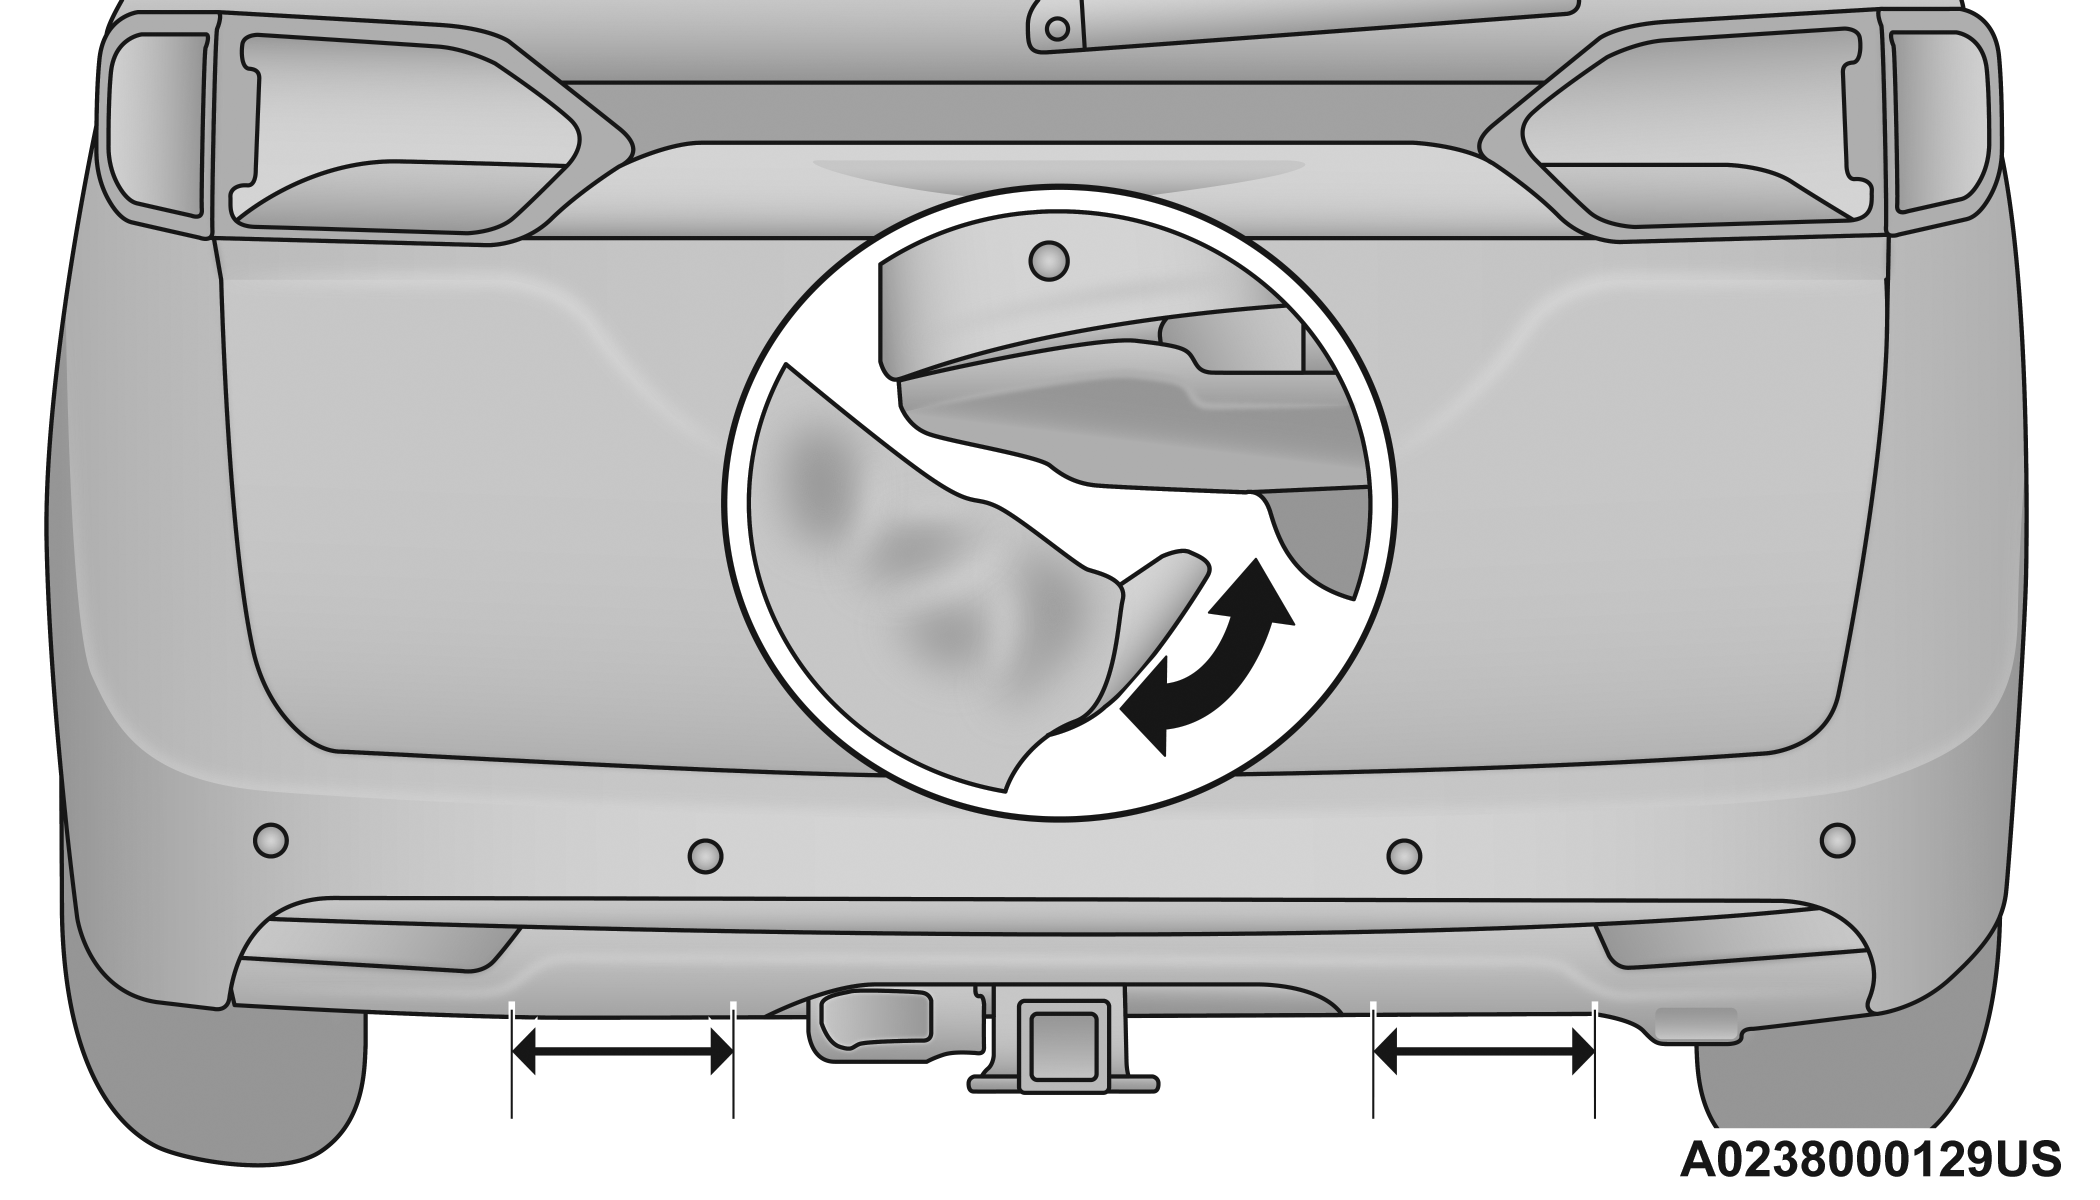
Hands-Free Liftgate Trailer Tow Activation Zones
When a valid kicking motion is completed, the liftgate will chime, the hazard lights will flash and the liftgate will open after approximately one second. This assumes all options are enabled in the Uconnect system.
Note:
To open the Hands-Free Liftgate requires a valid Passive Entry key fob within 5 ft (1.5 m) of the door handle. If a valid Passive Entry key fob is not within 5 ft (1.5 m), the liftgate will not respond to any kicks.
CAUTION:
The Hands-Free Liftgate feature may be turned on or off in Uconnect Settings. The Hands-Free Liftgate feature should be turned off during jacking, tire changing, and vehicle service "⇨UCONNECT SETTINGS".
Note:
-
The Hands-Free Liftgate will only operate when the transmission is in PARK.
-
If anything obstructs the Hands-Free Liftgate while it is opening or closing, the liftgate will automatically reverse to the closed position, provided it meets sufficient resistance.
-
There are pinch sensors attached to the side of the liftgate opening. Light pressure anywhere along these strips will cause the liftgate to return to the open position.
-
If the power liftgate encounters multiple obstructions within the same cycle, the system will automatically stop. If this occurs, the liftgate must be operated manually.
-
The power liftgate will release, but not power open, in temperatures below −12°F (−24°C). Be sure to remove any buildup of snow or ice from the liftgate before opening the liftgate.
-
If the liftgate is left open for an extended period of time, the liftgate may need to be closed manually to reset power liftgate functionality.
-
The Hands-Free Liftgate only works to open the liftgate.
WARNING:
-
Driving with the liftgate open can allow poisonous exhaust gases into your vehicle. You and your passengers could be injured by these fumes. Keep the liftgate closed when you are operating the vehicle.
-
If you are required to drive with the liftgate open, make sure that all windows are closed, and the climate control blower switch is set at high speed. Do not use the recirculation mode.
Gas props support the liftgate in the open position. However, because the gas pressure drops with temperature, it may be necessary to assist the props when opening the liftgate in cold weather.
Note:
Allow the power system to open the liftgate. Manually pushing or pulling the liftgate may activate the liftgate obstacle detection feature and stop the power operation or reverse its direction.
WARNING:
During power operation, personal injury or cargo damage may occur. Ensure the liftgate travel path is clear. Make sure the liftgate is closed and latched before driving away.
CARGO AREA FEATURES
CARGO AREA STORAGE
When the third row seats are not in the stowed position, there is a large area for cargo storage.
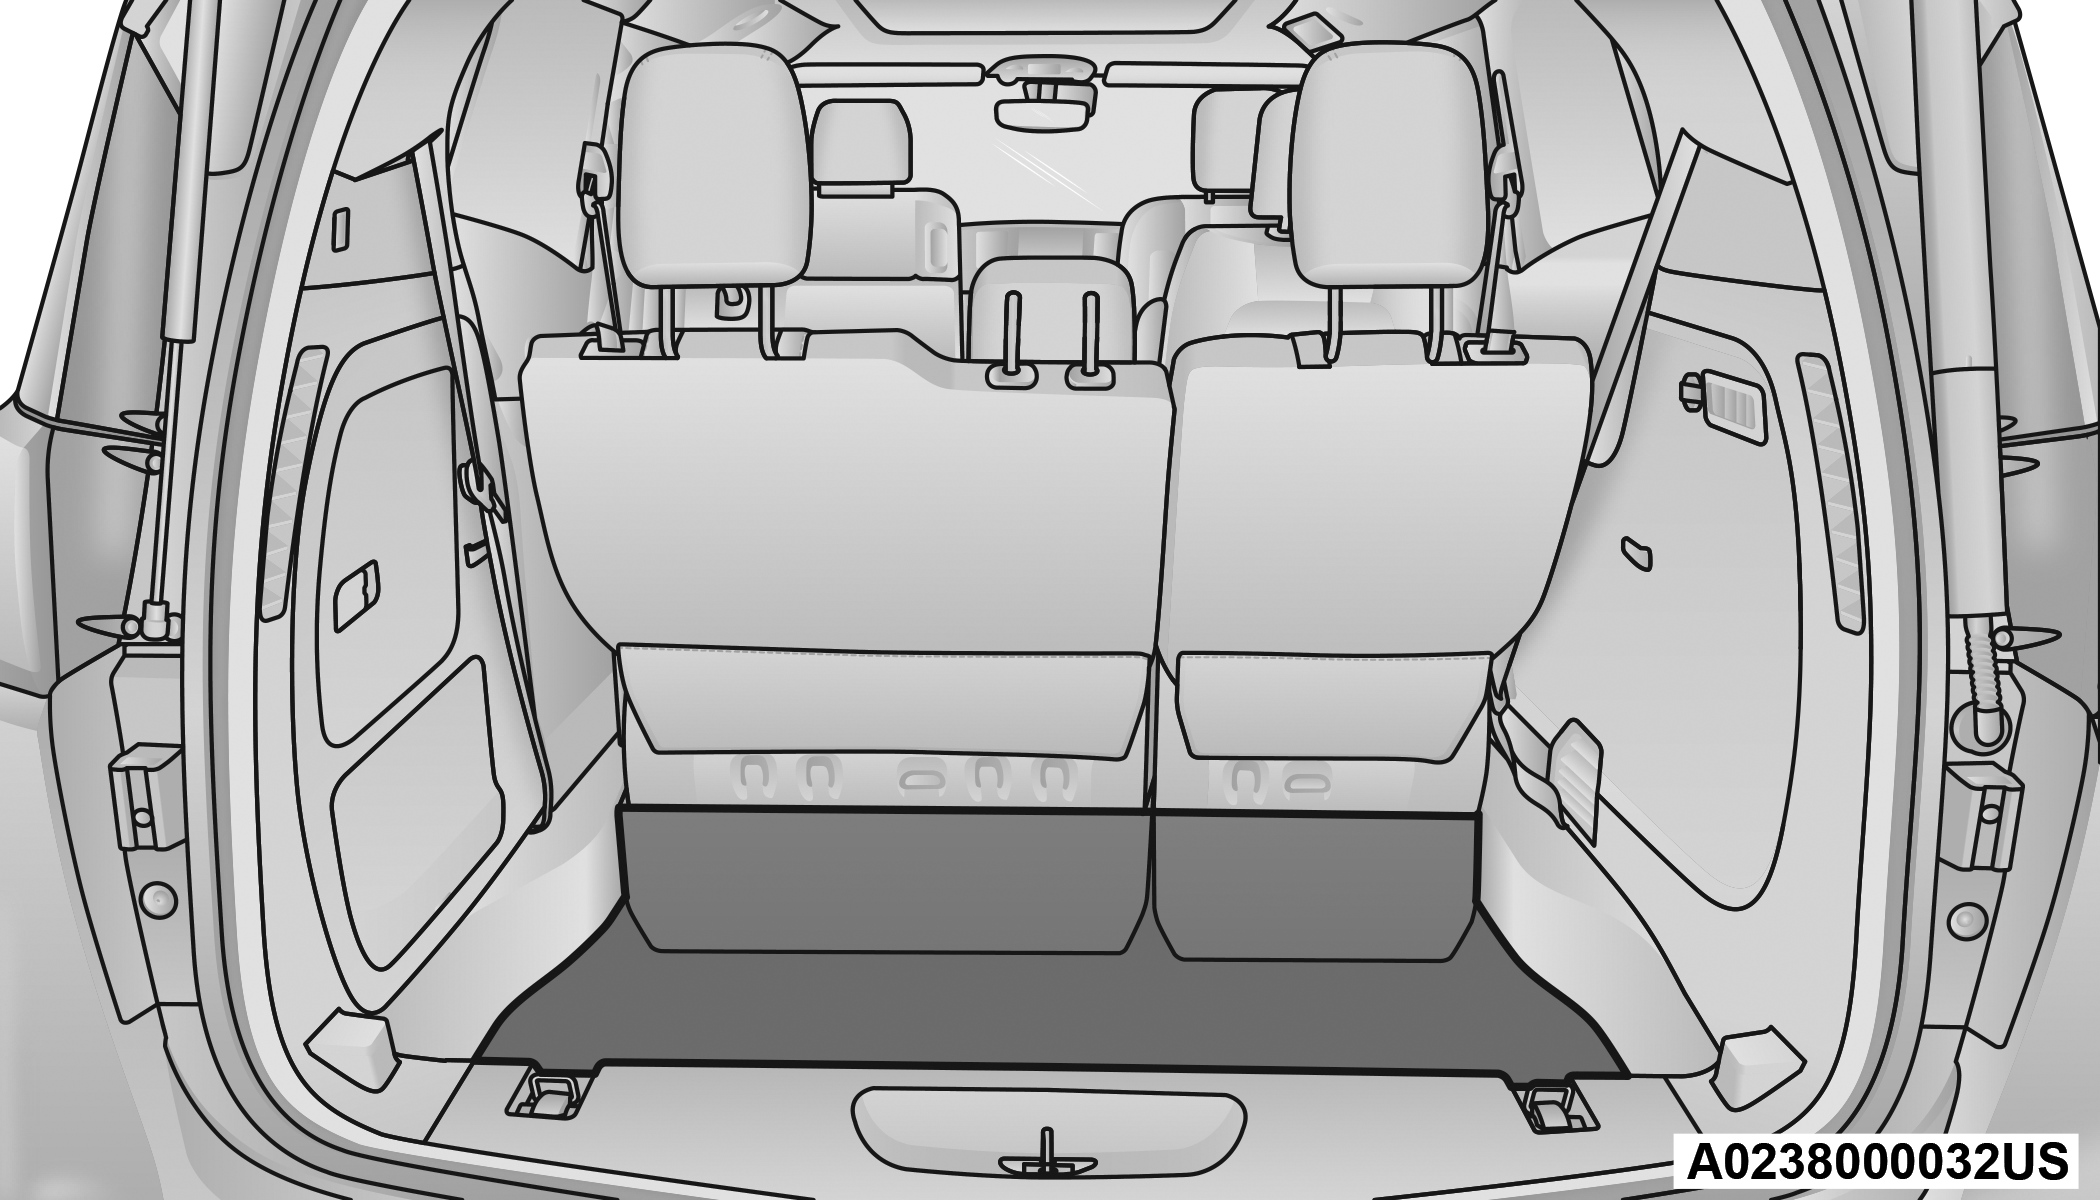
Rear Cargo Area
Note:
With all rear seats stowed or removed, 4 x 8 ft (1.2 x 2.4 m) sheets of building material will fit on the vehicle floor with the liftgate closed. The front seats must be moved slightly forward of the rearmost position.
STOW ‘N VAC INTEGRATED VACUUM — IF EQUIPPED
Your vehicle may be equipped with an integrated vacuum system. This vacuum is for in-vehicle use only and should only be used on dry materials and on in-vehicle surfaces. It is located in the rear trim panel behind the sliding door on the driver’s side of the vehicle.
IMPORTANT SAFETY INSTRUCTIONS
Read all instructions before using. When using your vacuum, basic precautions should be followed, including the following:
WARNING:
-
Never leave children alone in a vehicle, or with access to an unlocked vehicle. Allowing children to be in a vehicle unattended is dangerous for a number of reasons. A child or others could be seriously or fatally injured. Children should be warned not to touch the parking brake, brake pedal or the gear selector.
-
Do not leave the key fob in or near the vehicle, or in a location accessible to children, and do not leave the Keyless Enter ‘n Go™ Ignition in either the ACC position, or engine running (ON), unless you are using the vacuum system. Be aware a child could operate power windows, other controls, or move the vehicle when the vacuum system is in use. ALWAYS push ignition button to place ignition in the OFF position when finished using the vacuum system.
WARNING:
To reduce the risk of fire, serious injury or death:
-
Do not use vacuum while vehicle is in motion or while driving.

-
Do not vacuum wet surfaces or any liquids.
-
Do not use to vacuum up anything outside of the vehicle.
-
Do not vacuum any flammable liquids, such as gasoline, or use around explosive vapors. Vapors from flammable liquids may form an explosive mixture with air and can be ignited by heat, sparks, or flames. Vapors may travel to a source of ignition and explode.

-
Do not vacuum anything that is burning or smoking, such as cigarettes, matches, or hot ashes/embers.
-
Do not allow to be used as a toy. Close attention is necessary when used by or near children.
-
Do not leave the vacuum running while unattended.
-
Use only as described in this manual. Use only attachments provided with your vehicle.
-
Do not put any object into openings. Do not use with any opening blocked; keep free of dust, lint, hair, and anything that may reduce air flow.
-
Do not vacuum toxic material such as chlorine bleach, ammonia, drain cleaner, etc.
-
Do not vacuum hard or sharp objects such as glass, nails, screws, coins, etc.
-
Keep hair, loose clothing, fingers, and all parts of body away from openings and moving parts.
-
Only use with filter in place. Periodically check that the filter is in place and in good condition.
WARNING:
This equipment incorporates parts such as switches, motors, or the like that tend to produce arcs or sparks that can cause an explosion. When using your vacuum near gasoline-dispensing equipment or service stations, park vehicle at least 20 ft (6 m) away from the exterior enclosure of any dispensing pump. The vacuum is mounted more than 18 inches (45 cm) above ground level in your vehicle.
The vacuum will operate in two modes:
-
Ignition in the ACC position: Engine remains off, and vacuum usage is limited to 10 minutes.
-
Ignition in the START position: Engine is running, and vacuum usage is unlimited until the vehicle’s battery level falls below 60%.
Note:
The vacuum will not operate when the ignition is in the OFF position, or in the ON/RUN position with the engine off. For more information on ignition positions, see "⇨Keyless Enter ‘n Go™ Ignition".
-
Before Using Vacuum:
Accessory (ACC) Mode Operation - For up to 10 minutes of operation
Always apply the parking brake, shift the transmission into PARK, and push ignition button to place ignition in Accessory (ACC) mode. The engine will not be running in this mode. Do not leave the key fob in or near the vehicle, or in a location accessible to children.
Note:
The vacuum system will run for 10 minutes off battery power and then the vacuum will shut down. A low battery indication light (LOW PWR) located below the vacuum nozzle storage location will come on one minute before the vacuum shuts down.
Engine Running (START) Operation - For more than 10 minutes of operation
-
Position vehicle outdoors and fully open all side windows.
-
Always apply the parking brake, shift the transmission into PARK, and leave engine running.
WARNING:
Carbon monoxide (CO) in exhaust gases can cause serious injury or death. Follow these precautions to prevent carbon monoxide poisoning:
-
Do not inhale exhaust gases.
-
Do not start or run an engine in a closed garage or confined area. Always position vehicle outdoors and fully open all side windows before using vacuum system with the engine running.
-
Guard against carbon monoxide with proper maintenance. Have the exhaust system inspected every time the vehicle is raised. Have any abnormal conditions repaired promptly.
-
-
Unclip the vacuum nozzle and pull to extend vacuum hose from the storage location.
Note:
The hose can reach every corner of the vehicle floor.
-
Install desired attachment if needed.
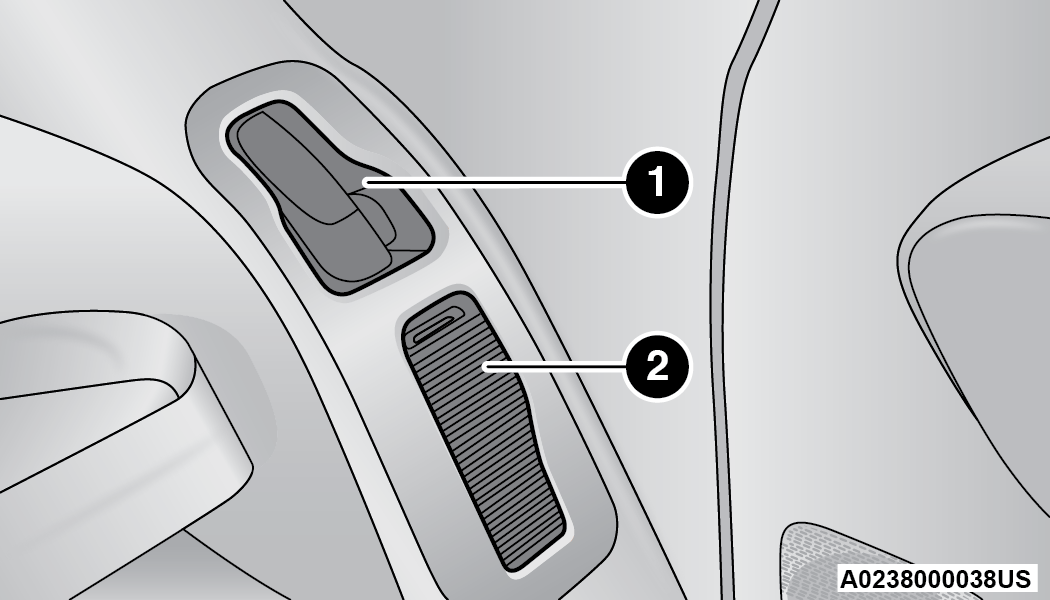
Front Storage Compartments
1 — Vacuum Nozzle Storage Location
2 — Attachment Compartment
Note:
To access crevice or upholstery attachments, open the front Attachment Compartment.
-
Crevice Tool — Able to reach into tight spaces including the seat latches located in the floor.
-
Upholstery Tool — Use to agitate dirt and debris from carpets and seats. This tool can also be used to pick up pet hair.
-
Hose Extension — Use to add another 12 ft (3.6 m) of usable length to the vacuum hose. Hose extension is provided in a bag attached to a grocery hook behind the third row seat on the driver’s side.
-
-
Push the vacuum on/off button
 located under the vacuum nozzle storage location. Use vacuum as needed.
Note:
-
When the vacuum is ON, the LED indicator on the on/off button will illuminate.
-
When the vacuum is OFF, the LED indicator will also be off.
-
After nine minutes of operation in ACC mode (engine not running), the Low Power Indicator Light (LOW PWR) will illuminate.
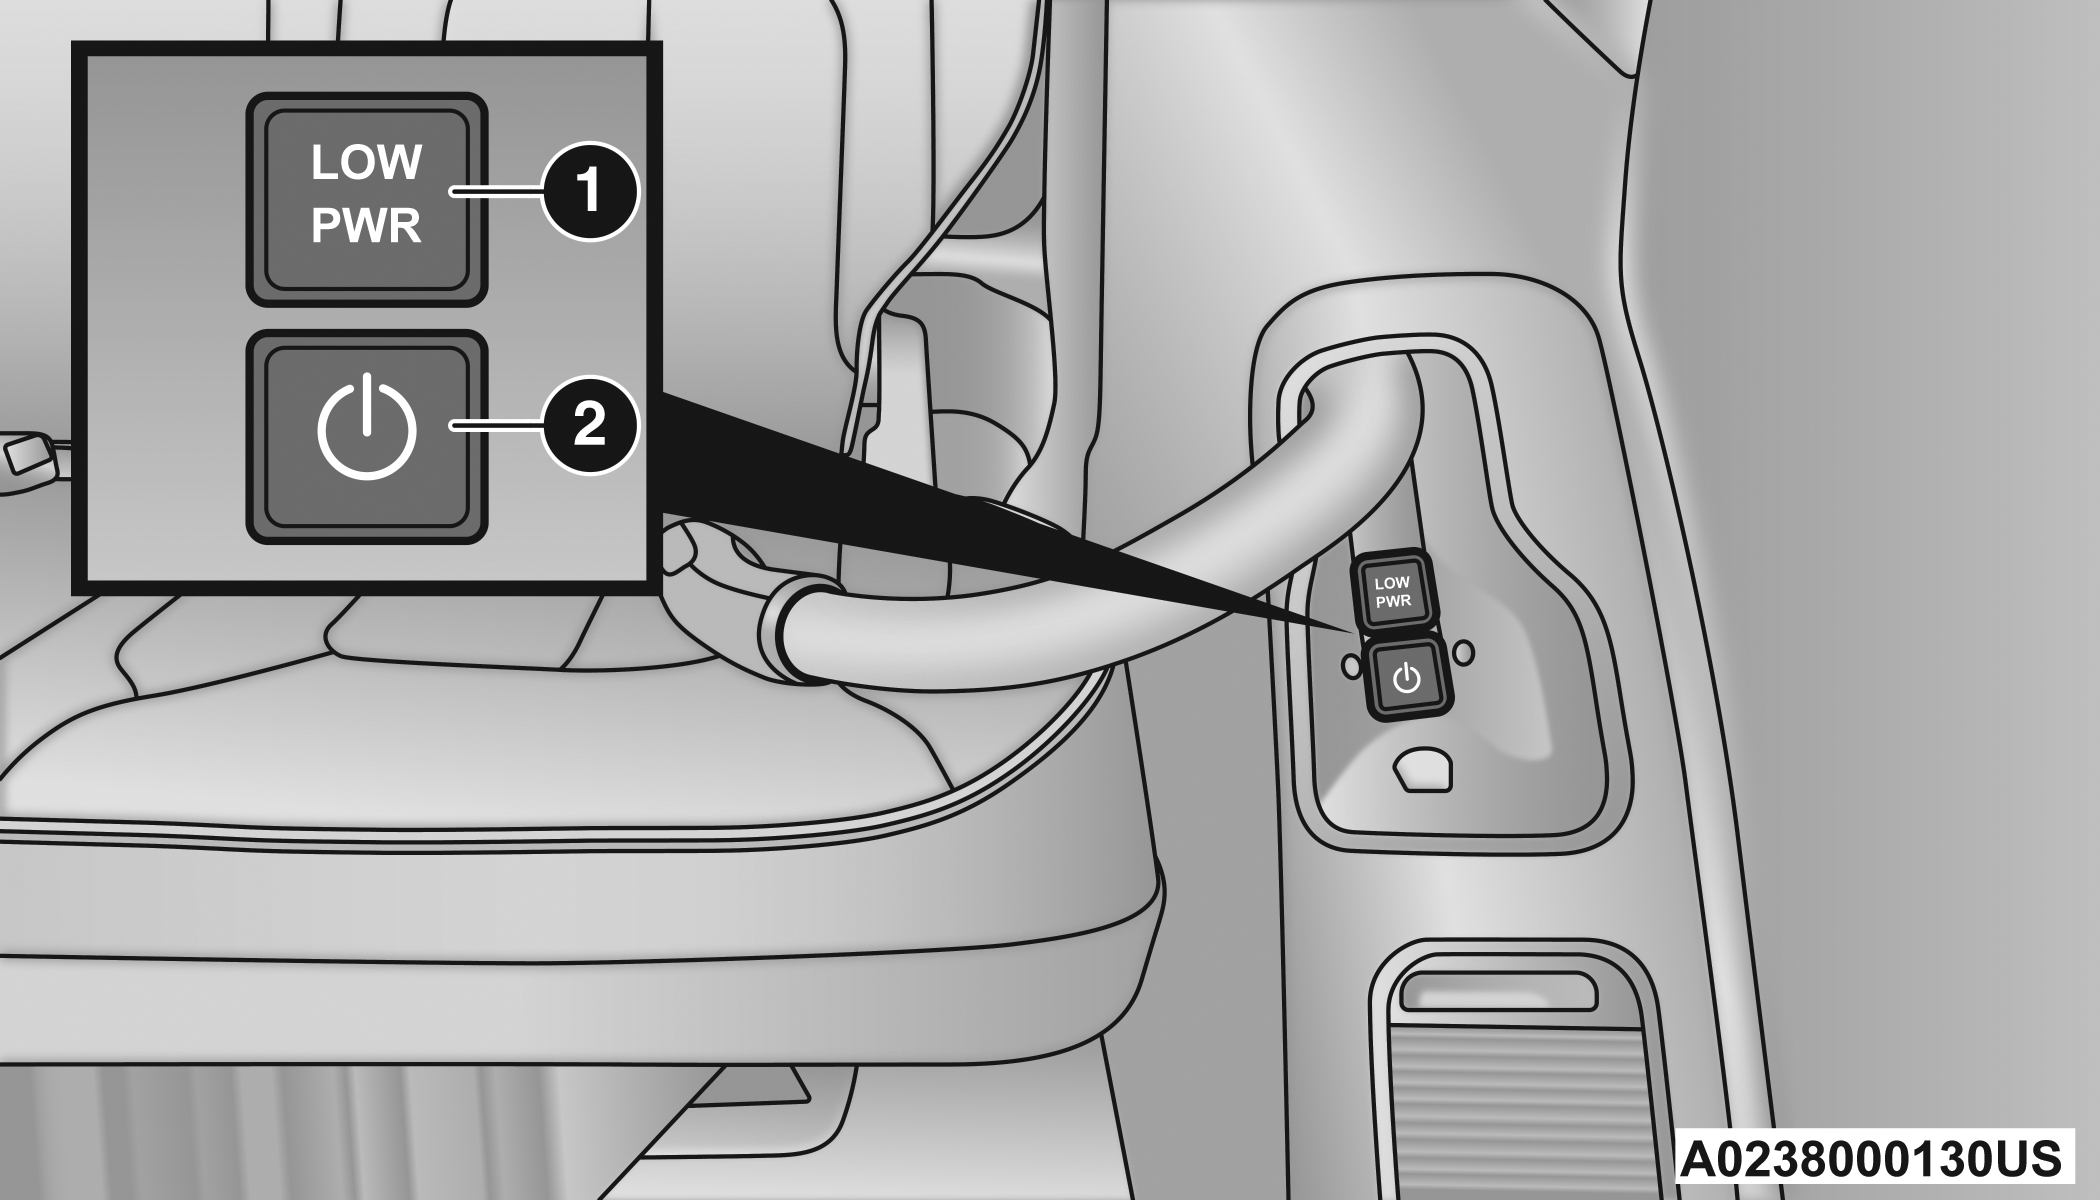
Power Buttons
1 — Low Power Indicator Light
2 — On/Off Button
WARNING:
For in vehicle use ONLY. To reduce the risk of fire, serious injury or death:
-
Do not use vacuum while vehicle is in motion or while driving.
-
Do not vacuum wet surfaces or any liquids.
-
Do not use to vacuum up anything outside of the vehicle.
-
Do not vacuum any flammable liquids, such as gasoline, or use around explosive vapors. Vapors from flammable liquids may form an explosive mixture with air and can be ignited by heat, sparks, or flames. Vapors may travel to a source of ignition and explode.
-
Do not vacuum anything that is burning or smoking, such as cigarettes, matches, or hot ashes/embers.
-
Do not allow to be used as a toy. Close attention is necessary when used by or near children.
-
Do not leave the vacuum running while unattended.
-
Use only as described in this manual. Use only attachments provided with your vehicle.
-
Do not put any object into openings. Do not use with any opening blocked; keep free of dust, lint, hair, and anything that may reduce air flow.
-
Do not vacuum toxic material such as chlorine bleach, ammonia, drain cleaner, etc.
-
Do not vacuum hard or sharp objects such as glass, nails, screws, coins, etc.
-
Keep hair, loose clothing, fingers, and all parts of body away from openings and moving parts.
-
Only use with filter in place. Periodically check that the filter is in place and in good condition.
WARNING:
This equipment incorporates parts such as switches, motors, or the like that tend to produce arcs or sparks that can cause an explosion. When using your vacuum near gasoline-dispensing equipment or service stations, park vehicle at least 20 ft (6 m) away from the exterior enclosure of any dispensing pump. The vacuum is mounted more than 18 inches (45 cm) above ground level in your vehicle.
-
-
When finished, push power button to turn vacuum off and store vacuum hose and any attachments.
-
Before exiting the vehicle:
-
If the ignition is in the ACC position, push the START/STOP ignition button to place ignition in the OFF position, remove key fob from the vehicle, and lock the vehicle.
-
If the engine is running, raise all of the windows, push the START/STOP ignition button to place ignition in the OFF position, remove key fob from the vehicle, close all of the doors and the liftgate and lock the vehicle.
-
Vacuum Troubleshooting
-
DO NOT use with any opening blocked. If an object becomes lodged in the hose, attempt to fully extend the hose in a straight line while the vacuum motor is running. If this does not dislodge the object, turn the vacuum OFF and remove the hose from the vehicle using the subsequent removal instructions. If the filter is clogged, follow the emptying debris bin procedure and lightly tap the filter on the collection bin to remove any collected debris from the filter. Both the bin and the filter can be rinsed with water if needed. To avoid mold and stale odors, allow both to dry completely before reinstalling in your vehicle. If the filter has tears, holes or other damage and needs to be replaced, please contact an authorized dealer.
-
If there are any other issues with your vacuum, contact an authorized dealer. Your vacuum has no user serviceable parts.
Debris Bin
The debris bin is located behind the access panel behind the third row seat on the driver’s side.
To Empty
-
Push power button to turn vacuum OFF.
-
Open the access panel by pulling the finger grip towards you and then pull downward.
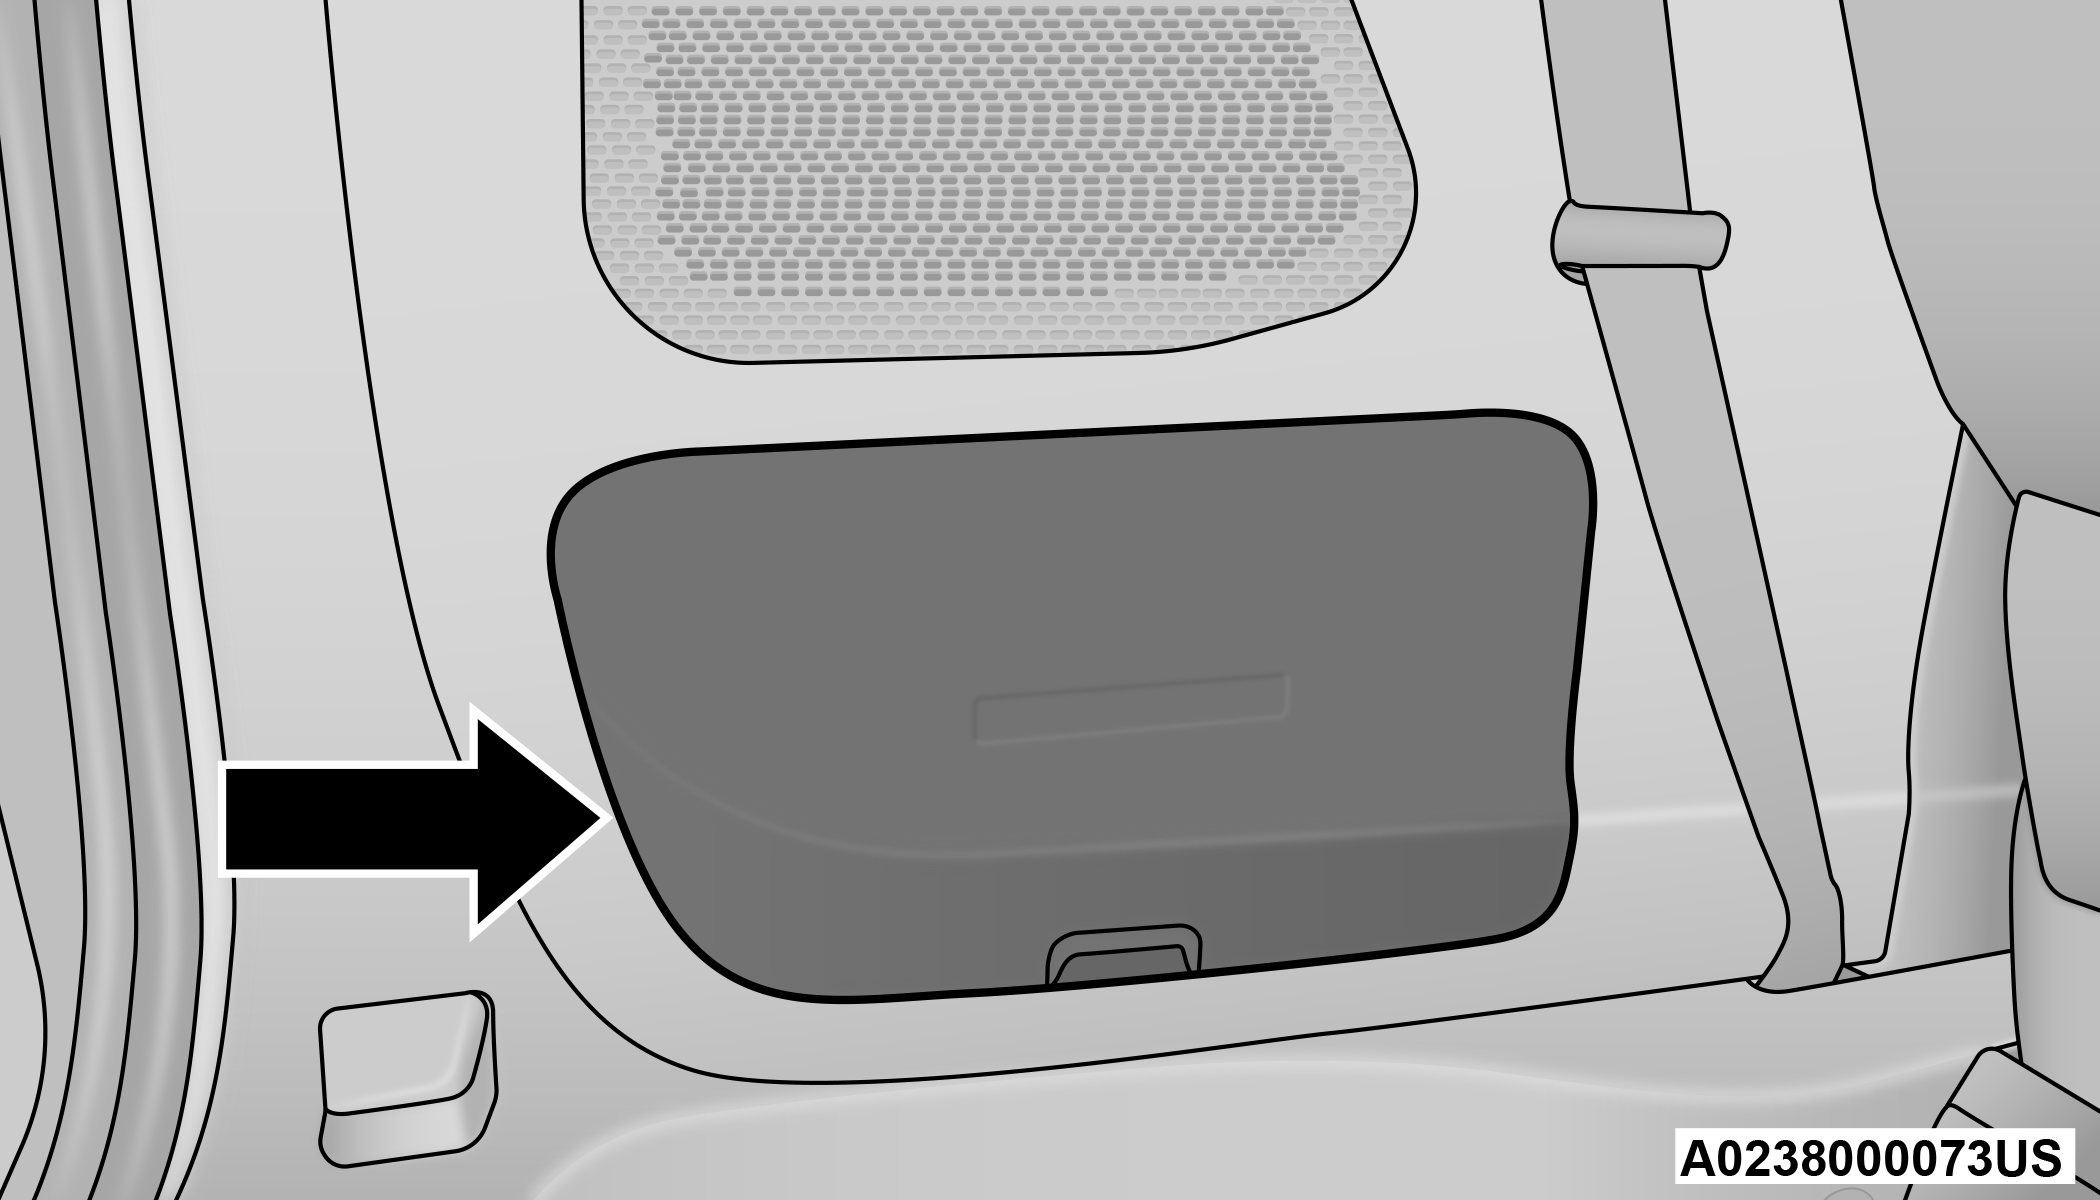
Vacuum System Access Panel
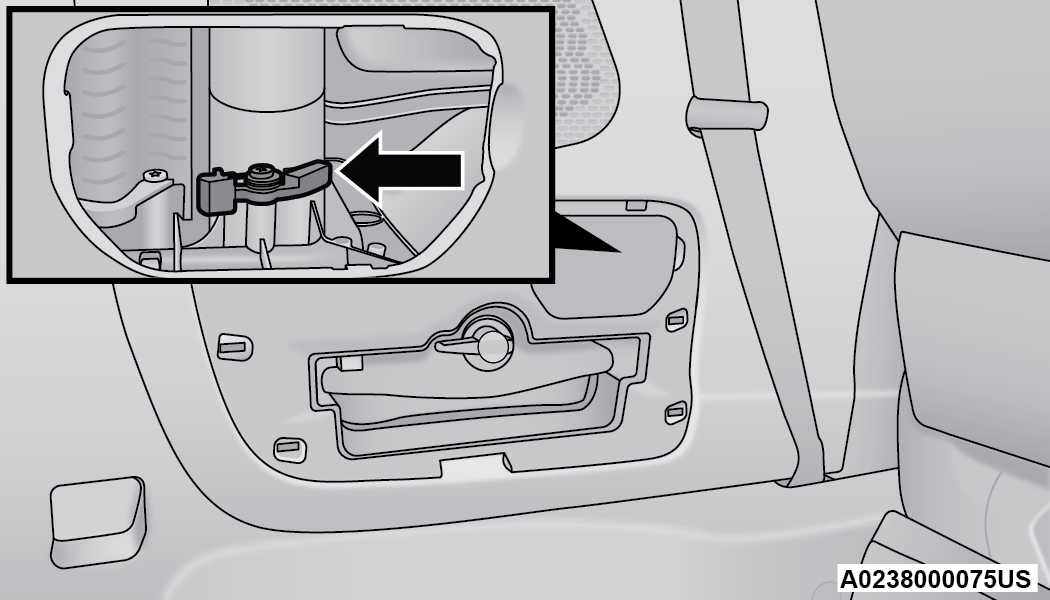
-
Twist the release knob counterclockwise and pull the bin towards you.

Debris Bin Release Knob
-
Remove the filter and dump the debris in a trash can. Lightly tap the filter on the collection bin to remove loose debris from the filter. If the filter is clogged from extended use, have the filter replaced by an authorized dealer.
-
Reverse the procedure to reinstall.
Note:
The debris bin must be fully installed and locked for the vacuum to function properly.
Hose Access Port
The hose access port is located behind the access panel behind the third row seat on the driver’s side.
To Remove Vacuum Hose For Cleaning
-
Open the access panel.
Vacuum System Access Panel
-
Open the small access panel on the upper right side, and unclip the hose from the hose access port by pushing the yellow vacuum hose release lever with right thumb and lifting the hose with index finger.
Vacuum Hose Release Lever
-
Return to vacuum nozzle storage location located behind the sliding door.
-
Grab the vacuum nozzle and gently pull the hose out through vacuum nozzle storage location.
-
Shake the hose to remove any objects stuck in the hose. Take care not to perforate the hose while attempting to dislodge any objects.
-
Reverse the procedure to reinstall and clip the hose into place.
Download Manual