Interior Storage and Equipment
The glove compartment is located on the passenger side of the instrument panel.
To open the glove compartment, pull the release handle.
Release Handle
FRONT DOOR STORAGE
Both interior front door panels have multiple pockets for storage.
WARNING:
If containers of hot liquid are placed in the bottle holder, they can spill when the door is closed, burning the occupants. Be careful when closing the doors to avoid injury.
OVERHEAD SUNGLASS STORAGE
At the front of the overhead console, a compartment is provided for the storage of one pair of sunglasses.
From the closed position, push the indentation to open the compartment.
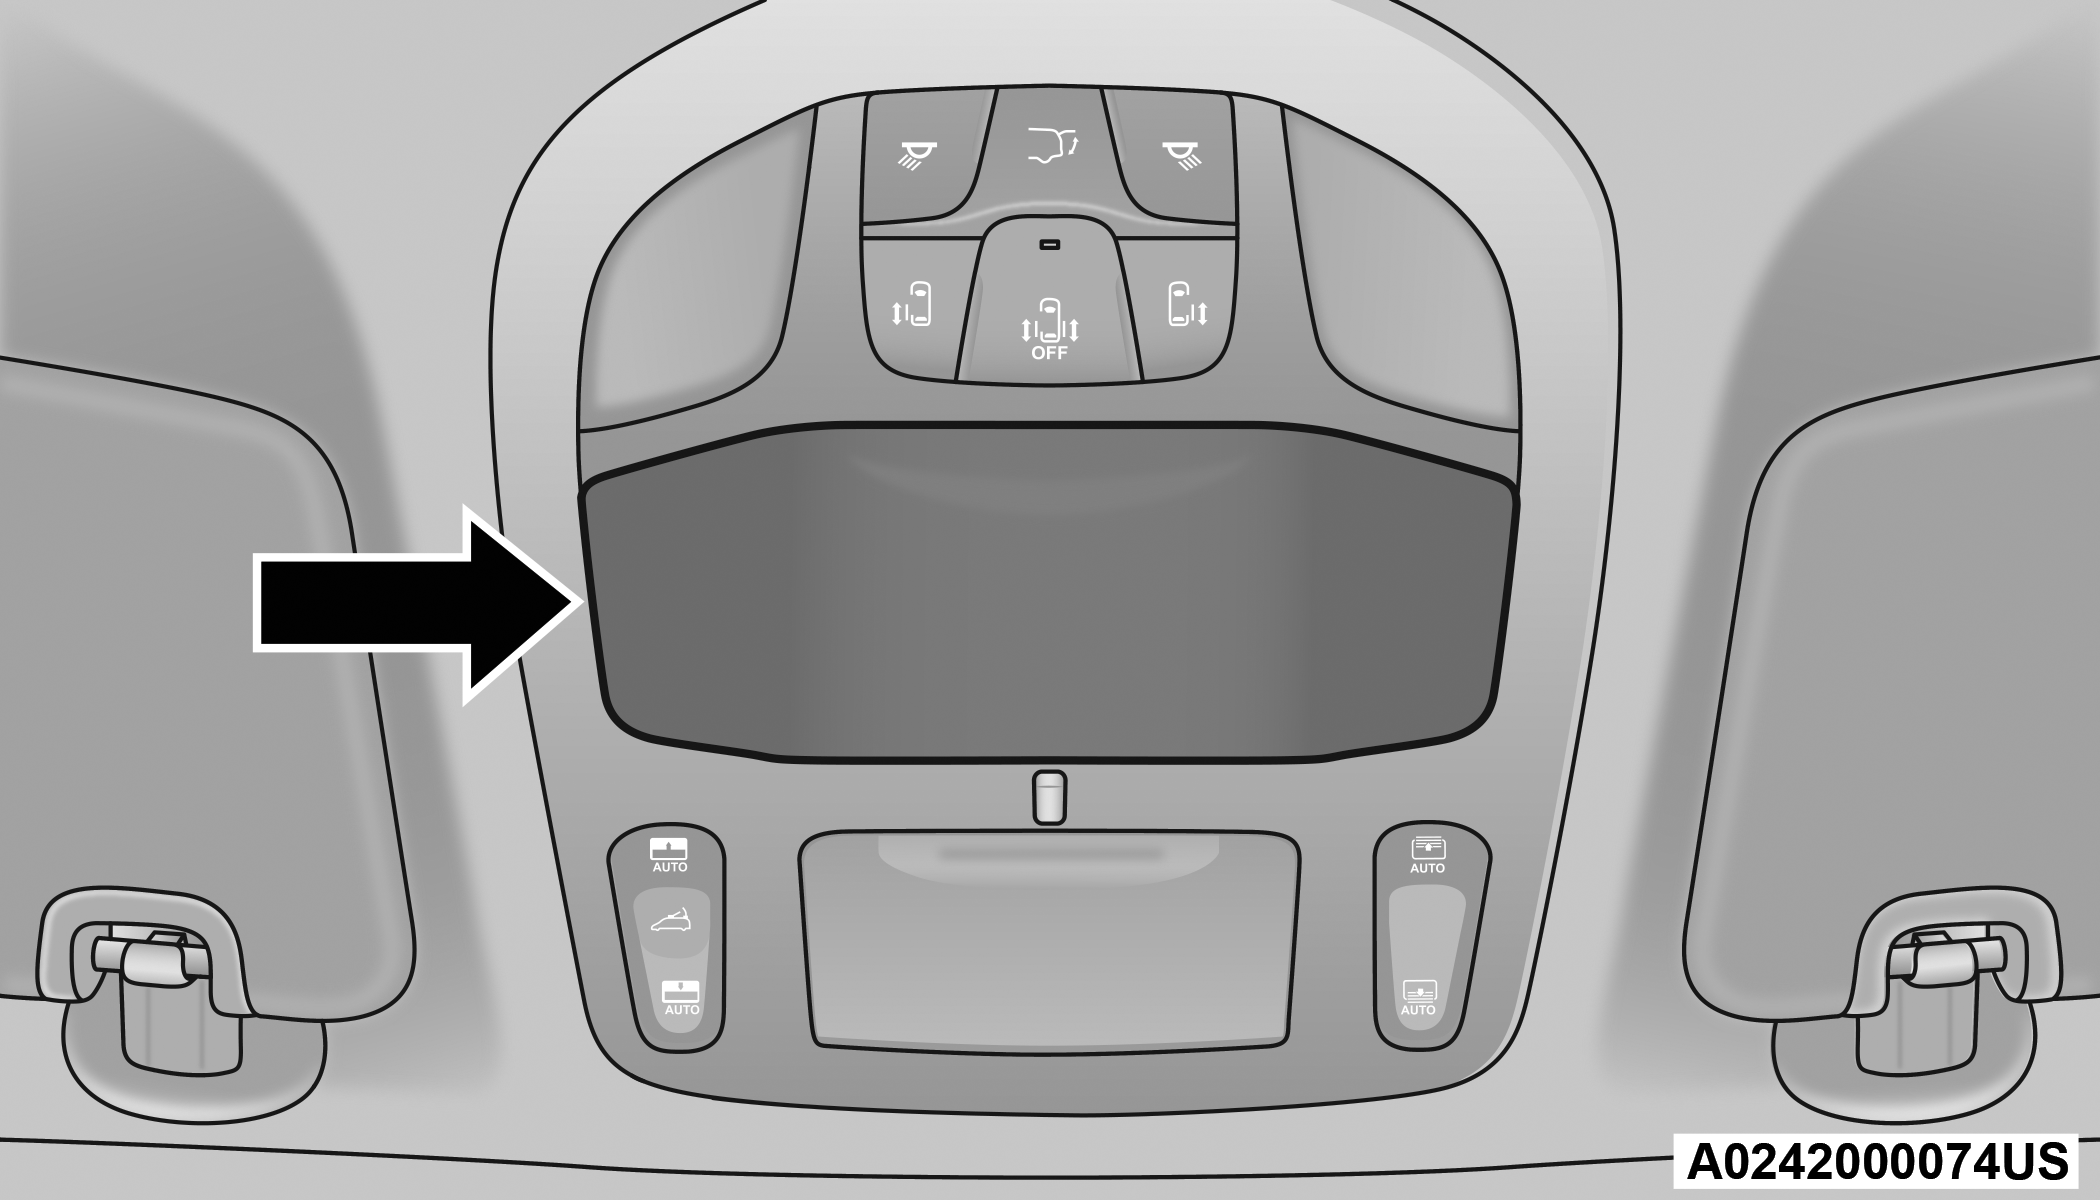
Overhead Sunglass Door Latch
The door will slowly rotate to the full open position.
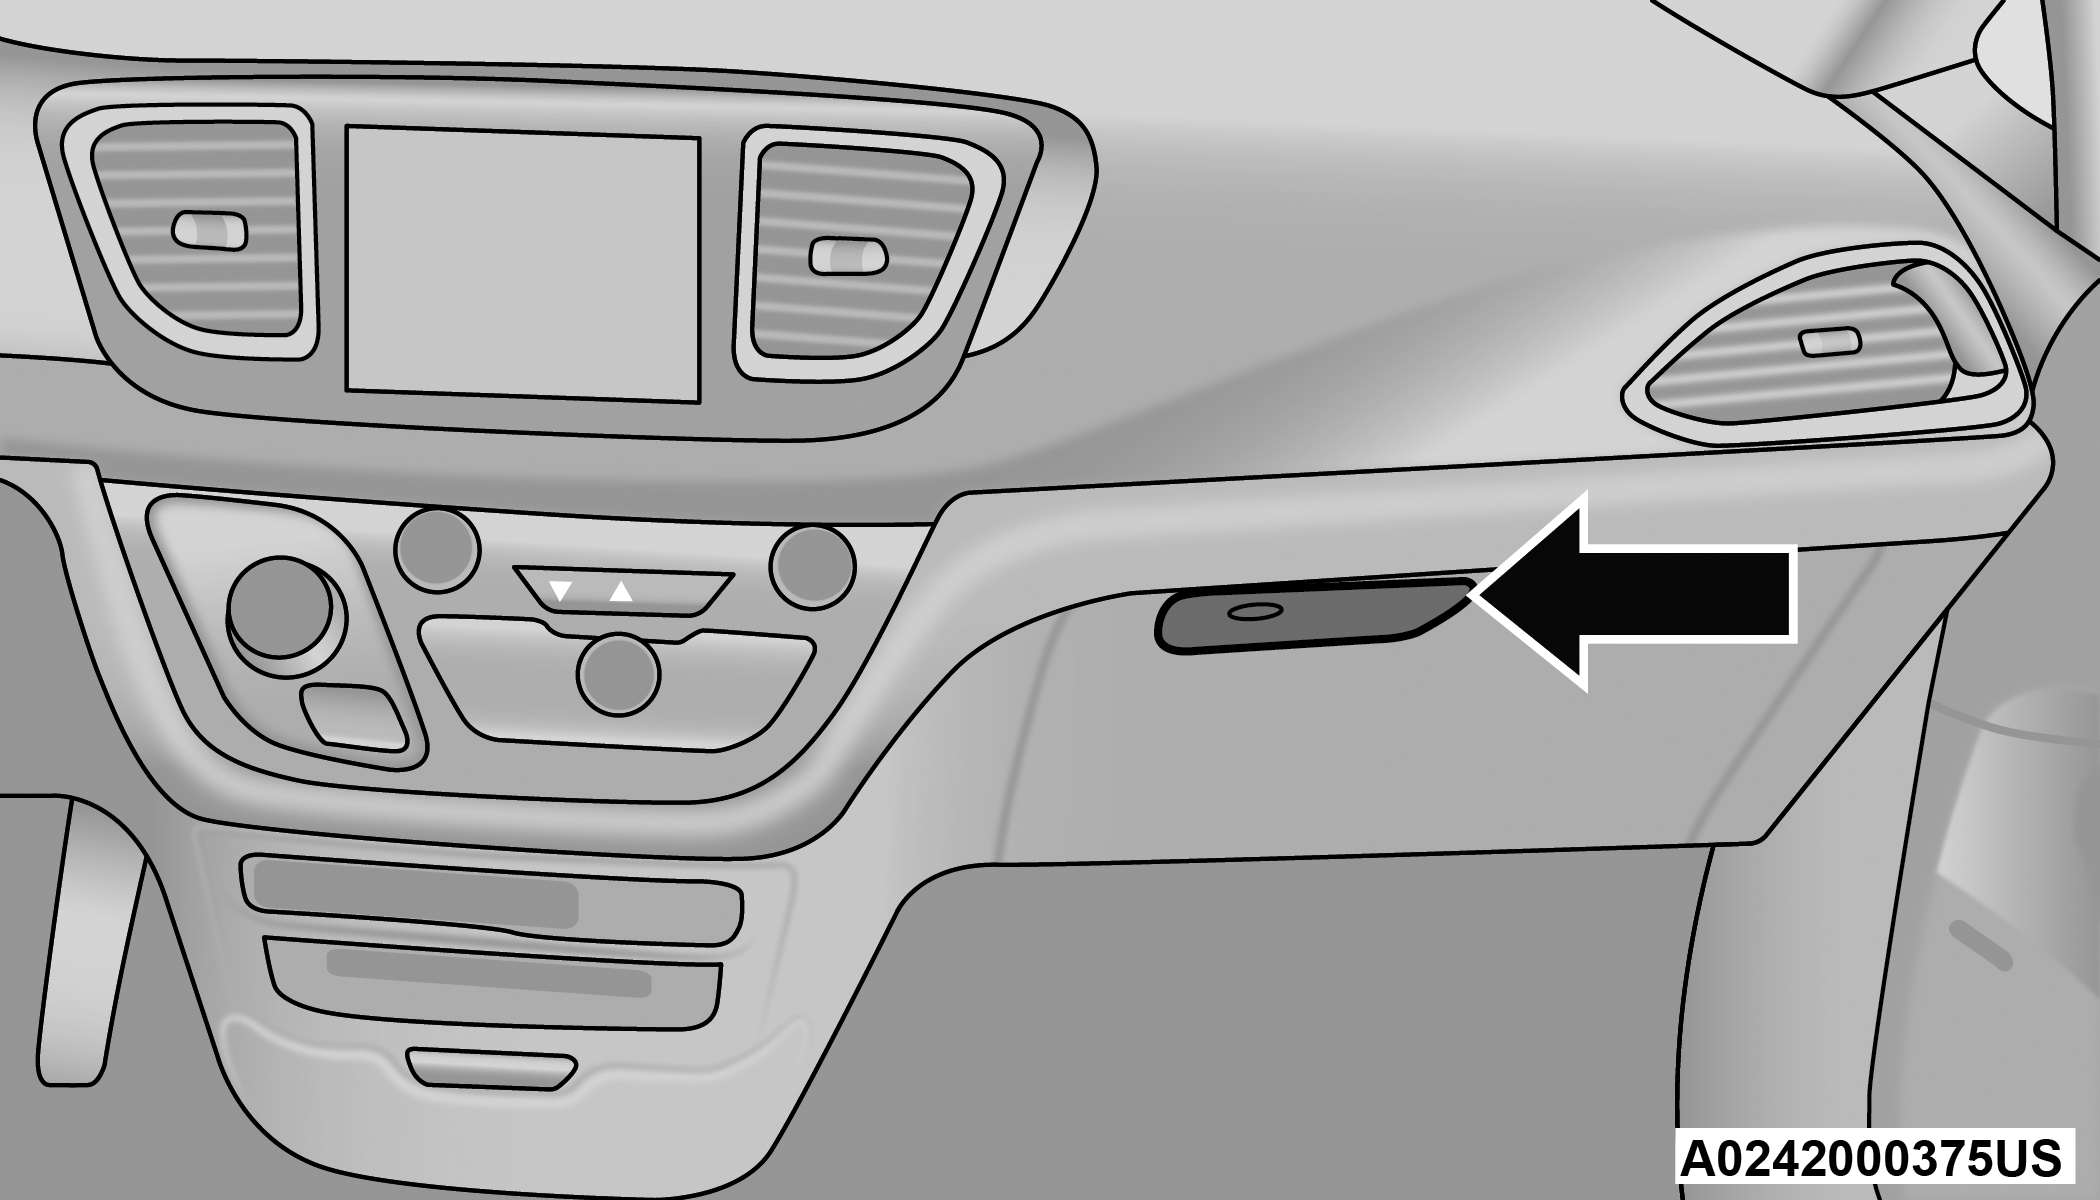
STORAGE DRAWERS — IF EQUIPPED
There may be a storage drawer located in the lower center of the instrument panel, or as part of the center console. It can be released by pushing the access button above the drawer. The drawer is actuator assisted once the access button is pushed. Pull drawer outward to the fully open position.
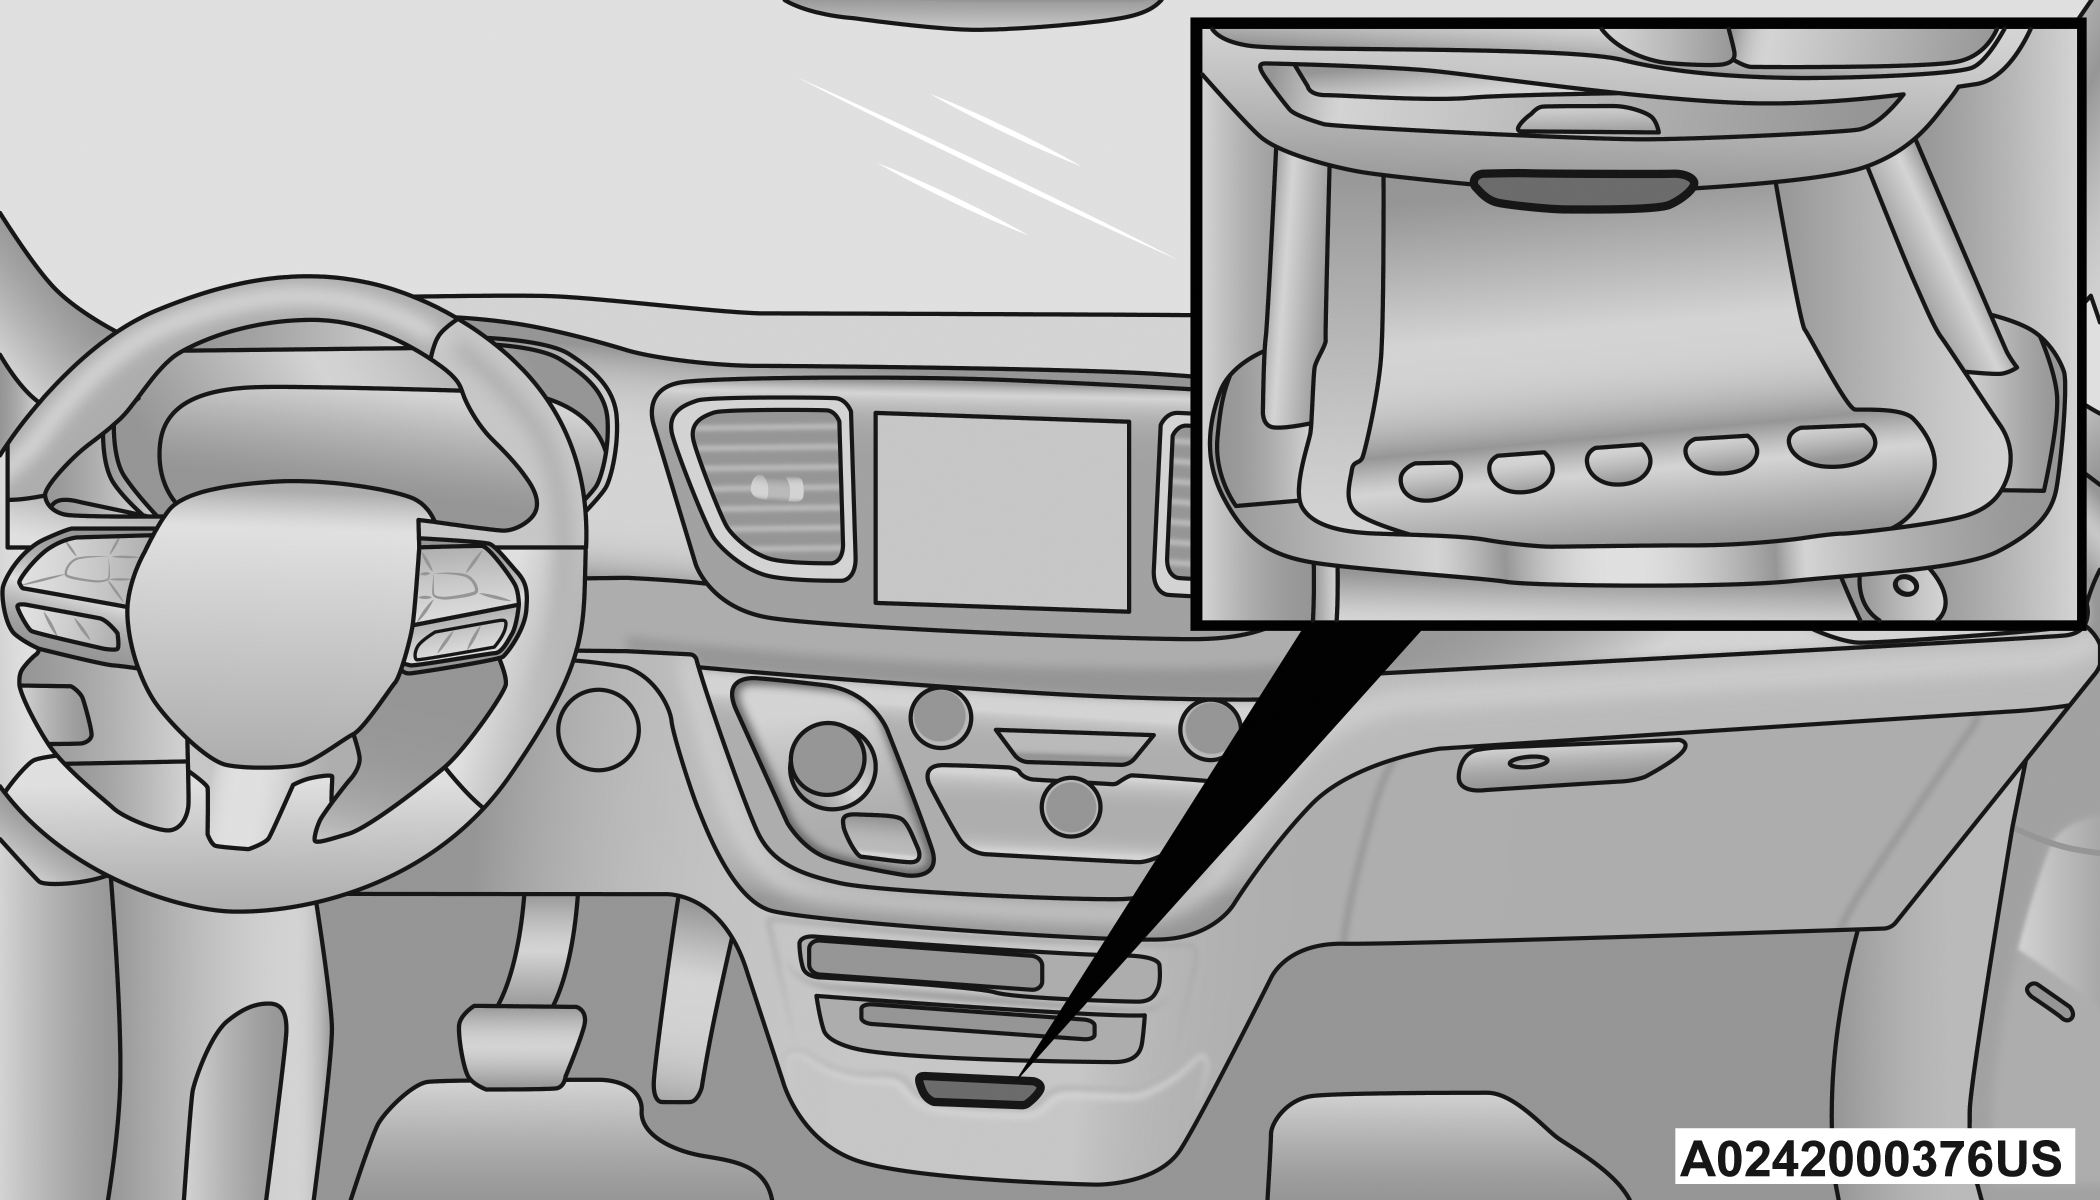
Instrument Panel Storage Drawer
CAUTION:
The storage drawer must be closed while driving. If left open during a collision, additional damage may occur to property or the drawer mechanism.
FRONT SEATBACK STORAGE — IF EQUIPPED
The front seatbacks have a storage pocket on some models.
Front Seatback Storage
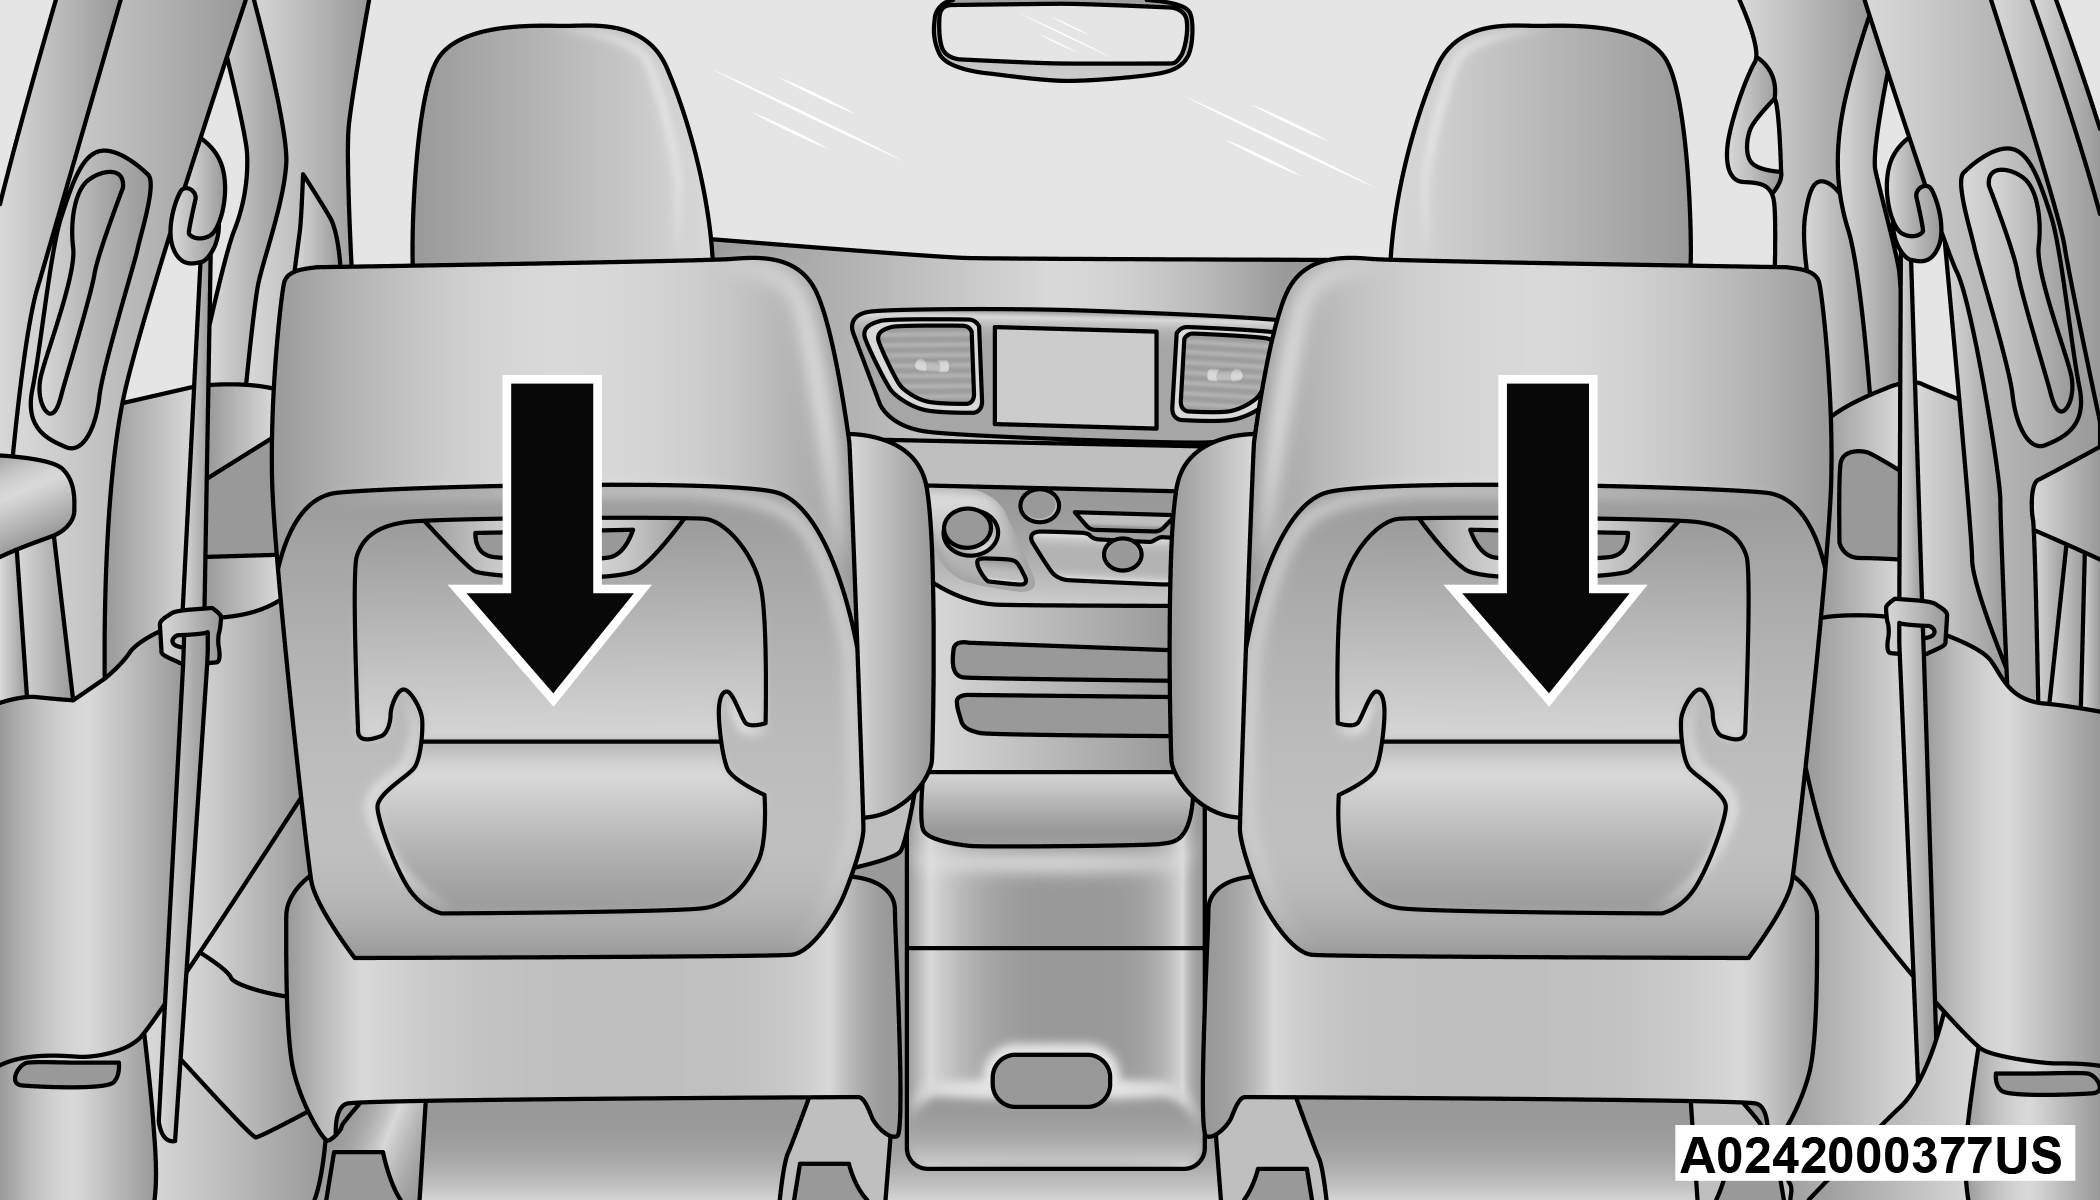
SECOND ROW FLOOR STORAGE BINS
There are removable storage bins (if equipped) located in the areas below the load floor, located in front of the second row seats.
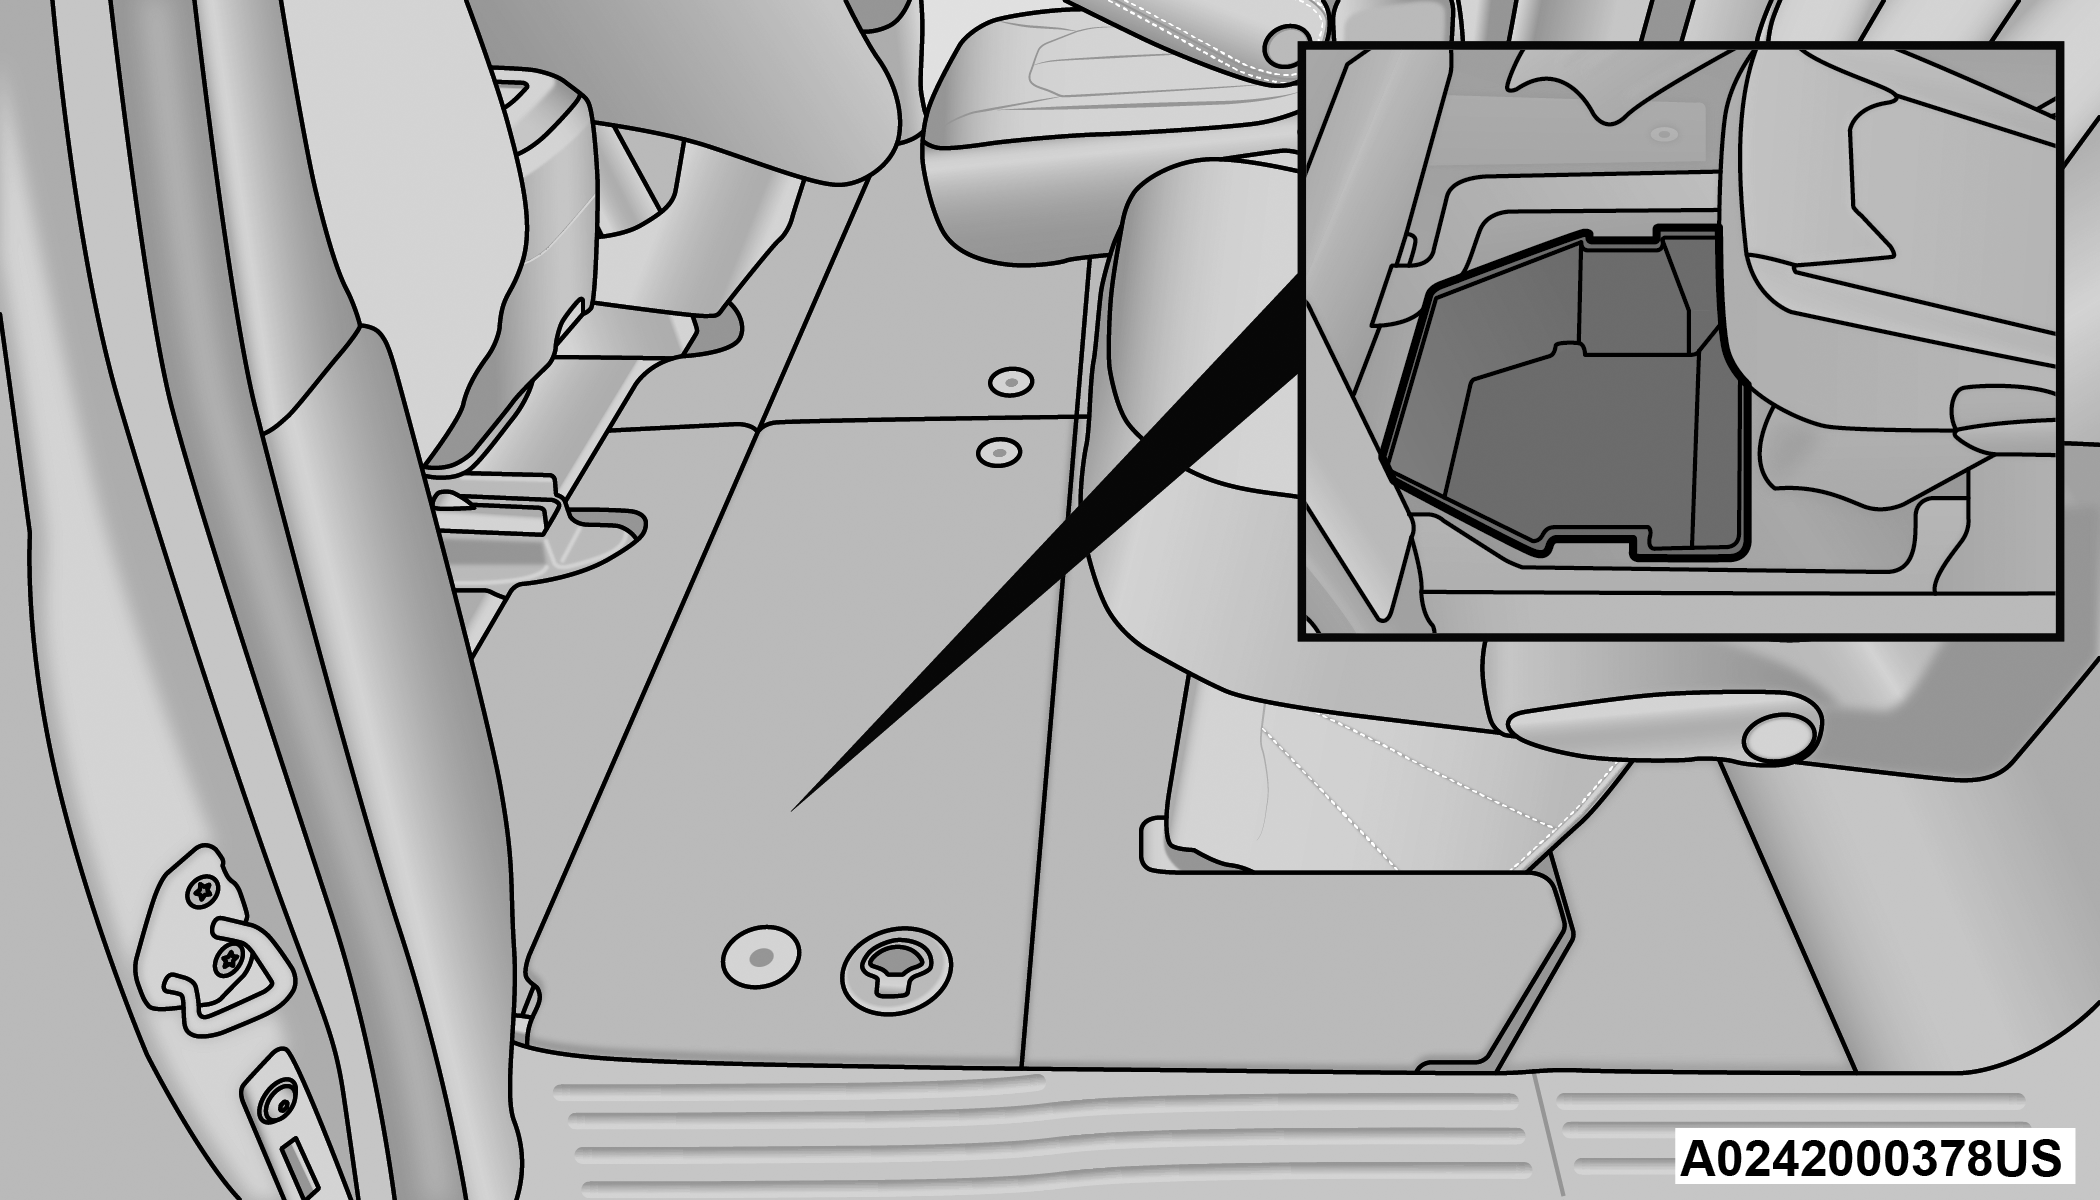
In Floor Storage Bin
-
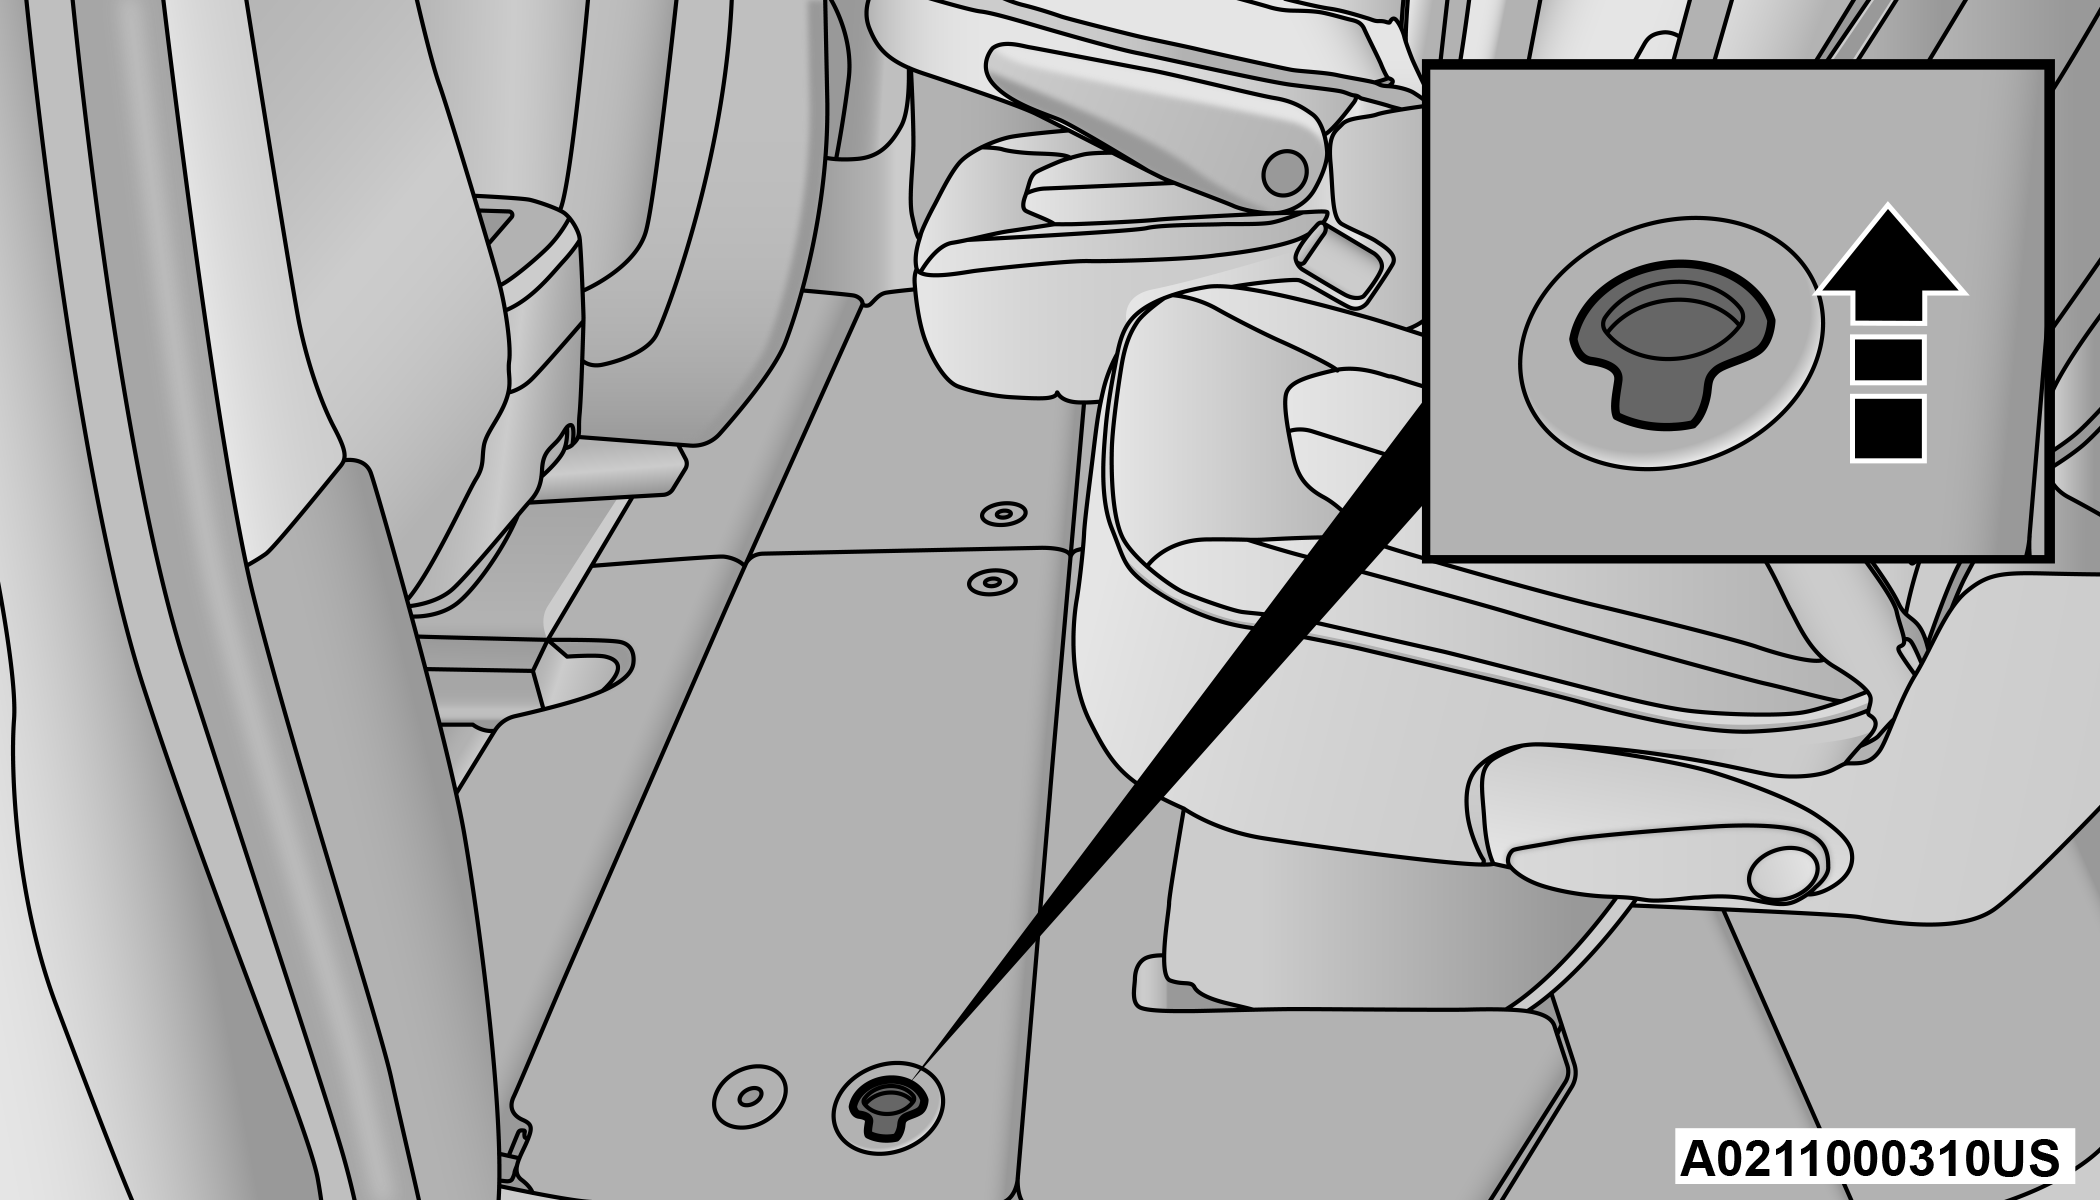
To access the storage bins with front seats in the rearward position, place the lock rod in the unlocked position so the load floor can fold upwards towards the seatback.
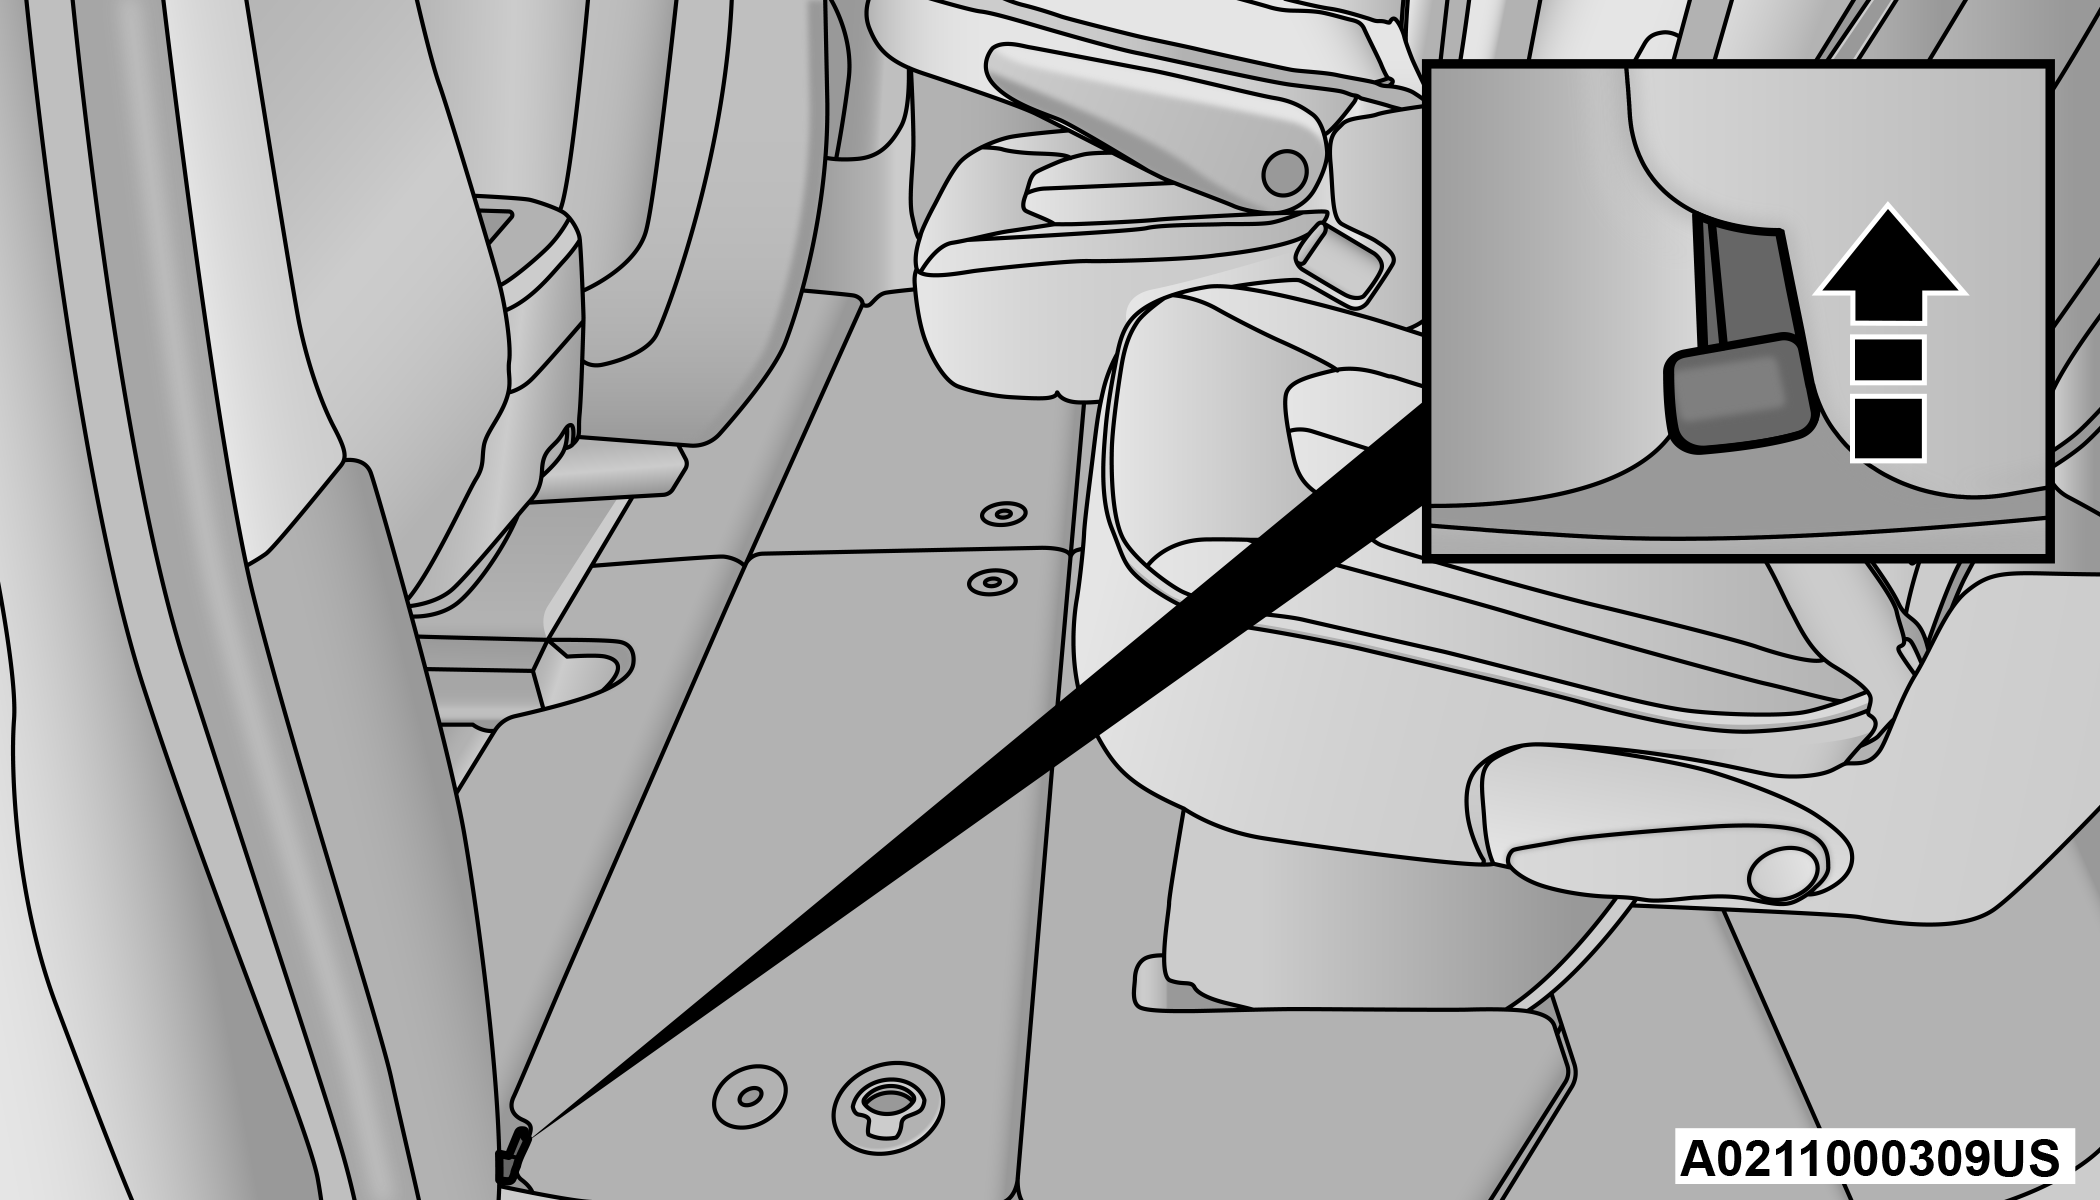
Lock Rod
Note:
-
Push the lock rod inward for the locked position.
-
Pull outward on the lock rod for the unlocked position.
-
-
Pull the latch located near the second row seat to open the floor panel.
Floor Latch
WARNING:
In a collision, serious injury could result if the seat storage bin covers are not properly latched.
-
Do not drive the vehicle with the storage bin covers open.
-
Keep the storage bin covers closed and latched while the vehicle is in motion.
-
Do not operate the storage bin covers while the vehicle is in motion.
-
Do not use a storage bin latch as a tie down.
CAUTION:
The storage bin cover must lie flat and be latched to avoid damage from contact with the front seat tracks, which have minimal clearance to the cover. If the storage bin cover is left in the open position, front seat adjustment may damage the cover.
STORAGE BIN SAFETY WARNING
Carefully follow these warnings to help prevent personal injury or damage to your vehicle:
WARNING:
-
Always close the storage bin covers when your vehicle is unattended.
-
Do not allow children to have access to the second row seat storage bins. Once in the storage bin, young children may not be able to escape. If trapped in the storage bin, children can die from suffocation or heat stroke.
-
In a collision, serious injury could result if the seat storage bin covers are not properly latched.
-
Do not drive the vehicle with the storage bin covers open. Keep the storage bin covers closed and latched while the vehicle is in motion.
-
Do not operate the storage bin covers while the vehicle is in motion.
-
Do not use a storage bin latch as a tie down.
CAUTION:
The storage bin cover must lie flat and be latched to avoid damage from contact with the front seat tracks, which have minimal clearance to the cover. If the storage bin cover is left in the open position, front seat adjustment may damage the cover.
SEAT STORAGE BIN COVER EMERGENCY RELEASE LEVER
As a security measure, the Seat Storage Bin Cover has an Emergency Release Lever built into the latching mechanism.

Storage Bin Cover Emergency Release Lever
Note:
In the event of an individual being locked inside the storage bin, the storage bin cover can be opened from inside of the bin by pushing on the glow-in-the-dark lever attached to the storage bin cover latching mechanism.
LIGHTED CUPHOLDERS — IF EQUIPPED
On some vehicles, the front cupholders are equipped with a light ring that illuminates the cupholders for the front passengers. The light ring is controlled by the Dimmer Controls "⇨Dimmer Controls".
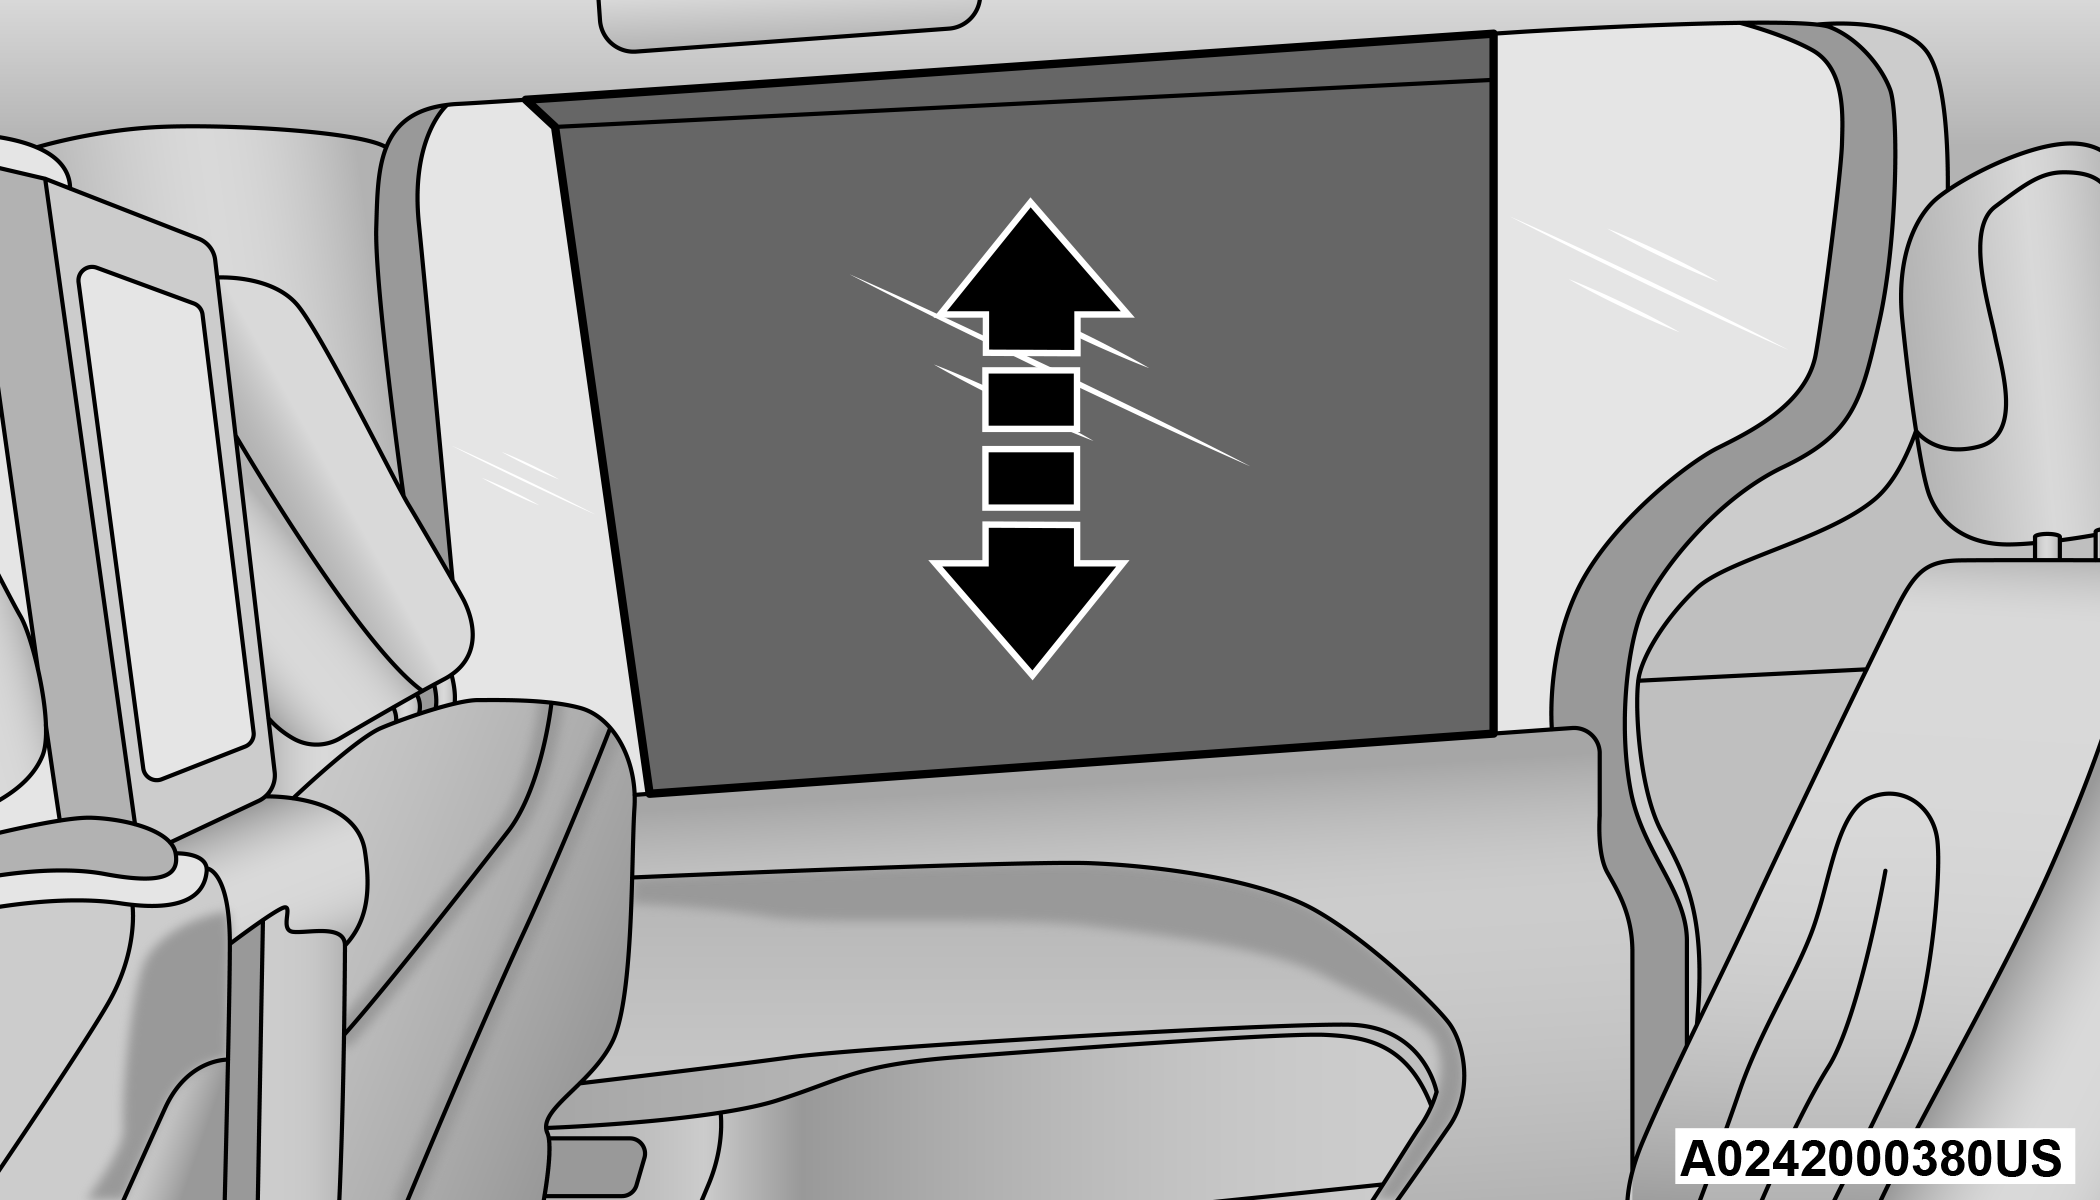
SUN SCREENS — IF EQUIPPED
Sun screens are available for second and third row seating windows. The screens store in the sill trim panels, and the tops of the windows are equipped with hooks that the sun screens attach to when pulled out.
Gently pull up on the tab to raise the sun screen. Continue pulling the sun screen until the tab is near the top of the window.
Once the screen is completely to the top of the window, extend the top bar of the sun screen over the two hooks attached to the top of the window.
Sun Screen Extended
To lower the sun screen, gently lift the tab upward to disengage the hooks, and feed the screen back into the base sill.
USB/AUX CONTROL
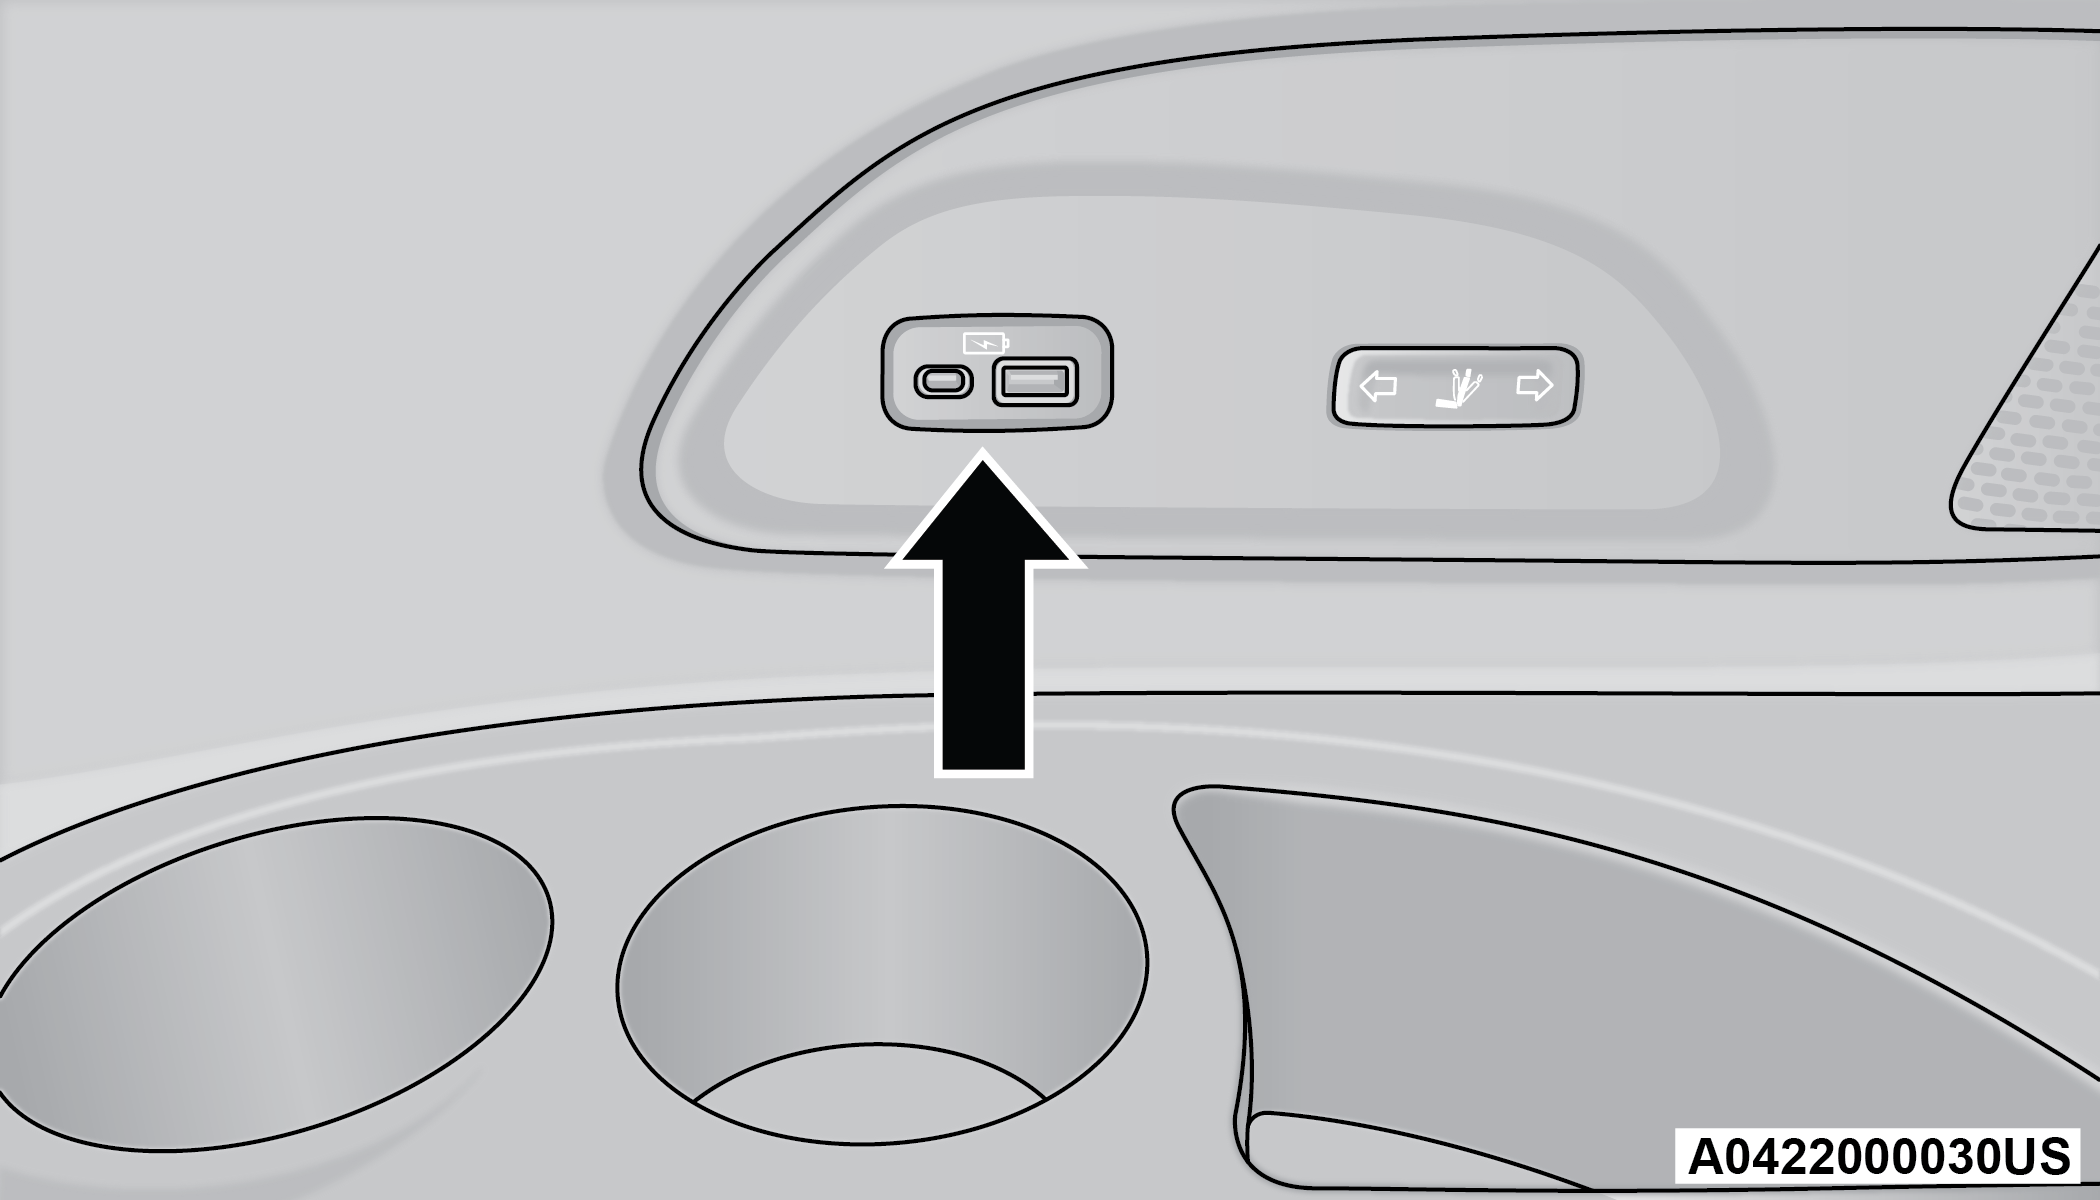
There are numerous USB ports located throughout the vehicle that allow an external USB device to be plugged into the USB port.
Note:
-
If a smartphone is plugged into a video USB port, the device will only have charging capability and allow for files/media to be stored, if equipped with Uconnect Theater.
-
Once a device is connected to the USB port, it will begin charging and is ready for use with the system. Type C and Type A charge-only USB ports can be used at the same time but cannot be used simultaneously while playing media. When both Type C and Type A charge-only USB ports are in use they will be charged at a reduced rate.
For example, if a device is plugged into the Type A USB port and another device is plugged into the Type C USB port, a message will appear and allow you to select which device to use.
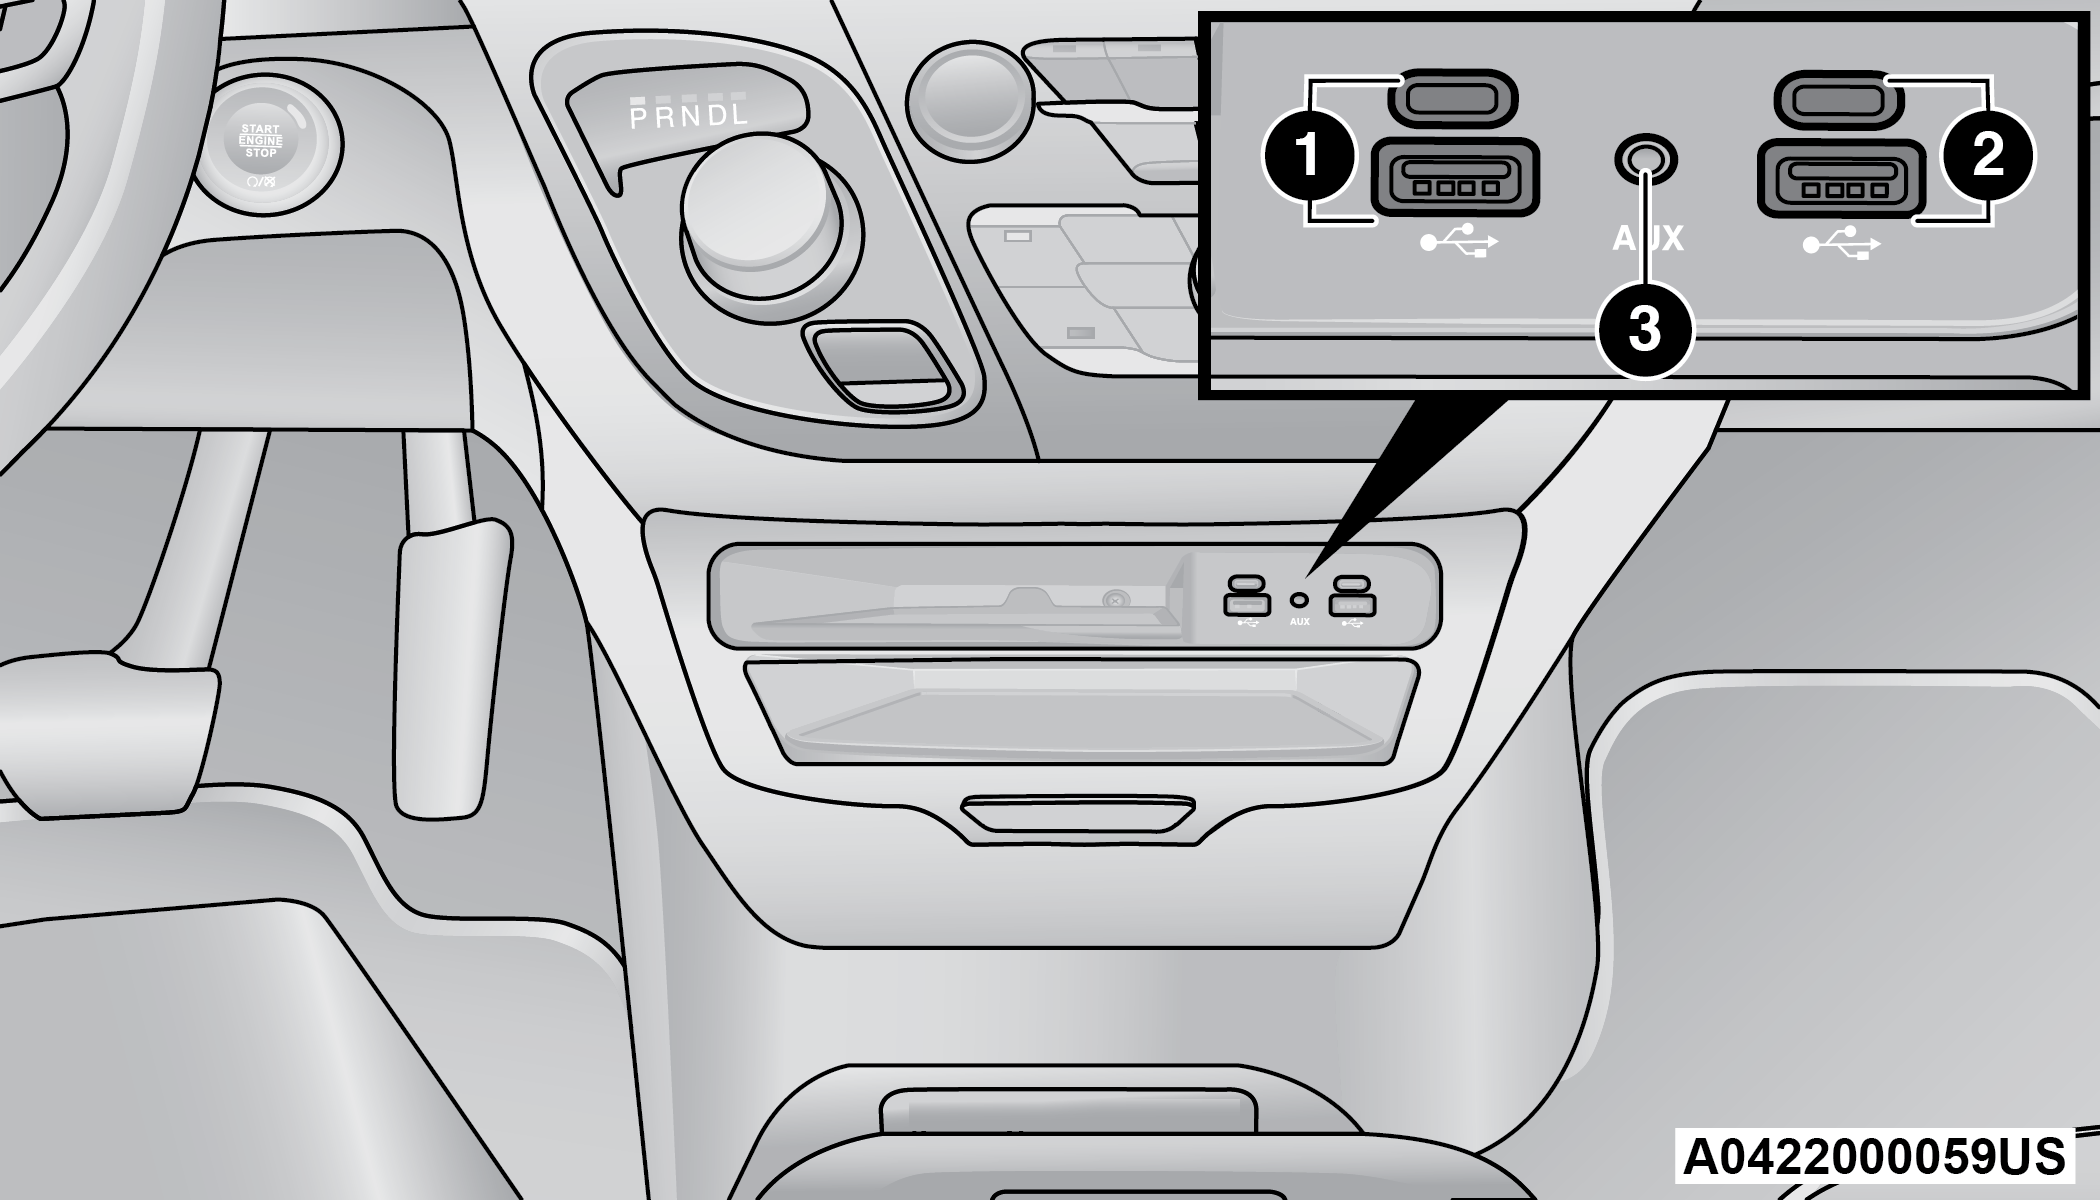
Front Center Stack AUX Jack And USB Ports
|
1 — Type C And Type A USB Ports 1 |
|
2 — Type C And Type A USB Ports 2 |
|
3 — AUX Port |
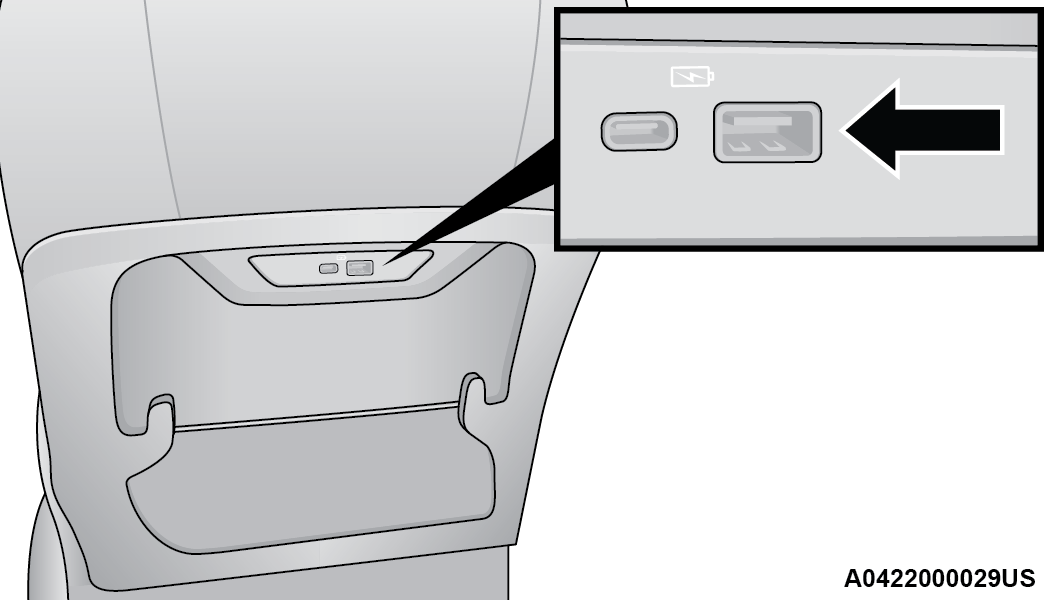
There are multiple USB “Charge Only” ports in this vehicle.
-
In the center console
-
On the instrument panel
-
On the back of the front row seats in the Uconnect Theater Media Hubs (if equipped)
-
On the back of the front row seats
-
Above the rear cup holder in the third row of seats
Charge Only USB In The Center Console
Note:
The USB outlet in the bottom of the instrument panel can be switched from ignition only to constant battery powered all the time. See an authorized dealer for details.
Rear Seat USB Charging Port Without Uconnect Theater
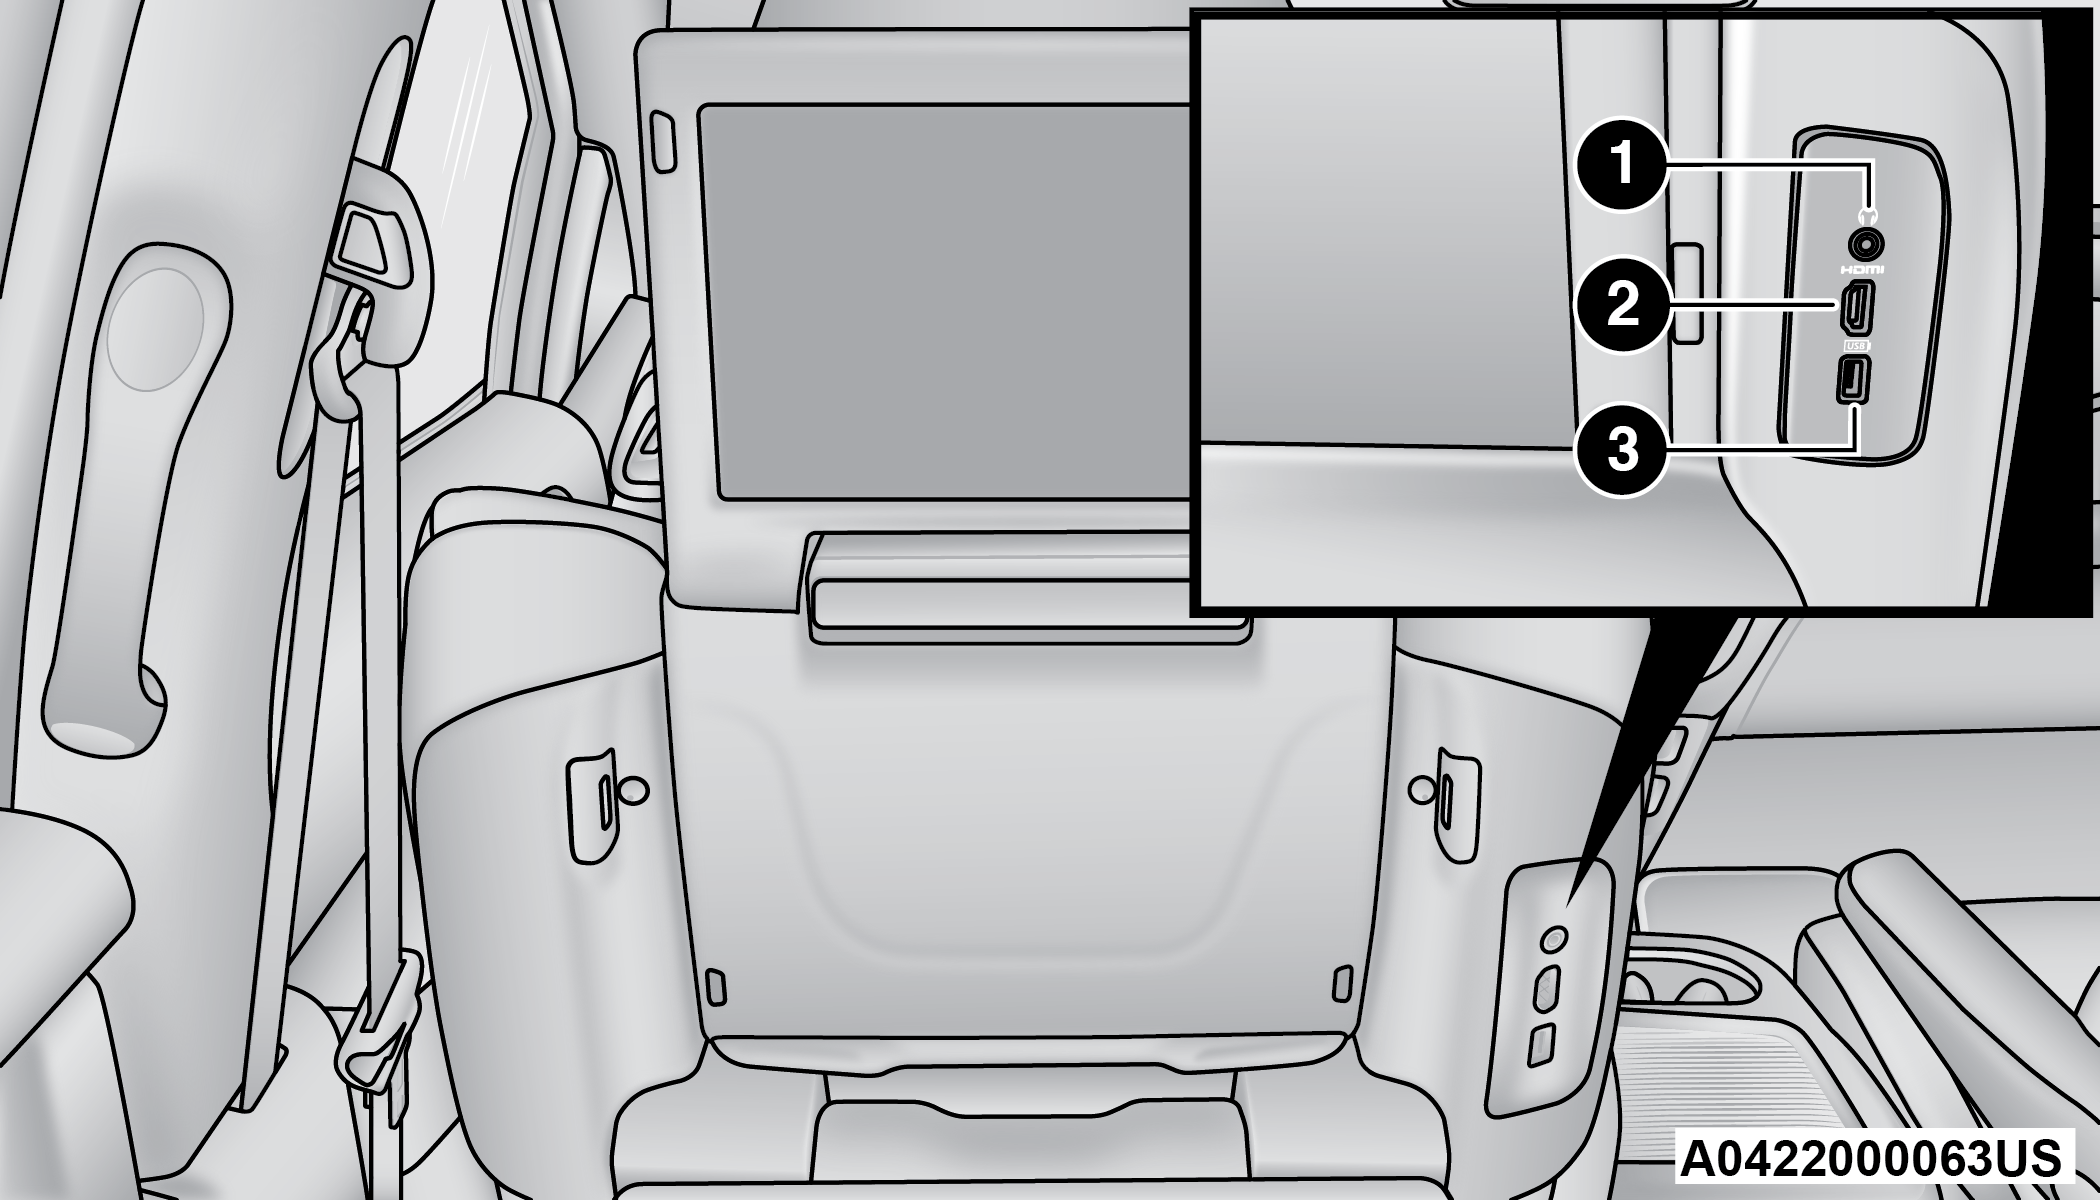
Rear Seat USB Media Hub With Uconnect Theater
|
1 — Headphone Jack (Headphone Output Only) |
|
2 — HDMI Port |
|
3 — USB Port (Charge Only) |
3rd Row USB Charging Port
Note:
The USB “Charge Only” ports will recharge battery operated USB devices when connected.
Different scenarios are listed below when a non-phone device is plugged into the smaller and larger USB ports, and when a phone device is plugged into the smaller and larger USB ports:
-
“A new device is now connected. Previous connection was lost.”
-
“(Phone Name) now connected. Previous connection was lost.”
-
“Another device is in use through the same USB port. Please disconnect the first device to use the second device.”
Plugging in a phone or another USB device may cause the connection to a previous device to be lost.
Note:
Charge unsupported devices with the Charge Only USB ports. If an unsupported device is plugged into a Media USB port, a message will display on the touchscreen that the device is not supported by the system.
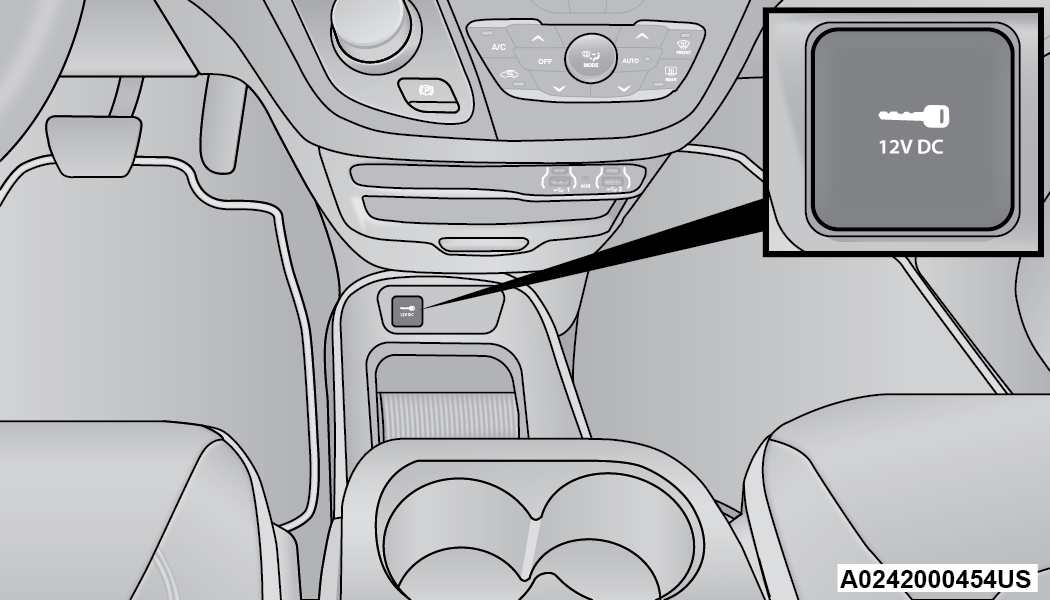
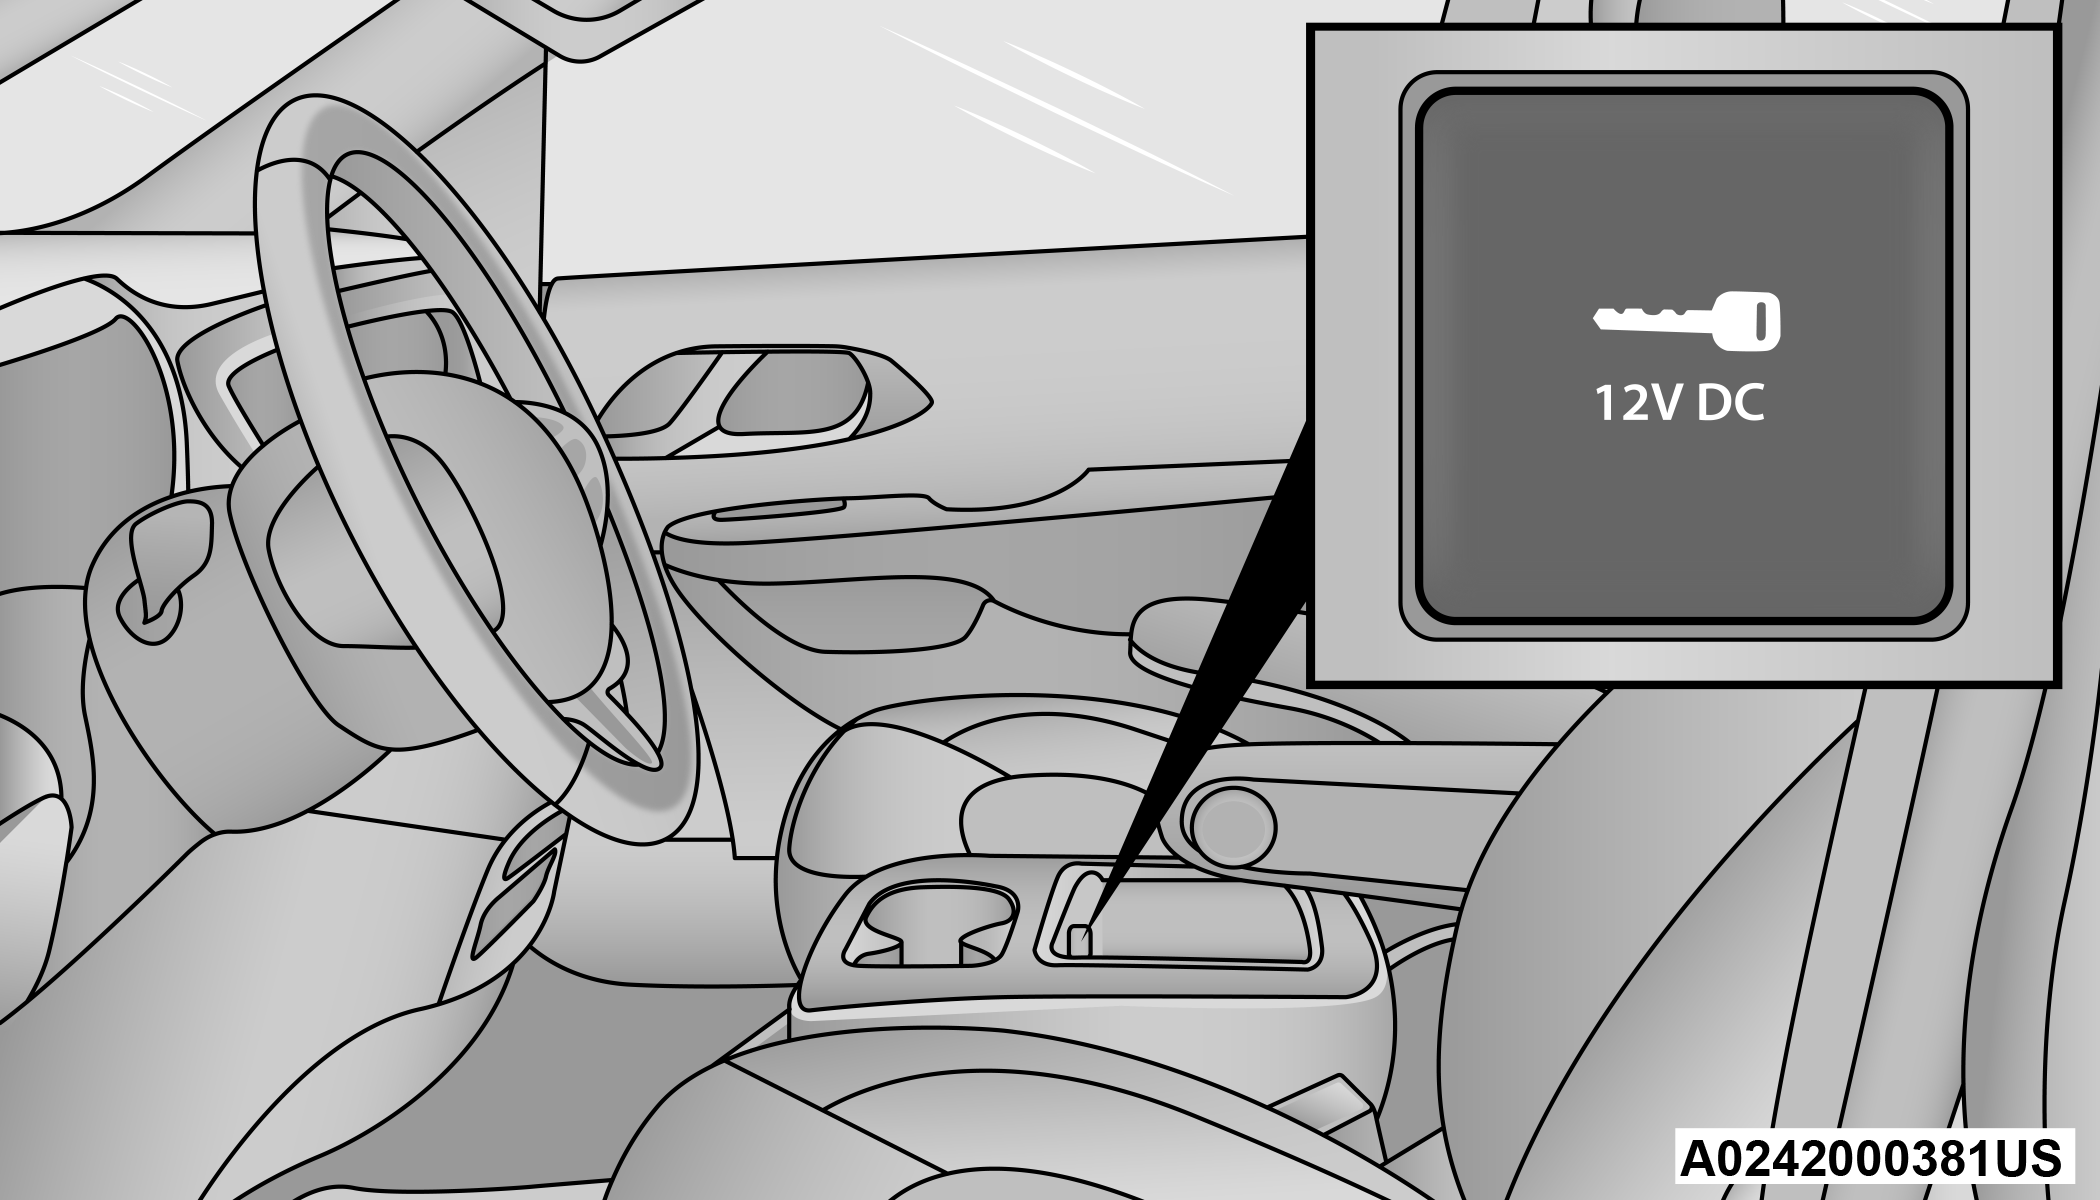
POWER OUTLETS
Your vehicle is equipped with 12 Volt (15 Amp) power outlets that can be used to power cellular phones, small electronics and other low powered electrical accessories. The power outlets can be labeled with either a “key” or a “battery” symbol to indicate how the outlet is powered. Power outlets labeled with a key symbol are powered when the ignition is in the ACC or ON/RUN position, while the outlets labeled with a battery symbol are connected directly to the battery and powered at all times.
Note:
All accessories connected to the battery powered outlets should be removed or turned off when the vehicle is not in use to protect the battery against discharge.
CAUTION:
Power outlets are designed for accessory plugs only. Do not insert any other object in the power outlets as this will damage the outlet and blow the fuse. Improper use of the power outlet can cause damage not covered by your New Vehicle Limited Warranty.
Depending on the type of center console your vehicle is equipped with, there is a front power outlet located either on the bottom of the instrument panel or inside the center console.
12 Volt Front Power Outlet (In Floor Tray) - If Equipped
12 Volt Front Power Outlet (In Center Console)
In addition to the front power outlet, there is also a power outlet located in the rear cargo area.
The rear power outlet is located in the right rear cargo area.
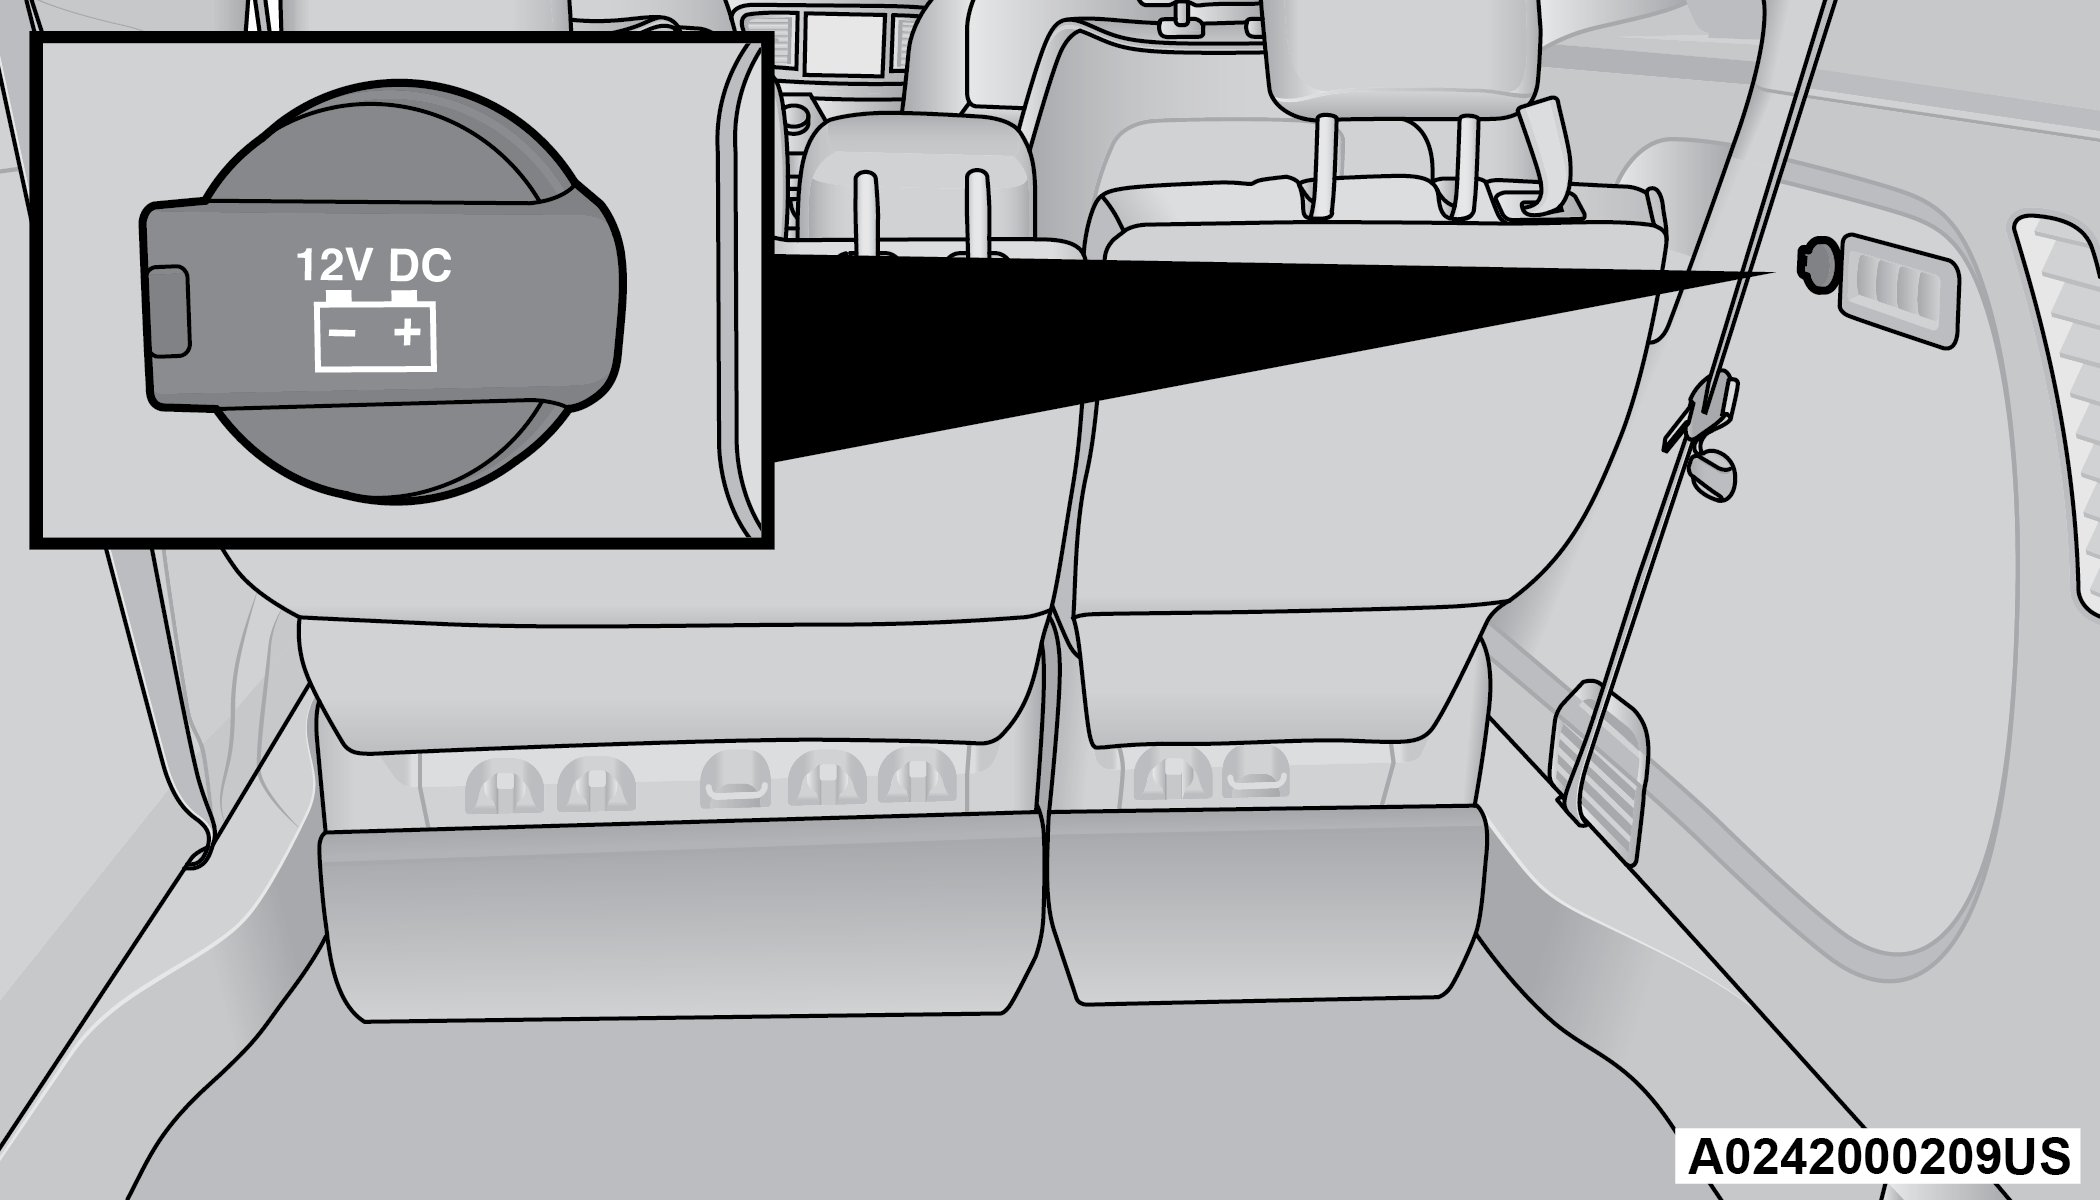
Rear Power Outlet
Note:
The front power outlet can be changed to battery powered at all times by switching the power outlet fuse in the Power Distribution Center panel from fuse location F95A to F95B.
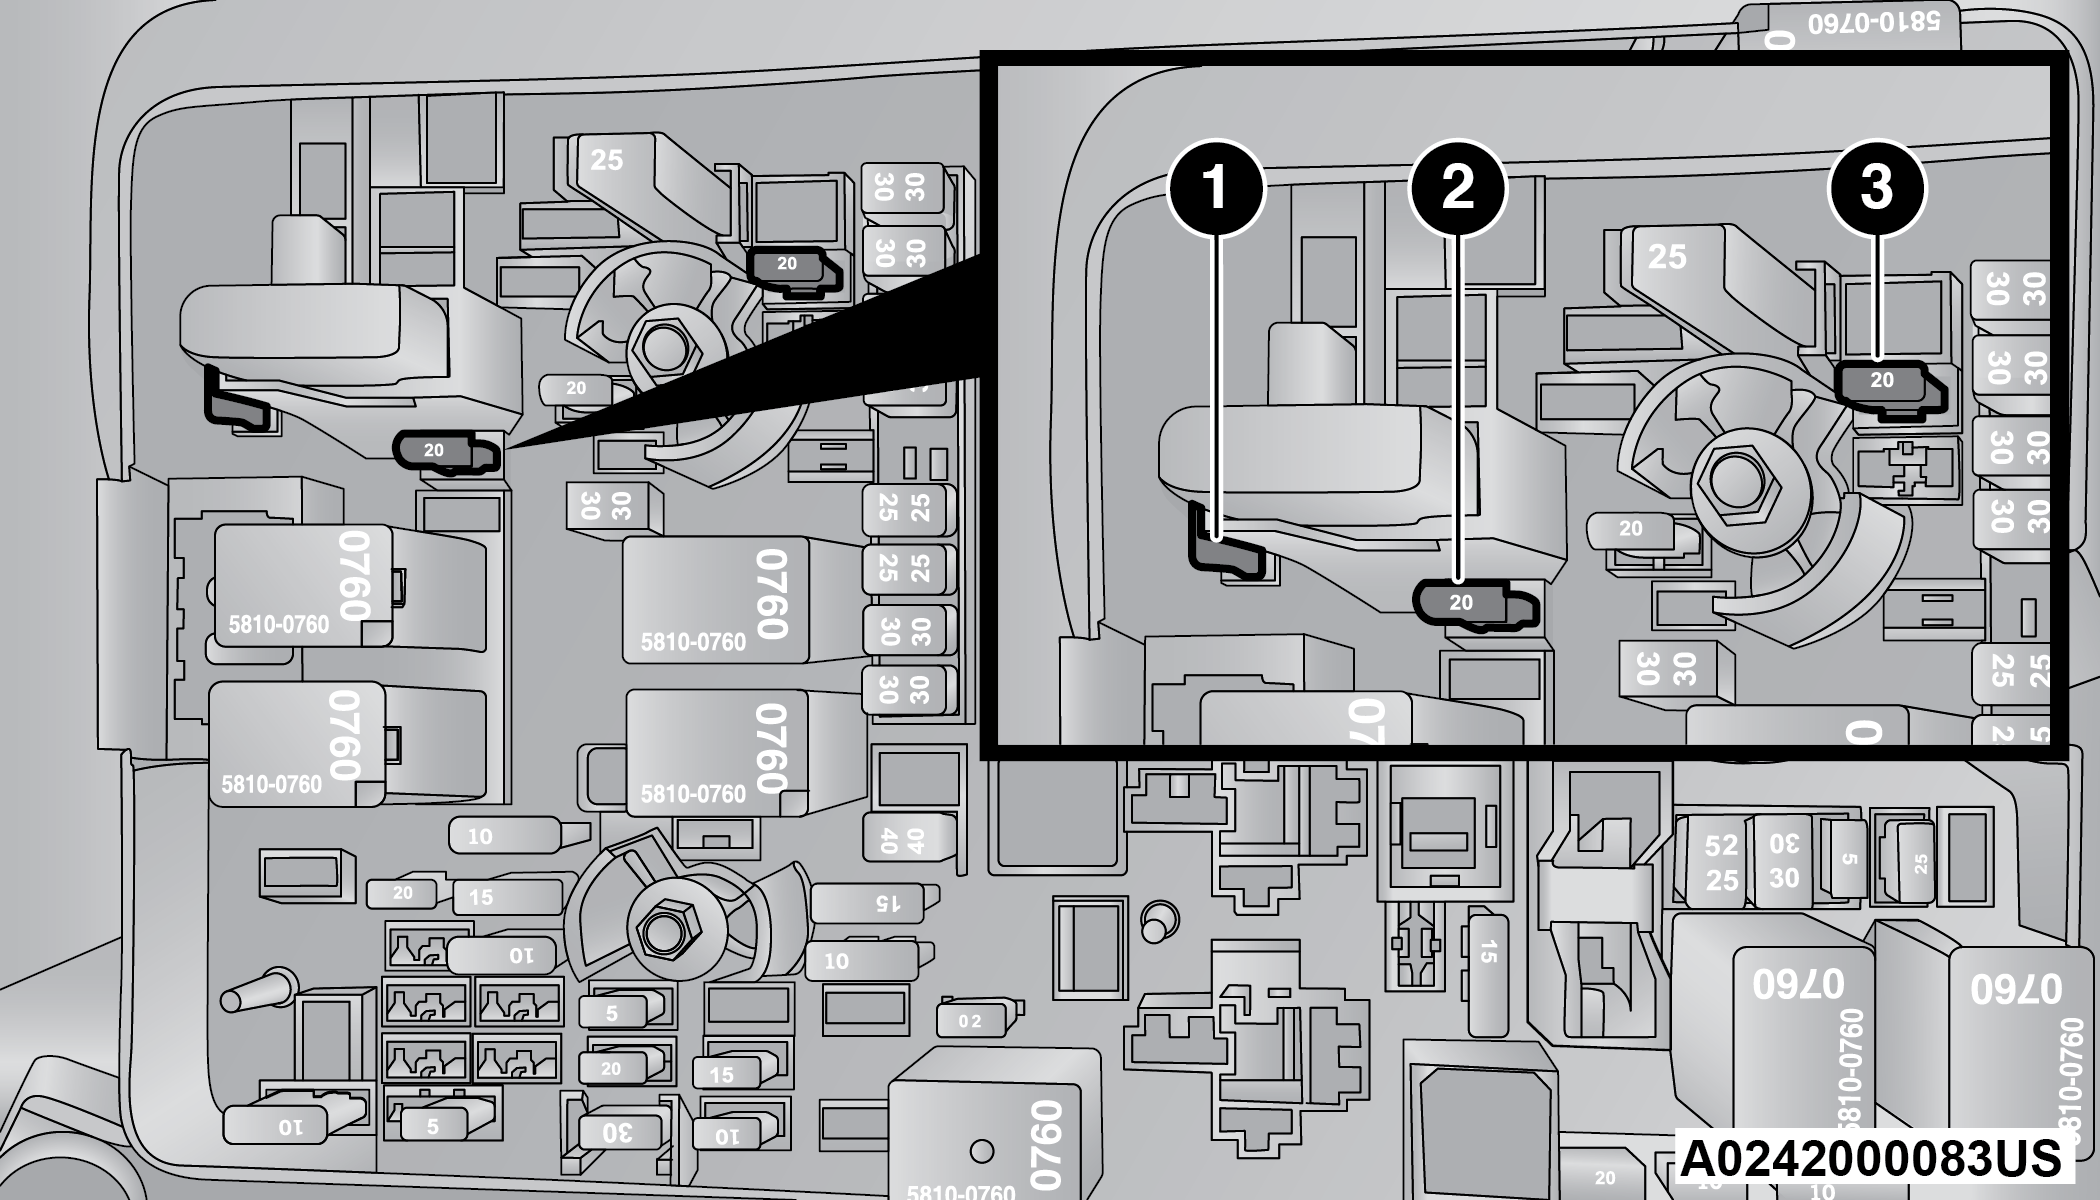
Power Outlet Fuse Locations
|
1 — F95A (Ignition)/F95B (Battery) Front Power Outlet 10A |
|
2 — F85 Cigar Lighter 20A |
|
3 — F60 RR Cargo Power Outlet 20A |
WARNING:
To avoid serious injury or death:
-
Only devices designed for use in this type of outlet should be inserted into any 12 Volt outlet.
-
Do not touch with wet hands.
-
Close the lid when not in use and while driving the vehicle.
-
If this outlet is mishandled, it may cause an electric shock and failure.
CAUTION:
-
Many accessories that can be plugged in draw power from the vehicle's battery, even when not in use (i.e., cellular phones, etc.). Eventually, if plugged in long enough, the vehicle's battery will discharge sufficiently to degrade battery life and/or prevent the engine from starting.
-
Accessories that draw higher power (i.e., coolers, vacuum cleaners, lights, etc.) will degrade the battery even more quickly. Only use these intermittently and with greater caution.
-
After the use of high power draw accessories, or long periods of the vehicle not being started (with accessories still plugged in), the vehicle must be driven a sufficient length of time to allow the generator to recharge the vehicle's battery.
POWER INVERTER — IF EQUIPPED
There is a 115 Volt, 150 W Power Inverter outlet located on the right side of the vehicle, before the third row of seats to convert DC current to AC current. The Power Inverter can power cellular phones, electronics and other low power devices requiring up to 150 W. Certain video game consoles will exceed this power limit, as will most power tools.
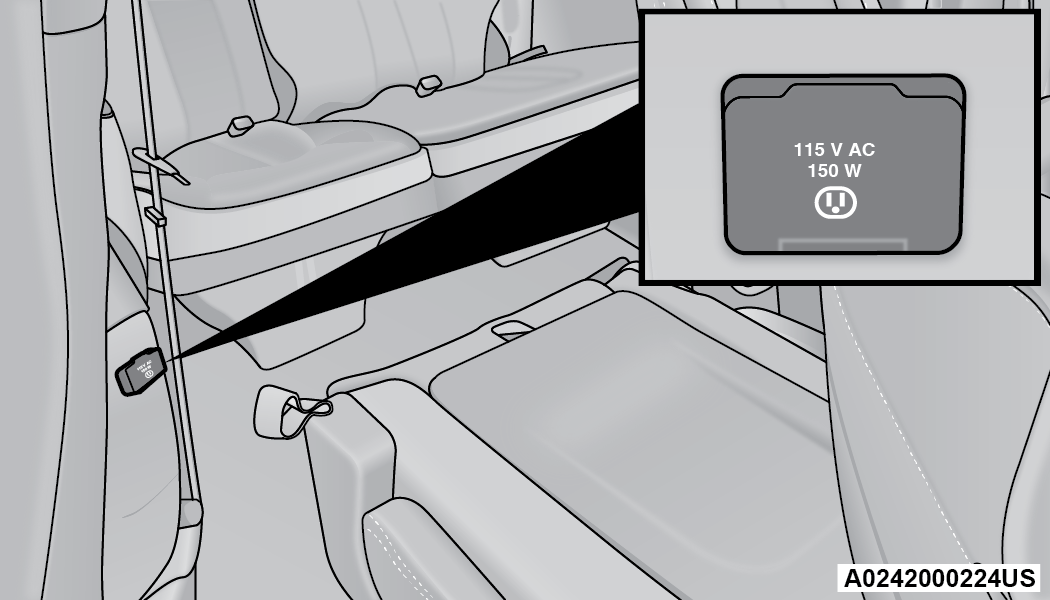
Power Inverter
The Power Inverter turns on when the device is plugged in, and the ignition is in ON/RUN position. It turns off when the device is unplugged or the ignition is no longer in ON/RUN position.
The Power Inverter is designed with built-in overload protection. If the power rating of 150 W is exceeded, the Power Inverter shuts down. Once the electrical device has been removed from the Power Inverter, it resets. To avoid overloading the circuit, check the power ratings on electrical devices prior to using the Power Inverter.
WARNING:
To avoid serious injury or death:
-
Do not insert any objects into the receptacles.
-
Do not touch with wet hands.
-
Close the lid when not in use.
-
If this outlet is mishandled, it may cause an electric shock and failure.
WIRELESS CHARGING PAD — IF EQUIPPED
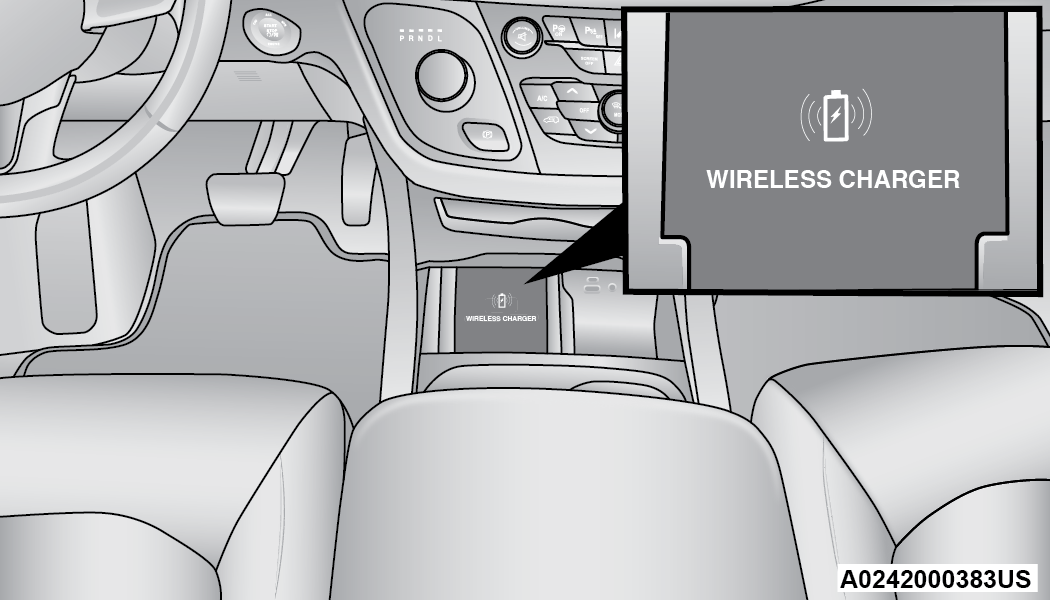
Wireless Charging Pad Location
Your vehicle may be equipped with a 15W 3A Qi wireless charging pad located inside of the storage area below the climate controls. This charging pad is designed to wirelessly charge your Qi enabled mobile phone. Qi is a standard that allows wireless charging of your mobile phone.
Your mobile phone must be designed for Qi wireless charging. If the phone is not equipped with Qi wireless charging functionality, an aftermarket sleeve or a specialized back plate can be purchased from your mobile phone provider or a local electronics retailer. Please see your phone’s Owner’s Manual for further information.
The wireless charging pad is equipped with an anti-slip mat, a cradle to hold your mobile phone in place, and an LED indicator light.
Place the device inside the prepared area delimited in the mat as shown in the image. Incorrect positioning will prevent the phone from charging.
LED Indicator Status:
-
No Light: Charging pad is idle or searching for a device. Device may not be compatible with the Qi standard.
-
Blue Light: Device is detected and is charging.
-
Red Light/Flashing: Internal error, or foreign object is detected.
-
Green Light: Device has completed battery charging (if device is equipped to transmit this information).
Important Notes Regarding This Vehicle’s Wireless Charging Pad:
-
The presence of the Near-Field Communication (NFC) function active on a smartphone could signal malfunction anomalies.
-
The ignition must be in the ON/RUN position in order for the phone to charge.
-
To avoid interference with the key fob search, the wireless charging pad will stop charging when any door or liftgate is opened, even if the engine is running.
-
Be sure to place the mobile device correctly (display facing upward, and phone not covering the LED) on the wireless charging pad.
-
If the phone moves on the pad causing the red light to illuminate, the phone will have to be picked up and placed back on the charging pad to resume charging.
-
Wireless charging is not as fast as when the phone is connected to a wired charger.
-
The phone’s protective case must be removed when placed on the wireless charging pad.
-
iPhone 12 (including iPod) is equipped with software to protect the device from overheating. When the software is active, the rate of charge is slowed down to protect the device.
-
Phones must always be placed on the wireless charging pad within the outline shown on the pad so that its charging parts connect with the charging coils of the system. Movement of the phone during charging may prevent or slow the rate of charge.
-
Having multiple applications open on the phone while charging will reduce the charging efficiency, and may even shut down an application that is actively running (i.e. Apple CarPlay). This may also cause the phone to overheat.
-
Wireless chargers may implement certain methods to prevent the phone from overheating during charging such as slowing down the rate of charge. In certain instances, the device may shut down for a brief period of time (when the device reaches a certain temperature). If this happens, it does not mean there is a fault with the wireless charging pad. This may just be a protective measure to prevent damage to the phone.
-
The use of multiple wireless functions at the same time (wireless charging, Apple CarPlay, Android Auto) could cause the device to overheat, resulting in limitation of the functions or it turning off. In this case, it is recommended to connect the system using the USB port.
-
Do not place the key fob or any other type of metal/magnetized object inside the mobile phone housing or near the wireless charging pad.
-
With a compatible device placed on the charging pad, and the ignition is cycled to the OFF position, a reminder message may appear on the instrument cluster display to warn the driver.
CAUTION:
The key fob should not be placed on the charging pad or within 6 inches (15 cm) of it. Doing so can cause excessive heat buildup and damage to the fob. Placing the fob in close proximity of the charging pad blocks the fob from being detected by the vehicle and prevents the vehicle from starting.
Download Manual