Driving Information
Distracted Driving
Distraction comes in many forms and can take your focus from the task of driving. Exercise good judgment and do not let other activities divert your attention away from the road. Many local governments have enacted laws regarding driver distraction. Become familiar with the local laws in
your area.
To avoid distracted driving, keep your eyes on the road, keep your hands on the steering wheel, and focus your attention on driving.
Program all trip information into any navigation device prior to driving.
Refer to the infotainment section and/or infotainment manual on using that system and the navigation system, if equipped, including pairing and using a cell phone.
Defensive Driving
Defensive driving means “always expect the unexpected.” The first step in driving defensively is to wear the seat belt. See Seat Belts 0 67.
Death and injury associated with drinking and driving is a global tragedy.
Braking, steering, and accelerating are important factors in helping to control a vehicle while driving.
Braking action involves perception time and reaction time. Deciding to push the brake pedal is perception time. Actually doing it is
reaction time.
Average driver reaction time is about three-quarters of a second. In that time, a vehicle moving at 100 km/h (60 mph) travels 20 m (66 ft), which could be a lot of distance in an emergency.
Helpful braking tips to keep in mind include:
of you.
If the engine ever stops while the vehicle is being driven, brake normally but do not pump the brakes. Doing so could make the pedal harder to push down. If the engine stops, there will be some power brake assist but it will be used when the brake is applied.
Once the power assist is used up, it can take longer to stop and the brake pedal will be harder to push.
If the vehicle has electric power steering, it does not have power steering fluid. Regular maintenance is not required.
If power steering assist is lost due to a system malfunction, the vehicle can be steered, but may require increased effort. See your dealer if there is a problem.
If the steering wheel is turned until it reaches the end of its travel, and is held in that position for an extended period of time, power steering assist may be reduced.
If the steering assist is used for an extended period of time while the vehicle is not moving, power assist may be reduced.
Normal use of the power steering assist should return when the system cools down.
See your dealer if there is a problem.
(2500/3500 Series – All Regular Cab, Double Cab/Crew Cab without Digital Steer Assist)
The power steering system may require maintenance.
See Power Steering Fluid (1500 Series) 0 346 or Power Steering
Fluid (2500/3500 Series) 0 346.
If power steering assist is lost because the engine stops or the system malfunctions, the vehicle can be steered but may require increased effort. See your dealer.
(2500/3500 Series – Double Cab/ Crew Cab with Digital Steer Assist)
The vehicle has a Digital Steer Assist power steering system that varies the amount of effort required
to steer the vehicle. Less steering effort is required at slower speeds. At faster speeds, the steering effort increases. The system helps the steering wheel return to center at low speeds. Pressing the Tow/Haul button adjusts steering effort for driving conditions described in Tow/ Haul Mode 0 261.
The power steering system may require maintenance.
See Power Steering Fluid (1500 Series) 0 346 or Power Steering
Fluid (2500/3500 Series) 0 346.
If power steering assist is lost because the engine stops or the system malfunctions, the vehicle can be steered but may require increased effort. See your dealer.
a hand.

The vehicle's right wheels can drop off the edge of a road onto the shoulder while driving. Follow these tips:
There are three types of skids that correspond to the vehicle's three control systems:
Defensive drivers avoid most skids by taking reasonable care suited to existing conditions, and by not overdriving those conditions. But skids are always possible.
If the vehicle starts to slide, follow these suggestions:
Remember: Antilock brakes help avoid only the braking skid.
Four-wheel-drive vehicles can be used for off-road driving. Vehicles without four-wheel drive and vehicles not equipped with All Terrain (AT) or On-Off Road (OOR) tires must not be driven off-road except on a level, solid surface. For contact information about the original equipment tires, see the warranty manual.
One of the best ways for successful off-road driving is to control the speed.
if equipped.
To gain more ground clearance if needed, it may be necessary to remove the front fascia lower air dam, if equipped. However, driving without the air dam reduces fuel economy.
. Do not park over things that burn. See Parking over Things That Burn 0 254.
Driving safely on hills requires good judgment and an understanding of what the vehicle can and cannot do.
For more information about loading the vehicle, see Vehicle Load Limits 0 238 and Tires 0 371.
Before driving on a hill, assess the steepness, traction, and obstructions. If the terrain ahead cannot be seen, get out of the vehicle and walk the hill before driving further.
When driving on hills:
If the vehicle stalls on a hill:
R (Reverse), release the parking brake, and back straight down.
the hill.
P (Park), and turn the vehicle off.
A hill that can be driven straight up or down might be too steep to drive across. Driving across an incline puts more weight on the downhill wheels, which could cause a downhill slide or a rollover.
Use a low gear when driving in mud
— the deeper the mud, the lower the gear. Keep the vehicle moving to avoid getting stuck.
Traction changes when driving on sand. On loose sand, such as on beaches or sand dunes, the tires tend to sink into the sand. This affects steering, accelerating, and
braking. Drive at a reduced speed and avoid sharp turns or abrupt maneuvers.
Traction is reduced on hard packed snow and ice and it is easy to lose control. Reduce vehicle speed when driving on hard packed snow
and ice.
If the standing water is not too deep, drive through it slowly. At faster speeds, water can get into the engine and cause it to stall. Stalling can occur if the exhaust pipe is under water. Do not turn off the ignition when driving through water. If the exhaust pipe is under water, the engine will not start. When going through water, the brakes get wet
and it may take longer to stop. See “Driving on Wet Roads” later in this section.
Remove any brush or debris that has collected on the underbody or chassis, or under the hood. These accumulations can be a fire hazard.
After operation in mud or sand, have the brake linings cleaned and checked. These substances can cause glazing and uneven braking. Check the body structure, driveline, steering, suspension, wheels, tires, and exhaust system for damage and check the fuel lines and cooling system for any leakage.
More frequent maintenance service is required. See the Maintenance Schedule 0 431.
Rain and wet roads can reduce vehicle traction and affect your ability to stop and accelerate. Always drive slower in these types
of driving conditions and avoid driving through large puddles and deep-standing or flowing water.
Hydroplaning is dangerous. Water can build up under the vehicle's tires so they actually ride on the water. This can happen if the road is wet enough and you are going fast enough. When the vehicle is hydroplaning, it has little or no contact with the road.
There is no hard and fast rule about hydroplaning. The best advice is to slow down when the road is wet.
Besides slowing down, other wet weather driving tips include:
Driving on steep hills or through mountains is different than driving on flat or rolling terrain. Tips include:
Snow or ice between the tires and the road creates less traction or grip, so drive carefully. Wet ice can occur at about 0 °C (32 °F) when freezing rain begins to fall. Avoid driving on wet ice or in freezing rain until roads can be treated.
For Slippery Road Driving:
See Antilock Brake System (ABS) 0 270.
The surface of a curve or an overpass can remain icy when the surrounding roads are clear. Avoid sudden steering maneuvers and braking while on ice.
Stop the vehicle in a safe place and signal for help. Stay with the vehicle unless there is help nearby.
If possible, use Roadside Assistance. See Roadside Assistance Program 0 454. To get help and keep everyone in the vehicle safe:
To save fuel, run the engine for short periods to warm the vehicle and then shut the engine off and partially close the window. Moving about to keep warm also helps.
If it takes time for help to arrive, when running the engine, push the accelerator pedal slightly so the engine runs faster than the idle speed. This keeps the battery charged to restart the vehicle and to signal for help with the headlamps.
Do this as little as possible, to save fuel.
Slowly and cautiously spin the wheels to free the vehicle when stuck in sand, mud, ice, or snow. See “Rocking the Vehicle to Get It Out” later in this section.
The Traction Control/Electronic Stability Control can often help to free a stuck vehicle. See Traction Control/Electronic Stability Control 0 273. If TC/ESC cannot free the vehicle, see “Rocking the Vehicle to Get it Out” following.
For information about using tire chains on the vehicle, see Tire Chains 0 395.
Turn the steering wheel left and right to clear the area around the front wheels. For four-wheel-drive vehicles, shift into Four-Wheel Drive High. Turn the TCS off. Shift back and forth between R (Reverse) and a forward gear, spinning the wheels as little as possible. To prevent transmission wear, wait until the wheels stop spinning before shifting gears. Slowly spinning the wheels in the forward and reverse directions causes a rocking motion that could free the vehicle. If that does not get the vehicle out after a few tries, it might need to be towed out. See Towing the Vehicle 0 413. Recovery hooks can be used, if the vehicle has them.
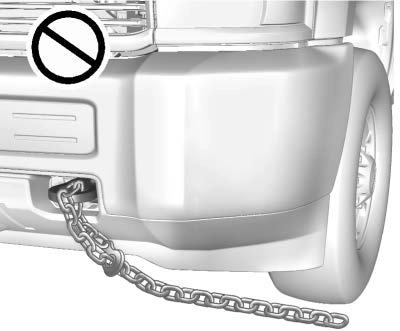
There are recovery hooks at the front of the vehicle. Use them if the vehicle is stuck off-road and needs to be pulled some place to continue driving.
Two labels on the vehicle may show how much weight it was designed to carry: the Tire and Loading Information label and the Certification/Tire label.
Tire and Loading Information Label
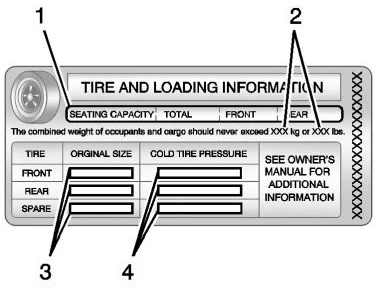
Label Example
(B-pillar). The Tire and Loading Information label shows the number of occupant seating positions (1), and the maximum vehicle capacity weight (2) in kilograms and pounds.
The Tire and Loading Information label also shows the size of the original equipment
tires (3) and the recommended cold tire inflation pressures (4). For more information on tires and inflation see Tires 0 371
and Tire Pressure 0 379.
“Steps for Determining Correct Load Limit–
1400 lbs. and there will be five 150 lb passengers in your vehicle, the amount of available cargo and luggage load capacity is 650 lbs. (1400-750 (5 x 150) =
650 lbs.)
your vehicle. Consult this manual to determine how this reduces the available cargo and luggage load capacity of your vehicle.”
See Trailer Towing 0 298 for important information on towing a trailer, towing safety rules, and trailering tips.
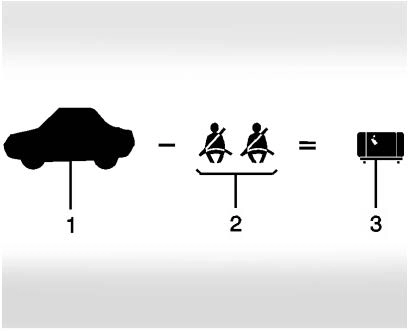
Example 1
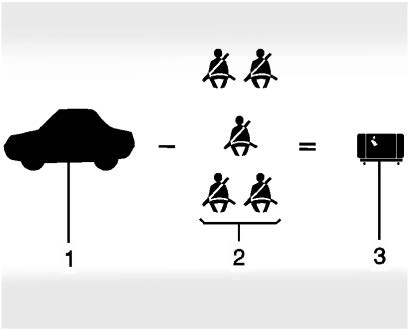
Example 2
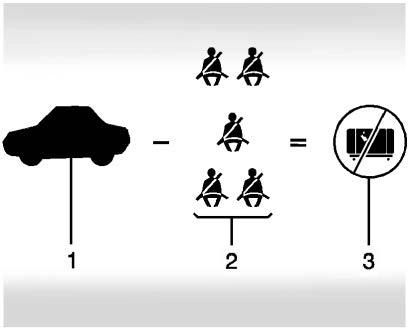
Example 3
of the driver, passengers, and cargo should never exceed the vehicle's capacity weight.
Certification/Tire Label
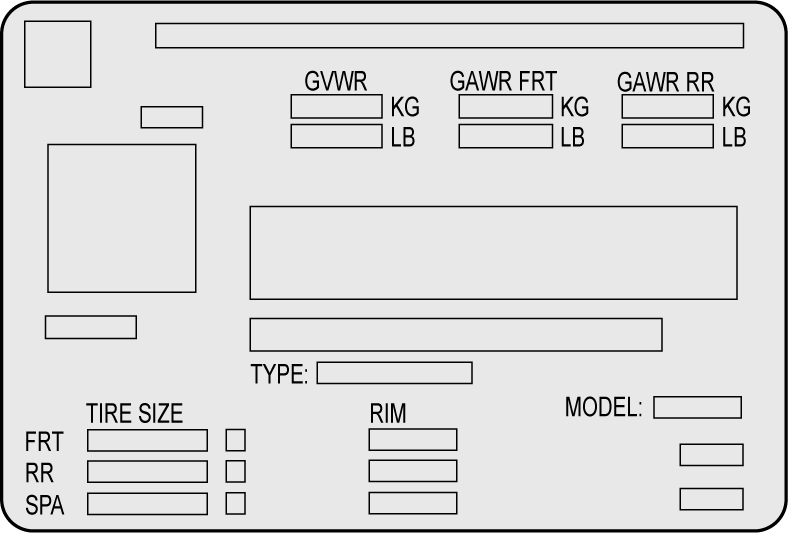
Rating (GVWR). The GVWR
includes the weight of the vehicle, all occupants, fuel, and cargo.
The Certification/Tire label also may show the maximum weights for the front and rear axles, called Gross Axle Weight
Rating (GAWR). To determine the actual loads on the front and rear axles, weigh the vehicle at a weigh station. Your dealer can help with this. Be sure to spread the load equally on both sides of the centerline.
The Certification/Tire label also contains important information about the Front Axle Reserve Capacity. See Adding a Snow Plow or Similar Equipment
0 319.
There is also important loading information for off-road driving in this manual. See “Loading the Vehicle for Off-Road Driving“ under Off-Road Driving 0 230.
Two-Tiered Loading
Depending on the model of the pickup, an upper load platform can be created by positioning three or four 5 cm (2 in) by
15 cm (6 in) wooden planks across the width of the pickup box. The planks must be inserted in the pickup box depressions.
When using this upper load platform, be sure the load is securely tied down to prevent it from shifting. The load's center of gravity should be positioned in a zone over the rear axle. The zone is located in the area between the front of each wheel well and the rear of each wheel
well. The center of gravity height must not extend above the top of the pickup box flareboard.
Any load that extends beyond the vehicle's taillamp area must be properly marked according to local laws and regulations.
Remember not to exceed the Gross Axle Weight
Rating (GAWR) of the front or rear axle.
Add-On Equipment
When carrying removable items, a limit on how many people carried inside the vehicle may be necessary. Be sure to weigh the vehicle before buying and installing the new equipment.
Remember not to exceed the Gross Axle Weight
Rating (GAWR) of the front or rear axle.
Loading Points

Structural members (1) and (2) are included in the pickup box design. Additional accessories should use these load points. Depending on the accessory design, use a spacer under the accessory at the load points to remove gap. The holes for GM approved accessories (3) are not intended for aftermarket
equipment. See www.gmupfitter.com for additional pickup box load bearing structural information.
Your dealer can help make a good vehicle-camper match and help determine the Cargo Weight Rating (CWR).
When installing and loading a slide-in camper, check the manufacturer's instructions.
When carrying a slide-in camper, the total cargo load of the vehicle is the weight of the camper plus:
The CWR is the maximum weight of the load the vehicle can carry. It does not include the weight of the people inside. But, use about 68 kg (150 lb) for each seat.
The total cargo load must not be more than the vehicle's CWR.
Refer to the Truck-Camper Loading Information label in the glove box for dimensions A and B as shown in the following illustration.
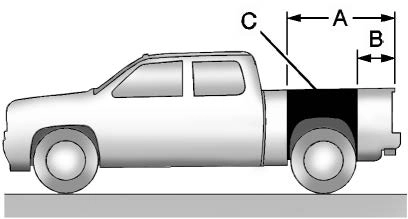
Use the rear edge of the load floor for measurement purposes. The recommended location for the cargo center of gravity is at point C for the CWR. It is the point where the mass of a body is concentrated and,
if suspended at that point, would balance the front and rear.
Here is an example of proper truck and camper match:
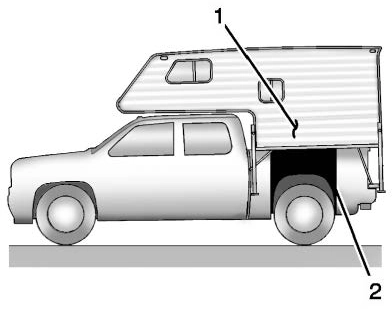
When the truck is used to carry a slide-in camper, the total cargo load of the truck consists of the manufacturer's camper weight figure, the weight of installed additional camper equipment not included in the manufacturer's camper weight figure, the weight
of camper cargo, and the weight of passengers in the camper.
The total cargo load should not exceed the truck's cargo weight rating, and the camper's center of gravity (1) should fall within the truck's recommended center of gravity zone (2) when installed.
Any accessories or other equipment that are added to the vehicle must be weighed. Then, subtract this extra weight from the CWR. This extra weight may shorten the center of gravity zone of the vehicle.
If the slide-in camper and its load weighs less than the CWR, the center of gravity zone for the vehicle may be larger.
Secure loose items to prevent weight shifts that could affect the balance of the vehicle. When the truck-camper is loaded, drive to a scale and weigh on the front and on the rear wheels
separately to determine axle loads. Individual axle loads should not exceed either of the gross axle weight ratings (GAWR). The total axle
loads should not exceed the vehicle's gross vehicle weight rating (GVWR). These ratings are given on the Certification/ Tire label attached to the
B-pillar. See “Certification/Tire Label” under Vehicle Load Limits 0 238. If weight ratings are exceeded, move or remove items to bring all weights below the ratings.
See your dealer for more information on curb weights, cargo weights, Cargo Weight Rating, and the correct center of gravity zone.
Download Manual