Trailer Towing
General Towing Information
Only use towing equipment that has been designed for the vehicle.
Contact your dealer or trailering dealer for assistance with preparing the vehicle to tow a trailer. Read the entire section before towing a trailer.
To tow a disabled vehicle, see Towing the Vehicle 0 314. To tow the vehicle behind another vehicle such as a motor home, see Recreational Vehicle Towing 0 315.
Trailering is different than just driving the vehicle by itself. Trailering means changes in handling, acceleration, braking, durability, and fuel economy.
Successful, safe trailering takes correct equipment, and it has to be used properly.
The following information has many time-tested, important trailering tips and safety rules. Many of these are
important for your safety and that of your passengers. Read this section carefully before pulling a trailer.
When towing a trailer:
Tow/Haul Mode is recommended for heavier trailers. See Tow/ Haul Mode 0 188. If the transmission downshifts too often, a lower gear may be selected using Manual Mode.
See Manual Mode 0 185.
If equipped, the following driver assistance features should be turned off when towing a trailer:
If equipped, the following driver assistance features should be turned to alert or off when towing a trailer:
If equipped with Lane Change Alert (LCA), the LCA detection zones that extend back from the side of the vehicle do not move further back when a trailer is towed. Use caution while changing lanes when towing a trailer.
If equipped with Rear Cross Traffic Alert (RCTA), use caution while backing up when towing a trailer, as the RCTA detection zones that extend out from the back of the vehicle do not move further back when a trailer is towed.
Towing a trailer requires experience. The combination of the vehicle and trailer is longer and not as responsive as the vehicle itself. Get used to the handling and braking of the combination by driving on a level road surface before driving on public roads.
The trailer structure, the tires, and the brakes must all be rated to carry the intended cargo. Inadequate trailer equipment can cause the combination to operate in an unexpected or unsafe manner.
Before driving, inspect all trailer hitch parts and attachments, safety chains, electrical connectors, lamps,
tires, and mirrors. See Towing Equipment 0 229. If the trailer has electric brakes, start the combination moving and then manually apply the trailer brake controller to check the trailer brakes work. During the trip, occasionally check that the cargo and trailer are secure and that the lamps and any trailer brakes are working.
When towing, the stability control system might be heard. The system reacts to vehicle movement caused by the trailer, which mainly occurs during cornering. This is normal when towing heavier trailers.
Stay at least twice as far behind the vehicle ahead as you would when driving without a trailer. This can help to avoid heavy braking and sudden turns.
More passing distance is needed when towing a trailer. The combination of the vehicle and trailer will not accelerate as quickly and is much longer than the vehicle alone. It is necessary to go much farther beyond the passed vehicle before returning to the lane. Pass on level roadways. Avoid passing on hills if possible.
Hold the bottom of the steering wheel with one hand. To move the trailer to the left, move that hand to the left. To move the trailer to the right, move that hand to the right. Always back up slowly and,
if possible, have someone guide you.
Make wider turns than normal when towing, so trailer will not go over soft shoulders, over curbs, or strike road signs, trees, or other objects.
Always signal turns well in advance. Do not steer or brake suddenly.
Reduce speed and shift to a lower gear before starting down a long or steep downhill grade. If the transmission is not shifted down, the brakes may overheat and result in reduced braking efficiency.
The vehicle can tow in D (Drive). Shift the transmission to a lower gear if the transmission shifts too often under heavy loads and/or hilly conditions.
When towing at higher altitudes, engine coolant will boil at a lower temperature than at lower altitudes. If the engine is turned off immediately after towing at high altitude on steep uphill grades, the vehicle could show signs similar to engine overheating. To avoid this, let the engine run, preferably on level ground, with the transmission in P (Park) for a few minutes before turning the engine off. If the overheat warning comes on, see Engine Overheating 0 256.
When parking your vehicle and your trailer on a hill:
If equipped with a manual transmission, move the shift lever into R (Reverse) if parking on a downhill slope, or shift into 1 (first) gear if parking on an uphill slope.
Backing the Trailer into the Water
Disconnect the wiring to the trailer before backing the trailer into the water to prevent damage to the electrical circuits on the trailer.
Reconnect the wiring to the trailer after removing the trailer from the water. If the trailer has electric brakes that can function when the trailer is submerged, it might help to leave the electrical trailer connector attached to maintain trailer brake functionality while on the boat ramp.
To back the trailer into the water:
1 (First) gear.
the vehicle can be shifted from four-wheel-drive high. Shift into the drive mode that is appropriate for the road conditions.
The vehicle needs service more often when used to tow trailers. See Maintenance Schedule 0 331. It is especially important to check the automatic transmission fluid, engine oil, axle lubricant, belts, cooling system, and brake system before and during each trip.
Check periodically to see that all nuts and bolts on the trailer hitch are tight.
The cooling system may temporarily overheat during severe operating conditions. See Engine Overheating 0 256.
If equipped with a diesel engine, see the Duramax diesel supplement.
Trailering is different than just driving the vehicle by itself. Trailering means changes in handling, acceleration, braking, durability, and fuel economy.
Successful, safe trailering takes correct equipment, and it has to be used properly.
The following information has many time-tested, important trailering tips and safety rules. Many of these are important for your safety and that of your passengers. Read this section carefully before pulling a trailer.
Safe trailering requires monitoring the weight, speed, altitude, road grades, outside temperature, and how frequently the vehicle is used to tow a trailer.
When towing a trailer, the combined weight of the vehicle, vehicle contents, trailer, and trailer contents must be below all of the maximum weight ratings for the vehicle, including:
See “Weight-Distributing Hitch Adjustment” under Towing Equipment 0 229 to determine if equalizer bars are required to obtain the maximum trailer weight rating.
See “Trailer Brakes” under Towing Equipment 0 229 to determine if brakes are required based on your trailer's weight.
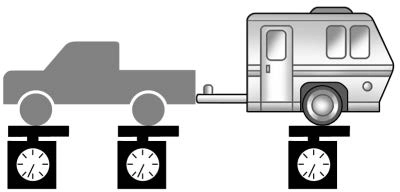
The only way to be sure the weight is not exceeding any of these ratings is to weigh the tow vehicle and trailer combination, fully loaded for the trip, getting individual weights for each of these items.
GCWR is the total allowable weight of the completely loaded vehicle and trailer including any fuel, passengers, cargo, equipment, and accessories. Do not exceed the
GCWR for your vehicle. The GCWR for the vehicle is on the Tow Rating Chart following.
To check that the weight of the vehicle and trailer are within the GCWR for the vehicle, follow these steps:
or sway bars.
The resulting weight cannot exceed the GCWR for the vehicle.
The gross combined weight can also be confirmed by weighing the truck and trailer on a public scale. The truck and trailer should be loaded for the trip with passengers and cargo.
For information about the vehicle's maximum load capacity, see Vehicle Load Limits 0 168. When calculating the GVWR with a trailer attached, the trailer tongue weight must be included as part of the weight the vehicle is carrying.
The maximum trailer weight rating is calculated assuming the tow vehicle has a driver, a front seat passenger, and all required trailering equipment. This value represents the heaviest trailer the vehicle can tow, but it may be necessary to reduce the trailer weight to stay within the GCWR, GVWR, maximum trailer tongue load, or GAWR-RR for the vehicle.
Use the tow rating chart to determine how much the trailer can weigh, based on the vehicle model, powertrain and trailering options.
Weights listed apply for conventional trailers unless otherwise noted.
|
SAE J2807 Compliant |
|||
|
Engine |
Axle Ratio |
Maximum Trailer Weight |
GCWR (a) |
|
2.5L L4 |
4.10 |
1 587 kg (3,500 lb) |
3 856 kg (8,500 lb) |
|
3.6L V6 * |
3.42 |
3 175 kg (7,000 lb) |
5 443 kg (12,000 lb) |
|
3.6L V6 (ZR2) |
3.42 |
2 268 kg (5,000 lb) |
4 672 kg (10,300 lb) |
|
(a) The Gross Combination Weight Rating (GCWR) is the total allowable weight of the completely loaded vehicle and trailer including any passengers, cargo, equipment, and conversions. The GCWR for the vehicle should not be exceeded. (*) Valid only for vehicles with Z82 trailering package. If the vehicle has a bumper mounted hitch then the maximum trailer weight is limited to 1 587 kg (3,500 lb) and GCWR is limited to 3 856 kg (8,500 lb). |
A step bumper trailer hitch can only support a total trailer weight up to 2,271 kg (5,000 lb). If a trailer hitch ball is added to the step bumper, check the hitch ball rating to be sure it is higher than the total trailer weight.
The Maximum Trailer Tongue Weight Rating is the allowable trailer tongue weight that the vehicle can support using a conventional trailer hitch. It may be necessary to reduce the overall trailer weight to stay within the maximum trailer tongue weight rating while still maintaining the correct trailer load balance.
Do not exceed a maximum trailer tongue weight of 349 (770 lb).
The trailer tongue weight contributes to the Gross Vehicle Weight (GVW). GVW includes the curb weight of your vehicle, any passengers, cargo, equipment, and the trailer tongue weight. Vehicle options, passengers, cargo, and equipment reduce the maximum allowable tongue weight the vehicle can carry, which also reduces the maximum allowable trailer weight.
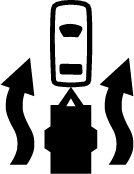
The correct trailer load balance must be maintained to ensure trailer stability. Incorrect load balance is a leading cause of trailer sway.
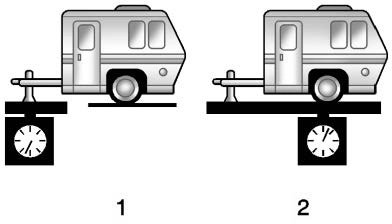
The trailer tongue weight (1) should be 10–15% of the total loaded trailer weight (2). Some specific trailer types, such as boat trailers, fall outside of this range. Always refer to the trailer owner's manual for the recommended trailer tongue weight for each trailer. Never exceed the maximum loads for the vehicle, hitch and trailer.
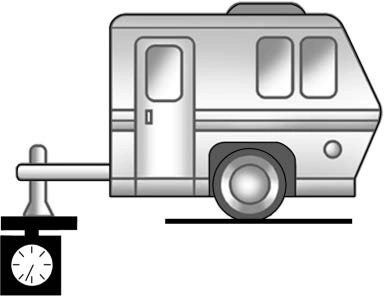
After loading the trailer, separately weigh the trailer and then the trailer tongue and calculate the trailer load balance percentage to see if the weights and distribution are
appropriate for your vehicle. If the trailer weight is too high, it may be possible to transfer some of the cargo into your vehicle. If the trailer tongue weight is too high or too low, it may be possible to rearrange some of the cargo inside of the trailer.
Do not exceed the maximum allowable tongue weight for your vehicle. Use the shortest hitch extension available to position the hitch ball closer to your vehicle. This will help reduce the effect of the trailer tongue weight on the trailer hitch and the rear axle.
If a cargo carrier is used in the trailer hitch receiver, choose a carrier that positions the load as close to the vehicle as possible. Make sure the total weight, including the carrier, is no more than half of the maximum allowable tongue weight for the vehicle or 227 kg (500 lb), whichever is less.
The GAWR-RR is the total weight that can be supported by the rear axle of the vehicle. Do not exceed the GAWR-RR for the vehicle, with the tow vehicle and trailer fully loaded for the trip including the weight of the trailer tongue. If using a weight-distributing hitch, do not exceed the GAWR-RR before applying the weight distribution spring bars.
Ask your dealer for trailering information or assistance.
Always use the correct hitch equipment for your vehicle. Crosswinds, large trucks going by, and rough roads can affect the trailer and the hitch.
Proper hitch equipment for your vehicle helps maintain control of the vehicle-trailer combination. Many trailers can be towed using a
weight-carrying hitch which has a coupler latched to the hitch ball, or a tow eye latched to a pintle hook.
Other trailers may require a weight-distributing hitch that uses spring bars to distribute the trailer
tongue weight between your vehicle and trailer axles. See “Maximum Trailer Tongue Weight” under Trailer Towing 0 224 for weight limits with various hitch types.
Avoid sharp turns when using a step-bumper hitch to prevent damage. Make wider turns to prevent contact between your trailer and your bumper.
Consider using mechanical sway controls with any trailer. Ask a trailering professional about sway controls or refer to the trailer manufacturer's recommendations and instructions.
A weight-distributing hitch may be useful with some trailers.
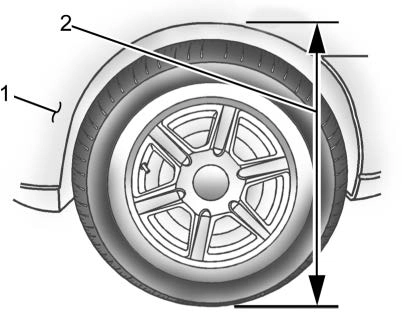
When using a weight-distributing hitch, measure the front fender height distance (2) before connecting the trailer. Adjust the spring bars until the front fender height distance (2) is the same height before the trailer was connected. Do not reduce the front fender height below the initial distance (2).
Always attach chains between the vehicle and the trailer, and attach the chains to the holes on the trailer hitch platform. Instructions about safety chains may be provided by the hitch manufacturer or by the trailer manufacturer.
Cross the safety chains under the tongue of the trailer to help prevent the tongue from contacting the road if it becomes separated from the hitch. Always leave just enough slack so the combination can turn. Never allow safety chains to drag on the ground.
Loaded trailers over 900 kg (2,000 lb) must be equipped with brake systems and with brakes for
each axle. Trailer braking equipment conforming to Canadian Standards Association (CSA) requirement CAN3-D313, or its equivalent, is recommended.
State or local regulations may require trailers to have their own braking system if the loaded weight of the trailer exceeds certain minimums that can vary from state to state. Read and follow the instructions for the trailer brakes so they are installed, adjusted, and maintained properly. Never attempt to tap into your vehicle's hydraulic brake system. If you do, both the vehicle anti-lock brakes and the trailer brakes may not function, which could result in a crash.
For vehicles not equipped with heavy-duty trailering, a harness is secured underneath the left side of the vehicle, next to the spare tire.
The harness requires the installation of a trailer connector, which is available through your dealer. The seven-wire harness contains the following trailer circuits:
(non-vehicle) battery, press the Tow/ Haul Mode button on the center stack. If the trailer is too light for Tow/Haul Mode, turn on the headlamps to help charge the battery.
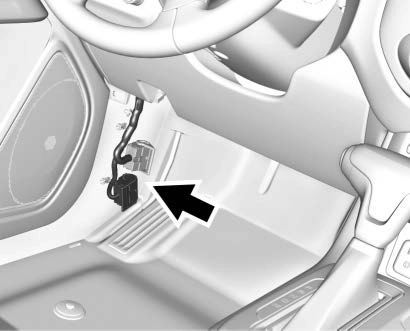
A four-wire harness, without connector, is secured behind the left side kick panel. The harness contains the following circuits:
To remove the left side kick panel, start at the front of the panel pulling toward the rear of the vehicle and lift upward to disengage the integral clips.
When properly connected, the trailer turn signals will illuminate to indicate the vehicle is turning, changing lanes, or stopping. When towing a trailer, the arrows on the instrument cluster will illuminate even if the trailer is not properly connected or the bulbs are burned out.
For instructions on how to enter Tow/Haul Mode, see Tow/Haul Mode 0 188.
Tow/Haul assists when pulling a heavy trailer or a large or
heavy load.
Tow/Haul Mode is designed to be most effective when the vehicle and trailer combined weight is at least 75% of the vehicle's Gross
Combined Weight Rating (GCWR). See “Weight of the Trailer” under Trailer Towing 0 224.
Tow/Haul Mode is most useful when towing a heavy trailer or carrying a large or heavy load:
Operating the vehicle in Tow/Haul Mode when lightly loaded or not towing will not cause damage; however, it is not recommended and may result in unpleasant engine and transmission driving characteristics and reduced fuel economy.
The vehicle may have an Integrated Trailer Brake Control (ITBC) system for use with electric trailer brakes or most electric over hydraulic trailer brake systems. These instructions apply to both types of electric trailer brakes.

This symbol is on the Trailer Brake Control Panel on vehicles with an ITBC system. The power output to the trailer brakes is proportional to the amount of vehicle braking. This available power output to the trailer brakes can be adjusted to a wide range of trailering situations.
The ITBC system is integrated with the vehicle's brake, antilock brake, and StabiliTrak/Electronic Stability Control (ESC) systems. In trailering conditions that cause the vehicle's antilock brake or StabiliTrak/ESC systems to activate, power sent to the trailer's brakes will be automatically adjusted to minimize trailer wheel lock-up. This does not imply that the trailer has StabiliTrak/ESC.
If the vehicle's brake, anti-lock brake, or StabiliTrak/ESC systems are not functioning properly, the
ITBC system may not function fully or at all. Make sure all of these systems are fully operational to allow the ITBC system to function properly.
The ITBC system is powered through the vehicle's electrical system. Turning the ignition off will also turn off the ITBC system. The ITBC system is fully functional only when the ignition is in ON/RUN.
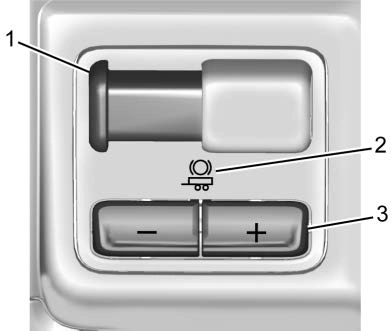
The ITBC control panel is on the instrument panel to the right of the steering column. See Instrument Panel 0 6. The control panel allows adjustment to the amount of output, referred to as Trailer Gain, available to the trailer brakes and allows manual application of the trailer brakes. Use the ITBC control panel
and the DIC trailer brake display page to adjust and display power output to the trailer brakes.
The ITBC display page indicates:
TRAILER GAIN: Press a Trailer Gain button to recall the current Trailer Gain setting. Each press and release of the gain buttons will then change the Trailer Gain setting.
Press the Trailer Gain (+) or (−) to adjust. Press and hold to continuously adjust the Trailer Gain. To turn the output to the trailer off,
adjust the Trailer Gain setting to 0.0. This setting can be adjusted from
0.0 to 10.0 with a trailer connected or disconnected.
TRAILER OUTPUT: This displays anytime a trailer with electric brakes is connected. Output to the trailer brakes is based on the amount of vehicle braking present and relative to the Trailer Gain setting. Output is displayed from 0 to 100% for each gain setting.
The Trailer Output will indicate
“ ” on the Trailer Brake Display Page whenever the following occur:
message displays on the DIC.
message displays in the DIC.
Slide this lever right to apply the trailer's electric brakes independent of the vehicle's brakes. Use this lever to adjust Trailer Gain to achieve proper power output to the trailer brakes. The trailer's and the vehicle's brake lamps will come on when either vehicle brakes or manual trailer brakes are applied and properly connected.
Trailer Gain should be set for a specific trailering condition and it must be readjusted anytime vehicle loading, trailer loading, or road surface conditions change.
To adjust Trailer Gain for each towing condition:
(20 - 25 mph) and fully apply the Manual Trailer Brake Apply Lever.
Adjusting Trailer Gain at speeds lower than 32 to
40 km/h (20 to 25 mph) may result in an incorrect gain setting.
Trailer wheel lock-up may not occur if towing a heavily loaded trailer. Adjust the Trailer Gain to the highest allowable setting for the towing condition.
lock-up is noticed at any time while towing.
TRAILER CONNECTED: This
message will briefly display when a trailer with electric brakes is first connected to the vehicle. This message will automatically turn off in about 10 seconds. This message can be acknowledged before it automatically turns off.
CHECK TRAILER WIRING: This
message will display if:
If the disconnect occurs while the vehicle is stationary, this message will automatically turn off in about 30 seconds. This message will also turn off if it is acknowledged or if the trailer harness is reconnected.
If the disconnect occurs while the vehicle is moving, this message will continue until the ignition is turned off. This message will also turn off if it is acknowledged or if the trailer harness is reconnected.
To determine whether the electrical fault is on the vehicle side or trailer side of the trailer wiring harness connection:
If the CHECK TRAILER WIRING
message only reappears when connecting the trailer wiring harness to the vehicle, the electrical fault is on the trailer side.
SERVICE TRAILER BRAKE
SYSTEM: This message will display when there is a problem with the ITBC system. If this message continues over multiple ignition cycles, have the vehicle serviced.
If either the CHECK TRAILER WIRING or SERVICE TRAILER
BRAKE SYSTEM message displays
while driving, the ITBC system may not be fully functional or may not function at all. When traffic conditions allow, carefully pull the vehicle over to the side of the road and turn the ignition off. Check the wiring connection to the trailer and turn the ignition back on. If either of these messages continues, either the vehicle or trailer needs service.
A GM dealer may be able to diagnose and repair problems with the trailer. However, any diagnosis and repair of the trailer is not covered under the vehicle warranty. Contact your trailer dealer for assistance with trailer repairs and trailer warranty information.
Vehicles with StabiliTrak/Electronic Stability Control (ESC) have a Trailer Sway Control (TSC) feature.
Trailer sway is unintended
side-to-side motion of a trailer while towing. If the vehicle is towing a trailer and the TSC detects that sway is increasing, the vehicle
brakes are selectively applied at each wheel, to help reduce excessive trailer sway. If equipped with the Integrated Trailer Brake Control (ITBC) system, and the trailer has an electric brake system, StabiliTrak/ESC may also apply the trailer brakes.

If TSC is enabled, the Traction Control System (TCS)/StabiliTrak/ ESC warning light will flash on the instrument cluster. Reduce vehicle speed by gradually removing your foot from the accelerator. If trailer sway continues, StabiliTrak/ESC can reduce engine torque to help
slow the vehicle. TSC will not function if StabiliTrak/ESC is turned off. See Traction Control/Electronic Stability Control 0 199.
Some trailers may come equipped with an electronic device designed to reduce or control trailer sway. Aftermarket equipment manufacturers also offer similar devices that connect to the wiring between the trailer and the vehicle. These devices may interfere with the vehicle's trailer brake or other systems, including integrated
anti-sway systems, if equipped. Messages related to trailer connections or trailer brakes could appear on the DIC. The effects of these aftermarket devices may have on vehicle handling or trailer brake performance is not known.
Special Trailer (ST) tires differ from vehicle tires. Trailer tires are designed with stiff sidewalls to help prevent sway and to support heavy loads. These features can make it difficult to determine if the trailer tire pressures are low only based on a visual inspection.
Always check all trailer tire pressures before each trip when the tires are cool. Low trailer tire pressure is a leading cause of trailer tire blow-outs.
Trailer tires deteriorate over time. The trailer tire sidewall will show the week and year the tire was manufactured. Many trailer tire manufacturers recommend replacing tires more than six
years old.
Overloading is another leading cause of trailer tire blow-outs. Never load your trailer with more weight than the tires are designed to support. The load rating is located on the trailer tire sidewall.
Always know the maximum speed rating for the trailer tires before driving. This may be significantly lower than the vehicle tire speed rating. The speed rating may be on the trailer tire sidewall. If the speed rating is not shown, the default trailer tire speed rating is 105 km/h (65 mph).
Download Manual