Steps to take in an emergency
Do not tow with a sling-type truck to prevent body damage.
8-2. Steps to take in an emergency
541
Use a towing dolly under the rear wheels.
From the rear
Use a towing dolly under the front wheels.
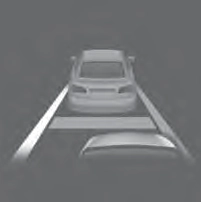
If your vehicle is transported by a flatbed truck, it should be tied down at the locations shown in the
illustration. 8
If you use chains or cables to tie down your vehicle, the angles shaded in black must be 45°.
Do not overly tighten the tie downs or the vehicle may be dam- aged.
542 8-2. Steps to take in an emergency
A driver must be in the vehicle to steer and operate the brakes. The vehicle’s wheels, drive train, axles, steering and brakes must be in good condition.
Type A Type B
If the engine does not start, turn the engine switch to the “ON” posi- tion.
8-2. Steps to take in an emergency
543
WARNING
Observe the following precautions.
Failure to do so may result in death or serious injury.
2WD models: Be sure to transport the vehicle with all four wheels raised off the ground. If the vehicle is towed with the tires contacting the ground, the drivetrain and related parts may be damaged or an accident may occur due to a change in direction of the vehicle.
4WD models: Be sure to transport the vehicle with all four wheels raised off the ground. If the vehicle is towed with the tires contacting the ground, the drivetrain or related parts may be damaged, the vehicle may fly off the truck.
There is a possibility that the steering wheel is locked and cannot be oper- ated.
8
544 8-2. Steps to take in an emergency
8-2. Steps to take in an emergency
545
(Water dripping from the air conditioning after use is normal.)
546 8-2. Steps to take in an emergency
8
|
Warning light |
Warning light/Details/Actions |
|
(U.S.A.) (Canada) |
ABS warning light Indicates a malfunction in: The ABS; or
The brake assist system
Have the vehicle inspected by your Toyota dealer immediately. |
|
Low fuel level warning light Standard fuel tank Indicates remaining fuel is approximately 4.0 gal. (15.0 L, 3.3 Imp.gal.) or less Large fuel tank Indicates remaining fuel is approximately 3.8 gal. (14.4 L, 3.2 lmp.gal.) or less Refuel the vehicle. |
|
|
Seat belt reminder light (warning buzzer)*1 Warns the driver and/or front passenger to fasten their seat belts Fasten the seat belt. If the front passenger’s seat is occupied, the front passenger’s seat belt also needs to be fastened to make the warning light (warning buzzer) turn off. |
|
|
Master warning light A buzzer sounds and the warning light comes on and flashes to indicate that the master warning system has detected a malfunction. P. 555 |
|
|
(U.S.A.) (Canada) |
Parking brake warning light (warning buzzer)*2 Indicates that the parking brake is engaged. Release the parking brake. |
|
Warning light |
Warning light/Details/Actions |
|
Tire pressure warning light |
|
|
When the light comes on: Low tire inflation pressure such as Natural causes (P. 552)
Flat tire (P. 565)
Adjust the tire inflation pressure to the specified level. The light will turn off after a few minutes. In case the light does not turn off even if the tire inflation pressure is adjusted, have the system checked by your Toyota dealer. |
|
|
When the light comes on after blinking for 1 minute: Malfunction in the tire pressure warning system. Have the system checked by your Toyota dealer. |
|
|
Slip indicator Indicates a malfunction in: The VSC system;
Trailer Sway Control system;
The TRAC system;
The hill-start assist control system; or
The AUTO LSD system.
Have the vehicle inspected by your Toyota dealer immediately. The light will flash when any of the above systems other than the hill-start assist control are operating. |
8
|
Warning light |
Warning light/Details/Actions |
|
(Flashes or illuminates) |
PCS warning light (If equipped) Indicates a malfunction in the PCS (Pre-Collision System) or that the system is temporarily unavailable due to the vehicle being extremely hot/cold, or dirt around a front sensor, etc. (P. 242, 555) Follow the instructions displayed on the multi-infor- mation display. (P. 242, 555) If the PCS (Pre-Collision System) or VSC (Vehicle Stability Control) system is disabled, the PCS warning light will illu- minate. P. 242 |
|
(Yellow) |
LDA (Lane Departure Alert) indicator (If equipped) The indicator comes on and a warning message is dis- played to indicate that the LDA (Lane Departure Alert) system is not available temporarily or has detected a mal- function. P. 555 |
*1: Driver’s seat belt buzzer:
The driver’s seat belt buzzer sounds to alert the driver that his or her seat belt is not fastened. Once the engine switch is turned to the “ON” or “START” position, the buzzer sounds for 6 seconds. If the vehicle reaches a speed of 12 mph (20 km/h), the buzzer sounds once. If the seat belt is still unfastened after 30 seconds, the buzzer will sound intermittently for 10 seconds. Then, if the seat belt is still unfastened, the buzzer will sound in a different tone for 20 more seconds.
Front passenger’s seat belt buzzer:
The front passenger’s seat belt buzzer sounds to alert the front passenger that his or her seat belt is not fastened. The buzzer sounds once if the vehicle reaches a speed of 12 mph (20 km/h). If the seat belt is sill unfas- tened after 30 seconds, the buzzer will sound intermittently for 10 seconds. Then, if the seat belt is still unfastened, the buzzer will sound in a different tone for 20 more seconds.
*2: Parking brake engaged warning buzzer:
A buzzer will sound if the vehicle is driven at a speed of approximately 3 mph (5 km/h) or more.
This warning light system monitors the airbag sensor assembly, front impact sensors, side impact sensors (front door), side impact sensors (rear), driver’s seat position sensor, driver’s seat belt buckle switch, front passenger occu- pant classification system (ECU and sensors), “AIR BAG ON” indicator light, “AIR BAG OFF” indicator light, front passenger’s seat belt buckle switch, seat belt pretensioners assemblies, airbags, interconnecting wiring and power sources. (P. 40)
First check the following:
If it is, fill the fuel tank immediately.
The light will go off after several driving trips.
If the light does not go off even after several trips, contact your Toyota dealer as soon as possible.
Check the tire inflation pressure and adjust to the appropriate level. Push- ing the tire pressure warning reset switch will not turn off the tire pressure warning light.
8
The temporary spare tire is not equipped with a tire pressure warning valve and transmitter. If a tire goes flat, the tire pressure warning light will not turn off even though the flat tire has been replaced with the temporary spare tire. Replace the temporary spare tire with the repaired tire and adjust the tire inflation pressure. The tire pressure warning light will go off after several minutes.
P. 501
If the tire pressure warning light frequently comes on after blinking for 1 minute when the engine switch is turned to “ON” position, have it checked by your Toyota dealer.
In some cases, the buzzer may not be heard because of noisy place or an audio sound.
8-2. Steps to take in an emergency
553
WARNING
Stop your vehicle in a safe place immediately and contact your Toyota dealer. The vehicle will become extremely unstable during braking, and the ABS system may fail, which could cause an accident resulting in death or serious injury.
Be sure to observe the following precautions. Failure to do so could cause a loss of vehicle control and result in death or serious injury.
The tire pressure warning system may not activate immediately.
Each tire, including the spare (if provided), should be checked monthly when cold and inflated to the inflation pressure recommended by the vehicle manufacturer on the vehicle placard or tire inflation pressure label (tire and load information label). (If your vehicle has tires of a dif- ferent size than the size indicated on the vehicle placard or tire inflation pressure label [tire and load information label], you should determine the proper tire inflation pressure for those tires.)
As an added safety feature, your vehicle has been equipped with a tire pressure monitoring system (TPMS-tire pressure warning system) that 8
illuminates a low tire pressure telltale (tire pressure warning light) when
one or more of your tires is significantly under-inflated. Accordingly, when the low tire pressure telltale (tire pressure warning light) illumi- nates, you should stop and check your tires as soon as possible, and inflate them to the proper pressure. Driving on a significantly under- inflated tire causes the tire to overheat and can lead to tire failure. Under-inflation also reduces fuel efficiency and tire tread life, and may affect the vehicle’s handling and stopping ability.
554 8-2. Steps to take in an emergency
WARNING
Please note that the TPMS (tire pressure warning system) is not a sub- stitute for proper tire maintenance, and it is the driver’s responsibility to maintain correct tire pressure, even if under-inflation has not reached the level to trigger illumination of the TPMS low tire pressure telltale (tire pressure warning light).
Your vehicle has also been equipped with a TPMS (tire pressure warn- ing system) malfunction indicator to indicate when the system is not operating properly. The TPMS (tire pressure warning system) malfunc- tion indicator is combined with the low tire pressure telltale (tire pressure warning light). When the system detects a malfunction, the telltale will flash for approximately one minute and then remain continuously illumi- nated. This sequence will continue upon subsequent vehicle start-ups as long as the malfunction exists. When the malfunction indicator is illu- minated, the system may not be able to detect or signal low tire pres- sure as intended.
TPMS (tire pressure warning system) malfunctions may occur for a vari- ety of reasons, including the installation of replacement or alternate tires or wheels on the vehicle that prevent the TPMS (tire pressure warning system) from functioning properly. Always check the TPMS (tire pres- sure warning system) malfunction telltale after replacing one or more tires or wheels on your vehicle to ensure that the replacement or alter- nate tires and wheels allow the TPMS (tire pressure warning system) to continue to function properly.
If a warning message is displayed
The master warning light also comes on or flashes in order to indicate that a message is cur- rently being displayed on the multi- information display.
If any of the warning light comes on again after the following actions have been performed, contact your Toyota dealer.
8
556 8-2. Steps to take in an emergency
|
Warning message |
Details/Actions |
|
(Yellow/ flashes) (If equipped) |
Indicates that the vehicle has deviated from the lane (while the LDA [Lane Departure Alert] sys- tem is operating). The lane line on the side the vehicle has deviated from flashes in Yellow.
A buzzer also sounds.
Check around the vehicle and back to inside of the lane lines. |
|
Engine Stopped Shift Into P (Flashes) |
Indicates that the engine was stopped with the shift lever not in P. A buzzer also sounds. Shift the shift lever to P. |
|
Engine Stopped Stop In a Safe Place (Flashes) |
Indicates that the engine was stopped while driv- ing. A buzzer also sounds. Stop the vehicle in a safe place such as the shoulder of a road. |
|
Engine Coolant Temp High Stop in a Safe Place See Owner’s Manual |
Indicates that the engine coolant temperature is too high A buzzer also sounds. Immediately stop the vehicle in a safe place and contact your Toyota dealer. |
|
CHECK TRANSMISSION SYSTEM |
Indicates a malfunction in the automatic transmis- sion system A buzzer also sounds. Have the vehicle inspected by your Toyota dealer immediately. |
8
558 8-2. Steps to take in an emergency
|
Warning message |
Details/Actions |
|
Windshield Washer Fluid Low |
Indicates that the washer fluid level is low Add washer fluid. |
|
Clean Parking Assist Sensor (If equipped) |
Indicates that intuitive parking assist is dirty or covered with ice Clean the sensor. |
|
Blind Spot Monitor Unavailable (If equipped) |
Indicates that the Blind Spot Monitor sensors or the surrounding area on the bumper is dirty or covered with ice A buzzer also sounds. Clean the sensor and its surrounding area on the bumper. |
|
Fuel Low |
Standard fuel tank Indicates remaining fuel is approximately 4.0 gal. (15.0 L, 3.3 Imp.gal.) or less Large fuel tank Indicates remaining fuel is approximately 3.8 gal. (14.4 L, 3.2 lmp.gal.) or less A buzzer also sounds. Refuel the vehicle. |
|
Maintenance Required Soon (U.S.A.) |
Indicates that all maintenance according to the driven distance on the maintenance schedule* should be performed soon. Comes on approximately 4500 miles (7200 km) after the message has been reset. If necessary, perform maintenance. |
8
560 8-2. Steps to take in an emergency
|
Warning message |
Details/Actions |
|
Pre-Collision System Malfunction Visit Your Dealer
(Flashes) (If equipped) |
Indicates a malfunction in the PCS (Pre-Collision System). A buzzer also sounds. Have the vehicle inspected by your Toyota dealer. |
|
LDA Malfunction Visit Your Dealer
(Yellow) (If equipped) |
Indicates a malfunction in the LDA (Lane Depar- ture Alert). A buzzer also sounds. Have the vehicle inspected by your Toyota dealer. |
|
LDA Unavailable Below Approx. 32MPH (If equipped) |
Indicates that the LDA (Lane Departure Alert) system cannot be used as the vehicle speed is lower than approximately 32 mph (50 km/h). Drive the vehicle at approximately 32 mph (50 km/h) or more. |
|
LDA Unavailable at Current Speed (If equipped) |
Indicates that LDA (Lane Departure Alert) system cannot be used due to the vehicle speed being too high. Slow down. |
|
SRS Airbag System Malfunction Visit Your Dealer |
Indicates a malfunction in the SRS airbag sys- tem. A buzzer also sounds. Have the vehicle inspected by your Toyota dealer. |
|
Check Brake System |
Indicates the following: The brake fluid level is low; or
The brake system is malfunctioning. A buzzer also sounds.
Immediately stop the vehicle in a safe place and contact your Toyota dealer. |
8
|
Warning message |
Details/Actions |
|
Drive-Start Control Malfunction |
Indicates a malfunction in the Drive-start control. A buzzer also sounds. Have the vehicle inspected by your Toyota dealer immediately. |
|
Visit Your Dealer |
|
|
|
|
|
Release Accelerator |
Indicates that the shift position was changed and Drive-Start Control was operated while depress- ing the accelerator pedal. Momentarily release the accelerator pedal. |
|
Turn Lights Off (Flashes) |
Indicates that the headlight switch is left on (with the key removed and the driver’s door opened) A buzzer also sounds. Turn the lights off. |
|
Headlight System Malfunction Visit Your Dealer |
Indicates a malfunction in: The automatic headlight leveling system; or
The LED headlight system (if equipped). A buzzer also sounds.
Have the vehicle inspected by your Toyota dealer. |
|
Headlight System |
Indicates a malfunction in the Automatic High Beam system. Have the vehicle inspected by your Toyota dealer. |
|
Malfunction |
|
|
Visit Your Dealer |
|
|
|
|
|
(If equipped) |
|
|
Tire Pressure Low Check Tire |
Indicates that the tire inflation pressure is low. Check the tire inflation pressure, and adjust to the appropriate level. |
|
Auto High Beam Ready Turn ON High Beam to Activate |
Indicates that the Automatic High Beam switch is pressed while the headlights are in low beam. Turn the high beam on and press the Auto- matic High Beam switch again. |
|
(If equipped) |
8
|
Warning message |
Details/Actions |
|
Trailer Brake Error. |
Indicates that an internal switch failure of trailer brake control system, an over current detected by trailer brake control system. Have the vehicle inspected by your Toyota dealer immediately. Indicates that an internal microprocessor error, output circuit to trailer brakes unintended current, or manual brake output slider is stuck or broken Have the vehicle inspected by your Toyota dealer immediately. |
|
If Towing, Come to a Safe Stop |
|
|
Contact dealer. |
|
|
Trailer Wiring, Type, or Connection fault. |
Indicates that the output circuit has reverse volt- age, or the internal trailer brake control system temperature is too high. Check trailer wiring issue, check trailer connection. If there is still a problem, have the vehicle inspected by your Toyota dealer immediately. |
|
See Owner’s manual. |
|
*: Refer to the separate “Scheduled Maintenance Guide” or “Owner’s Manual Supplement” for the maintenance interval applicable to your vehicle.
In the following cases, the warning message may not be displayed even if vehicle-to-vehicle distance decreases:
P. 501
If you have a flat tire
8
Double Cab models without storage box
Double Cab models with stor- age box
CrewMax models
8-2. Steps to take in an emergency
567
WARNING
Observe the following precautions.
Improper use of the tire jack may cause the vehicle to suddenly fall off the jack, leading to death or serious injury.
Do not use it on other vehicles, and do not use other tire jacks for replacing tires on this vehicle.
Insert the square head securely until you hear a click to prevent the extension parts from coming apart unexpectedly.
8
568 8-2. Steps to take in an emergency
8-2. Steps to take in an emergency
569
8
570 8-2. Steps to take in an emergency
8-2. Steps to take in an emergency
571
|
Flat tire |
Wheel chock positions |
|
|
Front |
Left-hand side |
Behind the rear right-hand side tire |
|
Right-hand side |
Behind the rear left-hand side tire |
|
|
Rear |
Left-hand side |
In front of the front right-hand side tire |
|
Right-hand side |
In front of the front left-hand side tire |
To protect the wheel and wheel ornament, place a rag between the wrench and the wheel orna- ment, as shown in the illustration.
(one turn). 8
572 8-2. Steps to take in an emergency
Make sure the jack is positioned on a level and solid place.
When positioning the jack under the rear axle housing, make sure the groove on the top of the jack fits with the rear axle housing.
When resting the tire on the ground, place the tire so that the wheel design faces up to avoid scratching the wheel surface.
8-2. Steps to take in an emergency
573
WARNING
Failure to do so may result in serious injury:
After the vehicle has been driven the disc wheels and the area around the brakes will be extremely hot. Touching these areas with hands, feet or other body parts while changing a tire, etc., may result in burns.
Steel wheel: 154 ft·lbf (209 N·m, 21.3 kgf·m)
Aluminum wheel: 97 ft·lbf (131 N·m, 13.4 kgf·m)
8
574 8-2. Steps to take in an emergency
If foreign matter is on the wheel contact surface, the wheel nuts may loosen while the vehicle is in motion, causing the tire to come off.
Tighten the nuts until the tapered portion comes into loose contact with the disc wheel seat.
Replacing a steel wheel with a steel wheel
Replacing an aluminum wheel with a steel wheel
8-2. Steps to take in an emergency
575
154 ft·lbf (209 N·m, 21.3 kgf·m)
8
576 8-2. Steps to take in an emergency
Then, check to ensure the claw is in the wheel lug nut hole and the holding bracket is centered in the wheel hub.
While raising, secure the tire, tak- ing care that the tire goes straight up without catching on any sur- rounding part, to prevent it from flying forward during a collision or sudden braking.
Tightening torque:
34.7 ft·lbf (46.6 N·m, 4.8 kgf·m)
8-2. Steps to take in an emergency
577
Visually check to ensure tire is not hung on surrounding parts.
If looseness or misassembly exists, repeat step 2 and step 3 .
Use the temporary spare tire temporarily, and only in an emergency.
P. 511
As the temporary spare tire is not equipped with the tire pressure warning valve and transmitter, low inflation pressure of the spare tire will not be indicated by the tire pressure warning system. Also, if you replace the temporary spare tire after the tire pressure warning light comes on, the light remains on.
Install the temporary spare tire on one of the front wheels of the vehicle. 8
Perform the following steps and fit tire chains to the rear tires:
1 Replace a front tire with the temporary spare tire.
2 Replace the flat rear tire with the tire removed from the front of the vehicle.
3 Fit tire chains to the rear tires.
578 8-2. Steps to take in an emergency
WARNING
The vehicle speed may not be correctly detected, and the following sys- tems may not operate correctly:
*: If equipped
Also, not only can the following system not be utilized fully, but it may even negatively affect the drive-train components:
Do not drive at speeds in excess of 50 mph (80 km/h) when a temporary spare tire is installed on the vehicle.
The temporary spare tire is not designed for driving at high speeds. Fail- ure to observe this precaution may lead to an accident causing death or serious injury.
8-2. Steps to take in an emergency
579
NOTICE
Do not continue driving with a flat tire.
Driving even a short distance with a flat tire can damage the tire and the wheel beyond repair.
Do not fit tire chains to the temporary spare tire.
Tire chains may damage the vehicle body and adversely affect driving performance.
When removing or fitting the wheels, tires or the tire pressure warning valve and transmitter, contact your Toyota dealer as the tire pressure warning valve and transmitter may be damaged if not handled correctly.
When a tire is repaired with liquid sealants, the tire pressure warning valve and transmitter may not operate properly. If a liquid sealant is used, contact your Toyota dealer or other qualified service shop as soon as possible. Make sure to replace the tire pressure warning valve and transmitter when replacing the tire. (P. 496)
8
580 8-2. Steps to take in an emergency
Flex-fuel vehicles: The type of fuel may be different. When refuel- ing, add the same type of fuel, if available.
After adding a different type of fuel, the engine may run roughly and driving performance may be reduced for a while when the engine is first started. In this case, wait until the engine runs normally.
Try to restart the engine again following correct starting procedures. (P. 194)
8-2. Steps to take in an emergency
581
One of the following may be the cause of the problem:
Contact your Toyota dealer if the problem cannot be repaired, or if repair procedures are unknown.
8
582 8-2. Steps to take in an emergency
When connecting the jumper (or booster) cables, depending on the situation, the alarm may activate and the doors may lock. (P. 87)
8-2. Steps to take in an emergency
583
Once the engine starts, have the vehicle inspected at your Toyota dealer as soon as possible.
The engine cannot be started by push-starting.
The moon roof must be initialized. (P. 156)
The electricity stored in the battery will discharge gradually even when the vehicle is not in use, due to natural discharge and the draining effects of cer-
tain electrical appliances. If the vehicle is left for a long time, the battery may 8
discharge, and the engine may be unable to start. (The battery recharges automatically during driving.)
584 8-2. Steps to take in an emergency
WARNING
Observe the following precautions to prevent accidentally igniting the flam- mable gas that may be emitted from the battery:
The battery contains poisonous and corrosive acidic electrolyte, while related parts contain lead and lead compounds. Observe the following pre- cautions when handling the battery:
8-2. Steps to take in an emergency
585
Carefully lift the hood after the steam subsides.
If you do not see steam: Carefully lift the hood.
If a large amount of coolant leaks, 8
immediately contact your Toyota dealer.
586 8-2. Steps to take in an emergency
Water can be used in an emer- gency if coolant is unavailable.
Stop the engine immediately and contact your Toyota dealer.
If the fan is operating:
Have the vehicle inspected at the nearest Toyota dealer.
8-2. Steps to take in an emergency
587
8
588 8-2. Steps to take in an emergency
Press to turn off TRAC.
Turn off TRAC and/or VSC if these functions are hampering your attempts to free the vehicle. (P. 301, 303)
8-2. Steps to take in an emergency
589
8
590 8-2. Steps to take in an emergency
Maintenance data
(fuel, oil level, etc.) 592
Fuel information 609
Tire information 613
Customizable features 623
Items to initialize 631
Maintenance data (fuel, oil level, etc.)
Download Manual