Bluetooth® phone
To display the screen shown below, press the switch on the steer- ing wheel or press the  button.
 Several functions are available to operate on each screen that is dis- played by selecting the 4 tabs.
Device name
Bluetooth® connection status
The vehicle’s built in micro- phone is used when talking on the phone.
The person you are speaking to can be heard from the front speakers.
To use the hands-free system, you must register your Bluetooth® phone in the system. (P. 363)
You can check indicators such as signal strength and battery charge on any screen.
Connection status Signal strength Battery charge
|
Indicators |
Conditions |
||
|
Connection status |
Good |
Poor
|
Not connected
|
|
Battery charge |
Full Empty
|
||
|
Call area |
“Rm”: Roaming area |
||
|
Signal strength |
Excellent
|
Poor
|


Making a call
1 Display the phone screen. (P. 370)
Select the “Dial Pad” tab and enter a phone number.
To delete the input phone number, select  .
.
For the first digit, you can enter “+” by selecting “*” for a while.
You can dial a number from the contact data imported from your cellu- lar phone. The system has one contact for each registered phone. Up to 2500 contacts may be stored in each contact. (P. 372)
Display the phone screen. (P. 370) Select “Contacts” tab.
Choose the desired contact to call from the list.
Choose the number and then press the  switch on the steering wheel or select .
You can transfer the phone numbers in a Bluetooth® phone to the sys- tem.
Operation methods differ between PBAP (Phone Book Access Profile) compatible and PBAP incompatible Bluetooth® phones. If the cellular
phone does not support either PBAP or OPP (Object Push Profile) service, you cannot transfer contacts.
When “Automatic Transfer” is set to on (P. 386)
Check that a confirmation screen is displayed when the opera- tion is complete.
Transfer the contact data to the system using a Bluetooth® phone.
Select to transfer new con- tacts from a cellular phone, select “Always” and then enable “Automatic Trans- fer”.
Select to transfer all the contacts from a connected cellular phone only once.
Select to cancel transferring.
Check that a confirmation screen is displayed when the opera- tion is complete.
Display the phone screen. (P. 370) Select the desired item.
Select to transfer the con- tacts from the connected cellular phone.
Select to add a new con- tact manually.
Select to cancel transfer- ring.
When “Transfer” is selected
Follow the steps in “For PBAP Incompatible but OPP compatible Bluetooth® Phones” from step (P. 387)
When “Add” is selected
Follow the steps in “Registering a new contact to the contact list” from step (P. 388)
You can make a call using numbers registered in the contact.
Display the phone screen. (P. 370) Select “Favorites” tab.
Select the desired number to make a call.
You can make a call using the call history, which has the 3 functions below.
: calls which you missed
: calls which you received
: calls which you made
Display the phone top screen. (P. 370) Select “Call History” tab.
Select or the desired entry from the list.
When is selected
Check that the “Call” screen is displayed.
When the desired contact is selected Select the desired number.
Check that the “Call” screen is displayed.
You may not be able to make international calls, depending on the mobile phone in use.
Turn the “PWR·VOL” knob.
Received international calls may not be displayed correctly depending on the cellular phone in use.
Select “Mute”.
When using phone services such as an answering service or a bank, you can store phone numbers and code numbers in the contact.
Select “0-9”. Input the number.
“Release Tones” appear when a continuous tone signal(s) contain- ing a “w” is registered in the contact list.
Select “Release Tones”.
Select “Handset Mode” to off from a cellular phone call to a hands-free call.
1 Select “Transmit Volume”.
 Select the desired level for the transmit volume. Select “OK”.
Press the switch on the steering wheel or select  .
.
When a call is interrupted by a third party while talking, an incoming call message will be displayed.
To talk with the other party:
Press the  switch on the steer- ing wheel or select
  .
.
To refuse the call:
 Press the swit
ing wheel or select .
the steer-
Every time you press the  switch on the steering wheel or select
  during call waiting, you will be switched to the other party.
Call waiting operation may differ depending on your phone company and cel- lular phone.
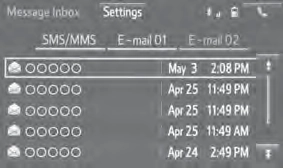 Check that the “Message Inbox” screen is displayed.
When an e-mail/SMS/MMS is received, the incoming message screen pops up with sound and is ready to be operated on the screen.
E-mail: Select to check the message.
Select to refuse the message.
Select to call the message sender.
E-mail:
E-mails: Select “Mark Unread” or “Mark Read” to mark mail unread or read on the “Message Inbox” screen.
This function is available when “Update Message Read Status on Phone” is set to on (P. 393)
Select to have messages read out. To cancel this function, select “Stop”.
Select to display the previous or next message. Select to reply the message.
Select the tab of the desired folder to be displayed.
Select the desired message. Select “Send”.
This operation cannot be performed while driving.
Select “Quick Message”.
Select corresponding to the desired message to edit. Select “OK” when editing is completed.
Calls can be made to an e-mail/SMS/MMS message sender’s phone number.
Display the “Message Inbox” screen. (P. 379) Select the desired message.
Select  .
.
Check that the “Call” screen is displayed.
Calls can be made to a number identified in a message’s text area.
Display the “Message Inbox” screen. (P. 379) Select the desired message.
Select the text area.
Select corresponding to the desired number. Check that the “Call” screen is displayed.
P. 378
1 Volume switch
Off hook switch
On hook switch
*: If equipped
Set the phone connection (P. 365)
Sound Settings (P. 385)
Contact/Call History Settings (P. 386)
Messaging Settings (P. 393)
Phone Display Settings (P. 394)
1 Display the “Phone/Message Settings” screen. (P. 384)
Select “Sound Settings” on the “Phone/Message Settings” screen.
Set the desired ringtone. Adjust the ringtone volume.
Adjust the message readout volume.
Set the desired incoming SMS/MMS tone.
Adjust the incoming SMS/ MMS tone volume.
Set the incoming e-mail tone.
Adjust the incoming e-mail tone volume.
Adjust the default volume of the other party’s voice.
Select “Default”, and then “Yes”.
The call history can be deleted and contact and favorites can be changed.
Display the “Phone/Message Settings” screen. (P. 384) Select “Contact/Call History Settings”.
Select the desired item to be set.
For PBAP compatible Bluetooth® phones, select to set “Automatic Transfer” on/ off. When set to on, the phone’s contact data and his- tory are automatically trans- ferred.
Select to update contacts from the connected phone. (P. 387)
Select to sort contacts by the first name or last name field.
Select to add contacts to the favorites list. (P. 390) Select to delete contacts from the favorites list. (P. 392) Select to clear contacts from the call history.
Select to add new contacts to the contact list.* (P. 388)
Select to edit contacts in the contact list.* (P. 389) Select to delete contacts from the contact list.* (P. 390) Select to reset all setup items.
*: For PBAP compatible Bluetooth® phones only, this function is available when “Automatic Transfer” is set to off. (P. 386)
If your cellular phone is neither PBAP nor OPP compatible, the con- tacts cannot be transferred.
Select “Update Contacts from Phone”.
Check that a confirmation screen is displayed when the opera- tion is complete.
This operation may be unnecessary depending on the type of cellular phone.
Depending on the type of cellular phone, OBEX authentication may be required when transferring contact data. Enter “1234” into the Blue- tooth® phone.
If another Bluetooth® device is connected when transferring contact data, depending on the phone, the connected Bluetooth® device may need to be disconnected.
Depending on the type of Bluetooth® phone being connected, it may be necessary to perform additional steps on the phone.
Transfer the contact data to the system using a Bluetooth® phone.
This operation may be unnecessary depending on the type of cellular phone.
Depending on the type of cellular phone, OBEX authentication may be required when transferring contact data. Enter “1234” into the Blue- tooth® phone.
To cancel this function, select “Cancel”.
For PBAP compatible Bluetooth® phones, this function is available when “Automatic Transfer” is set to off. (P. 386)
Display the phone screen. (P. 370)
Select the “Call History” tab and select a contact not yet regis- tered in the contact list.
Select “Update Contact”. Select the desired contact.
Select a phone type for the phone number.
New contact data can be registered. Up to 4 numbers per person can be registered. For PBAP compatible Bluetooth® phones, this function is available when “Automatic Transfer” is set to off. (P. 386)
Select “New Contact”.
Enter the name and select “OK”.
Enter the phone number and select “OK”. Select the phone type for the phone number.
To add another number to this contact, select “Yes”.
Display the phone screen. (P. 370)
Select the “Call History” tab and select a contact not yet regis- tered in the contact list.
Select “Add to Contacts”.
Follow the steps in “Registering a new contact to the contacts list” from step . (P. 388)
For PBAP compatible Bluetooth® phones, this function is available
when “Automatic Transfer” is set to off. (P. 386) Select “Edit Contact”.
Select the desired contact.
Select icon corresponding to the desired name or number.
For editing the name
Follow the steps in “Registering a new contact to the contact list” from step . (P. 388)
For editing the number
Follow the steps in “Registering a new contact to the contact list” from step . (P. 388)
Display the phone screen. (P. 370)
Select the “Contacts”, “Call history” tab or the “Favorites” tab and select the desired contact.
Select “Edit Contact”.
“E-mail Addresses”: Select to display all registered e-mail addresses for the contact.
For PBAP compatible Bluetooth® phones, this function is available
when “Automatic Transfer” is set to off. (P. 386) Select “Delete Contacts”.
Select the desired contact and select “Delete”. Select “Yes” when the confirmation screen appears.
Display the phone screen. (P. 370)
Select the “Contacts”, “Call history” tab or the “Favorites” tab and select the desired contact.
Select “Delete Contact”.
Select “Yes” when the confirmation screen appears.
Up to 15 contacts (maximum of 4 numbers per contact) can be regis- tered in the favorites list.
Select “Add Favorite”.
Select the desired contact to add to the favorites list.
Dimmed contacts are already stored as a favorite.
When 15 contacts have already been registered to the favorites list
When 15 contacts have already been registered to the favorites list, a registered contact needs to be replaced.
Select “Yes” when the confirmation screen appears to replace a contact.
Select the contact to be replaced.
Check that a confirmation screen is displayed when the opera- tion is complete.
Registering contacts in the favorites list in a different way (from the “Contacts” screen)
Display the phone screen. (P. 370) Select the “Contacts” tab.
Select  at the beginning of the desired contact list name to be registered in the favorites list.
When selected,  is changed to
  , and the contact is registered in the favorites list.
Display the phone screen. (P. 370)
Select the “Contacts” tab or the “Call History” tab and select the desired contact.
Select “Add Favorite”.
Check that a confirmation screen is displayed when the opera- tion is complete.
Select “Remove Favorite”.
Select the desired contacts and select “Remove”. Select “Yes” when the confirmation screen appears.
Check that a confirmation screen is displayed when the opera- tion is complete.
Deleting contacts in the favorites list in a different way (from the “Contacts” screen)
Display the phone screen. (P. 370) Select the “Contacts” tab.
Select  at the beginning of the contact list name to be deleted from the favorites. list.
When selected,  is changed to
  , and the data is deleted from the list.
Display the phone screen. (P. 370)
Select the “Contacts”, “Call history” tab or the “Favorites” tab and select the desired contact to delete.
Select “Remove Favorite”.
Select “Yes” when the confirmation screen appears.
Check that a confirmation screen is displayed when the opera- tion is complete.
1 Display the “Phone/Message Settings” screen. (P. 384) Select “Messaging Settings”.
Select the desired item to be set.
Set automatic message transfer on/off.
Set automatic message readout on/off.
Set the SMS/MMS notifica- tion popup on/off.
Set the e-mail notification popup on/off.
Set adding the vehicle signa- ture to outgoing messages on/off.
Set updating message read status on phone on/off. Change the incoming SMS/MMS display.
“Full Screen”: When an SMS/MMS message is received, the incoming SMS/MMS display screen is displayed and can be operated on the screen.
“Drop-Down”: When an SMS/MMS message is received, a message is displayed on the upper side of the screen.
“Full Screen”: When an e-mail is received, the incoming e-mail display screen is the displayed and can be operated on the screen.
“Drop-Down”: When an e-mail is received, a message is displayed on the upper side of the screen.
When set to on, messaging account names used on the cellular phone will be displayed.
Select “Default”, and then “Yes”.
Select “Settings”.
1 Display the “Phone/Message Settings” screen. (P. 384) Select “Phone Display Settings”.
Select the desired item to be set.
Change the incoming call display.
“Full Screen”: When a call is received, the hands-free screen is displayed and can be oper- ated on the screen.
“Drop-Down”: A message is dis- played on the upper side of the screen.
What to do if... (Troubleshooting)
If there is a problem with the hands-free system or a Bluetooth® device, first check the table below.
When using the hands-free system with a Bluetooth® device
|
The hands-free system or Bluetooth® device does not work. |
|
The connected device may not be a compatible Bluetooth® cellular phone. For a list of specific devices which operation has been confirmed on this system, check with your Toyota dealer or the following web- site: http://www.toyota.com/bluetooth |
|
The Bluetooth version of the connected cellular phone may be older than the specified version. Use a cellular phone with Bluetooth version 2.0 or higher (recom- mended: Ver. 3.0 with EDR or higher). (P. 405) |
When registering/connecting a cellular phone
|
A cellular phone cannot be registered. |
|
An incorrect passcode was entered on the cellular phone. Enter the correct passcode on the cellular phone. |
|
The registration operation has not been completed on the cellular phone side. Complete the registration operation on the cellular phone (approve registration on the phone). |
|
Old registration information remains on either this system or the cellular phone. Delete the existing registration information from both this system and the cellular phone, then register the cellular phone you wish to connect to this system. (P. 364) |
|
A Bluetooth® connection cannot be made. |
|
Another Bluetooth® device is already connected. Manually connect the cellular phone you wish to use to this sys- tem. (P. 366) |
|
Bluetooth® function is not enabled on the cellular phone. Enable the Bluetooth® function on the cellular phone. |
|
“Please check your device settings.” message is displayed. |
|
Bluetooth® function is not enabled on the cellular phone. Enable the Bluetooth® function on the cellular phone. |
|
Old registration information remains on either this system or the cellular phone. Delete the existing registration information from both this system and the cellular phone, then register the cellular phone you wish to connect to this system. (P. 364) |
When making/receiving a call
|
A call cannot be made/received. |
|
Your vehicle is in a out of cellular service area. Move to where “Out of cellular service area. Please try again later.” no longer appears on the display. |
When using the contacts
|
Contact data cannot be transferred manually/automatically. |
|
The profile version of the connected cellular phone may not be compatible with transferring contact data. For a list of specific devices which operation has been confirmed on this system, check with your Toyota dealer or the following web- site: http://www.toyota.com/bluetooth |
|
Automatic contact transfer function on this system is set to off. Set automatic contact transfer function on this system to on. (P. 386) |
|
Passcode has not been entered on the cellular phone. Enter the passcode on the cellular phone if requested (default pass- code: 1234). |
|
Transfer operation on the cellular phone has not completed. Complete transfer operation on the cellular phone (approve trans- fer operation on the phone). |
|
Contact data cannot be edited. |
|
Automatic contact transfer function on this system is set to on. Set automatic contact transfer function on this system to off. (P. 386) |
When using the Bluetooth® message function
|
Messages cannot be viewed. |
|
Message transfer is not enabled on the cellular phone. Enable message transfer on the cellular phone (approve message transfer on the phone). |
|
Automatic transfer function on this system is set to off. Set automatic transfer function on this system to on. (P. 393) |
|
New message notifications are not displayed. |
|
Notification of SMS/MMS/E-mail reception on this system is set to off. Set notification of SMS/MMS/E-mail reception on this system to on. (P. 393) |
|
Automatic message transfer function is not enabled on the cellular phone. Enable automatic transfer function on the cellular phone. |
In other situations
|
Even though all conceivable measures have been taken, the symptom sta- tus does not change. |
|
The cellular phone is not close enough to this system. Bring the cellular phone closer to this system. |
|
The cellular phone is the most likely cause of the symptom. Turn the cellular phone off, remove and reinstall the battery pack, and then restart the cellular phone. Enable the cellular phone’s Bluetooth® connection. Stop the cellular phone’s security software and close all applica- tions. Before using an application installed on the cellular phone, care- fully check its source and how its operation might affect this sys- tem. |
Download Manual