Disclaimer: Not affiliated with or endorsed by Chevrolet Motor Company. For informational purposes only. Full Disclaimer
How to Change a Blown Fuse in Your Chevrolet Impala
Updated:
Should your map lights, stereo, turn signals, heated seats, headlights, or other electronic elements suddenly cease functioning, it is probable that a blown fuse is the culprit.
When encountering an issue with your Impala car's electrical system, your initial investigation should focus on the fuses. They are relatively straightforward to inspect and come at a low cost to replace.
The extent of electronic components in your Impala vehicle directly corresponds to the number of fuses present. In particular Chevrolet models, the engine compartment might house multiple fuse boxes, necessitating precise identification of the relevant fuses.
It's worth noting that certain components could rely on multiple fuses, underscoring the importance of examining all associated fuses.
If you ever need to replace a fuse in your Chevrolet Impala because one has blown, ensure the replacement fuse has the same amperage rating as the blown one. Let's start by going into more detail about this subject.
What is a Fuse?

Fuses serve as safeguards for electrical circuits. In essence, if any of the electrical features in your Impala unexpectedly cease operation, a blown fuse could be the culprit.
Fortunately, the cost-effective and uncomplicated nature of fuse replacement offers a silver lining. Prior to lamenting the apparent malfunction of your stereo, air conditioner, or other devices, it's wise to prioritize inspecting these unassuming components.
In the Chevrolet Impala models, the fuses are situated in two key locations. Firstly, they reside within the engine compartment fuse block, which is positioned adjacent to the driver-side fender and situated just behind the filler cap used for the windshield washer fluid.
Secondly, the fuses can also be found in the instrument panel fuse block, discreetly positioned behind the lower dashboard panel to the left of the steering column. In your Impala, a combination of mini-fuses and J-case fuses are employed.
Shop From Amazon


The J-case fuses, which are square and designed for high-current applications, are replaced in the same manner as the mini-fuses: simply pull them straight out to remove and push them straight in to install.
Should the fuses be located too closely for manual grip, a fuse puller or a pair of needle-nose pliers can be utilized. It is imperative to consistently substitute a fuse with another of matching amperage rating.
How Do I Know if a Fuse is Blown in My Chevrolet Impala?

Visual confirmation is all it takes to identify this. This applies universally to various fuse types. A simple examination of the electrical conductor will reveal telltale signs of a blown fuse, distinguished by its distinct burnt appearance.
For a more precise assessment, a multimeter comes into play. The notable advantage here is the avoidance of removing the fuse from its housing.
Configure the multimeter to the continuity mode, utilizing its probes to examine the connection points on the fuse, as demonstrated in the accompanying illustration. A lack of audible response from the multimeter signifies a blown fuse, necessitating replacement.
How to Change a Blown Fuse

The Chevrolet Impala comes equipped with standard mini blade fuses. Certain General Motors models might feature the newer low-profile mini blade fuses. It is advisable to inspect your vehicle's fuse type before procuring replacements.
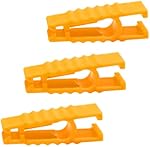
You can anticipate finding a white plastic fuse puller tool on both the engine bay electrical panel and the rear side of the driver's dashboard storage compartment.
Commence by opening the hood, followed by positioning yourself on the right (driver's side) of the engine bay. Situated at the far right side of the engine bay, adjacent to the 12V automotive battery and behind the driver's side headlight housing, is the primary fuse box.
Securing the fuse box cover are three retaining clips: one at the front edge, another at the rear edge, and the third on the right (driver's side).
To release the cover, pinch or squeeze the two tabs on the retaining clips together. Once all three clips are disengaged, lift the cover directly off the top of the fuse box.
For a clear view of the fuse and relay location diagram, flip over the cover. Near the right rear corner of the engine bay electrical block, you will discover a white plastic fuse puller tool.
Shop From Amazon


To access the interior passenger compartment electrical panel, direct your attention to the lower part of the dashboard, near the area where the driver's left knee would be positioned while driving. Begin by opening the storage compartment drawer and emptying its contents.
Apply firm pressure to both side walls of the storage drawer until the side stops become removable. Lower the storage drawer to reveal the diagram indicating fuse locations.
An additional white plastic fuse puller tool is affixed to the backside of the storage drawer. Operate the tool by pinching its end to open the jaws, then position them over the old fuse you intend to inspect or replace. Gently pull the old fuse directly out of its socket.
For a visual check, hold the old fuse up against a light source. If the thin metal strip or band within the translucent plastic center of the old fuse shows signs of burning or breakage, it is likely that the fuse is blown and necessitates replacement.
Should the metal wire inside the fuse appear intact, the old fuse is probably still functional. Considering the cost-effectiveness of new fuses, it's advisable to replace it as part of your electrical troubleshooting process. Insert a new mini blade fuse with the same amperage rating (e.g.) directly into the socket.
Note: certain GM models use the relatively newer style of shorter, low-profile mini blade fuses. For relay inspection, a multimeter is required.
The simplest approach for addressing a faulty relay is to replace it with a new one. Reattach the fuse puller tool to the engine bay electrical panel.
Align the fuse box cover and firmly press it into place until the three retaining clips audibly click. Restore the windshield washer fluid filler tube, raise the storage compartment drawer, and push in the side walls until the two side stops can be repositioned.
Return the contents to the storage compartment and securely close it. To conclude the task, test the electrical component that was presenting issues such as wipers, radio, power seat, power windows, tail lights, headlights, horn, interior lights, etc.
If the problem persists, there may be a shorted wire, or the component itself might require replacement. If inspecting and swapping the fuse for this particular component has not yielded results, it is advisable to enlist the expertise of a reliable professional mechanic.
They possess the skill to assess whether the component necessitates replacement, if there is a short circuit at play, or if there is another underlying issue within your Impala.

Nick Marchenko, PhD
Industrial Engineer & Automotive Content Specialist
Nick writes in-depth guides on car clubs, engine specs, vehicle ownership, and modifications, combining engineering knowledge with automotive passion.
Full profile → LinkedIn →You May Also Like
How to Protect Your Chevrolet Impala Catalytic Converter from Being Stolen
2 years agoIf one morning you start your Chevrolet Impala and the noise resembles a detached muffler, it's highly probable that your catalytic converter has been stolen. The incidence of catalytic convert...
How to protect the paint on your Chevrolet Impala?
2 years agoNewly acquired car proprietors need to recognize that safeguarding their vehicle's paintwork will uphold its visual allure over an extended period. Furthermore, this practice will maintain the veh...
How to wrap your Chevrolet Impala? Cost and benefits
2 years agoChevrolet Impala wraps have gained immense popularity in the recent past. They not only offer the flexibility to entirely transform your vehicle's look but also furnish substantial and enduring sa...
How to Check and Change Your Chevrolet Impala Transmission Fluid?
2 years agoA fluid exchange and a transmission flush are comparable yet distinct, much like a turtle and a tortoise or a malt and a milkshake. Let's take a closer look at these two services, how they cont...
How to install roof racks on your Chevrolet Impala?
2 years agoRoof racks are a great way to increase the amount of storage space in your car, whether you are going on a road trip or just need a place to put your kayak or skis. In order to ensure a safe and se...
How to Remove Stickers from Your Chevrolet Impala
2 years agoIt is normal to worry about how to remove the car decal without damaging the paint. Whether you decided to apply a sticker to your car but have now changed your mind, or you recently bought a car that...